Basic malfunctions and methods for their elimination
The most obvious reason for the failure of the Lada Largus clutch is oil contamination. If this happens, the clutch cannot be replaced until the leak is fixed. There can be two sources of leakage: engine or gearbox. Oil can leak out of the engine due to a worn oil seal behind the flywheel. Changing it is quite difficult due to the labor-intensive dismantling process.
If lubricant gets in from the gearbox, the culprit is a worn oil seal located on the front of the gearbox. To replace the unit, you will need to drain the oil from the gearbox and separate the final drive housing from the gearbox housing. The process is labor-intensive, but necessary. To remove the oil seal, you will also need to remove the flywheel.
Before proceeding with the removal and disassembly of the clutch, it is necessary to check the reliability of the fixing elements that attract the assembly to the Largus frame and engine. If the fasteners are loose or the rubber bushings are worn out, when pressing the pedal the driver will feel shaking and jerking when moving away.
Questions (24)
- Most useful
- The newest
Hello! I have a 2013 Largus. The problem is this: not immediately, but after about 20,000 km, a knocking sound of valves appeared (a feature of our VAZ engines). But I have K4M. The mileage is already 145,000 km. I can’t say that the car doesn’t pull or drive. But this knocking sometimes bothers me. As if the valves are not adjusted. What could be the reason? Dmitriy.
Alexey Revin
, editor of the magazine “Behind the Wheel” (automotive information department):
— If the nature and frequency of the knock is similar to the sound produced by large gaps in the valves, then this is the knock of hydraulic compensators. On the K4M engine, the valves are driven by rockers with rollers. And the gaps are compensated by hydraulic supports of the rockers. Although more often they say hydraulic compensators. Since you have been driving with the defect for a long time, of course there is no talk about the fact that the devices are not pumped. Most likely, one or more hydraulic compensators are faulty. The seal of the working volume is broken, and they do not hold the rocker in the desired position. A gap appears, which generates a knock.
I advise you to prepare a valve cover gasket sealant, flushing fluid and find a company where you can purchase hydraulic compensators. I recommend replacing the timing belt at the same time, since it still needs to be removed.
Having removed the cylinder head cover, we try to press the hydraulic compensators by hand. Those of them that are pressed easily are faulty. By raising the camshafts, you can remove the rockers and remove the hydraulic compensators. Then they can be washed or replaced immediately. Hydraulic compensators are quite reliable, and if problems arise with them, then perhaps you once filled in bad oil or installed a fake filter. Dirt particles jammed the hydraulic compensators.
For someone who likes to do everything themselves, the operation will take a whole day. The service will charge from 4,500 rubles for such work. One hydraulic compensator costs from 350 rubles.
What if he takes it at the very top - at the beginning of the move
Here the problem is solved in a similar scenario, it’s just that the adjusting nut needs to be turned in the opposite direction compared to the adjustment procedures described above. You need to move towards the clutch pedal by turning the key in that direction.
The problem here is that the driven disk does not have the ability to fully engage. Because of this, slipping occurs, torque is lost, so the car loses its acceleration dynamics.
If you ignore this problem, then at one point the car will not even be able to move.
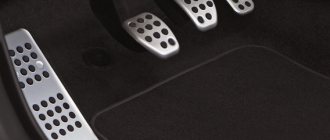
The hydraulic clutch requires special attention. Here you need to pay special attention to possible brake fluid leaks. Even a novice driver can adjust the free play of the pedal:
- First you need to get rid of any air that may presumably be inside the system. To do this, you need to fill the expansion tank to the recommended level. One end of the hose needs to be put on the bleeding valve, and the other should be lowered inside the can with the “brake seal”.
- After this, you need to press the clutch pedal all the way to drain the fluid along with the air.
- The next step is to tighten the valve and release the pedal.
- Finally, you need to add brake fluid to the required level.
It is recommended to monitor the condition of the clutch mechanism every 20,000 kilometers. Even a beginner can do the procedures described above, so it is advisable to develop such skills from the very beginning of driving practice.
Source
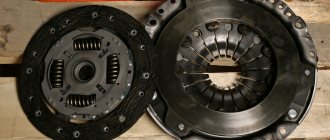
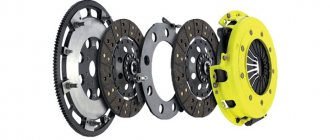
Replacing the friction clutch
Repairing the Larugsa clutch, like any other car, does not make sense; all worn parts must be replaced. To work, you will need a standard set of tools, amplifiers, a hammer and a new set of spare parts. First, the car must be placed on a lift or its front part raised on jacks above the inspection hole. The front wheels and engine protection are removed. After unscrewing the screws, you need to remove the left shield under the bumper. This will give you access to the shield fasteners in the wheel arch, which must also be removed.
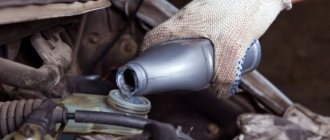
The gearbox oil is drained into a suitable container; to do this, first unscrew the plastic and then the metal plug. Do not remove the reservoir until maximum oil has been drained. Dismantle the brake caliper and put it aside along with the pads.
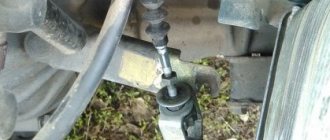
Removing the steering knuckle
Removal is carried out according to the following scheme:
- disconnect the ABS sensor;
- Using a 16 mm wrench, unscrew the nut on the tie rod screw, use a screwdriver to open the two sides of the knuckle, and press out the ball joint rod;
- on the steering end stud, unscrew the nut with a 16 mm wrench and press out the stud;
- Using two 18 mm wrenches, unscrew the fastening nuts that secure the fist to the stand. Now you can remove the steering knuckle, and also dismantle the CV joint from the gearbox (in this case, the rollers will probably fall out).
It is impossible to replace the clutch on a Largus without draining the oil, since the internal drive mechanisms (CV joints) cannot be unscrewed if there is lubricant in the gearbox.
Working in the engine compartment
First you need to disconnect the negative terminal of the battery and remove the cable. To do this, the counterweight is pulled forward, removed through the slot, after which the rubber coupling is removed through it. The engine harness holder is attached to the gearbox housing. To remove it, just loosen the fastener. Now you need to disconnect all the wire terminals:
- unscrew the two mounting screws and remove the terminal from the TDC sensor;
- Disable the reverse sensor at the gearbox;
- disconnect the speed sensor terminal;
- The oxygen concentration sensor (lambda probe) is also disconnected.
The breather hose needs to be loosened and moved away from the box, unscrew the two wires to ground. Next, find the gearshift knob rod, loosen the fastening and pull out the rod.
A mark is left on the fastening clamp using paint so that the rod can be placed correctly during installation.
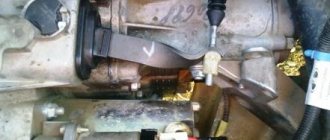
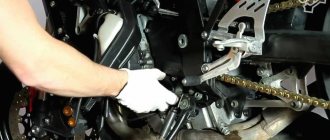
Removing the gearbox
It is impossible to replace the clutch on a Lada Largus without removing the gearbox. First you need to remove the subframe by unscrewing the three bolts securing it to the bumper. Then the rear support bracket is removed, the steering mounting bolts and the power steering mounting bolt on the left on the subframe are unscrewed. The exhaust pipe is disconnected from the exhaust manifold and removed from the rubber hangers. The subframe is attached to the body with 4 bolts - they need to be unscrewed. Additionally, you will have to remove the starter.
It remains to remove the two screws on top - they secure the gearbox to the engine - and the four bolts with which the clutch housing is attached to the oil sump. Suitable supports are first installed under the engine and gearbox. At the very end, the left engine mount bracket is dismantled, after which the nuts on the lower studs are unscrewed.
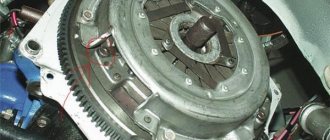
Replacing the mechanism
To remove the basket, perform the following operations:
- using an 11 mm wrench, unscrew 6 bolts that hold the basket, fixing it on the flywheel - one turn at a time, sequentially;
- holding the friction disc, remove the basket.
After replacing all worn elements, the assembly is assembled, and the steps are performed in the reverse order. For installation you will need to use heat-resistant grease and a centering mandrel.
Clutch adjustment
Ideally centering and balancing the friction clutch by doing the assembly yourself will be problematic, but possible. To adjust the tension with your own hands, you need to perform a number of actions:
- find the nuts for adjusting the clutch pedal (located under the power steering reservoir);
- unscrew the outer nut to the end of the stud;
- using the second nut, the travel of the clutch pedal is adjusted to the desired cable tension;
- After this, the external nut secures the fastener so that in the future it does not loosen and the cable does not fly off.
If the Largus clutch is adjusted correctly, first gear will engage easily. When the engine is running and the clutch pedal is fully depressed, there should be no crunching, crackling, spontaneous increase or decrease in speed.
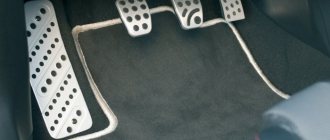
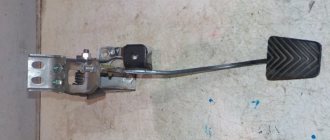
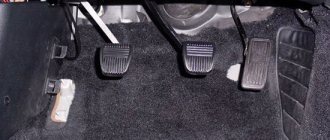
What should be the free play of the clutch pedal and how to measure it
This concept means the unimpeded movement of the pedal to the actuation point. At first, the leg will not feel any resistance, but after switching on, a certain stiffness will appear. This period of “relaxation” is called free movement.
The average norm is 160 millimeters. The range of acceptable values may vary. For each specific vehicle, technical requirements may vary.
An incorrectly adjusted freewheel can cause serious problems on the road.
Clutch parts will wear out more intensively. Therefore, to prevent unpleasant situations, it is recommended to periodically check the free play.
This should be done using the following algorithm:
- Press the clutch pedal all the way by hand, measure the distance from the floor to its pad using a regular ruler, setting it strictly vertically in relation to the floor surface.
- At the next stage, you need, on the contrary, to press this element back as much as possible and make the same measurements.
- Do simple calculations. Here you just need to subtract the smaller value from the larger number. This will be the amount of free play of the clutch. The norm is 12-14 centimeters. If measurements give readings that fall outside this range, then adequate corrective measures must be taken immediately.
If the value is too high, the disc will be in constant contact with the engine flywheel. Here the clutch will not disengage completely. Under such circumstances, even releasing the pedal smoothly, the driver will not be able to move the car. Operating a car with such a defect will inevitably lead to irreversible consequences and breakdowns.
If the free stroke is small, there will be a loss of torque. Here the car, like an impatient horse, will simply tear off. On some modern cars it is structurally impossible to change the “pickup moment”. In such circumstances, you need to contact the official service.
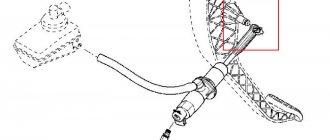
To adjust the clutch accelerator, you need to set the desired cable length. This is required in cases where the fork free play exceeds 3 millimeters. The adjustment must be carried out using special two nuts, one of which controls the length of the cable, and the other fixes the first one in the selected position. They are placed on the threaded part of the clutch cable.
What are the reasons and what to do if the clutch picks up at the very bottom - at the end of the stroke
During the operation of the car, its components, assemblies and individual parts wear out, which is why some of them are called “consumables”. In the clutch design, the disc friction linings wear out. This leads to an imbalance in the clutch system settings.
Under such circumstances, urgent adjustment of the drive cable is required. The clutch design can be mechanical or hydraulic.
In the first case, each motorist needs to adhere to the following algorithm:
- Open the hood, find the rod to which the cable from the clutch pedal is directly attached.
- Using WD-40 penetrating lubricant, treat the nuts securing the rod, and then loosen them.
- Turn the adjusting nut away from the clutch pedal. This will reduce its free movement.
- At the next stage, you need to make a control measurement of the amplitude of the pedal movement. If the result is positive, all that remains is to tighten the control nut until it stops. If the parameters need correction, then you need to tighten the nut closest to the adjustable pedal until it stops.
After the adjustments have been made, you need to check the operation of the clutch, which, in a good situation, should function without “noise and dust”, and should be easy and pleasant to press.
In this case, the gear shift lever must “stick” precisely and smoothly. The car should not slip or jerk when starting to move. In the case of a hydraulic clutch, the adjustment technology is somewhat different, since such a drive often has an automatic adjustment function. On the other hand, it will not be difficult to adjust it manually if a control nut is provided on the working cylinder pusher.
With the machine raised, adjustments should be made using the following procedure:
- Check the brake fluid level inside the expansion tank.
- Find a pusher on the working cylinder whose function fully corresponds to its name.
- Use pliers to unhook the spring from the clutch fork.
- Move it forward, and then measure the distance between it and the pusher.
- At the next stage, release the plug and then take similar measurements. If the values are outside the recommended range, then direct adjustment must be made.
- Next, press out the spring of the fork and working cylinder.
- Screw the nut towards the working cylinder.
- After taking the appropriate measurements, tighten the control nut. This should be done only when the required parameters have been achieved.
Features of the JH3 gearbox
The JH3 gearbox on the Lada includes a clutch housing, gearbox, and rear crankcase cover. Thanks to the clutch with a bearing located in the box, the clutch in the box is turned on and off. When changing speed modes, no extraneous noise is created. The Lada Largus gearbox provides the ability to accelerate quickly. The average working life of this box is approximately 250,000 km.
The gearbox control drive includes a rocker and a lever. It should be noted that there is a bevel differential. There is a drain plug at the bottom of the crankcase. It is controlled by a rigid rod. Its body is made of aluminum alloy. The JH3 540 version can be found in the five-seater Largus, which has an 8-valve engine.