Gap "B", between the edge of the throttle valve and the wall of the first chamber of the carburetor, appears when the choke handle is fully extended and the air damper is closed (the starter is cocked and ready for use).
Gap “A” appears when the engine starts and the diaphragm trigger mechanism is activated between the edge of the air damper and the wall of the first chamber.
If the starting device malfunctions or is incorrectly adjusted, it is quite possible that a cold car engine will not start or will start, but with difficulty, and will “flood” the spark plugs.
— slotted screwdriver (3mm)
— open-end wrench (7mm)
— open-end wrench (8mm)
— tachometer (multimeter, autotester operating in tachometer mode) To make adjustments without removing the carburetor from the engine.
If there is no tachometer, you can try to adjust by ear, but this is only if you have already dealt with adjusting and tuning carburetors and can distinguish between 3000 rpm of the engine and 3500 rpm. Such an adjustment is possible in principle, but will be very approximate. It is easier to adjust the starting device by removing the carburetor from the engine.
- a set of round probes or pieces of wire with a diameter of 0.85, 1.0, 1.1, 2.5, 2.7, 3.0 mm, depending on the carburetor model.
Before making adjustments, we check to see if the starting device is in order and we are wrongly blaming it.
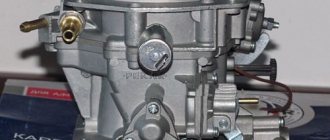
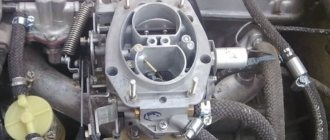
Checking the operation of the carburetor starting device 2108, 21081, 21083 Solex
1. Remove the cover of the air filter housing.
2. Completely close the air damper by pulling out the choke.
3. The assistant starts the engine, and we look at the carburetor from above.
If the carburetor starting device is working properly, then during start-up (after the first flashes) it will open the air damper at a small angle (starting gap).
starting gap "A"
If you do not observe such a phenomenon, then there are only two conclusions - either the trigger device is not adjusted, or its diaphragm is leaky.
You can also take into account such versions - the screws securing the cover of the starting device are not fully tightened, the plane of the cover is deformed for some reason and does not fit tightly to the body of the device, which depressurizes the entire system.
We carry out the adjustment as indicated below, tighten the screws, change the diaphragm, grind the cover or replace it with a new one.
Preparatory work
We carry out the adjustment with the engine not warmed up.
— Remove the air filter housing.
Removing the air filter housing on the VAZ 2108 engine
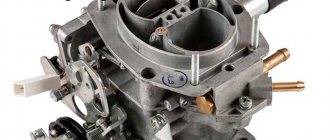
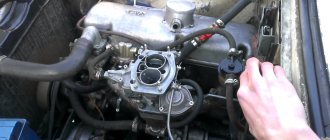
Adjusting the starting device of the Solex carburetor without removing it from the engine
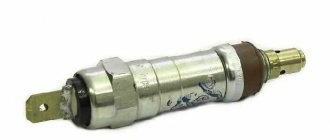
1. Connect the tachometer.
tachometer connection procedure
If there is a tachometer built into the instrument panel, then you can use it. 2. Pull out the carburetor air damper drive handle (“choke”) until it stops.
the air damper of the carburetor 2108, 21081, 21083 Solex is completely closed (top view of the carburetor)
The air damper completely covers the cross section of the first chamber of the carburetor.
3. Start the engine.
4. Press the edge of the carburetor air damper with a screwdriver and open it 1/3 (30 0 ).
open the air damper of the carburetor 2108, 21081, 21083 Solex approximately 30 degrees (1/3)
screw for opening the throttle valve of the first chamber of the carburetor 2108, 21081, 21083 Solex
6. Release the air damper .
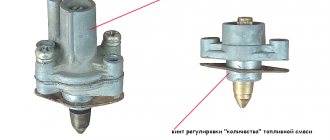
7. Use a slotted screwdriver to turn the starter adjusting screw, loosen its lock nut with an 8 mm wrench and reduce the rotation speed to 2800 - 3000 rpm.
carburetor trigger adjusting screw 2108, 21081, 21083 Solex
8. Hold the screw with a screwdriver and tighten the locknut. The adjustment is complete.
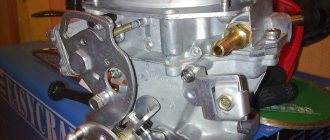
Adjusting the starting device on a removed carburetor
Before making adjustments, it should be recalled that on the Solex carburetor 2108, 21081, 21083, with the air damper completely closed, the throttle valve of the first chamber should be slightly open, the second chamber should be completely closed.
1. Remove the air filter housing.
Removing the air filter housing on the VAZ 2108 engine
2. Remove the carburetor from the engine.
3. Turn the air damper control lever counterclockwise until it stops (the air damper is completely closed).
carburetor air damper 2108, 21081, 21083 Solex is completely closed
Setting up the float chamber
This type of work allows you to adjust the optimal amount of gasoline in the float chamber. An incorrect level causes a decrease in power, uneven engine operation, and excessive fuel consumption.
- set of wrenches;
- thin probe (diameter 1 mm);
- pliers.
1. Remove the air filter and unscrew the carburetor cover.
2. Carefully remove the float chamber cover.
3. Check the condition and position of the floats. They should be parallel to the imprints of the side walls of the float bath on the gasket.
4. If they are displaced, we align them by bringing them together or spreading them apart.
5. Next, lay the lid horizontally with the floats up and use a feeler gauge to measure the distance from the bottom of the float to the gasket. It should be equal to 1 mm. If it is higher or lower, we continue further adjustment after installing the carburetor on the engine.
6. When fuel is pumped into the float chamber, its level should coincide with the red lines, as shown in the photo.
7. If the floats are set incorrectly, this level will be lower or higher. Simple adjustment is carried out by bending or bending the tongue of the floats, then closing the carburetor cover and pumping fuel.
For details on setting up the float chamber, see here
Operating principle
Solex 21073 works as follows. Gasoline will enter the float chamber using the inlet fitting; the fuel also passes through the mesh filter, where it is cleaned, and goes through the needle valve. The chamber with the float is two-sectional, and the sections are connected to each other. They will contain the same amount of gasoline. This design makes it possible to significantly reduce the effect of body tilt on the fuel level in this chamber.
This ensures more stable engine operation. As the chamber fills, the float, pressing part of the needle valve, blocks the access of fuel to the chamber. This maintains a constant level of gasoline in the mechanism. Next, from the float chamber, gasoline flows through the jets into the mixing wells. Air enters these same wells through special holes in the emulsion tubes or air jets. Next, gasoline and air are mixed in them. As a result, a fuel mixture is formed. It will get into the small as well as large diffusers of the device. This is the main dosing chamber. Depending on the operating mode of the engine, certain mechanisms and systems can be started in the carburetor. When the owner tries to start the engine when cold to enrich the fuel mixture, the starting device comes into play. Its driver starts this choke from inside the cabin.
Svetlov dynamics carburetor economy 21073 Solex - 1 part
For long-term operation of the carburetor
, it is required to carry out competent preparation.
This video
is familiar.
Setting up the launcher
- open-end wrench 7;
- open-end wrench 8;
- flat screwdriver;
- electronic tachometer or multimeter with its function.
1. Remove the air filter from the carburetor. Pull the “suction” towards you as far as it will go. Next, you will need an assistant to start the engine. At this time, you are watching the starter flap, which should open slightly after starting.
2. If this does not happen, it means that the starter is not adjusted.
3. We begin the adjustment. Warm up the engine, turn it off and connect the tachometer as follows.
4. Pull out the choke and start the engine. The suction valve must be completely closed.
5. Next, use a screwdriver to press on the edge of the damper, opening it 30 0 .
6. Using a 7 key, rotate the throttle position adjustment bolt until the tachometer shows a speed of 3200-3400 rpm.
7. Now use a screwdriver to rotate the starter adjustment bolt, having previously loosened its locknut with an 8 key, until the speed drops to 2800-3000 rpm.
8. In this position, holding the bolt with a screwdriver, tighten the locknut.
The adjustment process can be seen in this video
Operating principle of the main dosing chamber
During the combustion of the fuel-air mixture in the engine cylinders, air enters the chambers through the air filter. As the air flow increases, pressure is exerted on the nozzles. As a result, fuel rises from the wells into the atomizer. At the same time, air is fed through an air jet from above into the emulsion tube. In the chamber, the fuel is mixed with air and goes into the carburetor channels, where it is directed further into the engine under high pressure. This is the operating principle of almost all Solex carburetors.
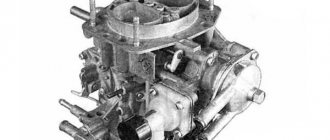
Solex carburetor design
The Solex carburetor has several models, namely:
The main modification of this brand of carburetors is SOLEX 21083. This model has the smallest diffuser cross-section. In terms of structure, all Solex models are the same, there are only some differences (different brands and models of cars have their own modification). Therefore, the Solex settings for all models are the same.
The Solex carburetor type is emulsion. It is installed only on cars with engines with contactless ignition.
Solex device:
- two chambers with throttle valves;
- chamber dosing system;
- transition systems for both chambers;
- idle speed system only for the first chamber.
Classification of Solex carburetors by configuration:
- Semi-automatic starting system.
- Carburetor accelerator pump.
- Power mode economizer.
Have you heard about a car device that can reduce fuel consumption, the FuelFree fuel saver?
Major Solex faults
Almost all malfunctions are associated with aging of parts and clogging of channels with poorly filtered or low-quality gasoline, as well as airborne debris passing through a defective air filter:
- fuel overflowing through a faulty float chamber valve, the engine starts poorly when hot, black smoke comes from the muffler;
- contamination of the jets of the main dosing system, the engine loses traction, starts poorly, shoots into the muffler or air filter;
- the tightness of the diaphragms of the starting system, accelerator pump or economizer is lost;
- general contamination of the carburetor when using low-quality fuel or getting water into it, power is lost, starting is difficult;
- the throttle valves are worn out, it is impossible to adjust the idle speed, failures in transient modes;
- non-flatness of the lower flange due to overtightening of the nuts, air leaks, loss of idle speed and power;
- clogging of the accelerator pump, failures during acceleration;
- The transition system of the second chamber is clogged, failures at medium acceleration modes.
Often the carburetor is blamed for problems created by the ignition system or gas distribution mechanics of the engine. Therefore, this technically complex device should be dealt with last, after making sure that all other systems are in full working order.
How to set up a Solex carburetor
The best carburetor is SOLEKS. Therefore, many drivers replace their standard carburetors with devices of this type. Solex works clearly even if there was a strong overflow of fuel.
As it turns out, many people have difficulty setting up the SOLEKS carburetor correctly. It must be configured so that fuel consumption is minimal and power is maximum, so you need to look for the “golden mean”. Therefore, those who do not want to learn the subtleties and nuances of setting up give this job to a professional.
But, for those who want to learn how to adjust and configure a Solex carburetor, we will describe the correct procedure:
- It is necessary to set the level in the float chambers. The manual (instructions) states that the level can be set using a special template. This is difficult if there is no factory setting. If there is no factory setting, you need to do it yourself. How to do it? To do this, start the internal combustion engine and warm it up for about 10 minutes. Next, turn off the engine and disconnect the fuel supply hose. When the hose is disconnected, gasoline flows out normally, but fuel must not be poured into the chamber, otherwise the readings will be spoiled. Next, unscrew the carburetor cover bolts and remove the choke cable. After disconnecting the cable, you must very carefully and horizontally remove the Solex carburetor cover. If you do this carelessly, the floats may be damaged. Now you need to measure the distance from the Solex cap to the surface of the gasoline. It is necessary to measure in each chamber; the fuel level in them may be different. To determine whether the level is normal or not, you need to add the two resulting distances and divide by 2, that is (distance of camera 1 + distance of camera 2)/2. If the measured distance is between 25 and 35 mm, then everything is normal. If the level goes beyond the limits up or down, then you need to adjust the level. To do this, bend the float in the desired direction and drain some of the fuel.
- We adjust the idle speed of the internal combustion engine. It often happens that when you press the clutch pedal, the engine speed immediately drops - this indicates that the idle speed has disappeared. To do this, warm up the car engine to normal operating temperature. Next, turn off the engine. In the hole in the Solex sole we look for the mixture quality screw and turn it to the right until it stops. Now you need to start the internal combustion engine and push in (remove) the choke. This screw is used to set the permissible minimum speed. This number of revolutions should ensure stable, stable operation of the motor, while the vacuum should be minimal. A well-tuned Solex carburetor should allow the engine to idle at speeds from 500 to 1200 rpm. After the engine begins to operate stably, we continue to rotate the mixture quality screw until the internal combustion engine begins to operate unstably, after which we turn it back 1-2 turns. Next, we proceed to setting the engine speed to normal; we need to make sure that the speed is in the range from 800 to 900 rpm. Turn the screw until the engine starts running stably.
- When adjusting the idle speed, beginners often have difficulties. It happens when you turn the quality screw, the engine operation does not change, but the quality of the internal combustion engine must change. When the engine is unstable, the mixture quality screw can be adjusted. If the engine does not respond to changes in the adjustment of this screw, then fuel continues to flow into the idle channel, the screw cannot close it. This may be due to an enlarged nozzle (hole for metered fuel supply) or due to a poorly screwed plug, as well as a deformed nozzle. This can be done by carrying out a simple diagnostic procedure: with the engine running, you need to unscrew the valve - here the engine should stall. If the problem is in the enlarged nozzle, then the internal combustion engine will suddenly turn off, and if the internal combustion engine does not stall at all, then gasoline is not supplied through the nozzle. In this case, when the engine does not stall with the carburetor valve removed, then we check the stopper screw of the second chamber. The locking screw is used to smoothly open the throttle valve.
Jets and accelerator pump
Owners of carburetor cars know that jets change, but they do not always understand why jets are needed and how their size affects the operation of the carburetor. Let's start with the fact that the engine sucks in air through a special hole made in a large diffuser. At the same time, a certain amount of fuel is drawn through the fuel nozzle. The engine displacement directly affects how much air the engine will draw through the diffuser in a certain time, as well as the amount of gasoline sucked in parallel with the air.
It is for this reason that large-volume engines have carburetors with small jets. Installing such a carburetor on an engine with a smaller volume will mean that the “original” jets in this carburetor will produce a mixture that is too lean for normal engine operation. To solve this problem, you should find jets from a carburetor, which was initially designed for a specific internal combustion engine volume or as close as possible to it. You need to select jets starting with the fuel jet, then select the air jet under the fuel jet. The selection is made from a group of jets for the first chamber, the second chamber is adjusted only after the first.
Now let's talk about the accelerator pump. The accelerator pump delivers additional fuel when the throttle valve opens, allowing for more efficient acceleration. The pump is activated using a special cam. On engines with a Solex carburetor installed, the indicated accelerator pump cam must be set to the largest one.
You should also pay attention to the so-called “spout” of the accelerator pump. When the valves are opened, fuel should flow in a clear stream and not drip even with a slight throttle opening. It is also important what position the nose occupies. The stream of gasoline must fall exactly into the area between the diffuser wall and the throttle valve, that is, the fuel is jetted directly into the manifold. The jet must not hit the diffuser or damper. If this happens, then after sharply pressing the accelerator pedal the car will not accelerate immediately, and a failure will occur. Self-refinement of the carburetor involves installing two spouts in the chambers to obtain better performance from the engine, or only one spout in the first chamber of the carburetor for a more economical mode.
How to check Solex
To ensure high-quality work on adjusting and tuning the carburetor, you should ensure that sand particles, etc. do not get on the throttle valves. If solid particles get into the carburetor, this can lead to an expensive overhaul of the internal combustion engine (due to some small thing).
After you have adjusted the carburetor correctly, you need to check the accelerator pump. When the throttle valve is opened slightly, the nozzle should spray gasoline. Here is the answer to the question: why does the car jerk when driving? If a stream of gasoline from the sprayer appears late, then this precisely leads to braking when you press on the gas and the car jerking.
To clean the carburetor, it must be disassembled. First, we unscrew the fuel and air jets, as well as the emulsion tubes. If it is difficult to remember what is where in the carburetor device, then it is most convenient to photograph each step.
To determine whether the diaphragm is intact, unscrew the cap of the power mode economizer.
Signs of a broken carburetor diaphragm:
- The internal combustion engine does not stall when the screw is tightened.
- If you turn off the ignition, the engine continues to run for some time, that is, self-ignition occurs.
- Unstable operation of the internal combustion engine.
- Increased gas mileage during normal, moderate driving.
ECTO or EURO? What brand of fuel is best to fill in? ECTO fuel is not recommended for use in cars with high mileage.
After checking the integrity of the diaphragm, we clean the SOLEKS. For cleaning we use air pressure (a compressor or pump is needed). If the dirt is hard and does not fly off with a stream of air, then carefully clean the stuck dirt with copper wire. I use air pressure cleaning without damaging the surfaces of carburetor parts. After this, close the lid and now you need to lubricate all the rubbing surfaces of the carburetor parts. It should be lubricated after washing the outer part.
Starting system
This mechanism is a special cavity that connects to the intake manifold. The device also has a diaphragm and a rod that is connected to the air damper. After the engine is started, a vacuum occurs in the intake manifold. It acts on the diaphragm rod, thereby opening the air damper. If the choke handle is returned to its normal position, this will reduce the starting clearances.
The gap parameters depend on the geometric characteristics of the lever and are not adjustable in any way. As for the throttle valve of the second chamber, when the choke is pulled out, it is in a locked state.
Solex carburetor tuning
Tuning, that is, improvement, modification of the carburetor is carried out to increase engine power and improve driving dynamics.
Important! In order to achieve maximum power, there must be a minimum of resistance at the carburetor inlet. With high resistance, the quality of the mixture is not always “at its best” (sometimes “poor”, sometimes “rich”).
If you sharply open the throttle valve with the Solex carburetor set at the factory, the air flow speed decreases, as a result of which less gasoline is supplied to the carburetor. Because of this, power drops significantly at low speeds.
The procedure for increasing engine power by tuning the Solex carburetor:
- We carefully disassemble the carburetor.
- We wash and blow, and divide into two halves.
- Pay attention to the air damper axis. There are protruding screws on this axis, which creates additional resistance while the car is moving. Any little things are important when tuning, so these protruding screws need to be smoothed out.
- Remove the axle and air damper from the top. The axle needs to be sharpened.
- From the lower part you need to pull out the throttle valves with their axles. At this stage, using a file we make the flaps larger. We hide the screw caps inside the axle. There are screws with conical heads, you can use them. The throttle valve needs to be assembled.
- Now we are tuning the diffusers. To improve the aerodynamics of the diffusers, it is necessary to make the legs in the shape of wings. We also check the protrusions of the factory casting; if there are any, they need to be ground off.
- The accelerator pump must have 2 tubes installed in one chamber. There is an opinion among some that when I use two tubes for each camera, “dips” may appear, that is, you press on the gas, but the car does not move.
In general, the basis of tuning is smoothing, erasing protrusions and irregularities. Any unevenness in the fuel and air mixing chamber creates resistance.
Solex carburetor modification options
The need for such “tuning” may arise if you are not satisfied with any of the standard characteristics of the device. For example, in order to achieve more stable operation of the internal combustion engine at idle, it is worth abandoning the EPHH mechanism (forced idle economizer) and installing a plug instead. But then gasoline consumption will increase by 7-8%. Rework can also be carried out when the Solex carburetor is being repaired.
Throttle sawing
This means drilling a hole with a diameter of 2 mm in the damper (at a distance of approximately 5 mm from the edge). What does this give?
- increased stability of idle even at the minimum speed set during tuning;
- instant response of the carburetor to the slightest manipulations with quality and quantity screws;
- comfortable, very smooth starting of the car.
Here, at the same time, take care of the standard throttle valve mounting screws - they protrude above the surface: you just need to cut off the protruding parts.
Diffuser polishing
This operation is necessary to reduce aerodynamic losses and increase the flow rate of the air-fuel mixture. For polishing, it is recommended to use GOI paste or other similar products. Diffusers must be treated to a shine - a mirror state.
Tuning the exhaust system of VAZ 2107
Some car owners make the engine sound louder so that it resembles the growl of sports cars. To do this, the catalyst is replaced with a special flame arrester. Other VAZ 2107 owners believe that tuning the exhaust system is justified if the result is an increase in engine power. When assessing the feasibility of such measures, it should be borne in mind that improper installation will lead to increased fuel consumption and deterioration in vehicle performance. Therefore, work on tuning the exhaust system should be entrusted to professionals.
Tuning the exhaust manifold and exhaust pipe
For better purging of exhaust gases, extreme sports enthusiasts replace the standard exhaust manifold with a StinGer spider complete with a double exhaust pipe (pants) made of stainless steel. This allows you to increase power at high speeds by about 9 hp. With. At the same time, the exhaust gas output formula “4–2-1” does not change.
Since the internal walls of the StinGer are smoother, installing such a manifold will increase the efficiency of exhaust gases and increase power at maximum speed by 9 hp. With
The smooth surfaces of the StinGer manifold flanges ensure a tight fit to the cylinder head and to the pants. However, the new exhaust pipe does not have a threaded seat for the oxygen sensor. Therefore, if necessary, a nut is welded on this pipe in front of the catalyst, into which the sensor is installed.
The oxygen sensor in the VAZ 2107 is located on the exhaust pipe in front of the catalyst - this is where the nut for its installation is welded
Since the pants end with a flange, the resonator of the injection model is attached without problems. However, on carburetor VAZ 2107 this unit is designed differently, so it is better to immediately install a resonator from an injection engine on such a car.
Installation of a straight-through muffler
The standard VAZ 2107 muffler consists of two pipes, welded at different angles and lined with a non-flammable mineral wool filler, which reduces the speed of exhaust gases and softens the exhaust. To increase the volume of the exhaust and make the flow of exhaust gases straight, audio tuning of the exhaust system is carried out. Instead of a conventional muffler, a direct-flow muffler made by yourself is installed.
In a direct-flow muffler, the exhaust gases do not make turns, which dampen the speed, and act as additional resistance, reducing engine power
There are two ways to make a direct-flow muffler:
- remake the old muffler, which will not cause problems even for inexperienced owners and will be very cheap;
- weld a new muffler, which will be quite difficult to secure under the bottom of the car.
The work is performed in the following order:
- The old muffler is removed.
- A window is cut out along the entire length of the oval body using a grinder.
- The filler is removed and the metal insides are cut out.
- Using a drill or grinder, perforate a piece of pipe equal to the length of the muffler (52 cm). A large number of holes or slots will disperse the flow of exhaust gases, reducing temperature and noise.
- A perforated pipe is carefully welded inside the body, connecting the inlet and outlet pipes.
- An exhaust pipe is welded to the rear side of the muffler - it can be double and chrome-plated. The part of the pipe that goes inside the muffler is also perforated using a drill.
- The oval body is filled with mineral wool, fiberglass, asbestos or other non-combustible material.
- The window in the housing is welded.
Video: manufacturing and installation of an adjustable exhaust with a damper for a VAZ 2107
Thus, with the help of tuning you can turn a VAZ 2107 into a completely new car. In accordance with the wishes of the car owner, almost any components and parts are modified, including the engine. Elements for tuning are available for sale, and most of the work is quite simple to complete, carefully following the instructions of professionals.