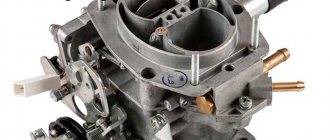
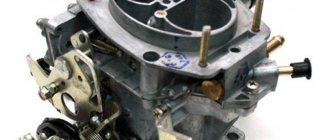
A carburetor is an important element of a car's fuel system. Its main task is to prepare the air-fuel mixture and seamlessly transfer it to the engine combustion chamber. Solex 21073 is one of the best designs of an emulsion two-chamber carburetor. It consists of two main elements: a massive lower part and a lighter lid. Taking into account the increasing requirements for environmental safety and decisions of the European Union Commission, all manufactured cars must comply with Euro 2 and Euro 3 standards. The Solex carburetor allows you to fulfill these rules.
Device and principle of operation
The basic principles of mixing fuel and air using a simplified scheme are demonstrated in the figure.
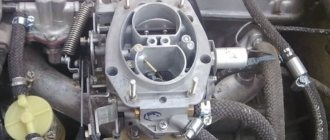
As the piston moves downward from top dead center, the intake valve opens, allowing the air-fuel mixture to be drawn in from the carburetor. At this moment, in the diffuser 6 of the mixing chamber 8, the fuel coming from the atomizer 4 through the nozzle 9, metering the fuel flow, is mixed with the air sucked in through the air damper 5. The flow of the air-fuel mixture is regulated by the throttle valve 7, connected to the gas pedal.
One of the main parts of the carburetor design is the float chamber 11. The operation of the engine depends on its correct setting. The fuel level in the float chamber is regulated by the position of floats 10 - there are two of them in Solex. When gasoline enters chamber 11 from fuel line 1, the floats float up and block the flow of fuel through needle valve 2. In this case, the air displaced from the float chamber leaves through technological hole 3.
Sprayer 4 is designed in such a way that its upper cut edge is slightly higher than the fuel level in the float chamber. As the air flow passes through the diffuser, gasoline is sucked in and further mixed with air. If there is too much fuel in the float chamber, it may leak out. If the mixture contains too much gasoline, it will lead to the following negative consequences:
- pouring candles;
- incomplete combustion of fuel;
- increased fuel consumption;
- reduction of engine thrust;
- increase in the volume of harmful emissions.
When the level of gasoline in the float chamber is low, it is difficult to suck it in. The air-fuel mixture contains an insufficient amount of gasoline, which leads to unstable engine operation and jerking when driving the car. For this reason, it is necessary to monitor the fuel level in the float chamber and the condition of the needle valve.
Selection Basics
If we install, for example, Solex 21041 (volume 1.8) on a 1.5 engine. This carburetor has a 24x26 diffuser, fuel volume is 102.5, which is not enough for a 1.5 engine. We are looking for a match between the chambers and the diffuser. We find the closest option: Solex 21073. It has a 24x24 diffuser and a TJ - 107.5. And the first cameras are almost identical. By the way, if the diffusers are almost the same, and the engine volume is smaller, then the intake of gasoline will be less (the jet is rather poor). This means that we need fuel jets (fuel jets) from 110. Let’s get a few.
Next you need to decide
, what do you want to get: economical slowness or costly acceleration. Depending on the decision, we also select a fuel mixture: to adjust the enrichment or leanness of the air-fuel mixture (a lean mixture will lead to gasoline savings, but will affect the acceleration dynamics of the car).
Installing a carburetor on a Niva
Until 1994, the Niva 2121 was equipped with Ozone carburetors, which still operate successfully to this day. Assessing all the positive and negative aspects of existing designs, AvtoVAZ began installing Solex 21073 carburetors on the Niva. According to numerous car enthusiasts, this mechanism is more economical than Ozone. The engine is characterized by better performance, but it becomes more difficult to configure, more capricious to the quality of gasoline and oil vapors penetrating from the crankcase.
You can install or replace the carburetor yourself using standard tools. First, you need to dismantle the air filter, loosen the fuel line clamp and carefully remove it from the fitting, draining the gasoline in the fuel line into a prepared container. Then you should loosen the clamps and remove all pipes connecting to the carburetor:
- draining fuel into the fuel tank;
- carburetor heating unit;
- vacuum regulator of the ignition distributor;
- exhaust gas recirculation systems;
- suction of crankcase gases.
By removing all the electrical connectors, you can remove the throttle linkages and the choke control cable. Having disconnected all external communications from the carburetor, it is necessary to unscrew the nuts securing it to the intake manifold. Then you can carefully dismantle the mechanism. Installing a new carburetor is performed in the reverse order.
Replacement in every detail
Adjusting screws for the Solex carburetor 2108
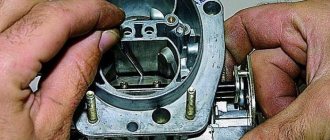
Having selected the Solex carburetor jets by numbers, you can begin to replace them; unlike boring, it is quite possible to carry out this operation yourself at home. By the way, the reason is not always an incorrectly selected element; very often during operation, these parts wear out and become clogged, which leads to a change in the diameter and composition of the mixture with all the ensuing consequences. In addition, car owners in this way increase the power of their “iron horse” or, conversely, reduce gasoline consumption. In general, replacing jets is quite suitable in the category of vehicle tuning.
To remove the Solex jets, you will have to dismantle the engine and, of course, disassemble it. Before removing the power unit, be sure to disconnect the negative cable from the battery, and then remove the air filter housing. Prepare a clean rag and a solvent, such as white spirit, in advance to clean the surface of the motor from dirt. Now you need to find the place where the drive cable is attached to the air damper and slightly loosen the screw securing these parts. Do the same with the bolt securing the cable sheath. An open-end wrench is perfect for this purpose. After disconnecting the cable from the carburetor, remove the crankcase gas supply hose from the pipe.
Removing jets from Solex
To disconnect the fuel hose from the fitting, in addition to a wrench, you will also need a Phillips screwdriver. First, loosen the fastening clamp, then remove the hose and use an M8 bolt to plug the hole in the latter. It is necessary to remove the vacuum regulator hose. The wire terminal is also disconnected from the solenoid valve terminal. We take a flat-head screwdriver and use it to press out the end of the throttle linkage, and then remove it. Now it is possible to remove the return spring.
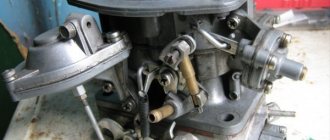
To remove the carburetor you need to prepare a spanner and open-end wrench set to “13”. The first to unscrew are 3 nuts, through which the part is attached to the inlet pipeline, and the second is the fastening nut. Take this opportunity to inspect the carburetor gasket; perhaps it could use replacement. If the unit will be removed for a long time, be sure to plug the inlet pipe with a rag. To replace the jets in the carburetor, it remains to remove the cover from it. Take a flathead screwdriver and unscrew these parts. First we remove the fuel jets, then the air jets. In the rings of the last parts you will find emulsion tubes; to pull them out, you should pry them off with a file.
Replacing the carburetor gasket
The main fuel element of the secondary chamber is designated by the letter “A”, and the primary one by “B”. Then we proceed to removing the air jets, marked “B” and “D” for the secondary and primary chambers, respectively.
Replacement should not be done blindly. Visually assess the condition of the jets. The presence of marks, scratches and irregularities on their inner surface is unacceptable, since these defects reduce throughput. Contamination of parts with resins also has a negative impact. Before installing new jets, it is advisable to check them on a special stand, so you can see how well the specified throughput of the elements corresponds to real indicators.
Installation of new Solex parts
If you have already started disassembling the carburetor, then it would be a good idea to study the condition of its other parts; perhaps replacing the jets is not the only need for this unit. We unscrew the accelerator pump screw and remove the latter along with the valve and o-rings. Then we remove the rings and diffusers of both chambers from their original location. To remove the channel from the accelerator pump, you need to unscrew the fixing screw.
Next, remove the fuel nozzle along with the housing and take it out. You can dismantle the diaphragm after you open its cover and remove the spring. Having unscrewed the bolted connections, we disconnect the carburetor body and the throttle valve. Now you have access to the thermal insulation element and cardboard spacers. Remove the cover along with the adjusting screw, then remove the latter with the sealing ring. All parts with defects must be replaced; the remaining parts are thoroughly washed in a special product. We blow out the jets and other holes with compressed air. Reassemble in reverse order.
Instructions for adjusting the carburetor
Solex is a fairly reliable device, but it is advisable to carry out the necessary adjustments every six months of vehicle operation in order to optimize engine performance and save gasoline. These include: adjusting the quality of the fuel mixture, its level in the float chamber and the number of idle speeds.
Before carrying out any calibration work or troubleshooting, it is advisable to clean the carburetor of dust, oil and other contaminants. It is more convenient to do this with the air filter removed.
When adjusting the Solex carburetor installed on the Niva, you need to put the gearshift knob in the neutral position, start the engine and let it run for about five minutes. This will allow the fuel pump to fill the chamber. Then you should remove the fuel hose from the carburetor, after turning off the ignition. To prevent the gasoline remaining in the fuel line from leaking onto the engine, prepare in advance a container into which it can be drained. After this, dismantle the choke control cable and remove the screws securing the carburetor cover to its body. When removing the cover, you need to be extremely careful not to damage the gasket and fastenings of the floats.
Having gained access to the float chamber, it is necessary to measure the fuel level. It is convenient to do this with a caliper with a depth gauge. The distance from the edge of the chamber to the edge of the fuel should be 24-25 millimeters. If these values do not correspond, you should bend the tongue on the float axis in the desired direction, put the cap in place, start the engine, and then repeat the procedure of removing the cap and measuring the fuel level.
The idle speed setting is carried out on a warm engine. First, use a flat-head screwdriver to tighten the mixture quality screw located on the base of the carburetor until it stops. It has a left-hand thread, so it should be screwed counterclockwise. Then you need to unscrew it five turns and start the engine. Having removed the choke (air damper), we make minimum but stable engine speeds by rotating the fuel supply amount screw. Then, slowly turning the quality screw, you need to achieve unstable operation of the motor, and after that, unscrew the quality screw one and a half turns. This is enough to restore stable operation. You can set the recommended rpm (850-900) using the quantity screw.
Float mechanism
The Solex 21073 carburetor, installed on the Niva, has a float chamber of two sections. They are located on both sides of the main cameras of the device. The system consists of two ebonite floats, which are mounted on a lever.
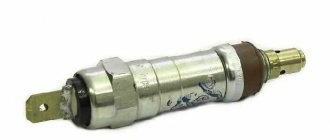
The latter swings on an axis pressed into the bosses of the device cover. There is a tongue on the bracket. The element presses the needle valve needle through a special ball. The float mechanism serves to adjust the level of fuel required for normal operation of the carburetor. The needle valve is a non-separable type. It is not being repaired. The valve body is mounted on a thread in the carburetor cap. The ball protects the needle from shock when the machine moves. If the chamber is empty (for example, if the driver is using LPG), then the floats will knock.
Basic Solex malfunctions and methods for eliminating them
Before looking for problems with the device, you need to make sure that the ignition system is working flawlessly and is adjusted correctly. You also need to check whether the timing belt is functioning correctly, since malfunctions in the operation of this mechanism can also cause malfunctions in the carburetor.
Table 1. Classification of possible carburetor malfunctions and methods for eliminating them.
| Malfunctions | Causes |
Elimination methods
Results
Of course, it is clear that there is no limit to improvements. Sometimes they can even go to excess: drilling, for example, a throttle valve, polishing an MD, soldering epulsion tubes on a carburetor. But, as they say, what is in excess is unhealthy. But such a procedure, fascinating in its own way, like selecting the types of jets for a Solex 21073 carburetor, for example, is something quite necessary for the correct setup of the unit and its complete compatibility with the engine compartment. As a result, you get an economical car that responds well to gas.
Advantages and disadvantages of tuning
The Solex carburetor is assembled from standard parts and assemblies from various manufacturers and is not subject to individual adjustment. But the cast body, made of aluminum alloy, diffusers, damper jets, as well as fasteners have unprocessed burrs, protrusions, and roughness. The task of tuning is to remove all obstacles to the movement of the air-fuel mixture by grinding, polishing channels and parts with which the fuel flow comes into contact, as well as modifying diffusers and adjusting jets in accordance with the individual requirements of the car enthusiast.
To perform the above work, it is necessary to remove the carburetor from the engine intake manifold and remove the cover. It is necessary to achieve complete alignment of all holes of adjacent removable parts. This is done using a scraper or file.
You need to remove the air damper and replace its round head screws with flat head screws. Then drill out the holes a little to “recess” the protruding parts of the fasteners. This will reduce hydrodynamic resistance during the passage of the air-fuel mixture. It is advisable to replace the needle valve with a valve with a rubber tip to prevent gasoline overflow.
All carburetor diffusers need to be polished, the technological ebbs on the bridges must be cut down and given a more streamlined shape. The flow rate of the fuel mixture in the mixing chamber reaches 120 meters per second, and any roughness will impede the flow of air.
To increase dynamics during acceleration, you can change the accelerator pump drive cam from number 7 to number 4. They are sold in carburetor repair kits.
Tuning the carburetor not only affects the throttle response of the engine, increases its power, but also significantly increases fuel consumption. Before assembling the mechanism after modification, it is recommended to wash all its parts with a special liquid for cleaning the carburetor, and then blow out the holes with compressed air.
The Solex carburetor is one of the best engineering developments successfully used on Russian Niva SUVs. Carburetor engines are repairable, easy to maintain and reliable. Tuning can significantly improve engine performance and increase its efficiency.
The idle speed system (IAC) is responsible for the operation of an engine with a Solex 21073 carburetor at idle speed (XX). At idle, fuel enters the engine only through it.
— The car engine is warmed up to an operating temperature of 80-90º
— The carburetor air damper is completely open (“the choke” is recessed all the way)
— The throttle valves of the first and second chambers are completely closed
— The air filter housing with the filter element is not dismantled
Checking the idle speed of an engine with a 21073 Solex carburetor
The idle speed of an engine with a Solex carburetor 21073-1107010 should be in the range of 750-800 rpm (for a Niva car). Checked using a standard or connected external tachometer. At idle, the engine should run smoothly without interruption. When you sharply press the gas pedal, the engine speed at idle increases without “dips”, and when you release the gas, they decrease without stalling the engine.
If the picture does not correspond to the required one, we adjust the idle speed.
The most basic adjustment of the idle speed of a car engine with a 21073-1107010 Solex carburetor comes down to rotating the screw for adjusting the “amount” of the fuel mixture. Clockwise - the speed increases, counter - decreases. The “quantity” screw with its tip moves the throttle lever of the first chamber and it slightly opens or, conversely, closes the throttle valve. This regulates the amount of fuel mixture entering the engine cylinders (See “The principle of operation of the Solex carburetor idle system”).
Starting system
This mechanism is a special cavity that connects to the intake manifold. The device also has a diaphragm and a rod that is connected to the air damper. After the engine is started, a vacuum occurs in the intake manifold. It acts on the diaphragm rod, thereby opening the air damper. If the choke handle is returned to its normal position, this will reduce the starting clearances.
The gap parameters depend on the geometric characteristics of the lever and are not adjustable in any way. As for the throttle valve of the second chamber, when the choke is pulled out, it is in a locked state.
Solex carburetor design
The Solex carburetor has several models, namely:
The main modification of this brand of carburetors is SOLEX 21083. This model has the smallest diffuser cross-section. In terms of structure, all Solex models are the same, there are only some differences (different brands and models of cars have their own modification). Therefore, the Solex settings for all models are the same.
The Solex carburetor type is emulsion. It is installed only on cars with engines with contactless ignition.
Solex device:
- two chambers with throttle valves;
- chamber dosing system;
- transition systems for both chambers;
- idle speed system only for the first chamber.
Classification of Solex carburetors by configuration:
- Semi-automatic starting system.
- Carburetor accelerator pump.
- Power mode economizer.
Have you heard about a car device that can reduce fuel consumption, the FuelFree fuel saver?
Additional Information
In general, in addition to the selection of jets, there are a lot of useful and interesting nuances of setting up the Solex, so that it works correctly and is combined with the engine of your carburetor car.
You should always start by setting the levels in the chambers. They are installed manually according to the positions of the floats themselves, depending on the unit cover (everything is done using special templates). And in vain you think, like many gullible Solex users, that everything is already on display from the factory. To avoid overflow and stress on the needle, we make the appropriate adjustments by bending the float tongues.
After setting the levels, you can start idling. It depends on the position of the screws for the quality and quantity of the mixture (torsion should be performed with the suction removed).
How to set up a Solex carburetor
The best carburetor is SOLEKS. Therefore, many drivers replace their standard carburetors with devices of this type. Solex works clearly even if there was a strong overflow of fuel. As it turned out, many people have difficulties in correctly setting up the Solex carburetor. It must be configured so that fuel consumption is minimal and power is maximum, so you need to look for the “golden mean”. Therefore, those who do not want to learn the subtleties and nuances of setting up give this job to a professional.
But, for those who want to learn how to adjust and configure a Solex carburetor, we will describe the correct procedure:
- It is necessary to set the level in the float chambers. The manual (instructions) states that the level can be set using a special template. This is difficult if there is no factory setting. If there is no factory setting, you need to do it yourself. How to do it? To do this, start the internal combustion engine and warm it up for about 10 minutes. Next, turn off the engine and disconnect the fuel supply hose. When the hose is disconnected, gasoline flows out normally, but fuel must not be poured into the chamber, otherwise the readings will be spoiled. Next, unscrew the carburetor cover bolts and remove the choke cable. After disconnecting the cable, you must very carefully and horizontally remove the Solex carburetor cover. If you do this carelessly, the floats may be damaged. Now you need to measure the distance from the Solex cap to the surface of the gasoline. It is necessary to measure in each chamber; the fuel level in them may be different. To determine whether the level is normal or not, you need to add the two resulting distances and divide by 2, that is (distance of camera 1 + distance of camera 2)/2. If the measured distance is between 25 and 35 mm, then everything is normal. If the level goes beyond the limits up or down, then you need to adjust the level. To do this, bend the float in the desired direction and drain some of the fuel.
- We adjust the idle speed of the internal combustion engine. It often happens that when you press the clutch pedal, the engine speed immediately drops - this indicates that the idle speed has disappeared. To do this, warm up the car engine to normal operating temperature. Next, turn off the engine. In the hole in the Solex sole we look for the mixture quality screw and turn it to the right until it stops. Now you need to start the internal combustion engine and push in (remove) the choke. This screw is used to set the permissible minimum speed. This number of revolutions should ensure stable, stable operation of the motor, while the vacuum should be minimal. A well-tuned Solex carburetor should allow the engine to idle at speeds from 500 to 1200 rpm. After the engine begins to operate stably, we continue to rotate the mixture quality screw until the internal combustion engine begins to operate unstably, after which we turn it back 1-2 turns. Next, we proceed to setting the engine speed to normal; we need to make sure that the speed is in the range from 800 to 900 rpm. Turn the screw until the engine starts running stably.
- When adjusting the idle speed, beginners often have difficulties. It happens when you turn the quality screw, the engine operation does not change, but the quality of the internal combustion engine must change. When the engine is unstable, the mixture quality screw can be adjusted. If the engine does not respond to changes in the adjustment of this screw, then fuel continues to flow into the idle channel, the screw cannot close it. This may be due to an enlarged nozzle (hole for metered fuel supply) or due to a poorly screwed plug, as well as a deformed nozzle. This can be done by carrying out a simple diagnostic procedure: with the engine running, you need to unscrew the valve - here the engine should stall. If the problem is in the enlarged nozzle, then the internal combustion engine will suddenly turn off, and if the internal combustion engine does not stall at all, then gasoline is not supplied through the nozzle. In this case, when the engine does not stall with the carburetor valve removed, then we check the stopper screw of the second chamber. The locking screw is used to smoothly open the throttle valve.
Idle adjustment
Many car owners, namely beginners, most often buy old cars and do not know how to adjust the carburetor correctly. The result is power loss, high fuel consumption, floating speed and other problems. After the level adjustment is successfully completed, the idle speed is adjusted. Before doing this, it is recommended to turn off the engine. To work, you will need a flat blade screwdriver and time. There is a hole on the base of the mechanism. It contains a screw responsible for the quality of the mixture. It is screwed in until it stops. However, you should not be too zealous.
Then, from the extreme position, the screw is unscrewed five turns. Next, the engine is started without choke. Unscrew the quality screw - carburetor 21073 will regulate the engine speed. Then the element is screwed in again. It is necessary to rotate until the operation of the power unit becomes as stable as possible. Rotate the screw slowly. When the engine becomes quieter, turn it out no more than one turn. As a result, the idle speed will be about 900. But if the engine stalls, they are slightly increased.
How to check Solex
To ensure high-quality work on adjusting and tuning the carburetor, you should ensure that sand particles, etc. do not get on the throttle valves. If solid particles get into the carburetor, this can lead to an expensive overhaul of the internal combustion engine (due to some small thing).
After you have adjusted the carburetor correctly, you need to check the accelerator pump. When the throttle valve is opened slightly, the nozzle should spray gasoline. Here is the answer to the question: why does the car jerk when driving? If a stream of gasoline from the sprayer appears late, then this precisely leads to braking when you press on the gas and the car jerking.
To clean the carburetor, it must be disassembled. First, we unscrew the fuel and air jets, as well as the emulsion tubes. If it is difficult to remember what is where in the carburetor device, then it is most convenient to photograph each step.
To determine whether the diaphragm is intact, unscrew the cap of the power mode economizer.
Signs of a broken carburetor diaphragm:
- The internal combustion engine does not stall when the screw is tightened.
- If you turn off the ignition, the engine continues to run for some time, that is, self-ignition occurs.
- Unstable operation of the internal combustion engine.
- Increased gas mileage during normal, moderate driving.
ECTO or EURO? What brand of fuel is best to fill in? ECTO fuel is not recommended for use in cars with high mileage.
After checking the integrity of the diaphragm, we clean the SOLEKS. For cleaning we use air pressure (a compressor or pump is needed). If the dirt is hard and does not fly off with a stream of air, then carefully clean the stuck dirt with copper wire. I use air pressure cleaning without damaging the surfaces of carburetor parts. After this, close the lid and now you need to lubricate all the rubbing surfaces of the carburetor parts. It should be lubricated after washing the outer part.
Scheme, principle of operation
When a cold power unit starts up, the starting device starts working first, which is controlled by the driver from inside the car. If the choke handle is fully extended, the air damper in the PC closes completely, and the air damper opens slightly within the set starting gap. This gap can be changed within small limits using an adjusting screw.
The PU is a cavity connected to the intake manifold by a special channel, to a diaphragm, and also through a rod to the air damper. When the driver starts the engine, a vacuum is formed in the intake manifold, which is transmitted to the diaphragm. As a result, the rod pushes the PC air damper, opening it slightly by the amount of the starting gap adjusted by the PU screw.
Solex carburetor tuning
Tuning, that is, improvement, modification of the carburetor is carried out to increase engine power and improve driving dynamics.
Important! In order to achieve maximum power, there must be a minimum of resistance at the carburetor inlet. With high resistance, the quality of the mixture is not always “at its best” (sometimes “poor”, sometimes “rich”).
If you sharply open the throttle valve with the Solex carburetor set at the factory, the air flow speed decreases, as a result of which less gasoline is supplied to the carburetor. Because of this, power drops significantly at low speeds.
The procedure for increasing engine power by tuning the Solex carburetor:
- We carefully disassemble the carburetor.
- We wash and blow, and divide into two halves.
- Pay attention to the air damper axis. There are protruding screws on this axis, which creates additional resistance while the car is moving. Any little things are important when tuning, so these protruding screws need to be smoothed out.
- Remove the axle and air damper from the top. The axle needs to be sharpened.
- From the lower part you need to pull out the throttle valves with their axles. At this stage, using a file we make the flaps larger. We hide the screw caps inside the axle. There are screws with conical heads, you can use them. The throttle valve needs to be assembled.
- Now we are tuning the diffusers. To improve the aerodynamics of the diffusers, it is necessary to make the legs in the shape of wings. We also check the protrusions of the factory casting; if there are any, they need to be ground off.
- The accelerator pump must have 2 tubes installed in one chamber. There is an opinion among some that when I use two tubes for each camera, “dips” may appear, that is, you press on the gas, but the car does not move.
In general, the basis of tuning is smoothing, erasing protrusions and irregularities. Any unevenness in the fuel and air mixing chamber creates resistance.
His Majesty diffuser
As you can see, the diffuser occupies not the last place in this hierarchy, and here’s why. The main problem with Solex DAAZ 21083 is that the standard mixture is too lean. The engineers deliberately took this step in order to strangle the engine in favor of efficiency, depriving it of its dynamic potential. But even without resorting to complex and subtle calculations, it is clear that first of all it is necessary to eliminate aerodynamic errors, which are full of any DAAZ carburetor.
After the diffusers are brought into human form, the filling of the cylinder with the working mixture is significantly improved, and as a result, the output from the engine, even after such an insignificant alteration at first glance, is visible even to the eye. Now it makes sense to think about increasing the filling of the combustion chamber. Standard diffusers on 21083 have diameters of 21x23 mm of the primary and secondary chambers, respectively. Usually the dimensions are adjusted to 24 mm, so the motor will not be pinched at least by air.
Now you can increase the diameters of the fuel jets. “Can” does not mean necessary, and if fuel economy is more important, then the jets are best left alone. Even after replacing them with jets of increased diameter, the car will not turn into a Maserati, but fuel consumption will definitely increase. If this doesn’t scare you, then change the standard jets to 107.5 and 115, and the air jets to 155 and 135 in the primary and secondary chambers, respectively. If you are not satisfied with the result, you can always install the standard jets in place.