26.09.2018
24738
Cars, Repair
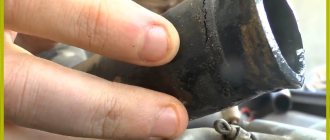
When is it necessary to replace the cooling system pipes? Everything is very simple - when they crack, burst, tear and begin to leak coolant. Something similar happened to me - hernias appeared on some of the pipes in the area of the clamps. There were no fluid leaks, but their appearance indicated that this could happen at any moment. Therefore, it was decided to replace all the pipes, as well as the thermostat and, at the same time, fill in new antifreeze.
To gain access to the pipes on Kalina, you need to remove the air filter and the corrugation going from it to the throttle assembly.
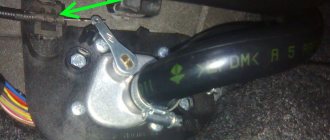
Also, drain the coolant first. It is better to do this on a cold engine to avoid getting burned. You need to drain the cylinder block and radiator. The drain hole on the block is located directly behind the ignition module (so it also needs to be removed), and on the radiator - at the bottom left.
How did I drain the antifreeze? I cut off half of a plastic bottle (it turned out to be something like a watering can) and put a hose on the neck itself. I placed the bottle under the drain hole, and led the other end of the hose under the engine into a bucket. It turned out very convenient. The pressure of the drained liquid can be controlled by the cap on the expansion tank (by opening/closing it slightly).
After the coolant has been completely drained, you can begin to remove the pipes and thermostat. There is nothing complicated here - unscrew the clamps and remove the pipes and hoses. The only thing that caused me difficulty was removing the outlet and inlet pipes of the stove. The clamps are very inconvenient, I had to tinker a little.
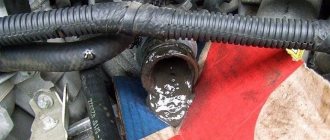
Having removed the pipes, I realized that I had not bought a new thermostat in vain. There was a rather large hole in the fitting going to the stove. As I understand it, it appeared as a result of the interaction of antifreeze and its additives with metal. The remaining thermostat outputs were in slightly better condition, but there were traces of interaction with the coolant.
Replacing the thermostat on Kalina 8 valves
The thermostat on Kalina consists of 2 parts - the so-called thermostat cover and housing. The cover is the part in which the thermocouple is located, and the housing is the part that is attached to the engine. Housings are not sold separately, unlike covers, at least I haven’t seen them. Therefore, you can either replace the cover or buy a completely assembled thermostat.
It is attached to the engine with 2 nuts along with the ground wire from the battery. We unscrew them and remove the thermostat. In most cases, the remaining gasket will stick to the engine. They will need to be removed with a knife or blade.
The coolant temperature sensor is screwed into the thermostat housing. You need to unscrew it from the old one and screw it into the new thermostat, or just buy a new one. It is attached under a copper gasket, which seems to need to be replaced with a new one, but practice shows that a used one also holds up normally. The thread of the sensor itself, closer to the gasket, can be lightly coated with sealant.
To be sure, I additionally applied a thin layer of sealant to the new thermostat gasket and installed it in the prepared place. According to reviews on the Internet, it is best to buy an original thermostat from AvtoVAZ. He will last the longest. In second place, this is exactly what I bought, since I simply couldn’t find the original one. Some samples may open not at 85 degrees, but at 90-95º. Not sure if this is normal. It should also be noted that the PRAMO thermostat cover will not fit into the AvtoVAZ body; the side will interfere, which the craftsmen successfully saw off with a grinder.
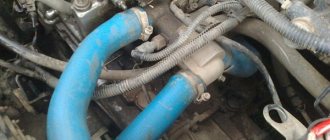
Replacing the pipes of the Kalina cooling system can be divided into replacing the heater pipes and replacing the radiator pipes. There are 2 pipes suitable for the stove - inlet (1) and outlet (2). There is also an inlet (3) and outlet (4) to the radiator. There is also a small connecting pipe (5) from the thermostat to the siphon.
The first option for improving the tank
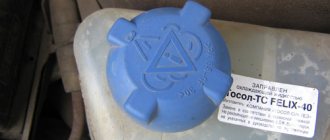
Which lid is better? We purchase a cover of the “FEBI” brand (code – “02269”). Its cost does not exceed 160 rubles. We disassemble the standard product and remove the valve assembly. We carry out the same procedure with the purchased part.
We cut the original mechanism and then remove it together with the side, which allows for the centering of the spring. We grind the mechanism down to 1 mm on the “FEBI” valve element. This manipulation ensures that the valve and rubber seal are seated correctly.
Now we assemble the part and screw it onto the tank of the Lada Kalina. The result is a lid that is not subject to freezing. The refinement process will not take more than an hour of time, but the effectiveness of the product will increase many times over.
Replacing the pipes of the Kalina stove
In my case, the heater pipes were in the worst condition. In addition, unscrewing the clamps on the heater radiator itself was very problematic, since they are located immediately under the steering rack. To do this job I used a small ratchet with an 8mm head. It was simply impossible to get through with a screwdriver.
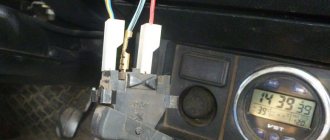
Before removing the pipes, be careful - the liquid remaining in the heater radiator will flow from them, so prepare small dishes in advance. Do not allow liquid to get on the speed sensor, which is installed exactly under the heater pipe.
Classic lid upgrade method
Upgrading the cover in this embodiment involves removing and disassembling the component. We take out the rubber seal and the internal assembly (a pair of springs with a valve). We use a screwdriver.
Refinement involves trimming two springs. The first of them must be shortened by one turn, and the second by as many as two. We assemble according to a well-known algorithm. After this, we check the functionality of the upgraded node. The valve outlet element will now begin to open when the pressure reaches 1 bar. Previously, this figure was 1.7 bar.
Upon successful completion, the lid can be easily blown through the mouth. This check ensures there is free passage of air in both directions. If the indicated effect is observed, then we can state that the modification is correct. Now the risk of airing the circuit has been reduced many times over.
Replacing radiator pipes Kalina
When replacing radiator pipes, no difficulties should arise. We take off the old ones and put on new ones. The inlet pipe is attached to the top of the radiator, the outlet pipe is attached to the bottom. It is worth noting that the outlet pipe consists of 2 - one part (the main one) goes to the thermostat, the second goes to the expansion tank. This pipe is the most expensive - its cost exceeds the total cost of all other pipes taken together. Therefore, it is advisable to treat it with care.
There is only one connecting pipe left (from the thermostat to the siphon) and heating hoses for the throttle assembly. Replacing them shouldn't cause any problems either. I bought a hose for the throttle (10mm) separately, 1 meter long, then cut it to the length of the old ones.
I did not touch the hose for the overflow from the radiator to the expansion tank. She appeared to be in good condition.
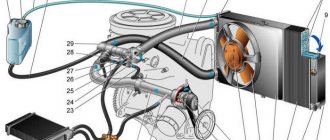
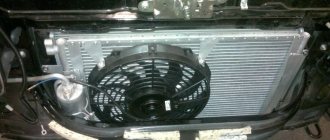
Engine cooling system
It is impossible to say that the system consists only of some elements and nothing more; modern cars are crammed with a lot of sensors and control is carried out by an on-board computer. But there are still basic components without which the system simply will not exist.
These components include:
- radiator;
- water pump;
- thermostat;
- thermostat steam removal hoses;
- radiator steam hoses;
- expansion tank;
- radiator supply hoses;
- electric radiator fan.
Such parts can be found both in the most modern cars and in the oldest domestic ones. Therefore, when starting to search for damage, you should first inspect these elements.
Filling with new coolant Kalina
The installation of new pipes is complete. Now the most interesting part is that you need to fill in new antifreeze . Don't forget to tighten the bolts from the drain holes back. I use Felix Green G11. To avoid the occurrence of a large number of air pockets, before filling in the coolant, I removed one hose from the throttle heating - the highest point of the cooling system. During the process of filling the system, air could be heard escaping. Out of 10 kg of antifreeze, about 2 liters remain in the canister.
I filled it up to the MAX mark on the expansion tank and put the hose from the throttle back in place. Now you can try to start the engine and see what happens. Before this, of course, you need to put in place the ignition module and the air filter along with the mass air flow sensor and the adsorber valve.
After the first start, the engine heated up to 120 degrees, but the radiator remained cold. I waited about 10 minutes until the engine cooled down and SLOWLY unscrewed the cap from the expansion tank, releasing the pressure, and then unscrewed it completely. At that moment I heard a gurgling sound - excess air was coming out. Some fluid has leaked into the system. I added new fluid to the reservoir and started the engine again. This time everything worked as it should - the radiator warmed up, the fan turned on, the stove was heating, the temperature stayed around 90º.
And on this positive note, the procedure for replacing the pipes on Kalina, as well as the thermostat and antifreeze, can be considered completed.
Principle of operation
The operating algorithm of this system consists in the close interaction of various sensors, parts and elements, including devices that measure oil temperature, outside temperature and many other factors. Taking into account all these points, on the VAZ Kalina the cooling system automatically sets the optimal switching conditions and operating time of all structural elements, thereby ensuring effective engine cooling.
It should also be noted that depending on the temperature, the liquid can pass through a small or large circle. In the first case, the antifreeze passes through all the channels of the system, bypassing the radiator. The thermostat is in the closed position during such circulation. When the engine temperature increases, this part gradually opens, and the antifreeze begins to “run” in a large circle, getting into the radiator. The latter is cooled by a counter flow of air, and if the SOD is not enough, it will send a signal to the fan, which will force cold air onto the cells.
After cooling, the coolant flows back to the small circle. Then, depending on the engine temperature, the system automatically circulates antifreeze either in a large or small circle, maintaining the optimal operating temperature of the internal combustion engine (95-105 degrees Celsius).
How to get to the damper
To see where the central heater flap is located, you will need to partially disassemble the dashboard, and specifically, unscrew the beard.
This is the place on where the heater switches are located. Progress:
- Remove the ashtray.
- Squeeze out the 2 plugs located next to the emergency lights button.
- Remove all control knobs.
- Unscrew the 2 self-tapping screws of the center console and carefully pull it out, while prying it at the latches.
- Disconnect all wires.
- Now you can easily reach the damper.
- Replace the damper or its drive components.
Very often, the cause of the malfunction may be a broken damper drive mount. If the situation is not critical, then you can simply glue the part that has fallen off using superglue.
There are cases when the valve drive mount breaks off due to an undeveloped cable that is very difficult to lower. In this case, it must be developed manually, after which this problem should not arise.
Main stage
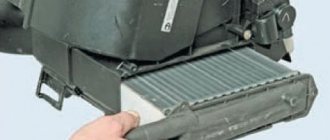
Replacing the heater radiator in Lada Kalina is available in two ways:
- Traditional. Here you will need to disassemble the front panel. The assembly is supposed to be removed through the opened opening.
- Fast, without removing the panel. It does not provide for the need to dismantle the panel. The radiator is removed from the side. A similar procedure is used to install a new product. Here you will need to slightly cut the decorative radiator panel in order to increase the width of the technological opening necessary for the installation process.
It is this method that will be discussed further, how to change the radiator with your own hands directly without removing the panel.
Many experienced owners advise making a designated opening before directly dismantling the LADA Kalina radiator. You may also be puzzled by creating an opening before installing a new product.
- To freely remove the assembly to the side, you will need to unscrew the plastic cover located on the side.
- Now we move aside the previously mentioned plate, which serves to cover the radiator fittings.
- We cut these elements with the extended blade of a hacksaw. Manipulation is required to allow lateral displacement of the old node.
- By raising the brake pedal, we remove the used product.
If there are difficulties in removing the brake pedal assembly rod, we recommend cutting and removing the old radiator in parts
- After removal, cut the previously specified plastic frame
- Now you can easily install a new product into the opening that appears.
- The last action in the assembly stage, performed according to the reverse algorithm, will be filling the liquid.
The stove radiator replacement has been completed.
Possible malfunctions of the ODS, diagnostics
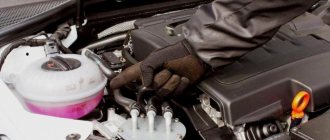
Almost always, a breakdown of the cooling function of a car is caused by an antifreeze leak. You should inspect the car under the hood for possible leaks. The cause of the leak may be:
- or a leaky clamp;
- or a radiator failure.
Then in the first case the element is replaced; this is not difficult and does not take long. As for the radiator, it is better to have it repaired. There are also no particular difficulties here: often you just need to solder the holes.
The reasons for overheating of this car can also be:
- thermostat. Its suitability is checked using both pipes: the temperature of the latter should not be sharply different (this is determined on a warm engine). Otherwise, the thermostat is faulty and antifreeze circulates in a small circle;
- clogging of radiator honeycombs. You can solve the problem by cleaning the outside of this element. Often this is not always easy to do, but there are no other methods other than manually cleaning the honeycombs;
- Fan malfunction. When the heating level of the coolant increases, this part should begin to operate. If this does not happen, check the relay, wiring or t° sensor;
- air in the coolant system. Lada Kalina is not insured, among other things, against the so-called air lock inside the system. In general, previous types of breakdowns are eliminated quite quickly and almost everything is clear with them. In the latter case, it is necessary to understand in more detail. The question - how to remove air from the Kalina cooling system - is really very important for the optimal functioning of the totality of the elements of this car.
Airlock
If the cooling system becomes airy, you need to do the following: with the expansion tank cap open, start the power unit, squeezing the gas pedal from time to time, warm it up until the t° sensor “reaches” the red scale. After “starting” the ventilation device, “add up the gas” a little more and then you can turn off the ignition.
If the cooling system is still leaking air and the above measures have not led to anything, you should act more radically. What needs to be done to remove air from the cooling system?
First, remove the power motor screen (dismantling is done in an upward direction).
Loosen the clamp with a screwdriver and remove one of the tubes from the heating fitting of the throttle assembly.
Unscrew the cap of the expansion tank. Cover the neck of the opened container with a clean piece of cloth. Now blow into the tank: coolant should flow from the tube that was removed. If you fail to break through the above container, close the lid and place the tube in its place.
Next, warm up the engine again and turn off the ignition. Then the tube must be removed again, without removing the lid from the tank, and wait until the antifreeze flows.
Since this liquid is very poisonous and dangerous for people, drain the coolant with extreme caution. Remember about safety: get rubber gloves. Monitor the temperature of the tubes. Keep in mind that you only need to drain the coolant when the engine has cooled down.
Now the tube is put on the fitting, the clamps are tightened. At this stage, the problem of how to remove air from the cooling system of the car has been successfully solved. As you can see, it is possible to eliminate faults in the ODS without the participation of professionals.
SOD Lada Kalina in a certain sense requires improvement.
At the moment, there are the following methods to improve it:
- rework. The car is equipped with a new thermostat. Thus, the temperature of the antifreeze will become stable, and the activity of the interior heating elements will return to normal;
- to minimize coolant malfunction, the machine is equipped with a coolant filter;
- an additional pump in the above-mentioned power unit system. This will force the antifreeze to circulate through the appropriate channels faster, which will definitely reduce engine overheating. And a plus - in cold weather you will not freeze in the car.
Everything that may be important for a motorist on the above topics regarding the Kalina car: what the Lada Kalina heating system is, as well as airing the cooling system, why the cooling system will air, how to remove air from the cooling system, possible malfunctions, necessary alterations more clearly will tell the presented video.
Replacing the thermostat Lada Kalina
Selection and main parameters of wipers for the Lada Kalina car
Preliminary disassembly
- First, you will need to empty the system of working fluid before replacing the heater radiator. This is done by opening the cap on the main radiator and draining the antifreeze into a previously prepared container.
- Now it is necessary to dismantle the air filter along with the suction pipe.
- We remove the battery.
- When access to the stove pipes appears, we first move the container under the junction of the pipes with the heating radiator. After removing the hoses, at least 1 liter of antifreeze will collect in the container.
- Near the pipes we find a nut that secures the plate inside. It will need to be moved, since there is a likely risk of interfering with the process of removing the radiator assembly. To do this, loosen and unscrew the nut from the engine compartment. We do this after the liquid has completely drained from the designated pipes.
- We go into the interior and remove the accelerator drive cable.
- Next you will need to dismantle the pedal itself. It is secured with three bolts.
- Remove the decorative radiator panel (it is located on the right side of the gas pedal).
- The brake pedal of the LADA Kalina can also cause inconvenience during the disassembly operation. There is no need to dismantle it, but by removing the rod it can be raised above its working position.
At this point, the preliminary disassembly procedure is complete.
Which car is right for you
If after reading the article you still cannot compare Kalina and Granta liftback and have not decided which car is best for you, pay attention to the most basic nuances:
- Exterior of the car. It is of no small importance, because every day it is you who drives the car, and not someone else.
- Price. Think carefully about what you are willing to pay for and what doesn't seem necessary. Based on this, choose the appropriate package
- Specifications. Decide what is more important to you - power and speed, or comfort and maneuverability on difficult roads? And perhaps the size of the trunk and the space in the cabin? Do you want to show off your car’s dynamic design to your friends and fly through the city at night, or just comfortably get from point A to point B? Only by thoughtfully and truthfully answering these questions can you choose the car that will completely satisfy you in all respects and will become a real “friend on wheels” for you!
Preparatory process with preliminary disassembly
To ensure the ability to carry out repair work to replace the radiator, you will need to acquire the following tools:
- locksmith set, which includes a wide range of standard keys;
- a hacksaw for metal with the ability to extend the blade;
- a container paired with a hose to drain antifreeze;
- silicone sealant or other means for gluing plastic;
- with a rag.
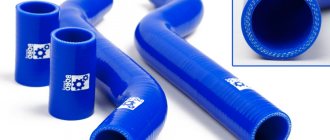
During the procedure for replacing the heater in the LADA Kalina model, we also recommend replacing its power supply and return pipes. On old hoses there is a high probability of cracks appearing, which can manifest themselves unexpectedly and negatively. This approach will eliminate the need to repeat the labor-intensive disassembly procedure in order to replace the pipes. We advise you to pay attention to silicone products.