Thanks to the camshaft of the VAZ 2114, the intake and exhaust strokes of the internal combustion engine are synchronized. The camshaft is driven by rotation of the crankshaft, which, in turn, rotates through the movement of the crankshaft. The most important structural part of the camshaft is the so-called “cams”. The cams are directly responsible for the process of opening/closing valves.
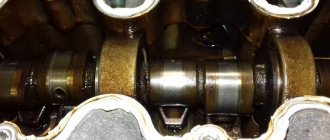
Thanks to the cams, the valve timing of the engine is regulated. On all cars, the camshaft is located in the RBC (cylinder block camber). The VAZ 2114 is equipped with a cast iron camshaft, the design of which can be seen in the screenshot below. The standard eight-valve engines of the Samara-2 family have one camshaft installed.
"VAZ" camshafts have an average resource potential: 90 - 100 tkm. At this point, a major overhaul of the internal combustion engine is usually carried out.
When is it time to change the camshaft
Emergency intervention in the operation of the VAZ 2114 8 cl camshaft is necessary in the event of any obvious malfunctions.
Signs may be different, for example, a knocking sound is heard when the engine is running or problems with the seals. You need to check what’s wrong in such a situation immediately, either on your own or at a service station. If you determine that the problem is in the seals, then 10 minutes will be enough for you to make a replacement. The oil seals are located in easily accessible places and installing a new one does not require dismantling large systems and components. If you don’t know which one you need to replace, you can check this simply by looking at which one is already installed.
New oil seal
A more complex malfunction may occur if you hear a knocking sound in the engine. This malfunction may not progress, that is, the knocking does not increase, while the readings of all sensors are normal. Some drivers take this calmly; they are not bothered by this state of affairs and continue to use the vehicle without paying attention to it. But the solution is simple: if your engine knocks, it means that the axial play of the camshaft has increased. In this case, you can put a washer between the camshaft and the cover and there is a high probability that the knocking will stop. A fairly simple way out of this situation.
Washer installation location
Some cars are equipped with camshaft position sensors, whose task is to signal in case of malfunction or malfunction of the system. But sometimes sensors fail and may need to be replaced. It is inexpensive and the price of such a sensor on the market does not exceed $10, and you can find out which one to buy from the car’s instructions. Installing such a sensor is simple, so there is no point in stopping there.
Special camshafts
As was said at the beginning of the article, not all drivers are satisfied with the “native” camshafts installed on VAZ cars. They do not provide sufficient torque (and, as a result, “throttle response”) at low speeds. This problem can be solved in two ways - by regrinding the cams of the existing camshaft or by installing a new, special one.
It is highly not recommended to grind a camshaft from a VAZ car due to the low efficiency of such an operation and the large number of special shafts that can be easily purchased at car dealerships.
Among such shafts, two directly opposite options can be distinguished - sports and tuning, as well as a large number of intermediate modifications between them.
The sports camshaft delivers an increased volume of mixture into the cylinder during operation due to higher valve lift, and its cams have a rounded, smooth profile. This ensures “wider” operating phases and good throttle response at all speeds.
Crankshaft oil seal
Today we will talk in more detail about the crankshaft oil seal, a spare part that is designed to seal (seal - approx.) connections in this moving part of the engine, as well as prevent engine oil from leaking. Below, we will describe in detail how to replace this element as quickly as possible.
Signs of crankshaft oil seal failure
The very first and main sign of failure of the crankshaft oil seal is considered to be the loss of its tightness.
Oil leak due to leaky crankshaft oil seal
And if in the case of oil seals on other engine elements it doesn’t look so bad, then if there is a malfunction on the crankshaft, oil can leak from the system in liters per 1000 kilometers.
Main causes of wear
- Wear and tear due to natural reasons due to expiration of service life.
- Incorrect installation of the oil seal in advance can cause cracks on its surface.
- Mechanical damage.
- The material is not original, made in violation of production technologies.
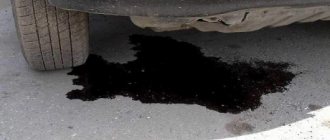
Please note that with an increase in oil consumption, due to leaks of the crankshaft oil seal, traces of oil will certainly be observed under the car; they are clearly visible and will not leave any owner unnoticed.
>
Also think about the presence of oil seal leaks and slight slipping of the clutch. This effect can be observed due to oil getting on the clutch disc and basket located near the gearbox.
Video on the topic:
Hi all! Any extraneous knocks or sounds when the car is operating should alert the driver. Regardless of the nature and origin, there should not be any unnecessary sounds during normal operation of the machine. Today I propose to talk about how the camshaft knocks, whether it can knock, why this happens and what to do in this situation.
The job of the camshaft or simply the camshaft is to control the opening and closing of the internal combustion engine valves. With its help, engine strokes are synchronized. As you know, valve knocking is also possible. We have already talked about them.
You should find out why such symptoms occur, what actions the car owner needs to take, and what consequences you should be prepared for if you do nothing.
Replacing the crankshaft oil seal on a VAZ-2114 8 valves
Any car is a technically complex device, which contains a large number of different components and parts. Accordingly, each of them has its own service life, at the end of which it must be replaced.
The video below shows the process of replacing the crankshaft oil seal on a VAZ-2114:
Crankshaft oil seal
Today we will talk in more detail about the crankshaft oil seal, a spare part that is designed to seal (seal - approx.) connections in this moving part of the engine, as well as prevent engine oil from leaking. Below, we will describe in detail how to replace this element as quickly as possible.
Signs of crankshaft oil seal failure
The very first and main sign of failure of the crankshaft oil seal is considered to be the loss of its tightness.
And if in the case of oil seals on other engine elements it doesn’t look so bad, then if there is a malfunction on the crankshaft, oil can leak from the system in liters per 1000 kilometers.
Main causes of wear
- Wear and tear due to natural reasons due to expiration of service life.
- Incorrect installation of the oil seal in advance can cause cracks on its surface.
- Mechanical damage.
- The material is not original, made in violation of production technologies.
Please note that with an increase in oil consumption, due to leaks of the crankshaft oil seal, traces of oil will certainly be observed under the car; they are clearly visible and will not leave any owner unnoticed.
Also think about the presence of oil seal leaks and slight slipping of the clutch. This effect can be observed due to oil getting on the clutch disc and basket located near the gearbox.
Where is it located?
Crankshaft oil seals are located on both sides of the crankshaft in the places where it connects to other engine components.
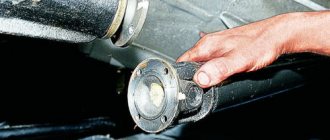
- The first, also known as the front one, is located directly behind the pulley, near the oil pump cuff.
- The second, also the rear one, will be accessible only when the gearbox, flywheel and clutch are removed.
We recommend: How to improve the headlights on a VAZ-2110 with your own hands?
Step-by-step process for removing the front oil seal
- Before starting work, you need to prepare a set of tools and wrenches.
- Make sure that the car is installed on a level surface and that wheel chocks are installed under the wheels.
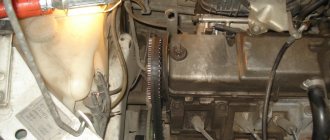
- First of all, open the hood and remove the timing belt protection.
We remove the timing case
- Next, we set marks on the shafts and proceed to dismantling the timing belt.
We combine according to the marks as in the picture
Here we also combine
- Loosen the fastening bolts, pull back the tension roller and remove the belt from its fixation point. When you put it back on, remember that you need to tighten the timing belt with a certain amount of force.
Removing the timing belt
- Next, we go under the car and remove the engine crankcase protection.
- Then, in order to provide access to the crankshaft pulley, we dismantle the front wheel from the corresponding side.
- Now that access is open, you can easily remove the belt, and then the generator pulley.
- Using a special puller, or using two flat-blade screwdrivers, remove the crankshaft pulley, not forgetting to remove the key along with it.
This work should be carried out very carefully. - Next, having prepared the container, drain the engine oil.
- We unscrew the oil pump in which the oil seal is located.
- To help it move out of its place better, you can use a screwdriver.
Place the old oil seal aside.
- At this point, work on dismantling the oil seal can be considered completed.
Step-by-step installation process
- When installing a new spare part, first lubricate it with oil and, using an old ring or pipe of the same diameter, press it into place.
A socket head is suitable for fixing.
- When it is installed and fixed, we assemble it strictly in the reverse order.
Step-by-step process for removing the rear oil seal
If no special experience is required when replacing the front oil seal, then to work with the rear oil seal, an assistant and a more thorough study of the technical component of the car may be required.
- When carrying out such work, it is necessary to do all the above points from 1-12.
- Next, you need to move on to dismantling the gearbox and clutch.
- When the clutch is removed, unscrew the four bolts that secure the flywheel, and then remove it.
- Then, when access to the oil seal is open, you can dismantle the housing in which it is located, or replace it directly in it.
- We remove the sealing ring from the place where it is fixed.
We install the new part and perform the entire assembly in the reverse order.
Upon completion of assembly, start the engine and pay attention to the presence of oil leaks at the places where they are installed.
Note!
When you buy new oil seals, regardless of their purpose, make sure that they are suitable for the type of engine oil poured into the system. Because cuffs for mineral and synthetic oil are made of different materials.
When should you replace the front crankshaft oil seal? It is only changed when the oil seal leaks, and it can leak only in some cases, the first case is when it breaks, the second case is when the rubber becomes unusable over time and begins to crack, and the last third case happens least often, but it still happens that this is the squeezing out of the oil seal from its seat (In this case, it 100%! must be replaced with a new one, since after squeezing out, it is greatly deformed on the pulleys and will no longer be subject to reinstallation), and this can only happen by for one reason, namely, excess pressure in the lubrication system, so if the oil pressure lamp lights up on your instrument cluster, then in no case should you operate this car, this lamp (Indicated in the photo below) can indicate that that there is excess pressure in the lubrication system or, conversely, that there is not enough pressure.
Note! It is not easy to understand that it is the front crankshaft oil seal that is leaking, you will have to feel everything everywhere, especially in the place where this oil seal is located, for greater certainty, take a flashlight, start the car and look in the place where this oil seal is located to see if there are any traces of leaks, As a rule, if the oil seal is worn out and the engine is running, all the engine oil will splash out through it under pressure, and if you look closely, you will 100% see and understand it!
How to replace the front crankshaft oil seal on a VAZ 2113-VAZ 2115?
Note! Before replacing the oil seal, make sure that it is the problem and it is not caused by the crankcase ventilation system, it’s just that this system becomes dirty over time and oil begins to be squeezed out through the seals. You can find out more about how to clean the crankcase ventilation system in the article , entitled: “Cleaning the crankcase gas system on a VAZ 2114”, everything is described in detail in it!
1. To remove the oil seal, you will need to first remove the timing belt from all the pulleys (We have already written how to do this in an article entitled: “Replacing the timing belt on VAZ cars”), and when it is gone, carefully use two small screwdrivers you will have to pry off the crankshaft toothed pulley (see photo 1) and behind this pulley you will immediately find the oil seal, it is not difficult to pull out, just use a screwdriver to pry it out and remove it from its seat (see photo 3), but it is still on the crankshaft metal key (see photo 2, it is indicated by an arrow), before removing the oil seal, either carefully pry it up with a screwdriver and remove it, or keep an eye on it, as it may fall and get lost (If you lose this key, be sure to purchase a new one at the auto store , in no case can you install the pulley without it, because it keeps the pulley from turning), that’s it, we’ve finished talking about removal, now about installation, it’s not difficult, the main thing is to lubricate the oil seal with the engine oil that is poured into the car’s engine At the moment, it is not the entire oil seal that needs to be lubricated, but only its working edge (This is the one with which the oil seal sits on the shaft itself, is lubricated so that it can be filled more easily), after lubrication we proceed to installation, take a small piece of pipe or a sleeve a head of suitable diameter and with their help, the oil seal is pressed inside (see. photo 4), with a thin but not too sharp pencil, after installation, you can tuck the oil seal under, just in those corners where it is not completely seated, press harder and check whether the oil seal is installed well.
Note! When installing a new oil seal, make no mistake, it has two sides and you will not install it as you want, or rather install it, but lubricant will flow through it, in general, the oil seal has a front side, there is also a spring on it, which is indicated by the letter B, and a back side, So the front one should be tucked inwards, and the back one should be directed outwards, for more details on the correct installation, see photo 4 above!
2. After the work done, put all the pulleys in their places, all the keys, put the timing belt in place as well (It is advisable to buy a new one so as not to climb and change the belt 100 times), adjust its tension using a tension roller (How to do everything, we already said in the article on replacing the timing belt, so look at everything there) and start the car, first of all pay attention to the place where you installed the oil seal, if there are no leaks, then it’s good, add engine oil to the engine mark MAX, drive for a while and if the oil does not drain quickly, it means the oil seal is installed correctly and nothing is leaking through it.
We recommend: Antifreeze red, green, blue - what's the difference?
Note! If after replacing the oil seal the leak does not stop, then it either was installed incorrectly, or the problem is not in it, but in the lubrication system, for example (the pressure in it is higher)!
Additional video: Check out the instructive video that explains in detail the process of replacing the oil seal, which is located just below:
Vaz-Russia.ru
On any car, crankshaft seals seal technical holes in the engine, on the one hand, preventing dirt from penetrating inside, and on the other, preventing oil leakage. Leaking oil seals manifests itself in oil leaks on the cylinder block housing from the timing belt side or the rear of the engine. Replacing crankshaft oil seals is considered one of the most difficult types of repair of a VAZ 2114. To install the front one, you have to remove the timing belt, and the rear one - the gearbox. In car services, such repairs are expensive, but without a pit and an assistant, carrying out the procedure is almost impossible.
Signs of a leaking crankshaft oil seal
The main sign by which ordinary VAZ 2114 owners and illiterate servicemen “sentence” oil seals is an oil leak. Indeed, an oily sump and block on the timing side are a sign of a front oil seal leak, and leaks in the flywheel area are a sign of a rear seal leak. But there are two “buts”.
Firstly, oil leaks can be caused by other reasons, and, secondly, leaking oil seals can be a consequence of a more serious malfunction.
Common causes of oil leaks around the seals include:
- Oil pressure sensor or oil filter bracket: Oil may drip from them onto the drive and scatter around.
- Leaking from the oil channel plug under the cylinder head casing.
- Leaking from the camshaft seal.
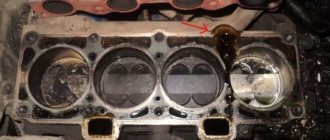
- A special feature of the VAZ 2114 with an 8-valve engine: the hole of the first manifold stud on the front side of the engine passes through the oil channel. When replacing the gasket on the inlet, this pin must be lubricated with sealant, otherwise a leak will occur.
Often problems with seals are symptoms of other problems. If the leak appears again soon after replacement, it may be due to poor quality consumables, or may be the result of the following problems:
- The breather is clogged (important for VAZ 2114 engines with high mileage - more than 200 thousand kilometers), and the oil seal is squeezed out by crankcase gases. When replacing, it would be useful to remove the valve cover and clean the filter mesh.
- The rings are stuck. Another reason for oil squeezing out through the oil seal. In this case, additional signs will be uneven compression and oil leaks from the dipstick.
- If there is play in the camshaft, the oil seal can be squeezed out by the shaft itself when the clutch is pressed. One of the saddest cases: the solution is engine capital.
Another reason for a leak from the oil seal may be the filling of low-viscosity oil. Follow the manufacturer's recommendations for oils for the VAZ 2114.
In any case, along with replacing the seals, it is better to check the condition of the components that may be associated with their leakage.
Replacement process
If you have some auto mechanic skills, you can replace the front oil seal yourself.
The algorithm is as follows:
- remove the protective crankcase and timing covers;
- align the ignition marks so as not to disrupt the operation of the gas distribution mechanism;
- remove the timing belt;
- dismantle the pulley and remove the generator belt;
- remove the crankshaft pulley (you will need a puller, do not forget to purchase it);
- remove the oil pump (drain the oil first);
- assess the condition of the oil seal (it may be “oaky” from time to time or, conversely, softened by oil);
- Press in a new oil seal with a socket of the appropriate size.
Replacing the rear oil seal is an extremely labor-intensive process, which is accompanied by checking the condition of important vehicle components - the crankshaft and clutch parts.
We strongly recommend changing the rear crankshaft oil seal on a VAZ 2114 at a normal car service center.
The process for replacing the rear crankshaft oil seal is as follows:
- separate the engine and gearbox;
- remove the clutch and flywheel;
- pull out the old oil seal and press in a new one.
At the same time, we check the shaft for play, examine the condition of the clutch, and after assembling the engine, you should also make sure that the breather is open.
After replacement, observe the car at idle and make sure there are no leaks. For a while, try not to over-spin the engine. It takes time for the seals to “get used” to the temperature conditions. Due to high oil pressure in the system, they can be squeezed out again.
Camshaft drive diagram
In this case, the procedure differs depending on which oil seal we are talking about - front or rear. We will talk about each of them separately.
Replacing the front
To perform this procedure on your VAZ 2114 car, you will need a minimum set of tools, which includes:
- 10mm socket;
- 10mm wrench;
- Mandrel;
- Screwdriver.
Pry it off with a screwdriver
Replacement work is performed in the following sequence.
- The oil pump is removed from the car. It is not difficult to do this, and it is quite possible to do it yourself.
- Next, the oil seal is removed from the cover of this same oil pump. Here you will need a thin screwdriver, which can be used to pry the device and thereby remove it.
- The new element is pressed in using a mandrel, the outer diameter of which should be about 41 millimeters. In this case, the working edge should be directed inward.
- The oil pump is returned to its place.
We recommend: Permissible tread height for a new summer tire
Replacing the rear
It should be noted that the clutch discs may become oily due to a leak through the gearbox input shaft oil seal, or due to the rear crankshaft oil seal.
The smells of oil from the engine and transmission are different, so many experienced specialists can use the smell to determine which element is causing problems.
Changing the rear oil seal is actually somewhat more difficult than changing the front oil seal. But this does not take away the fact that it is still more than possible to do the work with your own hands.
Disassembled
Following the instructions step by step, replacing the crankshaft oil seal on a VAZ 2114 will become a fairly simple task for you, which will add to your experience in repairing a car yourself.
- Disconnect the negative terminal from the battery of your VAZ 2114.
- Make notes on the location of the flywheel relative to the crankshaft, and then remove it.
- Next, the rear shield of the clutch housing is removed from the guide bushings.
- The next step is to remove the eight bolts that are responsible for securing the oil seal.
- This will allow you to remove the holder.
- The oil seal is pressed out of its holder.
- The new element is installed in place of the old one until it stops. Here you will need a mandrel again. Its outer diameter is 99 millimeters. Press in the element so that its working edge points inward.
- To make pressing easier, a chamfer is made on the seating edge of the element using a needle file. An alternative tool for bevelling is a small sanding wheel.
- Now we change the gasket, which is probably torn on the holder. Even if the old gasket looks fine, we strongly recommend replacing it with a new one.
- The gasket is glued with a special thick lubricant. This will ensure the strength of its retention, as well as additional tightness of the connection.
- The working edge of the pressed-in oil seal is treated with regular engine oil, as is the case with the front one.
- The crankshaft flange is subjected to similar processing.
- The fasteners of the engine oil sump to the cylinder block will need to be loosened slightly. To do this, it is enough to make 2-3 turns on each of the 14 bolts that hold the crankcase.
- When installing the holder, the working edge of the new oil seal is carefully tucked onto the crankshaft flange. Arm yourself with a wooden stick for this purpose, but do not use metal objects.
- Retighten the holder bolts.
- Screw back the engine crankcase mounting bolts.
- Place the clutch housing rear shield back onto the guide bushings.
- According to the previously marked places, mount the flywheel, gearbox and clutch in their place. To ensure that the flywheel mounting bolts have high quality adhesion and reliability, first apply sealant to their threaded part.
Obviously, it is quite possible to replace the crankshaft oil seals on a VAZ 2114 car with your own hands. The procedure requires accuracy and consistency of actions. Plus, do not forget to use new high-quality auto parts, so that after a short period of time you do not have to carry out the entire procedure again.
Special camshafts
As was said at the beginning of the article, not all drivers are satisfied with the “native” camshafts installed on VAZ cars. They do not provide sufficient torque (and, as a result, “throttle response”) at low speeds. This problem can be solved in two ways - by regrinding the cams of the existing camshaft or by installing a new, special one.
Tuning and sports camshafts
It is highly not recommended to grind a camshaft from a VAZ car due to the low efficiency of such an operation and the large number of special shafts that can be easily purchased at car dealerships.
Among such shafts, two directly opposite options can be distinguished - sports and tuning, as well as a large number of intermediate modifications between them.
The sports camshaft delivers an increased volume of mixture into the cylinder during operation due to higher valve lift, and its cams have a rounded, smooth profile. This ensures “wider” operating phases and good throttle response at all speeds.
Nuzhdin camshaft for VAZ 2114
In turn, tuning camshafts are distinguished by an increased base diameter and a “sharper” cam profile. They provide the vehicle with quiet, uninterrupted engine operation at all, even critically low, speeds. In addition, the use of such a shaft makes it possible to “push back” the limit of the onset of detonation at low rotational speeds.
It is also worth noting that the use of tuning camshafts can reduce fuel consumption, exhaust toxicity, and also slightly increase the overall service life of the engine before major repairs.
To summarize, it is worth noting that replacing a camshaft is not the most difficult operation and can be performed by any experienced motorist. But when to carry it out - in case of severe wear of the “native” shaft or when replacing it with a special camshaft - everyone decides for themselves.
Published March 24, 2019
Instructions with photos and video materials for anyone who is faced with the need to replace the camshaft on VAZ 2114, 13, 15 cars
Replacing the front oil seal
It is recommended to replace the front oil seal yourself in the following sequence:
- use a screwdriver to remove the oil pump;
- remove the worn oil seal from the cover of the removed pump using a screwdriver;
- By resorting to the frame, a new part is installed in place of the worn one. The outer size of the new element should not exceed 41 mm; during installation, the working edge should be directed inside the pump;
- After making sure that the oil seal is well pressed, the oil pump is installed in its original place.
At this stage, the process of replacing the front valve that has become unusable is completed.
Determination of DF failure
If it breaks down, slight difficulties arise with idle stability; when starting to move, a trimming effect is likely, as well as increased fuel consumption. These symptoms are associated with failure to receive data from the on-board driver about the ignition angle at a certain moment in engine operation. If there is no signal from the sensor, the control unit enters emergency mode, in other words, it starts working on a pre-programmed program without a sensor and generates an emergency error “0340” or “0343”.
Camshafts OKB Engine RS45/500 VAZ 2114
Let me start by saying that I ordered shafts for myself. I studied the information for a very long time, probably from the very assembly of the gear; even then there were ideas about shafts. In general, I ordered the following: — VAZ 2112-1006014-RS45 camshaft (exhaust) — VAZ 2112-1006015-RS500 camshaft (intake) — VAZ 2112 RS hydraulic pusher (INA, Germany, 16 pcs.) — Modified VAZ 2112 valve spring plates (16 pcs.) — Adjustable pulley VAZ 2112 (without curtain/with curtain) (2 pcs.)
Camshafts RS45/500, RS hydraulic pusher VAZ 2112 (INA, Germany), Modified valve spring plates VAZ 2112, Adjustable pulleys VAZ 2112
Split gear VAZ 2112 (production)
Modified VAZ 2112 plates
Split gear VAZ 2112 (intake)
What is this all for? I want to. Like. This is a VAZ. My hands are itching, I want to dig deeper), and I wonder how it will go), although no) I still needed to change the oil scrapers, it seemed to me that a jamb had crept into them - blue smoke at idle.
In general, the spare parts were ordered back in February, but I received them only on March 6th. During this time, everything necessary for replacing the shafts and oil in the engine was purchased - sealant white, red) - r/shaft seals - valve stem seals - intake gasket - a pair of r/shaft keys (in case I lose them) - mobil oil - oil filter
The disassembly process was not long: I removed the protection, the receiver (by the way, I pulled it out towards the battery this time), turned out the spark plugs, removed the cylinder head cover, the cover of the r/shaft bed, took out the drain shaft and put it aside)
But the assembly process took a long time: I turned the crankshaft to TDC of the 1st cylinder and began to change the oil scraper and plates in order. first 1-4, then 2-3. In total, 2 desiccants were broken. I don’t know what they sell in our stores. For 8kL there was a desiccant so a desiccant. And at 16 they really sniffle from any pressure. In general, replacing the plates and valve stem seals took the most time. As a result, I discovered the cause of the haze at idle, in the 3rd cylinder:
On the left is the old valve stem seal, on the right is the new one.
On the left is the old valve stem seal, on the right is the new one.
Why did he do it? I don't know, the valve bushings aren't broken, it seems. Well, at least you can’t feel the beating with your fingers.
Then, it's time to try turning the shafts in the head. The exhaust still turned somehow, but the intake was not working at all. It was decided to chop the meat. As a result, it was cut off at the outlet in 3 places and at the inlet in 14 places. Only after that they turned around without hitting anything.
The photo shows how much was cut down for a rise of 10.0
Now, regarding the hydraulics, it’s like I took it back and forth in vain: I initially wanted to change them, since I didn’t get them new. After assembly, some of them were knocking. So I was faced with a choice - I don’t remember the usual INAs in the store, I took the INAs and saved myself from other difficulties.
Step-by-step instruction
If your engine is knocking and you decide to replace the camshaft, then prepare everything you need in advance. It is difficult to carry out this work without relevant experience, so it is good if you are assisted by a more experienced partner.
Required Tools
- a set of keys;
- Screwdriver Set;
- torque wrench;
Torque wrench
- sealant.
Stages of work
- The first step is to remove the camshaft pulley VAZ 2114 8 cl.
- We take out the pulley key located in the camshaft groove.
- Unscrew the nut that secures the rear cover of the timing belt.
- Unscrew the nuts that secure the bracket to the cable.
- Having loosened the screws of the hose clamps responsible for ventilation of the crankcase gases, we remove them.
- Having loosened the clamp of the hose through which the crankcase gases are ventilated, remove it.
- After unscrewing the nuts, remove the valve cover.
- We remove the gasket.
- After unscrewing the nuts and bolts, remove the plug.
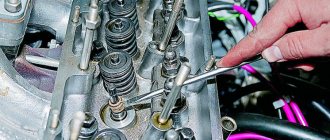
- In several circles (to reduce the spring pressure), unscrew the 10 nuts securing the camshaft bearing housing.
- We remove the camshaft housings VAZ 2114 8 cl.
- After the rear timing belt drive cover is removed from the cylinder head, remove the camshaft.
- Remove the camshaft oil seal.
- Before installing a new shaft, it is necessary to clean the contacting surfaces of the cylinder head and bearings if any sealant or grease remains on them.
- Lubricate the bearing journals and cams with fresh grease.
- We place the shaft in the cylinder head supports so that the cams of the 1st cylinder are oriented upward.
- We apply sealant to the cylinder head planes that come into contact with the bearings.
- We install the bearing housings and tighten the nuts in 2 circles.
- First, we do not completely tighten them as shown in the photo until the bearing housing and the cylinder head are in contact.
- Going in the same sequence around the second circle, we tighten the nuts to a torque of 2.2 kgf/m.
- Remove the leaked sealant.
- We insert the oil seal.
- We install the camshaft toothed pulley and belt drive.
- We turn the crankshaft clockwise to place the same alignment marks on the camshaft pulley and the rear cover of the timing belt drive.
- Rotate the crankshaft about fifty degrees (2-3 teeth on the camshaft pulley).
- Using a feeler gauge, check the gaps at the 1st and 3rd camshaft cams.
- The distance between the cams and washers should be 0.20 millimeters for the intake valves and 0.35 millimeters for the exhaust valves. The error should not exceed 0.05 mm.
- After adjusting the remaining valves, the work can be considered completed.
What to do
Drivers had to deal with the fact that occasionally after the start an incomprehensible knocking sound began to appear, but when accelerating and warming up the engine it disappeared. As we have already figured out, most likely the camshaft on the engine has failed.
Now another question. What to do in such a situation? If it is the camshaft that starts knocking, you should be prepared to spend a considerable amount of money. But this is not a 100% probability, since sometimes hydraulic compensators begin to knock, or knocking noises are made by worn gears and bearings. Not all situations solve the problem by replacing the entire camshaft. If you suspect a knocking noise from this unit, it is better to immediately go for diagnostics. Due diligence can help you find out where the source of the problem is and what needs to be done about it.
It’s definitely not worth delaying diagnostics. If the compensators fail, and the problem was in them, then the chain reaction will lead to the breakdown of the shaft itself. And these are completely different expenses. So it would definitely be a good idea to check the hydraulic compensators.
You can drive a car without hydraulic compensators with a knock from the camshaft for more than 50 thousand km, but then you will probably have to completely change the engine or carry out major repairs.
As you can see, delaying the check is definitely not in your interests.
List of tools
Before you start work, you need to prepare the necessary tools:
- 10 mm car head;
- 10 mm wrench;
- a regular screwdriver and a special mandrel.
To replace the camshaft oil seal on VAZ-2110 and 2112 16 valves, a minimum set of tools is required. These include:
- key to “10”;
- key to "17";
- Slotted screwdriver;
- Mandrel for pressing;
- A small amount of motor oil.
Procedure and diagram
We advise you to tighten the torque of the screws if you have ever encountered such a process. The following will describe the general procedure for the Lada 2108, but it should be noted that each engine has its own operating nuances that need to be taken into account.
Necessary tools
You will need a torque wrench for this procedure. This tool is needed specifically for tightening screws and determining torque. It can be purchased at any specialized store, and its price fluctuates around 1,300 rubles (approximately 400 hryvnia).
Sometimes so-called “masters” say that it is not necessary to use a torque wrench for this procedure. They say that an ordinary wrench will work just fine, and in general, you can tighten the screws “by eye.” Naturally, it will be possible to tighten the screws, but it will be incorrect, and later this may cause other problems.
Stages
If you feel that the quality of the head screw is poor, then do not even try to tighten it. Replace it immediately to protect yourself from possible problems. In addition, before the actual procedure, you should check the quality of the thread. It is also advisable to lubricate it. Do not forget that reusing spring parts is unacceptable, since in this case you will not achieve normal tension.
The stages of tensioning the pins on the Lada 2108 are similar to those performed on classic car models. The diagram is provided below. The process itself should begin with the central bolts. It takes place in four steps.
- Using the above tool, all cylinder head bolts must first be tightened to a torque of 2.0 kgf*m. First, the two middle elements are tensioned, then the two lower and two upper ones, which are located on the sides of the middle bolts. Then you need to tighten the two leftmost and two rightmost screws, starting with the bottom ones. The order should be exactly like this. The numbers on the diagram indicate the order of the components.
- Then, in the same order, using the same tool, you need to tighten the components with a torque of 7.5 - 8.5 kgf*m.
- After this, all pins must be tightened 90 degrees.
- Then they should be turned again, again by 90 degrees.
VAZ 2115 | CHECK AFTER REMOVAL
CHECK AFTER REMOVAL
Camshaft runout
1. Install the camshaft on two prisms with journals No. 2 and No. 5.
Attention: Do not install the camshaft on the prisms with journal No. 1 (from the side of the camshaft sprocket), because its diameter is different from the other four.
2. Attach the indicator sensing head (A) vertically to the No. 3 neck.
3. Rotate the camshaft by hand in one direction and measure the runout with an indicator (maximum indicator reading).
Standard and Limit: See “Technical Data and Specifications” section below.
4. If the runout exceeds the limit value, replace the camshaft.
Camshaft lobe height
1. Measure the height of the camshaft cam with a micrometer (A).
Cam Standard and Wear Limit: See Technical Data and Specifications below.
2. If wear exceeds the limit value, replace the camshaft.
Oil gap in camshaft journals
Camshaft journal outer diameter
Measure the outer diameter of the camshaft journal with a micrometer (A).
Standard: See “Technical Data and Specifications” section below.
Camshaft bracket inner diameter
• Tighten the camshaft bracket bolts to the required torque. See above.
• Measure the inside diameter of the camshaft bracket with a bore gauge (A).
B: Inner diameter measurement location
Standard: See “Technical Data and Specifications” section below.
Calculation of the oil gap in the camshaft journals
(Oil clearance in journals) = (inner diameter of camshaft bracket) - (outer diameter of camshaft journal)
Standard: See “Technical Data and Specifications” section below.
• If the clearance exceeds the limit, replace either the camshaft or cylinder head, or both.
Note: The camshaft bracket is integral with the cylinder head. Replace the cylinder head assembly.
Camshaft end play
1. Install the camshaft into the cylinder head. See above.
2. Install the indicator (A) axially with the sensing head towards the front end of the camshaft. Measure the end play by moving the camshaft forward/backward (axial direction).
Standard and Limit: See “Technical Data and Specifications” section below.
• If the end play is abnormal, measure the dimensions of the following components:
Dimension “A” of the groove for journal No. 1 in the cylinder head
Standard: 4,000-4,030 mm
Dimension "B" of the camshaft flange
Standard: 3.877-3.925 mm
Compare the measurements with the standard values indicated above and replace the camshaft and/or cylinder head.
Camshaft sprocket runout
1. Install the camshaft on two prisms with journals No. 2 and No. 5.
Attention: Do not install the camshaft on the prisms with journal No. 1 (from the side of the camshaft sprocket), because its diameter is different from the other four.
2. Measure the camshaft sprocket runout with indicator (A) (maximum indicator reading).
Limit: See Technical Data and Specifications section below.
• If the runout exceeds the limit value, replace the camshaft sprocket.
Valve pusher
• Check the valve tappet surface for wear or chips.
• If any defects are found, replace the valve tappet. See below.
Valve tappet clearance
Valve tappet outer diameter
Measure the outer diameter with a micrometer (A).
Standard: See “Technical Data and Specifications” section below.
Valve tappet hole diameter
Measure the diameter of the valve tappet hole in the cylinder head using a bore gauge (A).
Standard: See “Technical Data and Specifications” section below.
Calculation of valve tappet clearance (Valve tappet clearance) = (valve tappet hole diameter) - (valve tappet outer diameter)
Standard: See “Technical Data and Specifications” section below.
• If the value obtained is not normal for the inner and outer diameters, replace either the valve lifter or cylinder head, or both.
automn.ru
Algorithm for setting timing marks
To perform the operation you will need the following tools:
- Jack;
- The key is 13 (in some cases – 10);
- Flat thin screwdriver.
Labeling is carried out according to the following algorithm:
- Raise the car from the front right side with a jack.
- Open the hood.
- Unscrew and remove the timing case.
- Remove the alternator belt by loosening its tensioner.
- Start turning the right front wheel of the car until the camshaft mark on the block and pulley coincide. You need to turn it with first gear engaged.
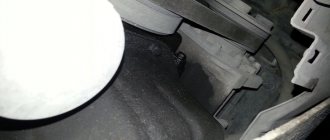
- Remove the plug on the manual transmission housing.
- See if the markings on the flywheel and housing match. If yes, then you don't need to do anything else.
- If the marks do not match, turn the right wheel until the mark on the flywheel and camshaft coincides with the marks on the block.
- Sometimes it is not possible to get them to match the first time. Often this requires cranking the crankshaft several times.
- If after 4-6 marks do not coincide, it is necessary to remove the timing belt, freeing its rollers. You need to remove the belt when the mark on the camshaft coincides.
- Rotate the crankshaft until the marks on the flywheel match.
- Reinstall the timing belt.
After placing, you should make sure that all marks are set correctly. Then you can install the casing in place. Operating a vehicle with incorrectly marked signs is dangerous. If installed incorrectly, the belt may break. Of course, on the 8-valve engine of this VAZ model, the valve will not bend as a result of this. But this can lead to burnout of pistons or valves. There may be problems with ignition and other malfunctions.
Gas distribution diagrams
The timing belt of a passenger car consists of the following elements:
- crankshaft gears (sprockets);
- camshaft gears (sprockets);
- drive belt or chain;
- camshaft;
- block head valves;
- tensioners and dampers, tension rollers (these parts may vary depending on the timing device).
The drive belt or chain is put on the crankshaft and camshaft gears, and transmits movement from the crankshaft (CV) to the r/shaft. The cams PB open and close the valves, thereby ensuring that the cylinders are filled with the working mixture. At the moment of compression, the mixture ignites and a working cycle occurs in the internal combustion engine cylinders.
Many modern cylinder heads have 4 valves per cylinder. To drive a large number of valves, you need quite a lot of cams, so often two valves are installed in the gas distribution mechanism.
- 1 Gas distribution diagrams
- 2 Timing faults
- 3 Replacing the VAZ camshaft
- 4 Replacing p/v on VAZ 2101-07 cars
- 5 Replacing the VAZ 2114 r/shaft (8 valves)
- 6 Replacement of VAZ 2110 shaft (16 valves)
- 7 Replacing Opel camshafts
- 8 Chevrolet camshaft replacement
- 9 Renault camshaft replacement
- 10 Replacement price 10.1 Related articles: