What is the function of the gasket?
As soon as the cuff loses its properties, the motor starts to leak. The gasket ensures complete tightness of the lid and neck for filling the lubricant.
The element is located under the valve mechanism cover and is attached with it using bolts and nuts. The cuff is made of a special type of rubber that does not lose its characteristics for a long time when heated. Then the quality of the material gradually deteriorates, the part loses its elasticity and is unable to hold oil under pressure. You have to shoot and think what to do next.
Why do you need a valve cover gasket?
An insignificant part of the car - a gasket under the valve cover - is not capable of radically changing the technical characteristics of the vehicle or worsening the parameters of the normal functioning of its engine. At the same time, any car enthusiast carefully monitors its condition, replacing the gasket at the first sign of a leak.
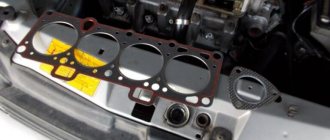
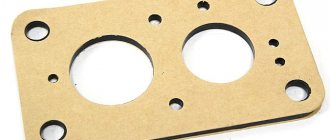
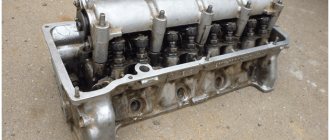
The valve cover has a neck through which engine lubrication is added to the system. Its task is to cover the gas distribution unit of the machine, to which it is bolted. The gasket, made of rubber, is directly mounted between the fastening elements and the timing head.
The gasket does not change its technical parameters under the influence of high or low temperatures; it does not come into contact with the car’s engine oil. But after a certain period of operation of the car (it is individual for each vehicle model), its owner may notice that oil is leaking from under the valve covers.
This situation occurs because the gasket becomes hard and much less elastic. This leads to the appearance of microcracks on it, which begin to leak oil. If the gasket is not replaced in time, the outside of the car engine will begin to become covered with dirt, which will be almost impossible to clean. Naturally, a dirty crust on its surface will not add stability to the “heart” of the vehicle.
When is replacement needed?
New sealing rubber is inexpensive. Therefore, during active use of the machine, it is worth changing it as often as possible. Here's when to do it:
- during engine overhaul;
- if traces of oil are found in the engine compartment or under the car;
- during repair/maintenance of the timing system;
- when changing the oil in the system - upon reaching 15–20 thousand mileage.
Basic mistakes
Before changing the valve cover gasket, it is necessary to clean all contact surfaces, otherwise the procedure will be useless. After a month, the consumable will crack and will have to be replaced again.
Despite the fact that the repair seems quite simple, drivers without experience face the following difficulties:
- Warping of the lid. Occurs when the fasteners are unevenly tightened or the part is mechanically deformed.
- Uneven distribution of sealant. This happens if you take a low-quality composition. Some products look half-dried when opened.
Most car models do not require sealant, so the product is not overused. In this case, a torque wrench is used for tight fixation. It presses all the parts tightly against each other, so auxiliary substances are no longer needed.
Since there is minimal risk of damage to car components during this repair, it is worth trying to perform the procedure yourself. If after this the problem is not solved, then contact a service station, they will carry out a comprehensive diagnosis and indicate where exactly the problem arose.
Which one to choose
There are a lot of products on sale from different manufacturers. There are original components and replacements. Original cuffs are a priori better. They provide tightness longer, but cost several times more.
On the other hand, the quality of some analogues can also be excellent. A lot depends on the brand. For example, the Viktor Reinz brand is a worthy analogue. Reinz gaskets are equipped with special thickenings (or protrusions) so that when tightening, not the entire surface of the seal is pressed in, but only the profile. This ensures the reliability of the product; the rubber can withstand temperature changes longer.
Analogue products from Viktor Reinz are very popular. They are installed on Lacetti, Duster, Almera. They cost less than the originals but last longer.
Types of parts
Before changing the valve cover gasket, it is worth considering that there are several options for parts, but they all perform the same functions and differ only slightly. The shape of the part follows the plane of the surface. It fills the main irregularities and compensates for deviations that appear between different parts.
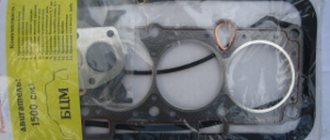
The cylinder head cover gasket has different design types:
- non-breaking - available in the form of a ring;
- complete - in addition to the main element there are seals for existing holes;
- composite - made of a gasket and several inserts for sealing.
Also, before replacing the valve fluid gasket, it is worth studying the materials:
- Rubber. This type is more popular than the others and is created from several types of material. It becomes softer when warming and hardens when cold.
- Paronitis. The parts are made from rubber, but minerals are added, which are molded and vulcanized. Non-asbestos paronite is supplemented with steel wire to give reliability to the product. Such parts partially act as sealants and do not change shape from external factors.
- Cardboard. They are made from paper that is protected from water, oil and gasoline. Such gaskets are rarely used because they are considered unreliable and are found on domestic cars.
- Rubber with cork. Here a light filler or cork is added in granular form. This increases the degree of sealing and compensates for vibration when the machine moves.
Before changing the valve cover gasket, it is recommended to determine the material of the new part. Craftsmen at service stations install rubber products, sometimes products interspersed with paronite or cork.
How to Replace a Valve Cover Gasket
Unfortunately, car enthusiasts often make irreparable mistakes when replacing them themselves, which reduces the service life of the part. They watch the video, try to repeat the master’s actions, but nothing works.
The first thing you need to prepare is a high-quality new cuff with the required catalog number, suitable for the size of the engine. It is also important to prepare a special type of sealant, preferably Permatex.
The replacement procedure is as follows:
- The battery must be de-energized, and the wire ends from the spark plugs must be removed.
- Disconnect all attachments from the valve cover.
- Unscrew the cover bolts and remove it.
- Remove the worn seal from the sinuses.
- Thoroughly degrease the working surface, including the mating surface of the head.
- Apply sealant and install a new gasket in the groove.
- Tighten the cover using a torque of 10 Nm.
Without experience and knowledge, it is better not to touch the mechanism. The slightest mistake can lead to depressurization of the gap and oil leakage from the engine.
How and when to change the gasket
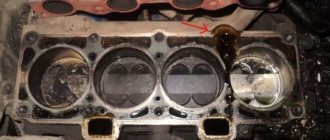
Any gasket will wear out over time. This applies to absolutely all types of seals used in the design of this power unit. The valve cover gasket is no exception. Due to poor-quality material or non-compliance with installation technology, it may lose its properties and begin to leak used oil out. It is not difficult to determine this fact; it is enough to inspect the junction of the valve cover and the cylinder head.
If there is a leak, then in this place there will be oil and a lot of dirt that has adhered to it during movement. The penetration of air into the block will lead to a decrease in the power of the internal combustion engine. When do you need to change the valve cover gasket? This question is ambiguous, because nothing usually happens to the material during operation, unless the technology for its installation was violated the previous time.
Typically, this part is replaced in the following cases:
- During any type of internal combustion engine repair involving lifting the valve cover.
- When an oil leak is detected, when the gasket in one of the places begins to leak.
- During block removal and restoration work.
How often should the valve cover gasket be replaced?
The intensity of replacement of the gasket under the valve cover depends on the type and nature of breakdowns that occur in the internal combustion engine. According to the regulations, this procedure is not provided for unless the engine is being repaired. If the engine's piston pair, rings, hydraulic compensators are badly worn, or valves need to be repaired, but decided to wait, then the likelihood of an early replacement is quite high. Also, the need for repeated and subsequent replacements will certainly arise if there are technical problems with the motor. For example, the valve cover gasket will have to be replaced during each valve adjustment procedure, since it will not be possible to remove it carefully.
When and why to change the valve cover gasket
The camshaft cover gasket is a flat sealing product that is used to seal the cover. Even though the metal surfaces of the block and the lid have perfectly smooth contact collars, there will still be a gap between them. The gasket, due to its elastic structure and ability to compress, ensures proper tightness of the connection. Camshaft cover gaskets are made from different materials:
- rubber;
- special impregnated cardboard;
- paronitis;
- various polymer materials.
When choosing a gasket, it is important to consider the temperature to which the block heats up. It can cause a leak, since the material, when exposed to an oil environment and high temperature, can soften, causing it to be squeezed out or pressed through.
Important. It is necessary to tighten the valve cover screws evenly and with the same force so that the gasket is compressed with uniform force at all points of contact with metal parts.
Features of replacing valve cover gaskets
If you find that the cover gasket has become unusable? Is waste oil seeping out from under it? This is a clear sign of damage to this sealing element. It's time to replace it, but how to do it right. It is worth mentioning several features of this process:
- In order for the new gasket to fit snugly into place, you must carefully remove all residue from the previous seal.
- When cleaning the contact area of the parts, use a non-sharp and non-metallic object to avoid scratching the surfaces of the parts.
- When tightening the screws, you must act correctly, that is, perform this procedure evenly so that the rubber gasket is not squeezed out.
Quality materials should be used. This applies to both the gasket itself and the sealant, which is additionally used to ensure a tight fit of the parts.
If not changed in a timely manner
On some foreign cars (such as Lacetti), gasket failure is a chronic disease. The original standard part can withstand no more than 70–80 thousand kilometers. During active use of the car, it breaks down even before the mileage of 40 thousand km.
Changing the gasket on time is extremely important. If you don't do this, there will be many unpleasant surprises:
- the entire valve group of the engine will be subjected to a powerful attack of dirt and dust, which will penetrate inside without obstacles;
- severe oil leakage will begin, and a lack of lubrication will have an extremely negative effect on the service life of the piston group and valves;
- oil will get on sensors, spark plug wells, wires, and other mechanisms in the engine compartment - the risk of fire will increase;
- cooling of the power plant will become worse.
Change the gasket as soon as it stops doing its job. If you choose a low-quality product or make a mistake during replacement, oil leaks will appear again within a few days after replacement.
Changing the gasket in a garage
Having a desire to maintain your car, as well as a set of simple tools, you can very quickly change the gaskets yourself. Among the consumables, you need to get a new gasket, a good high-temperature engine sealant and a degreaser (solvent, gasoline, anti-silicone, etc.).
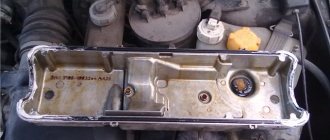
The gasket can be removed very easily. To do this, you need to remove the air cleaner housing and unscrew the mounting bolts around the perimeter. If the cover is burdened with additional devices (attachments), they should also be removed. The old gasket is immediately thrown away and is not left for a rainy day. The contact point between the cylinder head and the cover is cleaned of old sealant and degreased. The gasket, lubricated on both sides with sealant, is placed in place and covered with a lid. Assembly occurs in reverse order.
Seal replacement interval
In the enclosed space under the valve covers there is no oil pressure because there is air there. But during engine operation, the rapidly rotating camshaft, whose bearings are abundantly lubricated, scatters many small drops in all directions. Once on the inner walls, the oil flows back into the crankcase. If the slightest gap occurs between the sealing material and the adjacent surfaces, the lubricant will inevitably flow out.
When to replace the valve cover gasket:
- if traces or drips of engine oil are noticed on the side walls of the cylinder head;
- during the assembly of the power unit after a major overhaul;
- if gasket defects are detected during various repairs that involve dismantling the cover.
Sometimes inexperienced car enthusiasts accidentally damage the seal with a screwdriver or other tool. In such a situation, it is better to change the element, since attempts to seal the gap with sealant usually do not yield results - after some time, the lubricant penetrates outward at the point of damage.
Natural wear and tear of any cushioning material is loss of elasticity . The rubber or cork seal becomes dull and cracks, causing gaps to appear between the flanges of the cover and the cylinder head. The malfunction is not critical, but quite unpleasant - the engine walls are covered with a coating of oil mixed with dirt.
If you do not change a worn gasket, then it later becomes difficult to identify defects in other parts associated with leaks. It is difficult to notice leaks from under the timing cover or pump when the entire engine is already splashed with oil. Therefore, it is not recommended to operate a car for a long time with a defective valve cover seal.
Replacement procedure
To replace the valve cover gasket, you will need to dismantle the air cleaner and unscrew all the bolts around the perimeter. It is advisable to do this in a checkerboard pattern so as not to create additional stress on the remaining fasteners.
After removing the old gasket, sometimes you need to clean the surface from any remaining stuck material. This must be done carefully so as not to damage the body part.
You need to know that even a good-looking gasket should not be reused, as it loses its elasticity and will not provide high-quality isolation of the working area from the external environment.
Before installing a new gasket, the contacting surfaces are cleaned and degreased. A sufficient amount of sealant is applied to both clean, dry sides. The assembly of the structure is carried out in the reverse order of disassembly. Tightening the bolts is also done first in a checkerboard pattern, and then brought to maximum force.
Causes of valve cover seal wear
Almost every seal from a reputable manufacturer is made of high-quality rubber. However, sooner or later every driver has to replace the valve cover gasket, no matter how expensive the gasket is installed in the engine. The thing is that although this material is designed to withstand significant temperature effects, it still dries out and cracks over time. And if the car is operated in harsh climates, the material may wear out ahead of schedule. Other reasons include:
- Natural wear and tear - rubber degrades over time when exposed to high temperatures.
- Stretching - also in unfavorable conditions, the rubber stretches, therefore, the seal of the lid is significantly deteriorated, oil begins to leak
- Gasket breakdown - most often observed when the power unit overheats
- Impact of pressure - high pressure in the system squeezes the seal out of its seat
Article on the topic: Filter protection – should it be neglected?
All these factors, one way or another, affect the condition of the rubber product. Therefore, it is important to monitor the condition of the seals in the car system and promptly respond to their wear and damage.
Why is such a replacement needed?
If we take the design of the car as a whole, this gasket is not such a significant part as, say, the wheels, engine or steering wheel. It does not have any effect on the technical parameters of the engine, motor or the car itself as a whole. However, due to lack of care, various damage, cracks and other problems may appear that affect the cleanliness of the motor. That is why gasket replacement must be carried out in a timely manner and not delayed.
The neck is considered to be one of the important elements of the valve cover, which acts as an intermediary when motor lubricant is added to the system. The gasket itself is made of rubber and additional impurities for greater water retention, it is located between the GRI head and some fasteners. Valve gaskets are made in a unique way - neither the lowest nor the highest temperatures can cause changes in the technical parameters of the gaskets. In the robot, the gaskets do not come into contact with the oil. The process when a gasket begins to leak is a minor problem and at that very moment a colossal one. One of the reasons for this phenomenon can be called the service life of the gasket, since over time, it loses its elasticity and begins to harden. As a result, microcracks appear on its surface, through which small portions of oil begin to pass. As a result, a crust of dirt forms around the engine, which only worsens its performance.
Tips for quality work
Not in all cases, motorists are able to carry out the procedure without problems. Sometimes an oil leak forms almost immediately after several kilometers of driving. There may be several most popular reasons for this:
- use of low-quality gaskets;
- insufficient amount of sealant used, careless application of it to the surface;
- misalignment of the cover caused by improper tightening of the fasteners.
You need to know that for cars there are diagrams for tightening the bolts on the covers, which can be found in the car’s operating instructions.
The replacement must be carried out when the engine has cooled down so that thermal expansion does not negatively affect the performance result.
Typical mistakes when replacing gaskets
The seemingly simple procedure for replacing the elastic gasket sometimes causes difficulties for some car owners. After installing a new gasket, the oil leak not only does not stop, but even increases. Errors can be different, but the most common ones are:
- Use of poor quality gasket;
- uneven application or use of rough (old) sealant;
- uneven tightening of the cover bolts and, accordingly, its distortion.
Before you begin repair work, you should definitely find a diagram for tightening the cover fasteners in your car’s operating manual (the so-called “manual”) and follow it exactly. In this case, the tightening force should be monitored using a torque wrench.