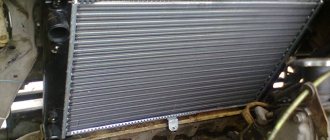
Lada 2114 Snow Queen Logbook 20 Replacing front brake hoses and brake fluid
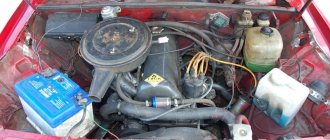
Good day everyone, I decided to start servicing the brakes. First of all, I have long wanted to replace the brake fluid, since the car is already 5 years old, and something tells me that it has never been changed, although the replacement interval is 45,000 km or three years of operation . All this is due to the high hygroscopicity (absorption of water) of brake fluid. Water is bad for brakes because it has a lower boiling point than brake fluid. When you press the brake pedal, water boils and air bubbles are released, which reduce the force of the brakes. A sign that the brake fluid needs to be changed is a change in its color.
Dark brake fluid
In my case it turned dark brown.
But before replacing the brake fluid, I checked the entire brake system and decided to replace the front brake hoses, since the one on the left was all cracked. And they definitely need to be replaced every 5 years or 125,000 km.
Old hoses
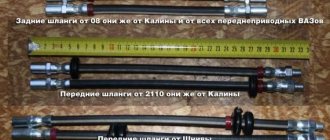
BRT hoses were purchased to replace the old ones. Brake fluid ROSDOT Dot 4 plus, two copper washers, a special brake wrench and a 15 wrench.
Brake and hoses
Wrench and washers
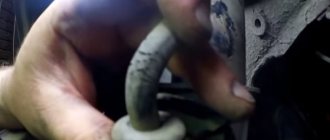
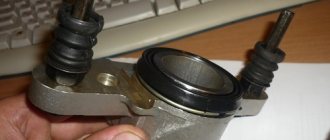
To remove the hose, you must remove the wheel. Then remove the hose from the bracket on the rack. And we treat the connection points of the hose with WD-40. Then, holding the upper tip of the hose with a 15mm wrench, use a special wrench to unscrew the brake pipe fitting.
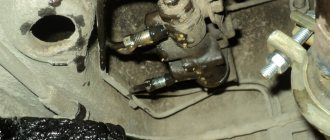
a special wrench is located on the brake pipe fitting
To prevent brake fluid from leaking, we put a protective cap on the fitting from the brake bleeder fitting.
cap on the fitting
Using a 15 wrench, unscrew the lower tip of the hose.
lower hose end
The hose is connected to the brake caliper through a copper ring that cannot be reused.
That's it, the hose is dismantled, reassemble in the reverse order, avoiding twisting the hose, this can be determined by the colored stripe on its body. The hose on the other side is changed in the same way. It is best to change them in pairs.
After installation, it is necessary to bleed the brake system.
And in my case, replacing the brake fluid. For this you will need a large syringe, a transparent tube, and new brake fluid.
bleeding the rear left wheel.
First of all, disconnect the connector from the brake fluid level sensor. Then we take out the old brake fluid with a syringe, leaving a little less than half the barrel so that no air gets in and fill the new one to the brim. Then we clean the dirt from the REAR RIGHT WHEEL bleeder fitting, remove the rubber cap, put on the tube, lower the other end into a container with partially filled fluid. Then the assistant presses the brake pedal several times and, after the last press, holds the pedal in the down position. We unscrew the bleeder fitting half a turn until liquid begins to flow out of the fitting. As soon as the liquid stops flowing, tighten the fitting. After this, the assistant presses the pedal again and we repeat the steps written earlier. We pump until new, lighter brake fluid comes out. Next, bleed the FRONT LEFT BRAKE CYLINDER. Then bleed the second brake circuit: REAR LEFT THEN FRONT RIGHT WHEEL
Work procedure
Rear brake pipes VAZ 2109
Before you take action, you need to prepare first. During the preparatory work, it is necessary to clean the surface of the fitting tubes from contamination. You also need to apply a special compound to all threaded connections, this will make it much easier to unscrew the nuts. In addition, you need to prepare a wrench, spare brake fluid for topping up, a small container to drain the remaining fluid from the system and a suitable vinyl tube. For convenient repairs, it is recommended to install the machine either on an overpass or on a pit for inspection:
- First, use a Phillips screwdriver to unscrew two self-tapping screws that secure the tube to the body of the vase.
- Using a suitable wrench, unscrew the 2 fittings through which the tubes are attached to the hose with the regulator.
- The tube is removed.
- After all necessary work has been carried out, the tubes are installed in the opposite order to dismantling.
- Add brake fluid.
- The quality of repaired brakes is checked.
On newer VAZ models, the tubes are first unscrewed from the main cylinder and brake hose, only after that the holes are plugged. In this case, you will have to unscrew the 3 fastening nuts and remove the plastic covering. Next, dismantle the metal plates and disconnect the necessary tubes from the clamps; if they are damaged, they will need to be replaced.
Replace the rear brake pipe of a VAZ 2109
Signs of air penetration into the system are considered to be increased travel and softened sagging of the brake pedal when pressed. It is necessary to follow a certain sequence of bleeding the brakes:
- rear right;
- front left;
- rear left;
- front right.
In addition to changing the brake line, the brake hose may also need to be replaced.
How to change a brake hose
As a rule, the brake system of any car must be in working order at all times. To prevent cracking and breaking of rubber brake hoses, it is necessary to periodically lubricate them with silicone grease.
To carry out repairs, it is recommended to buy or acquire:
a size 8 or 10 wrench, which is used to remove brake pipes; wheel wrench; wrench size 17 and 14; transparent vinyl tube; sealing copper washers; well-penetrating lubricant; a container for draining the “old” brake fluid; new fluid, it is recommended to pay attention to the DOT-4 class.
VAZ 2109 brake pipes
- Preparatory actions are being carried out. The machine is installed on a level place, stops are placed under the wheels on the opposite side in relation to the suspended wheel.
- The front area of the machine (right or left) is raised using a jack. To prevent the car from being supported by only one jack, for safety reasons it is placed on blocks. The wheel can be easily removed using a wheel wrench.
- All replaceable threaded and fixing parts of the system are treated with a well-penetrating lubricant, which ensures easy unscrewing. It is advisable to use the lubricant in advance so that it has time to penetrate deeper into the joints.
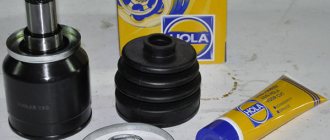
Choosing the right hose
Spare parts for Mazda 2
Summer tires
1.5 P5Y8
Spare parts for Audi 100
Windshield washer fluid 1.6 YM
Finding a suitable hose is not so difficult, and online stores are especially helpful. The fact is that searches can be carried out both by the hose code and by the VIN code. Most likely, the car enthusiast has lost the code for the old “artery” of the brake system, but he can always search by VIN code. Online stores further simplify the search, as they make it possible to select a brake hose based on vehicle parameters : make, year of manufacture and model. It’s worth noting right away that you need to take exactly the hose that is compatible with your car, additionally making sure that it has the same thread parameters as the old one. Pay attention to which wheel the hose being sold is intended for.
Particular attention should be paid to the manufacturer who produces the brake hose suitable for your car. Here is a list of the most famous manufacturing companies:
- Bosch (Germany);
- StopTech (USA);
- Starline (Czech Republic);
- TRW (Germany);
- Fenox (Belarus);
- ATE (Germany);
- Techna Fit (USA).
Starline and Fenox offer mainly inexpensive hoses that are not as good as the original ones, but are very affordable. In the case of Bosch, Fenox and TRW products, you should be wary of counterfeits and check both the product and its packaging with special care. As for American manufacturers, they can boast of excellent quality, but not the widest range of hoses. For example, they produce hoses for Japanese supercars, but have practically no positions for some city car models that are especially popular in Eastern European countries.
STAGED REPLACEMENT OF THE MAIN BRAKE CYLINDER
It is necessary to consider the entire process step by step. We will take into account all the nuances and features. This must be taken very seriously, since the braking system is our safety.
WHAT IS NEEDED TO REMOVE THE GTC FROM THE CAR
To perform such an operation, it is advisable to have an assistant and the necessary tools nearby:
- Wrenches for “10”, “13”, and “17”;
- Special wrench for unscrewing brake pipe fittings;
- Pliers;
- Rags;
- Metal brush;
- Liquid for topping up.
It is also necessary to ensure that there is a place where, if necessary, you will have to lay out the parts of this disassembled product. Let's look at the question of how to replace the brake master cylinder with your own hands. The matter is not very complicated and can be dealt with in about 30 minutes, unless unforeseen circumstances suddenly arise.
HOW TO REMOVE GTZ
When removing, you must perform the following steps:
- The first step is to disconnect the wiring from the brake fluid level sensor, which is located in the reservoir cap on the GTZ;
- The next step is to remove the cap from the tank and pump out the liquid from it. A large-volume medical syringe is well suited for this purpose;
- Now you need to use a special wrench and unscrew the fittings of the tubes that are connected to the GTZ;
- Move these tubes to the side so that the replacement of the VAZ gas turbine engine occurs without interference;
- After this, you can use a “17” wrench to unscrew the two nuts that secure the GTZ to the vacuum booster housing;
- The final step is to remove it from the vacuum booster.
Reasons for replacement
Brake hoses are designed to carry brake fluid from the master cylinder, through the brake lines, to the brake wheel cylinders under high pressure and temperature. They work constantly in moving suspension elements, therefore they are made elastic from a rubber compound.
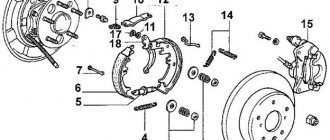
VAZ 2110 brake system diagram
The main reasons for replacing brake hoses on a VAZ 2110 car are:
- the presence of cracks on the outer part during bending;
- abrasions on suspension elements;
- brake fluid leaking from the splined joints of the tube;
- in more rare cases, a defect may occur as a result of a foreign body entering while driving on the road (crushed stone, stones, snow, ice, etc.);
- Also, in exceptional cases, the inner part of the hose peels off (it is not possible to detect it visually), in this case a blockage occurs inside and liquid does not pass through it; it is revealed during dismantling.
This material will help you understand the brake system: