Over time, almost everywhere possible, backlash begins to appear on cars produced by AvtoVAZ. The gearbox is no exception. It is not surprising that replacing the rocker on a VAZ 2114 has become a routine procedure familiar to all owners of this model.
Set
Determining the malfunction is quite easy:
- Gear shifts with problems, indistinctly;
- The gearbox is loose.
If such a malfunction occurs, a complete replacement of the element may be required. Moreover, many are switching to a short-throw rocker, which gives the car a more sporty character. This technology was borrowed from motorsports. By the way, a simple adjustment can turn it into a short-stroke one.
Some masters argue that it is not always wise to completely change. It is more profitable from a financial point of view to purchase a repair kit. But in fact, such repairs do not give the desired result, and after a while the link will still have to be changed.
Short-throw rocker for VAZ 2114, do-it-yourself adjustment
Over time, almost everywhere possible, backlash begins to appear on cars produced by AvtoVAZ. The gearbox is no exception. It is not surprising that replacing the rocker on a VAZ 2114 has become a routine procedure familiar to all owners of this model.
Set
Determining the malfunction is quite easy:
- Gear shifts with problems, indistinctly;
- The gearbox is loose.
If such a malfunction occurs, a complete replacement of the element may be required. Moreover, many are switching to a short-throw rocker, which gives the car a more sporty character. This technology was borrowed from motorsports. By the way, a simple adjustment can turn it into a short-stroke one.
Some masters argue that it is not always wise to completely change. It is more profitable from a financial point of view to purchase a repair kit. But in fact, such repairs do not give the desired result, and after a while the link will still have to be changed.
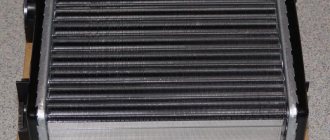
How to replace the oil seal
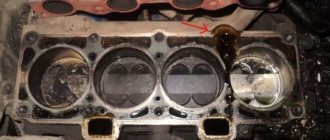
If you detect an oil leak from the gearbox, carefully inspect the crankcase. The leak will reveal itself. Lubricant usually leaks out through the CV joint seals and rocker panels.
In the latter case, to replace you will need to perform a number of actions:
- Purchase a new gearbox seal for VAZ-2109, 2114. Its price is about 100 -200 rubles.
- Drain the oil completely from the gearbox by unscrewing the plug from the bottom using the key “17”. If necessary, you can replace the lubricant later. It is recommended to pull out the upper dipstick to facilitate oil drainage.
- Disconnect the cardan from the rocker arm.
- Remove the boot, use a 10mm wrench to unscrew the bolt securing it to the gearbox rod.
- Using an awl or a thin screwdriver, remove the old oil seal. Inspect it for damage.
- Install the new oil seal using a pipe or large washer to press in.
Replacement instructions
Before starting work, we advise you not only to purchase a new spare part, but also to watch training videos on replacing the slide. The procedure is not very complicated, but a visual aid will never be superfluous. Especially if you do not have much experience in repairing a car and transmission in particular.
Replacement procedure
The process involves performing several sequential steps.
- Remove the housing from your gear shift knob.
- Raise the car using a jack. In some cases, an inspection hole will do, if you have one in your garage.
- Now you should dismantle the console, which will give you access to the backstage.
- The element is held in place by six bolts, which can be removed using a regular 13 mm wrench.
- But it's not that simple. You won’t be able to unscrew the top two bolts with a wrench, so don’t even try. They are specially planted as tightly as possible, so to dismantle them you simply need to cut them down with a grinder.
- Now you can safely remove the remaining two bolts in the lower fastening of the rocker, for which your effort and a 13 key will definitely be enough.
- The next step is to remove the clamp and move the boot. You will need to remove the hinge. At the same time as replacing the link, we recommend changing the hinge. It would be a good idea to replace the oil seal and cardan shaft. These elements have a limited service life, and since you decide to change the slide itself, there are objective reasons to do everything as efficiently as possible.
- After this, install the new unit in place of the old one. Act carefully so that the rubber bands of the slides fall on the welded bolts, which you previously sawed off using a grinder.
- The assembly is now reassembled, operating in the opposite sequence to disassembly. It is not necessary to seat the top mounting bolts tightly, but try to tighten them firmly.
Let's get down to business
The short-stroke rocker for the VAZ 2109 requires the following tools for manufacturing:
- Grinder and cutting wheel for metal or, at worst, a hacksaw for metal
- A piece of pipe and a piece of flat metal
- Welding (welding machine)
- be sure to purchase a lever drive from Lada Kalina
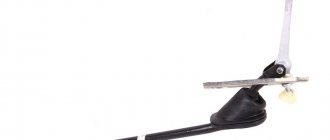
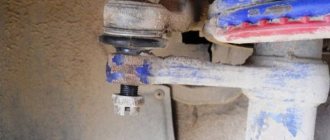
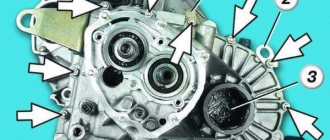
- The photo shows the places where you will need to make an incision.
Cut locations for your standard lever
- Everything is quite simple: you will need to remove the rocker from the car
- Moreover, it is not necessary to remove everything (I admit, I did just that and regretted it a little - it’s a chore, it turns out) it will be enough to disassemble your ball joint (to do this, unclench the locking metal ring so that the plastic fastening tabs separate and the ball is released)
- Then loosen the clamp near the gearbox and turn off the traction
- After this, carefully pull the rod through the dirt cover and get out of the car.
- Now you need a grinder with a cutting wheel for metal, a familiar welder with a welding machine, or someone who has access to one (you have the machine and know how to weld yourself - generally a test)
- Next, use a grinder to cut the parts according to the marks in the top photo. Then we weld a piece of pipe (with a wall thickness of 2 - 3 millimeters) into the rod and a piece of sheet metal with a thickness of 5 - 6 millimeters
- These pieces must certainly have the same length, otherwise you will have an unpleasant distortion, which is not at all desirable and the drive will only work worse
- For myself, I lengthened it by only 2 centimeters
- However, the space in the cabin allows you to lengthen it by 3 - 5 centimeters
After the cut, prepare pieces for insertion of the same size
- At first two centimeters was quite enough for me, but then I got used to them and it seems not enough again
- By the way, regarding the pieces, welders have nowhere to put them; as a rule, finding a suitable one does not cause any problems
- The VAZ 2109 short-stroke rocker is installed in the reverse order of removal
- However, among other things, the hinge with a hook, which serves to prevent erroneous engagement of reverse gear, rises automatically and no longer fits into a special slot on the blocking plate
- In order to avoid this, either remove this plate completely (this is for the especially lazy) you can ride without it, or you should move it upstairs to the height to which the hinge has risen
When you have installed the rocker on the VAZ 21093 gearbox, all that remains is to replace the drive shaft to eliminate play in the lever
Price issue
If you decide to replace the rocker seal at the same time as installing the rocker itself, this can be considered absolutely the right thing to do. Additionally, replacing the driveshaft will not cost much, but the efficiency of such a comprehensive repair will be much higher.
Short walker
Actions on your own, you only have to purchase the necessary parts and ordinary consumables. If you contact a car service, the minimum cost of the service will be 800-1000 rubles. That is, the savings are obvious.
The curtain itself costs about 400 rubles. From here it becomes clear why we did not advise buying a repair kit, but rather completely replacing the part. There will be no savings as such, but the difference as a result of the repair will be significant.
Is it worth fixing the problem?
Many people don’t even try to fix the gearshift lever of a VAZ 2114, but this task is completely solvable, it doesn’t require skills, and the undeniable advantages are worth an hour of time. The difference is so noticeable that if a breakdown has been present in your life for a long time, you will constantly remember that there is not enough noise.
The main thing to remember is that a machine is like a person, what “cured” one is not the fact that it will help the other, and don’t get upset.
The repair will take very little time, you can get away with a small sum, and in return you will receive a number of huge advantages, such as:
- the unpleasant sounds accompanying the increase in speed will disappear;
- the gearshift lever will be fixed;
- switching will become smooth;
- At idle, the lever will stop “dancing the lambada” under your hand.
Sports
We noted that for the VAZ 2114 you can install a sports short-throw rocker. Outwardly they are quite similar, but the difference in work is felt immediately. On a sports unit, gears shift faster and smoother. It's all about the design of the backstage itself. Unfortunately, it is precisely because of this that the process of independent replacement becomes almost impossible.
Sports model
If you decide to install a short-throw rocker on your VAZ 2114, contact trusted car services, or even better, a studio that specializes in tuning. Such events are classified as technical improvement, which is why no one understands this better than tuning specialists. Even official AvtoVAZ car services.
VAZ online stores, discounts for site users
- Accessories
- Spare parts
- Tuning
- Body kits
- Cases
- Studio
- Carbon tuning
- Flocking
Online stores for VAZ accessories
Online stores for VAZ spare parts
xn—2111-43da1a8c.xn—p1ai
Varieties of backstage
There are many models and designs. Each of them is characterized by its own characteristics. They are usually classified into two main types:
- long stroke;
- short-stroke.
Long-stroke scenes are often called standard. They were used in the production of cars of the domestic VAZ brand (starting from 2109, etc.).
Short-stroke rockers are typical for Kalina cars. They are similar in design to long-stroke ones.
Attention! The main difference between long-stroke and short-stroke is size. It is due to this that it is more convenient to change gears to second.
The short-stroke one is characterized by a convenient lever stroke, which is its main advantage. Thanks to its small size, the range of movement is significantly reduced, making gear shifting more convenient. Another plus in this regard is a clearer move.
According to reviews from users of such devices, for the VAZ 2114 the main disadvantage concerns the cost. The price for a short-stroke one is much higher. Also, after installation, you need to put more effort into switching.
Next you need to make an adjustment. To do this correctly, you need to know how to set up the rocker on a VAZ 2114. This process is described in detail below.
Modernization of standard to short-stroke
If you are not afraid of the minus associated with reducing the time before repairing another unit, but it is too easy to buy a ready-made copy, know that the standard rocker on a VAZ 2114 can be converted into a short-stroke one with due effort.
To carry out this operation you will need:
- standard rocker 2114;
- backstage repair kit 2114 (the bushings and axle from it will be useful);
- ball nut;
- metal tube with a diameter of 15 mm;
- steering cardan.
When all the necessary spare parts have been found, you must perform the steps in the following order:
- We cut the ball from the wings.
- We grind the lower edge of the cut so that it fits the tube.
- We put on the pipe and scald.
- We weld a ball nut to the lower edge of the structure.
- We attach the cardan to the gearshift lever.
- Then we proceed as when replacing the rocker seal and put everything back together.
CLARIFICATION! The essence of this procedure is that reducing the stroke is achieved by changing the length of the pressure lever. The action we performed is aimed at reducing the shift lever on our side, by increasing it on the side of the box.
If you carry out the modernization using this “makeshift” method, you will not have to remove the standard rocker.
Backstage adjustment
Step-by-step instructions on how to adjust the rocker on a VAZ 2114:
- Loosening the nut located on the clamp;
- Adjusting the position of the lever (at this stage you need to place it in the reverse position, and then tighten the nut on the clamp;
- Checking the gear engagement (here you need to carefully monitor the position - if the left side prevails when engaging reverse gear, then you need to smoothly move the cardan counterclockwise; if, on the contrary, the speed has “gone” to the right, then you need to turn it clockwise).
The correctness of the result of the adjustment process can be easily verified. To do this, you just need to install the lever in the middle. If everything was done correctly, the neutral gear will engage.
Advice! Watch the position of the lever itself. When installed correctly, the part will move freely. If it still interferes with the passenger or driver’s seat, then re-adjustment is required.
Adjusting QC
If you manage to replace the unit yourself, then it makes no sense to contact a specialist to adjust it. True, it will be very difficult to do this yourself; it is better to ask someone you know.
There are two methods for setting up a freshly installed rocker:
- In reverse gear, we put a friend behind the wheel and ask him to engage reverse gear. We install the lever in the most convenient position, in your opinion, and climb under the car, where we put the lever in place of the reverse gear and tighten the clamp.
- In first gear - if you can’t get the rear one in, put in the first one. We loosen the clamp as in the first case, but this time we must turn the drive, this must be done so that it reaches counterclockwise until the stop of the plastic clamp, after which we fix the clamp.
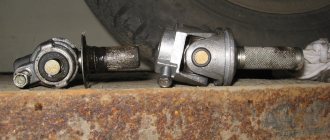
Cardan wings from Kalina on VAZ 2114
The original cardan on the VAZ 2114 has slight play. That is why its movement is characterized by vagueness. To fix this, you need to replace the part with a Kalinovskaya one.
Attention ! The Kalinovskaya yoke cardan is slightly longer than the original one. That is why it is impossible to install it in stock form. The part needs to be shortened. To do this, you need to prepare a grinder, a clamp, tape and a grinding tool. You should also dismantle the original cardan in advance.
Step-by-step instructions on how to shorten the Kalinovsky cardan:
- Measurement of the original part and the Kalinovskaya one (here you need to wrap tape around the tip of the cardan for cutting);
- Shortening (for convenience, you should insert the cardan into the clamp; then you need to cut off the excess part of the part with a grinder);
- Grinding (the finished shortened Kalinovsky cardan should be sanded with a special machine; this is necessary for ease of installation).
Step-by-step instructions on how to install the driveshaft from the Kalina on a VAZ 2114:
- Checking the size (you need to insert the cardan into the appropriate hole; at this stage, the correctness of the shortening is checked; if the part fits in well, then everything is done correctly);
- Placement of the wing boot;
- Installation of a new part (here you need to place the driveshaft from the viburnum in place of the original one and secure it with a key);
- Pulling the boot (the previously installed boot must be pulled onto the cardan).
Advice! When replacing parts, pay attention to the oil seal. It is best to replace it with a new one.
Where does the vibration come from?
In this article we will popularly understand where the legs “grow” from and what to do. As expected, this is a mistake by the VAZ design bureau, sometimes it is the result of “tuning”, but we will consider all the reasons in detail, as well as methods for solving the problem.
- When moving, the bushing connecting the lever and the rod first begins to rub and then hit the edge of the rod. This vibration creates this sound. This is a pure engineering miscalculation, the length of the sleeve is worked out incorrectly, its length is longer than necessary and it is this extra edge that catches.
- Replacing the lever with a Kalinovsky one, here the rattling comes along with the positive effects of the replacement. Due to the imperfection of the design, Kalina's driveshaft produces vibration, which is subsequently transmitted to all structural elements. The vibration and sound remain even without the lever.
- The retaining spring is broken; the first symptom is that the VAZ 2114 gearbox lever dangles freely in neutral gear, absolutely not fixed in the position between third and fourth. If the problem suddenly appears, then the spring is to blame, and only repairing the gearbox will help here, otherwise the remains of the spring will break the entire box, then it will be really expensive.
- Sometimes this occurs due to general wear and tear of the car's shock absorbing parts, gearbox mounts and engine.
Car owners put off the problem until forever “later”, due to lack of time and money, but it’s worth knowing that the repair procedure is inexpensive, done with your own hands, and costs very little
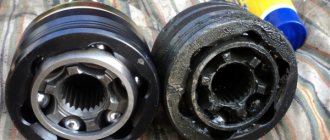
Replacing the universal joint
- Working with the clamp (on the drive rod it must be released and then pulled off the rod);
- Knocking down the cardan (before this, you need to remove the boot; you can knock down the part with gentle blows of a hammer);
- step 3 - installation of a new part (the procedure is performed in the reverse order: putting on the boot, fixing the cardan, putting the drive on the rod; the clamp is not tightened).
Next you need to adjust the system. As a result of self-replacement of parts or simply over time, the rocker may become loose. Fixing this problem is quite simple.
Sources
- vaz-2114.info/regulirovka-kulisy-vaz-2114/
- luxvaz.ru/vaz-2114/80-zamena-kulisy.html
- drive2.ru/l/548837172996735097/
Removal
2. Use a screwdriver to pry off the cover.
. and, turning the handle left and right, we pull it up together with the cover, and also remove the polyethylene tube and foam ring from the lever.
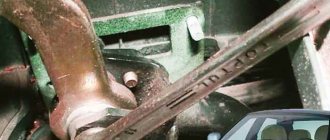
3. Hold with a 13 mm
the bolt securing the rod to the lever from turning, use a second wrench of the same size to unscrew the nut.
4. Remove the bolt and remove the lever from the traction fork.
5. Remove the plastic centering bushings.
6. Remove the steel spacer bushing from the lever hole.
7. To make it easier to remove the rod, remove the floor tunnel lining (see “Floor tunnel lining - removal and installation”).
8. From below the car with a 10 mm
Unscrew the four fastening nuts and remove the screen.
9. Mark the relative position of the drive rod and the hinge.
10. Hold with a 13mm
clamp bolt, use a second wrench of the same size to loosen the nut.
11. Unclench the clamp with a screwdriver and move it along the rod.
12. Apply penetrating lubricant to the connection between the rod and the hinge.
13. Unclench the rod with a screwdriver.
14. Disconnect the rod from the hinge.
15. Inside the car, remove the rubber seal from the hole in the car body.
16. Push the seal and rod down through the hole.
17. From the inspection hole, remove the rod assembly with the seal.
18. Remove the seal from the rod.
19. To remove the lever, remove the right trim of the instrument panel console (see “Instrument panel - removal and installation”).
20. 13 mm
Unscrew the two rear mounting bolts for the lever bracket.
21. Remove the bracket assembly with the lever.
Let's sum it up
Vibration after “Kalinovsky tuning” is inevitable, and all artisanal methods are ineffective. As for replacing vibration-damping elements, a repair kit will help, which is initially better to buy for the slide. If its installation does not help, then it’s worth purchasing new pillows. Another option is to install an additional locking spring directly on the lever. The solution is good if the problem is not a broken spring in the gearbox, otherwise the time to buy a new gearbox is just a matter of your luck.
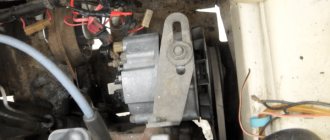
Backstage
The gearbox is a multi-lever assembly mechanism that connects
the gear shift lever
and the rod that fits the gearbox. It is located under the bottom of the car, as a rule, near the cardan or under the gearbox lever located in the cabin. In any case, dirt and water get there, which over time deteriorate the quality of lubrication of the rubbing elements of the slide, which is why they begin to wear out, leading to various problems.