02/28/2022 6,260 GAZ Gazelle
Author: Ivan Baranov
Modern cars, both foreign and domestic, are equipped with many different systems and devices that ensure normal engine operation. If one of the components or assemblies begins to work incorrectly, the car owner can always check the condition of these elements, and today this process takes much less time. How diagnostics are carried out in Gazelle cars and in what cases it is carried out - read below.
[Hide]
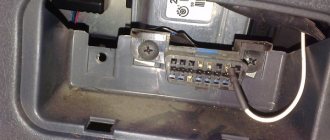
Gazelle diagnostic connector pinout
You can also familiarize yourself with the pinout of diagnostic connectors
Renault diagnostic connector
Opel diagnostic connector
KIA diagnostic connector
Currently, the overwhelming number of foreign cars, as well as domestic cars, have an OBD2 diagnostic connector. Through this connector you can connect diagnostic equipment to diagnose your car, as well as connect on-board computers and other devices that work through the diagnostic connector. Sometimes users have questions about the pinout of diagnostic blocks for certain car brands. For your convenience, we offer ready-made adapters for working with various diagnostic plugs on cars. However, if you forgot to purchase an adapter for your car, or you needed to make it in an emergency, or connect the adapter directly, then in this article you will find information about the pinout of OBD 2 standard blocks, as well as Russian and foreign-made cars.
Pinout of the OBD 2 block (the most common option in foreign cars since 2002, and is also installed in all VAZ cars after 2002):
4/5 - GND protruding contacts
16 — adapter power supply +12V
Pinout of the VAZ block before 2004:
M - k-line diagnostics
H or G - adapter power supply +12V
When connecting an adapter without a block directly to the wires, it is better to take power from the cigarette lighter, since the contact shown in Figure H, depending on the model, may not be routed, and when using the G contact, the fuel pump gives very large impulses that can damage the adapter.
(In 99% of cases, you can use the indicated contacts since damage to the adapters from the fuel pump practically does not occur.)
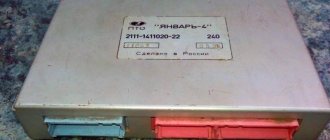
Connector GAZ (Gazelle) UAZ
2 - Power adapter +12V
10 - L-diagnostic line (may not be routed, as a rule not used)
11 — K-line diagnostics
Pinout for Daewoo Nexia n100, Matiz, Chevrolet Lanos, ZAZ Chans:
Connector M - K - line for diagnostics
Connector A - ground
Connector H - +12V (voltage in this connector may not be available on some car models)
Connector G - +12V from the ignition switch (there may be no voltage when the ignition is on and the engine is not running on some car models
If you are interested in the location of the diagnostic block in your car, as well as the pinout of diagnostic blocks for cars of other brands. Then you can familiarize yourself with them through a systematic catalog of diagnostic adapters. Download pinout of car brake pads.
Many people are wondering about diagnostics when their “turn off the engine” light comes on. BC owners know about a simple error, those with a better BC can find out more information. But only normal diagnostics (adapter + PC + software) can give the most comprehensive picture of the operation of sensors and actuators.
Chapter I. How to choose an adapter?
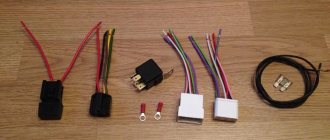
The question is this. Volga Is your only car? Are there any more cars? Are there any plans to diagnose other cars? How seriously do you want to approach diagnosing the car (flashing the ECU, checking sensors, as well as mechanisms and testing them separately from the car)? A correct and honest answer will save your money and nerves. There are a lot of different devices on the market. From a simple piece of PCB where you need to plug the wires into the diagnostic connector, to suitcases with a bunch of wires (or rather, connectors for direct connection to sensors and a lot of adapters for exotic connectors). We will not consider suitcases and a full set of cables. Those who want to buy them already know everything perfectly well without me. There are two good complexes on our market from Motor-Master LLC and Skanmatika. The first one is still better in hardware, the second one is better in terms of software. For those who simply need diagnostics, this option is not suitable; it is a bit expensive for something that is not always needed. I decided to describe a budget option. Let's focus on KKL 409.1, also known as VAG-COM 409, also known as KKL-USB. Why? The adapter is common, a lot of software works with it, and the price of about 500 rubles on various Internet resources is very good. In stores, of course, they sell it for 1,500, but you can find resellers in an advertisement in your city who buy and resell them, even if they make 100-200 rubles, but you can check it on the spot. This is what it looks like:
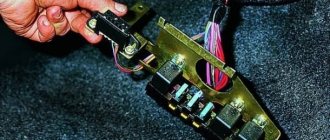
Chapter II. We make a 12 pin GAZ connector.
Of course, you can directly plug in 4 wires where you need them and everything will work great. But time and experience show that sooner or later you will mix up some wire. And it’s very inconvenient to control these pins from falling out. Therefore, we will do it carefully and beautifully. We buy in stores that sell BC, or the adapters themselves - OBD2 connector (female). And the GAZ connector is 12 pin. As you can see, all the contacts on the adapter plug are numbered. Its pinout is as follows:
This is where the “iron” part ends. In the second part, I will already describe the software and its work with the adapter using the example of the Mikas 7.1 ECU, ZMZ 406. It makes no sense to simply throw everything into one entry, because the volume of the material turned out to be too large.
If you already have an adapter and you are interested in connecting it and working with the software, then please go to the second part - DIY diagnostics. Part II - diagnostic software and working with it.
Modern cars, both foreign and domestic, are equipped with many different systems and devices that ensure normal engine operation. If one of the components or assemblies begins to work incorrectly, the car owner can always check the condition of these elements, and today this process takes much less time. How diagnostics are carried out in Gazelle cars and in what cases it is carried out - read below.
Checking the car's performance using a laptop
The diagnostic procedure at home is as follows:
- First of all, the adapter needs to be connected to a laptop or computer. The adapter should come with drivers; you need to install them. Go to Device Manager (Right-click on the “My Computer” icon - “Properties” - “Device Manager”) and make sure that the adapter is recognized by the computer. If the driver installation is successful, it will be registered in the system as a virtual COM port.
- Please note that most modern computers work with COM port number 1. Therefore, just in case, go to the “Properties” tab and select “Port Settings”, and then click the “Advanced” button and select the first port.
- Then you need to find the diagnostic connector - it can be located in the engine compartment near the windshield, behind the washer expansion tank, or under the steering wheel, as we wrote about above. Connect the adapter to the connector; the indicator on it should light up. At this point, the verification procedure can be considered complete; let’s proceed directly to testing.
- Now you will need to launch the software. Even if you have downloaded several programs, only one utility runs, otherwise the diagnostics will not give results. If you are not confident in one program, then you can check the car with several utilities, but one by one, and not simultaneously. The program should see the port to which the diagnostic adapter is connected; if this does not happen, try reconnecting it.
- Run the scan and wait for the results. During diagnostics, the corresponding indicator on the device may flash, there is nothing to worry about. The software should provide information regarding the basic technical parameters of the vehicle, as well as error codes if there are malfunctions in the operation of the car. The engine operating parameters must be checked with those indicated in the service book for the car; this will be the main step. When the diagnostics are completed, it will be necessary to decipher the error codes, if any, and repair the corresponding components.
Description and location of the diagnostic connector
If earlier, in order to find a fault, you often had to focus only on the symptoms of the breakdown, and also act at random, but today everything is much simpler. To determine the incorrect operation of a particular unit, it is enough to diagnose the vehicle using additional devices. These can be a computer, laptop, tablet and even a mobile phone. To check, you only need to connect the device to the diagnostic connector and run the appropriate software.
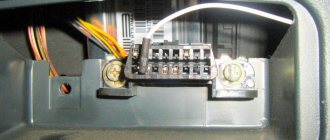
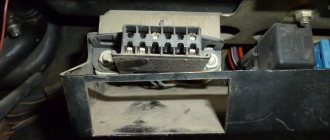
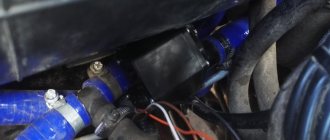
Location of the diagnostic connector in the engine compartment
As for the location of this connector, it may vary depending on the year of manufacture of the car. For example, in older versions of Gazelles, this connector is located in the engine compartment, near the windshield. Newer vehicles use an OBD II connector located under the steering wheel.
Today the situation has changed. Almost all cars have an OBD-II/EOBD diagnostic connector. This connector can be used to connect not only professional diagnostic devices, but also simple devices for reading fault codes (DTC).
There are quite a lot of such devices on sale. In terms of price and ease of use, they are quite affordable for the average motorist. To feel confident on a long trip, it is better to carry one of these devices with you.
The main fault codes are defined by the SAE standard and are almost the same for cars of all brands. However, the diagnostic connectors of the American standard OBD-II and the European EOBD, although identical in shape, differ in the purpose of some pins.
Most commercially available diagnostic tools allow you to read codes from any connector. However, when purchasing a device, you must clarify that it is compatible with the Cummins ISF2.8 diesel engine on the GAZelle NEXT car (OBD-II standard).
Diagnostic adapter Cummins INLINE 5 or Cummins INLINE 6 for diagnosing the Cummins ISF2.8 diesel engine on GAZelle NEXT.
To diagnose the Cummins ISF2.8 electronic engine management system on a GAZelle NEXT vehicle, it is recommended to use the INLINE 5 or INLINE 6 diagnostic adapter from Cummins. It comes with a set of connecting wires. As well as a personal computer with INLINE version 7.3 and higher installed.
Where is OBD 2 located?
The different positions of the diagnostic plug in a car are due to the fact that vehicle manufacturers do not use a single standard regarding the installation of pads. If the device is classified as J1962, it must be installed within a radius of 18 cm from the steering column. Manufacturers actually do not follow this rule.
The device location may be as follows:
- In a special slot in the lower casing of the instrument cluster. It can be seen in the center console in the driver's left knee area.
- Under the ashtray, which is usually located in the center of the console and instrument cluster. In this place, the connector is often installed by French car manufacturers - Peugeot, Citroen, Renault.
- Under the plastic plugs located on the bottom of the instrument cluster. In this place, the pads are usually installed by the VAG manufacturer - Audi, Volkswagen, etc. cars.
- On the rear of the center console, in the area where the glove compartment housing is installed. This location is typical for some VAZ cars.
- In the area of the handbrake handle, under the plastic of the center console. This situation is typical for Opel cars.
- At the bottom of the armrest niche.
- In the engine compartment, next to the engine shield. This is where the connector is installed by Korean and Japanese manufacturers.
obd2 adapter for gazelle
Many people are wondering about diagnostics when their “turn off the engine” light comes on. BC owners know about a simple error, those with a better BC can find out more information. But only normal diagnostics (adapter + PC + software) can give the most comprehensive picture of the operation of sensors and actuators.
Chapter I. How to choose an adapter?
The question is this. Volga Is your only car? Are there any more cars? Are there any plans to diagnose other cars? How seriously do you want to approach diagnosing the car (flashing the ECU, checking sensors, as well as mechanisms and testing them separately from the car)? A correct and honest answer will save your money and nerves. There are a lot of different devices on the market. From a simple piece of PCB where you need to plug the wires into the diagnostic connector, to suitcases with a bunch of wires (or rather, connectors for direct connection to sensors and a lot of adapters for exotic connectors). We will not consider suitcases and a full set of cables. Those who want to buy them already know everything perfectly well without me. There are two good complexes on our market from Motor-Master LLC and Skanmatika. The first one is still better in hardware, the second one is better in terms of software. For those who simply need diagnostics, this option is not suitable; it is a bit expensive for something that is not always needed. I decided to describe a budget option. Let's focus on KKL 409.1, also known as VAG-COM 409, also known as KKL-USB. Why? The adapter is common, a lot of software works with it, and the price of about 500 rubles on various Internet resources is very good. In stores, of course, they sell it for 1,500, but you can find resellers in an advertisement in your city who buy and resell them, even if they make 100-200 rubles, but you can check it on the spot. This is what it looks like:
Chapter II. We make a 12 pin GAZ connector.
Of course, you can directly plug in 4 wires where you need them and everything will work great. But time and experience show that sooner or later you will mix up some wire. And it’s very inconvenient to control these pins from falling out. Therefore, we will do it carefully and beautifully. We buy in stores that sell BC, or the adapters themselves - OBD2 connector (female). And the GAZ connector is 12 pin. As you can see, all the contacts on the adapter plug are numbered. Its pinout is as follows:
This is where the “iron” part ends. In the second part, I will already describe the software and its work with the adapter using the example of the Mikas 7.1 ECU, ZMZ 406. It makes no sense to simply throw everything into one entry, because the volume of the material turned out to be too large.
If you already have an adapter and you are interested in connecting it and working with the software, then please go to the second part - DIY diagnostics. Part II - diagnostic software and working with it.
You can also familiarize yourself with the pinout of diagnostic connectors
Renault diagnostic connector
Opel diagnostic connector
KIA diagnostic connector
Currently, the overwhelming number of foreign cars, as well as domestic cars, have an OBD2 diagnostic connector. Through this connector you can connect diagnostic equipment to diagnose your car, as well as connect on-board computers and other devices that work through the diagnostic connector. Sometimes users have questions about the pinout of diagnostic blocks for certain car brands. For your convenience, we offer ready-made adapters for working with various diagnostic plugs on cars. However, if you forgot to purchase an adapter for your car, or you needed to make it in an emergency, or connect the adapter directly, then in this article you will find information about the pinout of OBD 2 standard blocks, as well as Russian and foreign-made cars.
Pinout of the OBD 2 block (the most common option in foreign cars since 2002, and is also installed in all VAZ cars after 2002):
4/5 - GND protruding contacts
16 — adapter power supply +12V
Pinout of the VAZ block before 2004:
M - k-line diagnostics
H or G - adapter power supply +12V
When connecting an adapter without a block directly to the wires, it is better to take power from the cigarette lighter, since the contact shown in Figure H, depending on the model, may not be routed, and when using the G contact, the fuel pump gives very large impulses that can damage the adapter.
(In 99% of cases, you can use the indicated contacts since damage to the adapters from the fuel pump practically does not occur.)
Connector GAZ (Gazelle) UAZ
2 - Power adapter +12V
10 - L-diagnostic line (may not be routed, as a rule not used)
11 — K-line diagnostics
Pinout for Daewoo Nexia n100, Matiz, Chevrolet Lanos, ZAZ Chans:
Connector M - K - line for diagnostics
OBD Connector – Auto Electrician
- Connect contact “B”, which has the diagnostic block and “ground”;
- Turn the ignition key to the third position, do not start the car;
- First, the “CHECK ENGINE” lamp displays code 12 with 3 flashes. It shows that the diagnostic programs are working. On the VAZ 2110 this happens in this order: the lamp blinks briefly 1 time (which should be considered the designation of number 1). After a pause lasting at least 2 seconds, it flashes 2 times in a row (two). So we got the number two. And this is repeated 3 times so that the driver understands these signs;
- After the diagnostic program has declared its serviceability, it will begin to display error codes, if there are any, of course. In the same way - flashes and pauses.
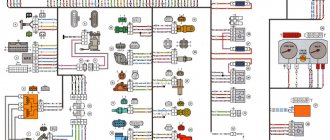
Necessary tools, materials and programs for diagnostics
So, what you will need to prepare for a proper vehicle check:
- Diagnostic adapter with cord. When purchasing a device, you need to be sure to select the adapter that will fit your connector, so find out exactly what connector your car uses.
- Diagnostic device. We will describe an example of testing with a laptop. If you don’t have one, you can use a desktop computer, but this is extremely inconvenient, especially since you will need a household outlet to connect it. The best option is a netbook. It can work autonomously, while its dimensions are very convenient for diagnostics.
- Software for checking. In this case, you have a huge choice - you can easily find the necessary diagnostic software on the Internet, there are many options. At the same time, programs have their own characteristics and characteristics. You can give preference to free software - most of these programs are just as effective at finding errors as their paid counterparts.
Photo gallery “Getting ready for diagnostics”
Is it worth adjusting the ECU?
Many car owners independently adjust the operating parameters of the Gazelle ECU, in the hope of getting more output from the engine.
It is worth knowing that a fully functional engine with functional sensors and systems does not need adjustment. Through their often unskilled actions, car owners significantly reduce the service life of engines, receiving in return a slight increase in power.
The only parameter that needs to be adjusted is the PUOS, and then only for engines running on gas. All firmware for engines that allow increasing engine efficiency significantly increases fuel consumption. Often the installed standard firmware itself causes various problems: due to differences in sensor errors, the ignition timing is incorrectly adjusted, which can lead to engine detonation. Detonation, in turn, occurring in chambers with an increased amount of fuel mixture, has a destructive effect on the elements of the piston system. As a result, the service life of the motor is significantly reduced, but performance does not increase much.
Renault diagnostic connector
Renault diagnostic connector
The diagnostic connectors used in Renault family cars are not very diverse, unlike Japanese car manufacturers, and currently there are two types of diagnostic connectors for Renault cars.
On Renault cars until approximately 1998, a 12-pin rectangular diagnostic connector was used.
As a rule, a diagnostic connector of this type on Renault cars is located under the hood of the car on the partition between the engine compartment and the interior of the car itself.
The presented 12-pin diagnostic connector for a Renault car has the following pinout:
1 K-line for vehicle automatic transmission diagnostics (AD4)
7 K-line for vehicle automatic transmission diagnostics (M)
8 L-line for vehicle engine diagnostics (Siemens/Bendix/Renix SPI/MPI systems)
9 K-line for vehicle engine diagnostics (Siemens/Bendix/Renix SPI/MPI systems)
10 L-line for vehicle engine diagnostics (Fenix 5, Magneti Marelli 06R, Motronic M4.4.2 systems)
11 K-line for vehicle engine diagnostics (Fenix 5, Magneti Marelli 06R, Motronic M4.4.2 systems), ABS, AirBag
On modern Renault car models, most models after 1997 and all modern models, have a 16-pin OBD-II connector made in the shape of a trapezoid.
This diagnostic connector on Renault cars is usually located under the dashboard (under the steering column)
at the feet of the front passenger (Renault Avantime)
or on the back wall of the glove compartment of a car (for example, on a Renault Logan) behind a plastic cover
Pinout of OBD 2 standard diagnostic connector
4 Grounding the car body
5 Vehicle signal ground
6 Line CAN-High, J-2284
7 K-line vehicle diagnostics (ISO 9141-2 and ISO/DIS 14230-4)
14 Line CAN-Low, J-2284
15 L-line vehicle diagnostics(ISO 9141-2 and ISO/DIS 14230-4)
16 Power supply +12V from car battery
Diagnostic connector Opel
Currently, in the Opel family there are only two types of diagnostic connectors.
On Opel cars from 1988 to 1996, a 10-pin diagnostic connector was used.
As a rule, a diagnostic connector of this type on Opel Vectra A and Omega A cars is located under the hood of the car, and on an Astra F car in the interior fuse box of the car itself.
The presented 10-pin diagnostic connector for an Opel car has the following pinout:
A) Ground contact
B) Contact designed to read slow vehicle self-diagnosis codes. K - car engine diagnostic line.
C) Contact designed for reading slow self-diagnosis codes of a vehicle’s automatic transmission. L-line for automatic transmission diagnostics of a car.
D) Contact designed for reading slow self-diagnosis codes of the on-board LCD display and the vehicle’s on-board computer.
E) Contact designed to read slow vehicle self-diagnosis codes.
F) +12V power contact
G) K-line diagnostics of the engine, automatic transmission, ABS of the car.
H) Contact designed to read slow self-diagnosis codes of the cruise control unit and anti-theft device (ATWS) of the vehicle.
J) Contact designed for reading slow self-diagnosis codes of the vehicle's four-wheel drive control system.
K) Contact designed to read slow ABS self-diagnosis codes. L-line for vehicle ABS diagnostics.
On modern Opel car models, most models after 1996 and all modern models, have a 16-pin OBD-II connector made in the shape of a trapezoid.
This diagnostic connector on Opel cars is usually located under the dashboard (under the steering column), using the example of the Opel Corsa car
near the parking brake handle on the tunnel between the front seats (Opel Vectra B)
Pinout of OBD 2 standard diagnostic connector
4 Grounding the car body
5 Vehicle signal ground
6 Line CAN-High, J-2284
7 K-line vehicle diagnostics (ISO 9141-2 and ISO/DIS 14230-4)
14 Line CAN-Low, J-2284
15 L-line vehicle diagnostics(ISO 9141-2 and ISO/DIS 14230-4)
16 Power supply +12V from car battery
All modern diagnostic adapters have an OBD 2 standard connector and do not require adapters
KIA diagnostic connector
If you are the owner of a Kia car, then in this article we will tell you what pinout the diagnostic connector of your car has, after which you can connect the on-board computer or diagnostic adapter to your car without resorting to the use of adapters.
This connector can be found on certain models of Kia Spectra, Sportage, Cee'd and many others. The connector is located under the hood and can be installed either separately or as a duplicate of the OBD2 standard connector installed in the car interior.
If your car has a 20 pin diagnostic connector (kia 20 pin), then it has the following connector pinout:
1) +12V power supply after the fuel pump relay 2) Signal to turn on the cooling system fan 3) Engine speed signal / primary ignition circuit control signal 4) GND - Ground 5) +B - +12V power supply 7) Primary ignition circuit control circuit (coil 2 ) L-line for ABS diagnostics 9) K-line for engine diagnostics 10) Automatic transmission fault signal 11) Check Engine lamp circuit - output for reading slow engine self-diagnosis codes 12) GND - Ground 14) K-line for airbag diagnostics (AirBag) 15) K-line for ABS diagnostics 16) Primary ignition circuit control circuit (coil 1) 17) K-line for cruise control diagnostics 18) L-line for automatic transmission diagnostics 19) L-line for engine diagnostics 20) Engine monitor output
If your car has a standard 16-pin OBD2 diagnostic connector (kia Obd-2 16-pin), then this connector has the following pinout:
Deciphering code errors
The first character is a letter and indicates a fault block:
- B - body;
- C - suspension;
- P — engine (ECM, gearbox);
- U - data exchange bus.
The second character is a number, code type:
- 0 — SAE (standard);
- 1.2 - OEM (factory);
- 3 - reserved.
The third character is a number, system:
- 1, 2 - fuel system;
- 3 - ignition system;
- 4 — reduction of exhaust gas toxicity;
- 5 - idle;
- 6 - ECU or its circuits;
- 7, 8 — transmission (automatic transmission).
The fourth and fifth characters are numbers, the error code itself.
Minimum computer requirements:
— Intel Pentium 4 processor—at least 2 GHz. — RAM at least 1 GB. — Hard drive of at least 40 GB. — Free hard disk space of at least 6 GB. — Display SVGA (1024×768 pixel) color. — The Windows XP operating system is installed.
When diagnosing a Cummins ISF2.8 diesel engine on a GAZelle NEXT vehicle, you must use the INLINE diagnostic equipment operating manual. As well as the INLINE program user manual.