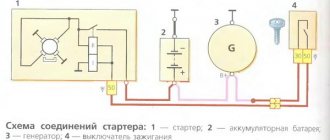
Not every driver knows what a VAZ 2107 charging relay is; in addition, this device is extremely rarely remembered. The charging relay is a voltage regulator or “chocolate bar” that is located in the generator. Owners of the Seven only pay attention to this detail after problems with the battery not charging begin. To prevent it from happening at one point, which negatively affects the engine, it is necessary to periodically monitor the operation of the charging relay.
Purpose of the regulator relay VAZ 2107 injector and carburetor
The main purpose of the voltage regulator relay on the VAZ 2107, and any other car, is to maintain a stable and sufficient charging current for the on-board network and the car battery, as well as to level out voltage surges in the generator. Variations in the generated voltage would occur as the generator rotates at different frequencies. When the power drops below 12V, the battery stops charging, and the entire bot network no longer functions at 100%. If the voltage exceeds 16 Volts, this can lead to boiling of the battery, as well as failure of on-board devices.
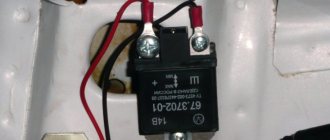
On early production VAZ cars of the carburetor type, the voltage regulator is located on the left arch of the engine compartment. Such devices are also called external, since they were installed outside the generator structure. To be more precise, a brush mechanism was installed in the generator, and control was carried out via a printed circuit board, which was installed outside the product.
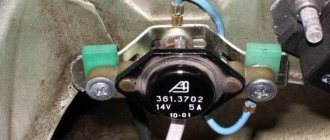
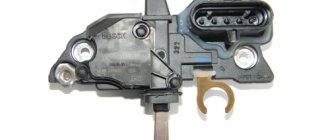
Most VAZ 2107 cars of the carburetor and injection type are equipped with generators with built-in charging relays. The charging relay on such VAZ 2107 vehicles is located directly on the side of the generator opposite the pulley.
To maintain an acceptable battery charge, the alternator requires 13.6 to 14.6 volts of power. The voltage regulation circuit is carried out using an electrical circuit, which is located on a printed circuit board (chocolate board) or in the form of a single semiconductor module (tablet) with brushes. The switch located inside the generator is usually not able to adequately respond to the ambient temperature due to its location close to the running engine. The built-in relay is sometimes replaced with a three-level voltage regulator, which is due to the greater efficiency of the product due to manual adjustment of the output voltage.
How to check the charging relay on a VAZ 2107
If you suspect a faulty operation of the voltage regulator relay, then you must first check the voltage at the battery terminals with the car running. The power supply must be no lower than 13 and no higher than 14.6 Volts. The reasons for such increased or decreased voltage can be caused by the following factors:
- charging regulator malfunction;
- failure of the generator itself;
- lack of contact in the electrical connections of the battery or generator.
To check the serviceability of the chocolate bar, it is necessary to remove it from the generator. This must be done by unscrewing two bolts.
It is important to know! Before you begin to remove the device, do not forget to remove the negative terminal from the battery.
To check the serviceability of the product, you need to connect a voltmeter or test lamp, as well as an adjustable power source of 12-22 Volts. You can use a power supply with a variable resistor. The control check of the regulator relay is carried out by connecting the minus wire from the regulated source to ground or terminal “Ш”. The positive wire of the power supply must be connected to terminal “B”. A voltmeter or lamp is connected to the brushes or relay output. If the product is in good working order, then when a voltage of 12 to 14 Volts is applied to it, the light will light up or the voltmeter will show similar values. If you apply power above 16 Volts, the light should go out. If the light bulb is constantly glowing, you can judge that the product is broken. The absence of a light bulb indicates a break in the relay. In both cases, the regulator cannot be repaired, so it needs to be replaced.
How can you check the product for serviceability without removing it from the car? To do this, you need to connect a voltmeter to the battery terminals, and then start the engine. If the voltmeter readings are below 12.7V or above 14.6V, then the probability of the chocolate bar failing is 95%. Replace the product with a new one, then check the voltage.
Checking the generator rotor VAZ 2108, 2109, 21099: 2 comments
Why is troubleshooting a generator that overcharges the charge voltage not described? Many will write about the failure of the voltage regulator (the so-called “chocolate bar”), so, I threw in 4 pieces (.), did not achieve any results, the overcharge was 18.7 volts. I replaced the generator with the same chocolates - EVERYTHING worked properly. What is the reason.
> Next, we check the “excitation” winding for a “break”. > Multimeter plus (in ohmmeter mode) on one contact ring, minus on the other. > When the excitation winding is in good condition, the resistance is in the range of 5-10 Ohms. > If a test lamp is used, then we connect the plus from the battery through it to one contact ring, and the minus with another wire to the second contact ring. The lamp should be on. If this is the case, then the “excitation” winding is working.
Thank you for the useful articles. I would like to add the following: 1) Regarding 5-10 Ohms for the winding of a working rotor. For example, in the maintenance and repair manual IZH-2717 (A.S. Kondrashkin, Moscow, 2004, ISBN 5-88924-240-7) for generators 584.3701 the resistance of a serviceable rotor winding is indicated as 3.7 ± 0.2 Ohm at a temperature of 20 °C. 2) Instead of “Next, we check the “excitation” winding for a “break”,” I would write: “Next, we check the “excitation” winding for a “break” (infinite resistance) and interturn short circuits (resistance lower than specified).” But here, it is clear that there will be only one way to check - measuring the resistance of the rotor winding. It is no longer possible to check interturn short circuits with a light bulb.
Basic faults
The main reason for the breakdown of generator brushes is their wear, which makes itself felt by a poor battery charge. Replacing the gear shift lever of a VAZ 2107 - sent to a classic engine and transmission gentlemen, tell me what to do? The gear shift lever on a VAZ 2107 (5-speed) broke off. Replacing the generator brushes of a VAZ 2108 on your own. You can detect a failed part by the following problems:
- voltage failures;
- the battery discharges quickly or does not charge at all;
- the headlights begin to burn much weaker or blink;
- instrument lights blink;
- There is not enough voltage for the electronics to operate and it turns off (radio tape recorder, for example).
Checking an Individual Regulator
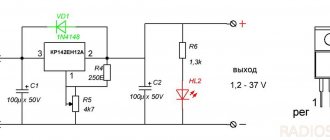
Checking the voltage regulator of the G-222 generator: 1 - battery; 2 - voltage regulator; 3 - control lamp.
As a rule, separate voltage regulators were installed on old cars, including domestic VAZs. But some manufacturers continue to do this to this day. The verification process is similar. To do this, you need to have a power supply with a voltage regulator, a 12 V light bulb, a multimeter and a directly tested regulator.
To check, you need to assemble the circuit shown in the figure. The process itself is similar to the one above. In normal condition (at a voltage of 12 V), the light bulb lights up. When the voltage value increases to 14.5 V, it goes out, and when it decreases, it lights up again. If during the process the lamp lights up or goes out at other values, it means that the regulator has failed.
Checking relay type 591.3702-01
Relay test diagram type 591.3702-01
You can also still find a voltage regulator of type 591.3702-01, which was installed on rear-wheel drive VAZs (from VAZ 2101 to VAZ 2107), GAZ and Moskvich. The device is mounted separately and installed on the body. In general, the test is similar to that described above, but the differences are in the contacts used.
In particular, it has two main contacts - “67” and “15”. The first of them is a minus, and the second is a plus. Accordingly, to check it is necessary to assemble the circuit shown in the figure. The verification principle remains the same. In normal condition, at a voltage of 12 V, the light bulb lights up, and when the corresponding value increases to 14.5 V, it goes out. When the value returns to its original value, the light comes on again.
A classic regulator of this type is a device of the PP-380 brand, installed on VAZ 2101 and VAZ 2102 cars. We provide reference data regarding this regulator.
| Adjustable voltage at regulator and ambient temperature (50±3)° C, V: | |
| at the first stage | no more than 0.7 |
| on the second stage | 14,2 ± 0,3 |
| Resistance between plug “15” and ground, Ohm | 17,7 ± 2 |
| Resistance between plug “15” and plug “67” with open contacts, Ohm | 5,65 ± 0,3 |
| Air gap between armature and core, mm | 1,4 ± 0,07 |
| Distance between second stage contacts, mm | 0,45 ± 0,1 |
Testing a three-level relay
Regulated power supply
Some car owners install on their cars, instead of standard “chocolate bars,” three-level relays, which are technologically more advanced. Their difference is the presence of three voltage levels at which the battery power is cut off (for example, 13.7 V, 14.2 V and 14.7 V). The appropriate level can be set manually using a special regulator.
Such relays are more reliable and allow flexible adjustment of the cutoff voltage level. As for checking such a regulator, it is completely similar to the procedures described above. Just do not forget about the value that is set on the relay, and accordingly, check it with a multimeter.
Generator check
There is one method by which you can check the performance of a car generator equipped with a regulator relay 591.3702-01 with diagnostic elements. It is as follows:
- disconnect the wires that went to pins 67 and 15 of the voltage regulator;
- connect a light bulb to it (excluding the regulator from the circuit);
- Remove the wire from the positive terminal of the battery.
If, as a result of these actions, the engine does not stall, then we can say that the car’s generator is in order. Otherwise, it is faulty and needs to be checked and replaced.
Why change brushes?
If signs of brush breakage are detected, they should be replaced. VAZ 2104 - 2107; replacing generator brushes on VAZ-2113, 2114, 2115. Without removing the generator. Repair of generator brushes on VAZ 2105-2107 models. Replacing the windshield of a VAZ 2107 with your own hands | auto-gid. If repairs are not carried out in a timely manner, there is a possibility that you will soon need to purchase a new generator, and this is a completely different expense. Replacing the brushes of the VAZ 2107 generator. Photo, instructions on how to do it. The battery can only hold the ignition without brushes for a few minutes, which means it will have to be constantly charged. Replacement of slip rings and bearings of the VAZ 2110 generator. And soon they will be replaced.
You can check the condition of the brushes by the size of their protrusion from the seat. Replacing the brushes of a VAZ 2107 generator is a simple procedure and usually takes a few minutes; replacing the brushes does not require removing the generator, just turn it off. If the protrusion size does not reach five millimeters , then they should be replaced immediately to avoid possible problems.
It is recommended to replace it every 50,000 km or every season, which is the key to safe operation of the vehicle. Replacing generator brushes in a Chevrolet Aveo. It is better to have a spare set of spare parts so as not to get into an unpleasant situation on the road and then call a tow truck.
What is it for?
Relay regulator 2107 is necessary to provide a stable charging current for the battery and equalize voltage drops in the on-board network. Drops would inevitably occur, since the generator spins at different frequencies and the current at its terminals can differ greatly from the nominal 12 volts. If the voltage drops below that, the battery cannot charge and many electrical appliances simply do not work. Likewise, if the voltage is too high, the battery may boil and devices may fail.
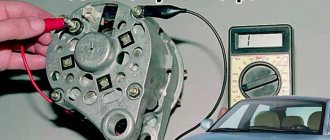
If the charging current to the battery drops, first check the regulator, since the generator itself rarely fails. You can simply check the charging current at the battery terminals using a tester or multimeter. In normal mode, the system voltage should be between 13-14 volts. If the readings are lower than 12 V, then the regulator may need to be replaced.
Without removing the generator
If you are sure that the problem with the car breakdown is a malfunction of the generator brushes , then you can do without removing it.
- Turn off the negative terminal.
- Disconnect the wires.
- On the brush holder body, unscrew the two bolts holding it in place.
- We extract the structure.
- We check for damage and the size of the protruding part of the brushes (it must be at least 5mm).
- We install new elements and carry out installation in the reverse order.
Tags
Chocolate generator that the output of the generator exceeds in the generator. generated by the generator transport directly the generator. generator voltage. generator voltage. from the generator. generator regulator VAZ from the generator. voltage regulator prevent voltage voltage regulator in the voltage regulator maintains the voltage of the on-board electrical equipment of the car serves as a test of car generators of any car is the car network not in the car are with brushes. generator brushes change check brushes brushes are applied time converter brushes
stator windingsblockquotesignssourceofdiodesnetworkcrankshaft
With the generator removed
Poor charging of the car can be caused not only by the brushes, but also by the alternator belt. To eliminate this point, when replacing brushes
it should be removed to check the condition of the belt.
First, we dismantle the unit.
- We unscrew the bolt securing the generator belt.
- Move the unit towards the engine and remove the belt.
- Unscrew the tensioner bar and remove it.
- Disconnect the plug and terminals.
- We take out the part.
Replacement result
After replacement, errors may appear about a low battery charge or a malfunction of the generator; there is no need to immediately try to find the cause of the failure. This phenomenon is not uncommon, since new brushes have just begun to break in. What are the causes of Chevrolet Niva generator breakdowns? Chevrolet Niva replacement brushes are soldered to. After some time, everything will return to normal, and you can safely continue to operate the car.
Replacing the VAZ-2107 generator brushes is perfect as a training demonstration for those who do not yet consider themselves specialists, but are just learning the basics of car repair and maintenance. This information can be used not only to repair the “Seven”, but also for other models (VAZ-2110 and 2114). Now let's proceed to a more detailed study of the issue.
Generator brushes - why are they needed?
Quite often (especially in older models) there are cases when, with a sharp increase in driving speed, various seemingly inexplicable things happen: the light of the dashboard or headlights dims, the cigarette lighter and (or) radio work intermittently. Drivers who have not been hardened by many years of experience in the cold lake may mistakenly think about burnt fuses, wiring, or shorted devices. It can take a whole day or more to work through all these versions. But what will be the driver’s surprise when the true cause of the malfunction becomes clear, that the whole essence of the problem is due to some small pieces of black metal called generator brushes.
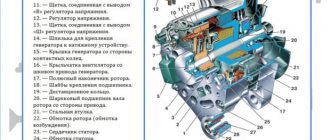
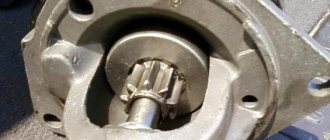
Generator device
Based on 9th or 8th grade physics lessons, everyone knows that any generator must include two main parts, one of which is movable (rotor), and the second, correspondingly, stationary (stator). Each part has a copper (in most cases) winding. Under the influence of magnetic force, the rotor begins to rotate, powered by electricity through the armature and two other metal parts. And they are called generator brushes. Due to the constant impact of friction, all parts gradually wear out due to the constant rotation of the rotor. This happens in any case, regardless of the quality of the material of the parts (and it is really strong).
Lada 2107 2006, engine Gasoline 1.6 liter., 96 hp, Rear drive, Manual - DIY
Comments 16
My brain explodes at the end of the article! Maybe I didn’t understand correctly, but from what I read I concluded that from the generator, namely, from the brushes, we throw the wire to the relay on pin 67, and from pin 15 we throw the wire again on the generator, namely on the M8 threaded stud, where 2 thick wires. So? Did I understand everything correctly?
So, here it would be necessary to be more precise. if you have a wire from the brushes going to the diode bridge, then you need 67 from the brushes and 15 to the wire that was inserted into the brushes. if not, then the wire comes from the brushes at 67 and 15 goes to that pin. But in this and in the case that the wire is a pin, this is the + output.
In general, I have an Oda and it has a VAZ2105 type generator with a tablet in the generator on the brushes, I bought myself a generator from a VAZ 2101 and now I’m looking for information on how to connect it. I have only 2 wires coming from my original generator, one double, on the M8 stud, the other to the terminal on the generator, and now a terminal has formed from the brushes, that’s the question, that’s why I’m asking how to properly connect with an external relay. I myself am not an electrician, for me these are murky miracles))) That is, as I understand it, we loop the relay on the generator from brushes 67 and from 15 to the M8 pin, leaving everything else unchanged? I looked at the diagram in the article, where the wire from the gene goes to 67 in the relay, and from 15 to the fuse block, here I am in a stupor... firstly, where to connect in the block, and secondly, the option with a loop confused me, because . It turns out 2 different connection options.
Yes that's right. you do this. But in the diagram it says it's a fuse. M8 is the output + for the fuse and for the battery)) the tablet is the same thing, just a shorter version.
Ok, I'll try it today.
152COPMOBO152
Yes that's right. you do this. But in the diagram it says it's a fuse. M8 is the output + for the fuse and for the battery)) the tablet is the same thing, just a shorter version.
I did it and it didn’t work. Charging 18.5 sucks!
umm... from a brush to 67 from 15 to a hairpin?
Weird. maybe a relay?
No, the relay is new, everything is fine with it. This connection diagram is not correct for this car model.
Either the skis don’t work or I’m an idiot, but: a) from the pre we have a wire going to the excitation winding of the generator, although no, that’s not the case, the pre is f10, responsible for the tidy (including the devices inside it and the first start of the genes), turn signal relay , the carb valve and the excitation winding, yes, yes on 222 generators, the fashion has become that through the tidy light bulb and the 12-volt diode from the tidy goes to the excitation winding for the first time. For 221 genes, aka a penny light bulb is purely an indicator. On modern cars, the light bulb is also an indicator; it is placed in parallel with resistors. b) RN is also a tablet, it takes the voltage from the additional diodes and checks it (a simple test method, if the voltage is more than 14 volts, we extinguish the generator, start it less, yes, we have a pulse 3-phase generator), made by AvtoVAZ to decouple the tablet from the on-board network. It was the same white wire that you had fallen out. c) In order for the gene to charge the battery, after starting the car (the biggest thing here is the starter, it eats decently), you need to drive a decent distance at rpm d) in principle, we can’t kill the generator on a vase, and can be treated by replacing any part. So, in general, it’s great, with repairing a car with improvised means, but the 221 generator (a cheap one) is, in principle, weaker than its 222 brother, EMNIP, 42A, versus 55A (the gene produces complete nonsense at 3000-3500 engine speeds)
You need to look at what the voltage is, and if the arrow lies completely, it may not be so good, since when the arrow lies completely, this is an overcharge. Because the light on the device from the generator was shining brightly, there was a lot of recharging - it was lucky that the battery didn’t boil. So check the voltage.
Those who are familiar with the principle of operation of a generator know that an excitation voltage is supplied to the armature through the brushes, which not only starts the electric machine (generator) into operation, but also regulates its output power.
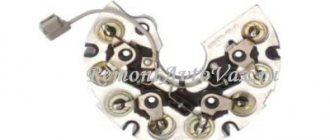
The regulation itself occurs due to a special device, a relay-regulator, which can be implemented directly on the brush holder or installed separately (on earlier models).
The device of the VAZ 2107 generator
As a rule, such a malfunction manifests itself gradually, initially accompanied by short interruptions in the operation of the generator, gradually leading to its complete failure, but other options are also possible, for example, a sudden failure.
How to determine the malfunction?
If, while warming up the car, you begin to notice strange actions on the dashboard (the voltmeter readings change greatly with minimal engine load or the battery charging light lights up), then this can only mean one thing - the alternator brushes are worn out and need to be replaced.
How to determine a generator malfunction
In some cases, a good warm-up of the engine allows you to “extinguish” the indicator. At the same time, the car drives on the autobahn quite calmly and normally, without any signs of malfunction. But you shouldn’t be such an optimist, because your car may break down at the most inopportune time. Don't forget to check the condition of the alternator winding and belt, although the absence of sparks and smoke suggests that the brushes are the cause of the breakdown.
Types of Voltage Regulators
Having understood what types of these devices there are, what their features and properties are, a complete understanding of the procedures carried out during testing will come. This will also give the answer to what scheme, in what way and how to check the generator voltage regulator. There are two types of regulators:
In the first case, it is meant that the regulator housing is combined with the brush assembly directly in the generator housing. In the second case, the regulator is a separate unit, which is located on the car body, in the engine compartment, and wires from the generator go to it, and wires from it go to the battery.
A special feature of the regulators is that their housings are non-separable. They are usually filled with sealant or special resin. And there is no particular point in repairing them, since the device is inexpensive. Therefore, the main problem in this regard is to check the generator voltage regulator relay. Regardless of the type of regulator, the voltage symptoms will be the same.
Replacing brushes on a VAZ-2107 and other similar models - is there a difference?
To begin with, it is worth clarifying that generator brushes are the parts that require replacement most often. For this reason, developers create special generator designs so that the driver can make the replacement without any problems. The process of their wear is quite long, it depends on the life of the car, as well as on the intensity of the load. When purchasing a used car with a fairly high mileage, you should not wait until the parts wear out and stop functioning fully. It's better to replace it right away. Fortunately, the low cost allows this.
Replacing old parts
People who are far from the structural features of their vehicle may well think that the production of different models at the same plant makes the replacement process the same (we are talking about popular domestic models). To be honest, this guess is correct. One can say even more: almost all models with an internal combustion engine have the same replacement process.
Tip: You can install brushes from VAZ on some Audi or BMW models, and they will function perfectly. The appearance, however, is slightly different with a rougher edging, but this does not affect the operation.
Useful tips
If, before replacing the brushes, you begin to notice noise when the generator is running, then this malfunction may indicate wear on the generator bearings.
Increased play may indicate premature bearing wear. In this case, you need to replace it.
Important! Premature bearing wear can occur for many reasons, not just due to insufficient lubrication.
Often, an overtightened alternator belt leads to bearing failure.
To prevent breakdowns of vehicle systems, it is advisable to regularly check components according to the manufacturer’s recommendations. Try to create a habit of periodically inspecting the engine compartment for noise. This will avoid serious damage and solve existing problems with minimal financial costs. It’s better to do everything right than to do it “as always.” Good luck on your journey!
Recommendations for increasing the service life of the regulator
In order to increase the service life of the voltage regulator, it is necessary to adhere to several simple rules aimed at implementing preventive measures. Among them:
- do not allow excessive contamination of the generator, periodically inspect its condition, and, if necessary, dismantle and clean the unit;
- check the tension of the alternator belt, tighten it if necessary (either yourself or in a car service);
- monitor the condition of the generator windings, in particular, do not allow them to darken;
- check the contact on the control wire of the relay-regulator, both its quality and the presence of oxidation on it;
- Perform periodic voltage checks on the vehicle battery with the engine running.