The sensor for turning on the fan of the VAZ 2106 car performs a vital function. If forced cooling of the radiator is not carried out in a timely manner, the engine will overheat and boil. This part is reliable and may never fail the driver during the entire period of operation of the car, but sometimes this still happens and emergency work has to be carried out to check and replace the fan sensor of the VAZ 2106 car.
VAZ 2106 fuse box pinout, diagram
If you have any problems with electrical equipment: the low or high beams have disappeared or are not working, the turn signals, stove, cigarette lighter, fan, wipers are not working, the signal has disappeared, etc., then this could all be the reason that the fuse has blown. This means it needs to be replaced.
To do this, you need to know the location of the mounting block. And it is located under the steering wheel, on the left side. In order to understand what the VAZ 2106 fuses are responsible for, you need to look at the simple pinout of the old fuse block (FB) and see the description below.
Table “VAZ 2106 fuse designations”
| Fuse number | Current, A | What is he responsible for? |
| 1 | 16 | 1. Lamps 2. Horns 3. Power socket 4. Cigarette lighter 5. Rear lamps 6. Front door open warning lamps 7. Clock |
| 2 | 8 | 1. Windshield wiper and wiper relay 2. Wiper motor 3. Heater motor |
| 3 | 8 | Left headlight (high beam) and high beam indicator lamp |
| 4 | 8 | Right headlight (high beam) |
| 5 | 8 | Left headlight (low beam) |
| 6 | 8 | Right headlight (low beam) |
| 7 | 8 | 1. Left front marker 2. Right rear marker 3. Trunk light 4. License plate light 5. Instrument lights 6. Cigarette lighter light |
| 8 | 8 | 1. Right front marker 2. Left rear marker 3. License plate light 4. Engine compartment lamp 5. Side light indicator lamp |
| 9 | 8 | 1. Oil pressure sensor with warning lamp 2. Coolant temperature sensor 3. Fuel level with reserve warning lamp 4. Parking brake activation and brake fluid level warning lamps 5. Turn signals and corresponding warning lamps 6. Battery charge warning lamp 7. Control lamp carburetor choke control lamp 8. Carburetor shut-off valve 9. Tachometer 10. Reversing lamps 11. Glove compartment lamp 12. Rear window heating relay coil |
| 10 | 8 | 1. Voltage regulator. 2. Generator excitation winding |
| 11 | 8 | Spare |
| 12 | 8 | Spare |
| 13 | 8 | Spare |
| 14 | 16 | Heated rear window |
| 15 | 16 | Engine cooling fan |
| 16 | 8 | “Emergency gang” |
Video review of the transcript.
Expansion tank
It would seem that one can talk about such a simple and uncomplicated element as an expansion tank. On the one hand, any container that satisfies certain conditions can be used as it. But without this node it will not work
2106
cooling system is normal . The volume of liquid always changes, it is not constant. But there is no more room for it in the pipes, engine jacket and radiator. And the reason that the volume of a liquid changes is the constant fluctuation of its temperature.
When the temperature increases (heating), the distance between the molecules of the substance increases. Everyone knows this from a physics course. Now imagine if the temperature of the antifreeze increased from zero to 80 degrees. Of course, its volume will also become larger. And the excess liquid has to go somewhere. They go through the pipe into the expansion tank. When the temperature drops, the volume steadily decreases. And all the excess that went into the tank is returned to the radiator and pipes.
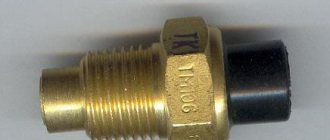
Fan switch sensor 2106
This is just one of the elements, but without it the system will not be able to work automatically. In essence, the sensor acts as a switch, nothing more. It consists of a bronze body containing a bimetallic plate. If you know its properties, then remember that it is capable of deformation at a certain temperature. Moreover, you can guess its value literally down to tenths of a degree, just by changing the percentage of metals in the alloy. Two contacts come out of the sensor - they are normally open and close when the case temperature reaches about 92 degrees.
Two options for turning on the fan (forced mode available)
Typically, the switching circuit consists of the following components:
- Sensor.
- Electromagnetic relay.
- Fan.
- Fuse.
It is worth noting that some circuits do not contain relays, as they are equipped with sensors with contacts that have a high degree of reliability. They are capable of operating for a long time under the influence of high currents. Just imagine what kind of sparks jump between the contacts when the fan is turned on, and, unfortunately, there is no arc extinguishing grille there.
Connection diagram without using an electromagnetic relay
I would advise, even despite the high reliability declared by the manufacturers, to still use a circuit with an electromagnetic relay. Don't rely on chance. There are not so many VAZ 2106 cars with an injection engine; they were produced by IZH-mash in recent years. In them, the fan switching circuit is slightly different - there is no sensor on the side of the radiator. Its functions have been completely transferred to the VAZ 2106 coolant temperature sensor located in the engine block. There is a slightly different algorithm here, since the fan motor starts after a signal is sent to the electronic control unit indicating that the temperature has reached the maximum value.
Typical malfunctions of the blowing system
Now let's look at the breakdowns that you may encounter during the operation of the car, as well as methods for eliminating them. Moreover, it should be noted that our site is dedicated to how to make repairs with your own hands, without resorting to the help of specialists at a service station. Why spend a lot of money if you can do everything yourself and very quickly? And you will receive a small “bonus” - because you will know how this or that car system works and what condition its components are in. Let's now make a rating of the most popular fan sensor failures.
A breakdown of the most sensitive element leads to the fact that the electric fan does not turn on even when the temperature has reached a critical level of 100 degrees, or even more. Of course, the antifreeze begins to boil and splashes out through the expansion tank cap. Therefore, many motorists install “emergency” buttons, which are used to start the fan. And for some, such a system is even the main one; you just need to not miss the moment when you should turn on the airflow. You can check whether the sensor (and not another element) has really failed - remove one wire from it and connect it to the second. If the impeller starts to rotate, the fan switch sensor is faulty.
Diagram for switching on the VAZ 2106 radiator blower
Of course, sometimes the fan itself fails, in which case even if directly connected to a power source it will not work. Please note that the wires may break or burn out, so you need to check the presence of voltage at the electric fan connector. Another nuance - as a rule, the entire electrical circuit is powered from the ignition switch. Consequently, if you turn off the engine while the electric fan is running, the latter will stop cooling the system. And this is fraught with consequences, since it is even possible to destroy the engine block - the appearance of cracks in it and the cylinder head. It is for this reason that you should either not turn off the engine until the fan stops, or connect the entire circuit to the battery.
And, of course, it is worth mentioning the electromagnetic relay. If it is used in your car, then you need to diagnose it. The contacts move and sometimes burn, which leads to failure of the relay.
Connection diagram for VO VAZ 2110
The circuit diagram for switching on the cooling fan of the VAZ 2110 on carburetor and injection cars is different. On cars with a carburetor engine, a thermobimetallic sensor TM-108 is used for this, and on cars with an injection engine, control is carried out by a controller.
System radiators
When repairs are performed on a VAZ-2106 car, the cooling system is rarely turned off. The exception is engine removal. In this case, you will need to drain the liquid and disconnect the pipes going to the heater and cooling radiators. What is a radiator? These are two small containers that are located in a horizontal plane. Metal tubes - cells - are laid vertically between them. Hot liquid is fed into the upper container and enters dozens of thin cells, which allows it to cool faster.
READ Where is the fuel pump for Ford Focus 2 restyling
Materials for the manufacture of radiators are copper, bronze, brass, plastic. Only the upper and lower containers are made from the latter. To increase the efficiency of heat transfer, there are several hundred very thin plates between the cells. Due to the fact that the area increases, the heat transfer of the radiator also improves. The design of the main radiator and the one located in the stove are the same. But there is a minor feature of the first one - the expansion tank is connected to it. All excess liquid is forced out of the radiator and enters the tank.
Step-by-step replacement instructions
Russian car enthusiasts driving Zhiguli “classics” ask the question of how to connect or replace the light relay on a VAZ 2106 so that it functions without problems in the future. Similar work is carried out when replacing the “six” light relay.
Replacing the VAZ 2106 light relay is carried out in the following sequence:
- Disconnect the wire from the negative terminal of the battery
- Using a Phillips screwdriver, unscrew the two screws and remove the relay.
- Installation of all removed parts is carried out in reverse order. We secure the side panel upholstery with new holders.
System connections
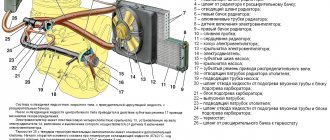
These are exactly the elements that are necessary for the VAZ-2106 engine cooling system to function normally. With their help, all components and assemblies involved in the operation of the system are connected. Liquid circulation occurs only with the help of these elements. The pipes are made of thick rubber; there is a cord inside it, which further strengthens the structure. Consequently, the pipes are not afraid of bends, minor impacts and serious deformations.
For each car model, the pipes have a different shape. Everything directly depends on the distance between the connected nodes. The point at which the pipes are connected to the system also plays a significant role. Due to the fact that the inside of the pipe is perfectly smooth, it fits as closely as possible to the metal tubes with which the connection is made. For maximum efficiency, silicone-based sealants can be used during installation. From the outside, each pipe is crimped with a metal clamp. The wider the latter, the better the connection will be.
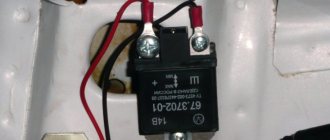
Where is the fan relay located?
4 – electric fan relay; 5 – electric fuel pump relay; 6 – main relay (ignition relay).
Attention: the order of the relays and fuses can be arbitrary, we are guided by the color of the wires. Therefore, we find a relay from which comes a thin pink with a black stripe wire coming from the main relay (pin 85*) (not to be confused with the thin, red with a black stripe wire coming from the controller) and a thick power white with a black stripe wire (pin 87) (white and pink wires we need), this is the fan relay.
Cooling fan diagnostics
The radiator fan of the VAZ 2114 ch1 does not turn on. The radiator fan of the VAZ 2114 ch1 does not turn on.
If signals appear on the dashboard that the permissible temperature level in the cooling system has been exceeded, this may indicate that the fan on the VAZ 2114 is not working. The main symptom of the malfunction is that the mechanism does not start even with a significant increase in temperature. It is urgent to turn off the engine to prevent its elements from overheating.
The engine should not be operated with a faulty electric cooling fan. This may damage the cylinder head.
If the cooling fan on a VAZ 2114 does not work, the following malfunctions may be the cause of the breakdown:
- The fan switch sensor on a VAZ 2114 has failed.
- Lack of contact at the sensor connector.
- The wiring has broken.
- Electric fan relay faulty.
- The fuse has blown.
- Damage to the device's electric motor drive.
Unplug the device. Connect it to the battery terminal. Maintaining polarity. If a direct connection to an energy source starts the electric motor, then the drive is working. There may be problems with the wiring, the fuse, or the temperature sensor.
Now it’s time to diagnose the fuse. You don't even have to open the plastic box to do this. If the relay malfunctions, the horn stops working at the same time as the fan. Therefore, if you notice the loss of the sound signal, it means that the fuse has definitely blown. You can find it in the engine compartment in a small plastic box. We release the cover, pressed by two latches, take out the burnt fuse with tweezers and replace it with a new one.
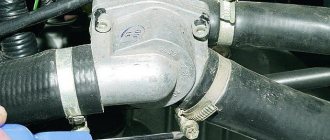
To diagnose the temperature sensor that supplies a signal to the radiator, you need to disconnect the connector from the sensor and start the ignition. The emergency mode will start, in which the electric fan will start blowing. If the fan starts late when the connector is disconnected, the sensor is most likely faulty. Replacing it will take no more than five minutes. You just need to unscrew two bolts using a Phillips screwdriver and install a new device in its place.
Even if a malfunction has occurred in the VAZ 2114 fan itself, this does not mean that it is time to change it. Sometimes you can simply replace a damaged bearing or brushes. But if the electric motor is faulty, it is much easier to purchase a new mechanism.
Replacing the VAZ 2106 fuse box with a “Euroblock”
And finally, for those who don’t know how to replace the old model with a “Euroblock”, the following information. There is nothing complicated here.
You just need to follow the instructions below:
- First you need to disconnect the minus from the battery.
- Use a 10mm wrench to unscrew the old power supply. In this case, the wires are not disconnected.
- According to the diagram above, wires and jumpers are installed.
- It is important to install jumpers only on those wires that carry voltage from the engine compartment.
- Jumpers are installed between pins 3-4, 5-6, 7-8, 9-10, 11-12.
- Next, the wires are removed one by one from the old device and attached to the Euroblock.
- At the end, check that the connection is correct (for example, with the low beam on, if you pull out the 5th fuse, the left headlight should go out).
- All other circuits are also checked.
The video below clearly shows how to replace an old power supply with a Euroblock.
Liquid pump
This element of the system allows you to improve the circulation of fluid through the pipes and radiators. work somehow
.
However, it is extremely important to give additional acceleration to ensure two conditions. Firstly, the liquid should not be heated to critical temperatures. Secondly, it must cool as quickly as possible. Short-term heating and cooling
allow you to maintain the temperature at a given level.
The liquid pump is a rotor in an aluminum casing, which has an impeller on the inside and an impeller on the outside. drive pulley. It is with the help of the impeller that the cooling system of the VAZ-2106 works normally (the flow diagram of the fluid flow is shown in the figure above). The impeller is made of plastic. But there are also aluminum samples, but it is unwise to use them for the reason that they can quickly collapse if water is used rather than antifreeze. The most common pump failure is a bearing failure. It can break gradually if the drive belt is over-tensioned.
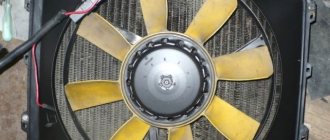
Replacing an electric fan in a car
- We park the car on a flat surface and immobilize it with the parking brake.
- Open the hood and disconnect the negative terminal.
- Using a 10mm wrench, unscrew the fastenings of the air filter housing.
- Using a screwdriver, loosen the air duct clamp on the air flow sensor and remove the corrugation.
- We unscrew the screws securing the cover of the air filter housing and remove the filter element.
- Using a size 8 wrench, unscrew the air intake mount and remove it.
- Using a 10mm wrench, then an 8mm wrench, unscrew the nuts securing the fan casing around the perimeter (6 pieces in total).
- Disconnect the wire block on the fan connector.
- Carefully remove the fan casing along with the drive.
- Using a 10mm wrench, unscrew the 3 bolts holding the electric motor to the casing.
- We put a new one in its place.
- We install the structure in place, fix it, and connect the connector.
- We carry out further installation in the reverse order.
Checking the condition and operation of the VAZ 2106 radiator shutter drive (VAZ 21061, VAZ 21063, VAZ 21065)
The radiator shutters of a VAZ 2106 car (VAZ 21061, VAZ 21063, VAZ 21065) are checked by pulling out and pushing in the control knob. When you pull the handle all the way, the doors should close tightly; when you push them in, they should open completely. If this condition is not met, the blinds are adjusted.
To make the adjustment, unscrew the locking screw securing the cable on the blinds swing lever, that is, release the cable, then manually open the shutters completely, first push the blind drive handle all the way, and then pull it out 2...4 mm and secure the locking screw. Now all that remains is to check that the adjustment is correct. If the blinds open and close with difficulty, then the shutter axes and the rod are lubricated with oil.
The rod can be lubricated with any oil, but the difficulty is that it will have to be removed from the casing by first unscrewing the locking screw and freeing the end of the cable, and after lubricating it, reinsert it into the casing. And this presents certain difficulties.
The lubrication process can be facilitated by using a composition of 60% mineral oil with colloidal graphite concentrate and 40% white spirit. This lubricant is applied directly to the rod shell, and it easily passes inside.
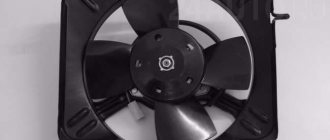
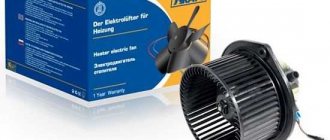
Fan motor
The electric motor is the main component of the device. The VAZ 2107 used two types of engines: ME-271 and ME-272. In terms of characteristics, they are almost identical, but as for the design, it is somewhat different. The ME-271 engine has a stamped housing, i.e., non-separable. It does not require periodic maintenance, but in case of malfunction, it can only be replaced.
Not every fan motor can be disassembled
Design and characteristics of the fan motor
Structurally, the motor consists of:
- housings;
- four permanent magnets glued around the circumference inside the case;
- armatures with winding and collector;
- brush holder with brushes;
- ball bearing;
- support sleeve;
- back cover.
The ME-272 electric motor also does not require maintenance, but unlike the previous model, if necessary, it can be partially disassembled and attempted to be restored. Disassembly is carried out by unscrewing the tightening bolts and removing the back cover.
ME-272 has a collapsible design
In practice, repairing an electric fan is impractical. Firstly, you can only buy used spare parts for it, and secondly, a new device complete with impeller costs no more than 1,500 rubles.
Table: main technical characteristics of the ME-272 electric motor
| Characteristics | Indicators |
| Rated voltage, V | 12 |
| Rated rotation speed, rpm | 2500 |
| Maximum current, A | 14 |
If the cooling fan does not work
To drive the fan, a DC electric motor with excitation from permanent magnets ME-272 or similar is installed. Technical data of the electric fan and fan switch sensor:
- Rated rotation speed of the electric motor shaft with impeller, 2500 – 2800 rpm.
- Electric motor current consumption, 14 A
- Sensor contact closure temperature, 82±2 degrees.
- Sensor contact opening temperature, 87±2 degrees.
The cooling system fan may not turn on due to:
- electric drive malfunctions;
- blown fuse;
- faulty thermostat;
- a failed thermal sensor for turning on the cooler;
- faulty VO relay;
- broken electrical wiring;
- faulty expansion tank plug.
To check the VAZ fan electric motor itself, we apply 12 V voltage from the battery to its terminals - a working motor will work. If the problem is with the fan, you can try to repair it. The problem is usually the brushes or bearings. But it happens that the electric motor fails due to a short circuit or break in the windings. In such cases, it is better to replace the entire drive.
The BO fuse is located in the mounting block of the car's engine compartment and is designated F7 (20 A). The test is carried out using a car tester turned on in probe mode.
- In a car with a carburetor engine, you need to check the sensor - turn on the ignition and short-circuit the two wires going to the sensor. The fan should turn on. If this does not happen, the problem is definitely not with the sensor.
- For injection cars, it is necessary to warm up the engine to operating temperature and disconnect the sensor connector, disconnecting it from the vehicle’s on-board network. In this case, the controller must start the fan in emergency mode. The electronic unit perceives this as a failure in the cooling system and forces the fan drive to operate in constant mode. If the drive starts, the sensor is faulty.