Lighting devices (optics) of the VAZ 2110 are of great importance when driving outside the city or even in the city itself behind any car, in some cases it does not lead to anything good, because the front cars are a very high source of danger, since when driving For example, on gravel at high speed, the front car can cause good damage to the rear one, since all the stones from under the wheels will fly into the rear moving car and thus they can damage the hood, radiator grille, headlights, fog lights of the car that is driving behind and after that You will have to change some parts.
In today's article we will talk to you about when it is necessary to replace headlights 2110-2112, which optics are better to choose and how to replace the low and high beam lamps with your own hands
Design and arrangement of lighting devices VAZ 2110 – 2112
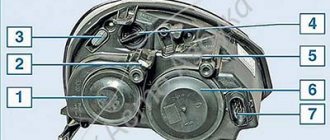
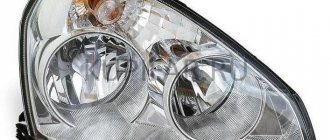
The car uses two block headlights, in which reflectors for high and low beam lamps are installed in a single housing. For high and low beams, single-filament halogen lamps AKG12-55-2 (H1) with a power of 55 W are used. In the low beam sections, A12-5-2 (W5W) front side light lamps are additionally installed. Headlight units from different manufacturers may differ in the design of the low beam section. The vehicle must have headlights of the same design. The headlights are turned on by a switch installed on the instrument panel trim. The high and low beam headlight lamps only light up when the ignition is on. When the ignition is turned off, only the side light lamps can light in the headlights. The headlights are switched from high beam to low beam using the left steering column switch lever
Diagram for switching on headlights on a VAZ 2110, VAZ 2111, VAZ 2112: 1 – left headlight; 2 – right headlight; 3, 7 – to power supplies; 4 – mounting block of fuses and relays; 5 – headlight switch; 6 – external lighting switch; 8 – relay for turning on fog lights; 9 – to the mounting block (block Ш1, pin 6); 10, 11 – rear fog lamps; 12 – control lamp for fog lights; 13 – fog lamp switch; 14 – ignition switch; 15 – high beam indicator lamp; K4 – headlight low beam relay; K5 – headlight high beam relay
To adjust the direction of the low beam beam, there are two screws with plastic handles on the rear wall of each headlamp unit. The screws allow you to change the direction of the light beam in the horizontal and vertical planes. The headlights are equipped with a hydraulic luminous flux direction corrector, which allows you to change the vertical direction of the light beam from the passenger compartment in accordance with the vehicle load. Some cars are equipped with fog lights, which are mounted in the niches of the front bumper. The fog lamp switch is installed in the instrument panel trim on the left side. When the fog lights are turned on, the warning lamp located next to the switch lights up. The headlights can be equipped with lamps of the type AKG 12-55-2 (HI) or AKG 12-55-1 (NZ). The relay for turning on the fog lights is installed in the mounting block.
Diagram for switching on fog lights on a VAZ 2110, VAZ 2111, VAZ 2112: 1 – Fog lights; 2 – control lamp for turning on fog lights; 3 – relay for turning on fog lights; 4, 7 – to power supplies; 5 – mounting block of fuses and relays; 6 – external lighting switch; 8 – to the light switch; 9 – fog light switch
On a car not equipped with fog lights, their installations are covered with plastic plugs. The front direction indicators are mounted on the outer sides of the headlight units. They are equipped with lamps of type A12-21-4 (PY21W) with orange light bulbs. Turn signals are duplicated by side turn indicators (repeaters) mounted on the front fenders. The side turn signals have baseless lamps. Moreover, if the lantern’s diffuser is orange, then lamps of type A12-5-2 (W5W) are used, and if the diffuser is colorless, then with an orange bulb of type A12-5-3 (WY5W). The turn indicators are activated by the left steering column switch.
Scheme for switching on external lighting on a VAZ 2110, VAZ 2111, VAZ 2112 car: 1 – side light lamps in the headlights; 2, 6 – to power supplies; 3 – mounting block of fuses and relays; 4 – external lighting switch; 5 – ignition switch; 7 – indicator lamp for external lighting; 8 – side light lamps for rear lights; 7 – brake signal lamps; 9 – license plate lights; 10 – instrument lighting switch; 11 – to instrument lighting lamps; 13 – brake light switch; 14 – display unit of the on-board control system; K1 – lamp health monitoring relay
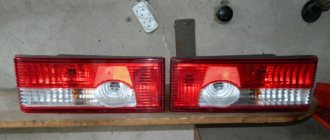
The VAZ 2110 with a sedan body and the VAZ 2112 with a hatchback body are equipped with combined rear lights, which consist of two parts. One part is the external light, installed in the rear fender niche and consists of two sections: the upper - the turn signal section with the A12-21-3 (P21W) lamp and the lower - the side and fog light sections. There are two lamps installed in the lower section: A12-21-3 (P21W) and A12-4-1 (T4W). The other part is the internal light, installed on the lid (or door) of the luggage compartment and also consists of two sections: a reversing light section with a colorless lens and a brake signal section with a red lens. Both sections are equipped with the same type of lamps - A12-21-3 (P21W).
Diagram for switching on direction indicators and hazard warning lights on a VAZ 2110, VAZ 2111, VAZ 2112: 1, 2 – direction indicator lamps in the headlight unit; 3, 6 – to power supplies; 4 – mounting block of fuses and relays; 5 – ignition switch; 7 – alarm switch; 8 – left side direction indicator; 9, 10 – direction indicator lamps for rear lights; 12 – left steering column switch; 13 – indicator lamps for direction indicators; KZ – relay-interrupter for turn signals and hazard warning lights
On a VAZ 2111 station wagon, the interior light also consists of two sections with A12-21-3 (P21W) lamps, but instead of the brake signal section there is a fog light section. The external lamp has three sections: the upper one - side light with lamp A12-10 (R10W); middle – brake signal; the lower one is the turn indicator. The two lower sections contain the same type of lamps A12-21-3 (P21W).
Scheme for turning on the sound signal on a VAZ 2110, VAZ 2111, VAZ 2112 car: 1 – sound signal; 2 – sound signal switch; 3 – mounting block of fuses and relays; 4 – cooling system fan wire block; 5 – to power supplies
A lighting lamp is installed on the ceiling of the cabin. It turns on automatically when you open any of the side doors using limit switches installed in the door openings, or forcibly when you press the lamp diffuser. An AC12-5-1 (C5W) type lamp is installed in the interior lighting lamp. The same lamps are used in license plate lamps, glove box and luggage compartment lamps. The license plate is illuminated by two lamps.
The license plate lamps and luggage compartment lamps light up when the side lights are turned on. The luggage compartment lamp can be turned off forcibly, for which there is a switch on the lamp itself. The glove box light comes on when the ignition is on and the glove box lid is open.
Self-recovery methods
To get to the reflector, the headlight removed from the car must be disassembled. The first option involves repeatedly passing the hot air of a hair dryer over the seam. The second option involves leaving the headlight in an oven preheated to 100°C for 20 minutes. After opening, all parts are cleaned of sealant residues, washed without using alcohol-containing liquids and dried.
The sealant holding the headlight components together begins to deteriorate when exposed to temperatures above 75°C.
Using metallic tape
Let's start with how to restore the reflector on a headlight using tape foil. All you need is metallized tape, purchased at a hardware store for about 30 rubles. Its adhesive base copes well with high and low temperatures, and the aluminum film is very wear-resistant.
In order to obtain a smooth surface with a minimum of seams after gluing the tape on the reflector, first, pieces of the most suitable shape are formed from several strips. Then remove the protective film and carefully stick it on. The whole procedure takes about half an hour.
Immediately before gluing, the surface must be degreased.
Advantages of the method: durability, low cost, ease of implementation.
Disadvantages: when gluing, irregularities and seams remain, which impair the properties of the reflector.
Using metal foil
Aluminum foil is highly reflective, which allows it to be used in the restoration of headlight reflectors. You will also need some epoxy resin. To maintain a perfectly smooth surface of the foil, the entire pattern is made from plain paper. Then the parts are duplicated from aluminum sheet, a thin layer of resin is applied to the reflector and glued, removing excess resin.
Advantages: withstands any temperature changes.
Disadvantages: being between the metal foil and the plastic base, epoxy glue lacks air and takes a very long time to dry. It is almost impossible to remove dried glue. Therefore, such a reflector is not suitable for repeated restoration. With the advent of tape foil, this method is practically not used.
Using chrome paint
Headlight reflector repair using chrome paint is the most popular. No need to cut and glue anything. Paint is sprayed onto the degreased surface of the reflector from a can of white chrome until a uniform, uniform layer is obtained. After painting, the headlight is dried according to the instructions on the can.
Benefits: Provides a smooth surface. You can even spray paint onto metal tape, thus increasing the reflective effect.
Reasons for replacing headlights on VAZ 2110 – 2112
The VAZ 2110 -2112 model's lighting devices periodically break down - there is no low beam, insufficient brightness, or the lights simply do not light.
After several years of operation, car enthusiasts note the failure of the standard hydraulic corrector for factory optics. This is due to sudden sub-zero temperature changes and poor quality of device seals.
Correctors lose working fluid and need to be replaced. In rare cases - less than 10% - there is a factory defect in the standard dampers and block.
How to remove glass?
Removal will be necessary if, for example, it is necessary to replace broken glass on a VAZ 2110 or it has become cloudy, covered with microcracks, etc.
If you are dealing with Bosch, then you need to release the latches, then easily remove the glass. When installing a new one, it’s worth inspecting the rubber; replacing it won’t hurt either. Some also use sealant, although there is no particular need for this, unless, of course, you are dealing with genuine products and not Chinese fakes.
You'll have to tinker with Kirzhach a little longer. Here, in order to remove the glass, you must first carefully insert a flat-head screwdriver into the corner of the glass, forming a gap. Then connect a thin stationery knife to the process.
So, with the help of a knife and a screwdriver, you may be able to detach the glass. If the sealant “sticks”, you need to warm it up with a hairdryer and immediately continue removing the sealant while it is warm.
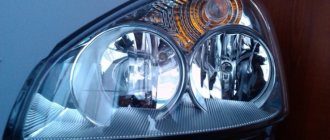
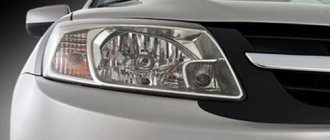
Selection of lighting fixtures VAZ 2110 – 2112
Drivers, first of all, always need a good low beam. Kirzhach headlights are equipped with a lens for low beam and, accordingly, a reflector for high beam. Bosch uses reflectors in both cases. Unlike a reflector, the lens has a much clearer light line; in addition, Kirzhach lighting devices can be legally “equipped” with xenon, which is not provided for Bosch.
However, if we compare the results of the review of experts and the opinions of car owners, it is worth noting that they are somewhat different. “Bosch” headlights have weak flare from the side in the low beam, but besides this, they are the ones that cause preference. In addition, they have a large surface for low beam due to the reflector. This has the best effect on the quality of automobile road lighting in cloudy weather.
In order for lighting to be as productive as possible at night, choosing high-quality optics is not enough. The headlights should be adjusted correctly, and the glass should be clean (the glass should be secured with a sealant, but on Bosch they are held on by sealants. This makes the process of replacing glass easier). However, the best option would be to use bright halogen lamps for car lighting.
What's better
One of the questions that 2110 owners ask is which headlights are best to choose for this vehicle. For the VAZ 2110, only Bosch and Kirzhach headlights are standard. If we consider the secondary market, what headlights are suitable for a foreign car?
This car configuration uses the following types of products:
- in the form of a monoblock;
- using lenses;
- modular;
- black;
- chrome plated;
- tinted.
In order not to be confused about which base is in the VAZ headlights, you can refer to the manufacturer’s documentation. Cars have a standard H1 base. When choosing new blocks, you need to focus on this feature.
Replacing low and high beam lamps VAZ 2110 -2112
Before you start, you should definitely know some nuances that relate to light lighting in a car, namely, the low beam lamp and the high beam lamp are absolutely identical, so if you come to the store and hear the answer: “Do you want a low beam lamp or a high beam lamp? “, then in this case, explain to the seller or leave the store, because these two lamps are installed identically from the factory on these models, namely, the lamps are installed only “H1”!
Disassembling the headlight and removing the Bosh glass - do it yourself
- The glass on a Bosch headlight is very easy to remove, since it is not sealed with sealant. Unfasten the headlight latches.
- To remove the reflector, you need to unscrew the adjustment screws and pull out the cap that covers the low beam bulb; to do this, pry it off with a screwdriver from the other side.
- You have to adjust the headlight beam quite often, especially on station wagons, when the car trunk is heavily loaded and the light is directed into the eyes of oncoming drivers. If at one point you notice that the reflector has fallen and the light adjustment does not work, then you can try to repair the 2110 headlight yourself .
Disassembling the headlight and removing the Kirzhach glass - do it yourself
So, the first thing you need to do is remove the glass from the headlight. I consider this stage to be the longest and most dangerous. Dangerous because if you are not careful you can break the glass.
- We insert a screwdriver or knife into the edge of the headlight, between the glass and the plastic block.
- This will create a small gap through which you can insert a utility knife and begin cutting the sealant.
- Be careful, do not rush, do not insert the screwdriver too deeply, otherwise the headlight glass will simply crack.
- We go through the entire perimeter of the headlight with a knife. If the sealant does not yield, you can warm up the headlight with a hairdryer.
- When the sealant has been slightly trimmed around the entire perimeter of the headlight, you can carefully push the screwdriver deeper into the headlight or insert a thicker screwdriver.
- And again we go through the entire contour with a knife. (I played with the first headlight for 2 hours, with the second one less, either I gained experience, or there was less sealant. The second one succumbed to me in half an hour).
- When the glass has completely come off, remove it from the headlight. Be careful, as the glass caught on the chrome plastic inside the headlight. And then it is fastened behind the headlight with three bolts. Therefore, if this happens to you, pry it with a stationery knife so that it comes unstuck from the glass.
- Remove the chrome insert. To do this, unscrew 3 bolts from behind the headlight.
- If you need to remove the headlight module and reflector, then remove the spring through the hole for the hydraulic corrector.
- Now tighten the adjustment screws as much as possible, insert the screwdriver handle and unscrew the adjustment screws.
- Now you can remove the board from the plastic headlight housing
Tuning with a plastic tube
To complete the work, you need a set of tools, as well as materials for manufacturing: a jar suitable for the diameter of the headlight, LED strips, resistors, transparent plexiglass sticks.
Having prepared everything for work, we step by step:
- Heat the tube with a hairdryer, bend it around the can using pliers, this is the diameter of the headlight.
- Let cool and saw off excess.
- Assemble LEDs and resistors.
- Sand the edges of the tube and drill holes at the ends.
- Use a hacksaw to make notches on the inside of the tube.
- Fix the LEDs in the holes and remove the contacts.
- Apply sealant to the structure and secure it around the headlight lens.
How to replace the headlight on a VAZ 2110 - 2112 - step-by-step instructions
In order to replace the headlight on a VAZ 2110 - 2112, do the following:
- At the very beginning of the operation, open the hood of the car and unscrew all the bolts or screws (different everywhere) that secure the radiator grille to the car; for clarity, the grille mounting bolts are indicated in the photo below by arrows:
- After the bolts have been unscrewed, remove the grille from the car and begin unscrewing the bolts securing the headlight unit itself; to do this, take the extension with a cap head in your hand and use it to unscrew the two top and one side bolts securing the headlight unit.
- Then, on the reverse side, find two blocks of wires that are connected to the headlight, one of these blocks is indicated by a red arrow in the photo, but the second one is not visible from the angle, since it is connected to the turn signal and therefore is not visible in the photo because of the body, so after you find both pads and disconnect them, you will have to remove the hydraulic corrector from the headlight (the corrector is indicated by a blue arrow), to do this, press the latch that holds the corrector and then turn it clockwise about 90 degrees, remove it from the hole in which it is located.
- Now again move to the outside of the headlight block and remove the cover from the block, in order to remove it, grab it with your hand as shown in the main figure below and then move it to the center by about 3-4 centimeters, and after it moves to center to the required distance, press your hand on its lower part and push it further until you completely remove it from the car as shown in the small photo below:
- Next, when the cover of the headlight block is removed, take the extension cord and put the cap on it and then unscrew the last nut that secures the headlight block itself (Indicated by an arrow in the small photo), and when this nut is unscrewed, pull it towards you and thereby completely remove the entire unit from the vehicle.
Disassembly
After removing the device, it can be replaced with a new one, the old one can be repaired, or the optics can be tuned. Here the decision depends entirely on your needs and wishes.
Foggy
Disassembling the headlight unit is not a tricky task. But there are some peculiarities:
- Unscrew the two screws that are responsible for fastening;
- Disengage the two hooks located on the turn signals from the headlights;
- Thus, the optics is disassembled into two components.
Principle of step-by-step action
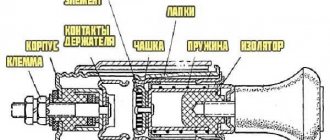
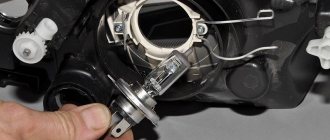
Let's start removing the lamp from the headlight unit. To do this, we need a thin screwdriver and an awl, as well as a magnet on a long handle (if possible). We unscrew the lamp protection box on the headlight unit on both sides by hand.
Remove the cover. Below it you can see the three-pin headlight power connection block, as well as the spring mechanism of the lamp holder.
Replacing the low beam bulb on a VAZ 2114 Before disconnecting this unit, you need to disconnect the contact block. Then you need to compress the lamp fastening spring and release the lighting element itself. With a slight movement of the hand, we remove the lamp from its standard mounting location and replace it in the reverse order.
Before changing the low beam bulb on a VAZ 2114, it is advisable to make sure that there is no condensation in the reflector unit. If moisture is present, this may be the main reason for the failure of this device.
To eliminate it, it is important to clean the drainage channel, which is located in the area where the turning lamp is mounted (left or right)
When performing this work, you must adhere to basic safety rules. When the lights for the VAZ 2114 stop shining on the road, you don’t need to stand on the side of the road, creating an emergency situation, but try to get to the nearest gas station or service station.