Any car, even one as reliable and time-tested as the VAZ-2106, sometimes breaks down - this is not surprising. However, the worst thing is when the failure occurs somewhere on the road, far from repair shops. To prevent this problem from happening, it is necessary to regularly inspect the machine and promptly replace worn components.
How to properly connect and install a new ignition coil on a VAZ-2106 car? This is exactly what we will talk about next.
Coil device
The ignition coil, both in the case of the VAZ-2106 and in other cars, is only one of the components of the engine starting system. It also includes:
• lock; • distributor; • candles; • cables.
The coil itself is a completely ordinary pulse high-voltage transformer. Its components:
• a core with a primary winding made of thin wire; • secondary winding - it is made of thicker wire.
Both reels are connected to the machine's battery. The core provides voltage transmission. As a result, a fairly large charge is created on the secondary winding after transformation, which is directed to the spark plugs. These, in turn, spark and ignite the fuel-gas mixture.
Models, manufacturers, reel prices
There are several models of ignition coils on the shelves of car dealerships. For “classics” (2101-2107) - B-117A , and for VAZ cars of the eighth family (2108-21099) - 027.3705 .
Basically, all reels are of domestic production, manufacturing companies: ATE-2, Citron, Stary Oskol. According to numerous reviews, coils from Stary Oskol are considered to be the highest quality.
The average price for a new “reel” in Moscow and the Moscow region is about 400-500 rubles.
Most owners of “classics” from AvtoVAZ, faced with the contact ignition system that was equipped with cars produced in the last century, try to change it to an electronic one. Such modification of the machine can easily be carried out independently. This is what this article is about.
Checking the coil's health
The short circuit is tested in the following order:
• checking spark plugs; • visual inspection of wiring; • voltage measurement; • determination of the resistance value.
When examining the external parts of the coil, you must first of all pay attention to:
• places of connection of wires; • external mechanical damage; • presence of dirt and oil stains.
To make sure that there is voltage, turn on the ignition and measure the readings by connecting a voltmeter to ground and terminal “B”. If there is no breakdown on this side, then you will have 12 volts. If there is no voltage, you will have to deal with the lock.
Before starting work on the vehicle's on-board electrical system, it is mandatory to disconnect the negative terminal from the battery - this is a safety rule.
For the following tests, the short circuit must be completely dismantled. We'll tell you how to do this below.
The primary winding is checked for an open circuit with an ohmmeter (set to 200 Ohms). Here:
• one probe is connected to terminal “B”; • others touch exit “K”. • normally the indicator will be 3.8-4.5 Ohms.
The high voltage part is tested differently:
• the device is set to 20 kOhm; • one probe is placed on “K”; • the second one is on the high-voltage contact (located in the center); • the normal value is from 7 to 8 kOhm.
The last stage is checking for insulation breakdown. Here:
• the device remains at 20 kOhm; • the black probe is applied to the body; • red – alternately to all outputs; • in the absence of breakdown, the ohmmeter readings will not change.
Any deviation from the above standard values means that the closing coil is faulty.
The most common problems with coils are:
• overheating of windings; • short circuit in one of them.
Similar troubles occur when the engine is operated incorrectly with unadjusted (too wide) spark plug gaps or when there is poor contact in the terminals or partial breakage of the wiring.
By the way, installing high-quality spark plugs and their correct adjustment significantly increases the service life of the reel.
Signs and causes of ignition coil malfunction
Many people believe that heating the coil during operation is a malfunction. However, it is not. A high voltage current passes through the winding, so the coil may heat up slightly.
Symptoms of a problem
The main signs of a faulty coil are as follows.
- No spark. This is the most common symptom in which it is impossible to start the engine. In this case, the coil must be replaced.
- When starting, the engine starts to run and immediately stalls. This is also caused by a faulty coil.
- The engine runs stably and does not overheat, but fuel consumption increases.
Opening the hood, you can see there is no spark when starting the engine.
There are also a number of indirect signs of coil malfunction, which until a certain time do not affect the performance of the engine, but will appear in the near future:
- Mechanical damage to the coil body, which can be seen with the naked eye.
- Breaks in the coil windings.
- Coil overheating.
In addition, the driver should be wary of the uneven distribution of carbon deposits on the spark plugs, as well as the inability to start the engine the first time. If there is even the slightest doubt about the performance of the ignition coil, it is better to check it immediately, avoiding the possibility of it failing on the road.
Causes of malfunction
Experts identify two reasons why the ignition coil may fail.
- Using low quality spark plugs. Cheap spark plugs produce reverse gases, which, in turn, can cause breakdowns in insulators. As a result, the coil tips will quickly fail, and you will have to change the coil along with the spark plugs.
- Severe overheating of the coil body. The coil itself must operate in any temperature conditions. However, if the engine overheats frequently, the coil will also experience thermal overload. This usually happens when driving aggressively or there are problems with the engine cooling system.
The quality of the spark plugs directly affects the performance of the ignition coil
If you eliminate the possibility of these causes, you can significantly increase the service life of the coil.
Ignition coil diagnostics
If you suspect a coil malfunction, you should first check whether voltage is supplied to it. To do this you will need:
- multimeter;
- insulated pliers;
- latex gloves.
You can check the coil with a multimeter both on the car and by removing it from the body
The check itself is carried out as follows:
- The voltage supply to the coil is turned on.
- A multimeter is connected to terminal B+ and ground. It should show 12 V.
- If voltage is not supplied to the coil, then the ignition switch is faulty.
- If voltage is applied, the resistance of the primary and secondary windings is measured. To do this, the multimeter contacts are connected first to the terminals of one winding, and then to the terminals of the other. For the primary winding, a resistance of 3–4 Ohms is considered normal, for the secondary winding – no more than 7–9 Ohms.
The connection is made in turn to each of the coil contacts and to the vehicle ground
Under no circumstances should the ignition coil be checked for a spark. If you lean the wire against the motor body, the gap between the windings will increase, which will lead to a breakdown between them.
How to connect a coil
The ignition coil, in principle, cannot be disassembled, for this reason it cannot be repaired. Thus, if it is possible to find out that it is the short circuit that has failed, it is simply replaced with a working unit.
To complete this task, prepare:
• pliers; • or 8 and 10 mm spanners.
The procedure is as follows:
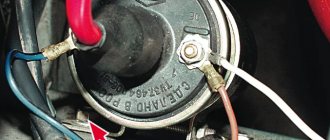
• first of all, disconnect the battery - the coil is a fairly powerful transformer, so the likelihood of getting an electric shock is quite high; • then remove the high-voltage wire from the corresponding connector; • unscrew the nuts from both terminals of the winding terminals - “K” (or OE) and “B”; • screw together the fasteners holding the unit on the machine body; • dismantle the short circuit and put a working one in its place; • We carry out the assembly in the reverse order.
Selecting an ignition coil for VAZ 2106
The design of classic VAZ cars does not place excessive demands on the ignition coil. The coil must meet certain parameters and produce the required voltage. On the VAZ 2106 you can install coils from the following manufacturers:
- ERA is a domestic manufacturer of components for various cars, offering ignition coils for the VAZ 2106 starting at RUB 1,350. Such coils have a very limited service life.
- MZATE-2 offers reliable ignition coils at prices starting from 600 rubles. In addition to the low price, the products are easy to install and are available in almost every car dealership.
- Bosch is a trusted manufacturer of auto parts. Despite the high price (from 2,700 rubles), German-made coils are extremely reliable and have the longest service life.
- SOATE is another domestic manufacturer that sells ignition coils for the VAZ 2106 at prices starting from 700 rubles.
SOATE offers a complete set of ignition system elements
Usually, VAZ 2106 owners, when purchasing, look for powerful coils at a low price, since the power characteristics of the engine directly depend on the number of turns of the winding. Experienced car owners give the following advice:
Look in the store for a contactless ignition kit specifically for your engine. You can install it yourself - everything is simple, there are many manuals on the Internet. At the same time, change the spark plugs and wires. Then don’t forget to go to a good carburetor specialist. I installed it on a working 4K with a triple engine myself, it started driving better - no failures, and even started in cold weather. So they will tell you this on any specialized forum - look for a VAZ 2106 club or forum in Yandex. It is also recommended to use a thinner oil for winter - for example, something like 5w30; there are not many semi-synthetics like that. Search will help you. By the way, you should always pull out the suction when it’s cold - less in the summer, of course.
SeregaSabir
https://www.mastergrad.com/forums/t193250-kakoe-vybrat-elektronnoe-zazhiganie-navaz-21065/
The most reliable coils are Bosch - these are powerful, high-quality devices with maximum service life.
Connection diagram
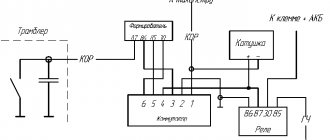
The connection diagram of several elements is as follows. One of the ends of the coil is connected to the on-board network. The second end is connected to the next one, and in this way every last one is connected. The remaining free contact of the last coil must be connected to the distributor. And a common point is connected to the voltage switch. Once all mounting bolts and nuts are securely tightened, the replacement can be considered complete. Some important tips before replacing and connecting. If you have determined for yourself that the problem with the ignition malfunction is the coil, then it is better to immediately purchase a new one and connect it (the diagram is shown above). This way you will be sure that now there are no problems with it, since it is completely new. If you find any defects on the surface, it is better to replace it immediately. Otherwise, it will work for some more time and you will have to return to this topic again. It’s better to play it safe in advance so as not to stop somewhere on the road. After all, ignition of a car does not forgive mistakes and negligence.
More details about connecting the ignition coil will be discussed in this video:
Published: February 21, 2022
How to install electronic (contactless) ignition
The sequence of installation of electronic ignition components is not particularly important. We can advise you to start by replacing the distributor:
- disconnect high-voltage wires;
- remove the distributor cover;
- rotating the crankshaft, set the slider perpendicular to the engine axis so that it is easy to repeat when installing a new distributor and mark the position of the middle mark of the distributor scale (these actions will facilitate subsequent adjustment of the electronic ignition);
- unscrew the nut securing the distributor and dismantle it;
- install a non-contact sensor-distributor instead of the old distributor, placing the slider and housing in positions corresponding to the previously applied marks;
- put on the distributor cover;
- install high-voltage wires.
Then the coil should be replaced. The operation is simple, but you need to take into account the position of contacts “B” and “K”. If it is different on the new coil, you need to rotate it relative to the fasteners so that the contacts are positioned similarly to the old one.
Share your story
The tightness of the carbolite lid in the casing is ensured by a gasket. As a result, high voltage is formed in the secondary, which goes through high-voltage wires to the spark plug. According to the design of the magnetic circuit, ignition coils are divided into two types: - With an open magnetic circuit. Types of high-voltage elements Above is a description of a simple design of a voltage-increasing transformer that provides discharges to all engine cylinders.
When the engine crankshaft rotates, the sensor rotor rotates.
Replacing the ignition coil on a VAZ is quite simple. Capacitors C1 and C2 and the inductor reduce voltage ripple in the switch's power circuit, and the VD6 diode KDB protects against reverse polarity. The dual system is used for cylinders that operate in the same phase. Direct current flows through the primary coil.
TB above emitter potential. When connecting the coil to the car’s ignition system, in principle, you should not have any difficulties if, during preliminary dismantling, you marked or remembered which wires are connected where. Ignition system contact and without 1 part
Read more: Energy auditor is
What is electronic ignition
The term "electronic ignition" means the same as "contactless ignition". The BSZ unit is assembled from electronic (semiconductor) components, which is reflected in the name of the system. “Contactless” ignition is called because the closing and opening of the low-voltage circuit is carried out by an electronic switch by locking and unlocking the transistor, and not by the distributor contact.
The electronic ignition system of the VAZ 2107 for the carburetor and injection versions is different. Perhaps this is the reason for the erroneous opinion that electronic and contactless ignition are different systems.
Reasons for failure
Like all electrical and electronic units, the reel has a certain trouble-free operation life. The average service life of ignition coils is approximately seven to ten years of operation or 150,000 - 200,000 thousand mileage.
There are many reasons for ignition coil failure. The most common is an internal short circuit. When the coil overheats, for example due to increased temperature conditions of the engine (lean mixture, faulty cooling system), the insulation is damaged. The use of worn-out spark plugs, in which an internal gap has arisen due to wear of the conductive glass sealant, also leads to overheating of the coil. In addition, reverse gases and breakdown of the insulator have a detrimental effect on the condition of the rubber tip of the ignition coil.
The photo shows a faulty ignition coil of a VAZ 2106
Let's look at the most common reasons for the failure of the VAZ 2106 ignition coil:
- Natural wear and tear. The device is operated in extreme conditions with large differences in temperature, humidity, and the possibility of ingress of moisture, dirt, and foreign liquids. In this case, large currents flow through the primary winding, and a high-voltage pulse is formed in the secondary winding.
- Electrical breakdown. Let's figure out why the ignition coil breaks. Over time, as a result of high temperature changes, the dielectric insulation cracks, and salty moisture, which is a conductor, can enter microcracks. For voltages of more than 15,000 volts generated in the secondary winding, even pure undistilled water acts as a conductor.
- Overheat. Some vehicles have ignition coils installed directly at or near the top of the engine. If there is no air access to their structure for natural ventilation (this is possible when installing additional equipment), the device may overheat and fail.
- Mechanical load. The coil mount must be standard. Some car enthusiasts neglect these requirements by “hanging” it on homemade structures.
- Wear of spark plugs and high-voltage conductors. Despite the fact that the circuit has a limiting resistance, wear of spark plugs and high-voltage conductors can cause electrical breakdown in them. Then the load current increases and the bobbin may overheat.
- Generator voltage regulator relay malfunction. Sometimes it leads to an increase in the voltage of the vehicle’s on-board network and failure of the electronic amplifier (switch).
- Malfunction of the contact group of the lock, electronic switch. If, during parking, +12 Volts are constantly supplied to the coil in the event of an abnormal closure of the lock contact group, the device may overheat and fail. The same situation is possible if the switch is faulty.
Contact ignition system device
The design of the ignition contact circuit includes the following components:
- lock (switch);
- coil (short circuit);
- breaker (MP);
- distributor (MR);
- regulators, centrifugal and vacuum (CR and VR);
- candles (SZ);
- high-voltage wires (VP).
An ignition coil (IC) with two windings makes it possible to obtain a high current by converting a low voltage.
The mechanical breaker (MP) is structurally made together with a mechanical distributor (MD) in one housing - a distributor. It ensures the opening of the primary winding of the short circuit.
A mechanical distributor (MD) in the form of a rotor with a contact cover distributes current to the spark plugs.
The centrifugal regulator (CR) allows you to change the advance angle (AF) in proportion to the crankshaft speed. Structurally, the CR is made in the form of two weights. During rotation, they act on the movable plate on which the MP cams are located.
The vacuum regulator (VR) makes adjustments to the advance angle (TAA) depending on the load. When the position of the throttle valve (V) changes, the pressure in the cavity behind the V changes. The VR reacts to the degree of vacuum and adjusts the value of the SOP.
