In the terminology of drivers and car mechanics, the word muffler often means the entire complex of chambers and pipes that are included in the exhaust system of a modern vehicle, hence the name - muffler resonator. Replacing a faulty resonator yourself is a rather labor-intensive undertaking, but quite doable at home. It is worth noting that due to the design features of the resonator, it cannot be repaired, so the only way out in the event of a breakdown is to replace it with a new one. More on this later in the article.
Muffler 2114: replacement and repair
As a rule, the easiest way is to replace the muffler with the original one, which is installed from the factory. Such mufflers are reliable, there are no problems with installation (if the products are truly original, since there are many fakes on the market).
It is quite possible to choose an analogue solution, but not all mufflers are of high quality and can be installed on the car without modifications. For this reason, you need to take into account all the nuances before purchasing.
Experts also recommend changing the fastening bolts, choosing the original or high-quality analogues. If you skimp on bolts, they will stick to the bottom, after which problems will arise when you try to remove them. Let us also add that if a knocking sound from the muffler appears, the rubber hangers may require replacement.
Having prepared all the parts, you should also have the necessary tools: a pair of open-end wrenches 13, a hammer, a chisel, brake fluid or WD-40, and a flat-head screwdriver.
The replacement process itself generally suggests the following:
- The car is driven into the pit and raised on a lift;
- If this is not possible, you should jack up the car or drive it onto an overpass, and then install wheel chocks;
- Having climbed under the car, you should treat all joints of pipes and bolts with WD-40, leave the lubricant for 15 minutes;
- Afterwards, you can try to unscrew the bolts; if this fails, then cut them off using a chisel or hammer (when doing this, avoid hitting the bottom);
- Having unscrewed the pipe, the element is removed from the rubber hangers, lifting the part (in the case when the rubber is “hardened”, you can pry it off with a screwdriver). The muffler itself on the VAZ 2114 and 2115 is attached to 5 hangers;
- After dismantling, you can repair the old muffler or install a new one. Having completed the work, you should proceed to installing the part on the car;
Before installation, it is advisable to clean all parts and mounting points of the muffler on the bottom from rust and dirt, lubricate it, and treat it with anti-corrosive, if necessary.
- When installing, you must first tighten the muffler 2114 or muffler VAZ 2115 under the car body and place it in the same way it will be installed on the car. Next, the exhaust pipe and resonator are hung on rubber hangers. Afterwards the quality of fastening is checked;
- Having installed all the elements, you can begin to twist the nuts on the bolts, tightening them tightly, but being careful not to overtighten the threads.
At this stage, the work of replacing the muffler is considered complete. All that remains is to start the engine and check the tightness of the exhaust system, making sure there is no noise. They also make a test drive to make sure that the muffler does not catch anywhere and does not knock while swinging on the suspensions.
Correct selection
p, blockquote 32,0,0,0,0 –>
In order for the muffler corrugation to reliably protect the exhaust system of the car, and at the same time the body, you need to know some of its features. This will help you choose the best option without overpaying.
p, blockquote 33,0,0,0,0 –>
p, blockquote 34,0,0,0,0 –>
Before you go to the auto parts store, you need to determine the type of old element. It is usually located in two positions:
p, blockquote 35,0,0,0,0 –>
- horizontally;
- vertically.
In a horizontal position, the corrugation can be seen, if viewed from the side of the power unit, then after the first bend of the exhaust pipe. In this case, it bends under load. As for the length, it can reach up to 400 mm with a diameter of 65 mm. When choosing a new part, you need to focus on the dimensions of the old one.
p, blockquote 36,0,0,0,0 –>
In a vertical position, the corrugation, under the influence of the load from engine operation, first compresses and then straightens. Typically, such elements have a reinforced design. At the same time, the dimensions are limited: the length is no more than 150 mm, and the internal diameter is 65 mm. When choosing this part, it is important to consider how the old corrugation is welded.
p, blockquote 37,1,0,0,0 –>
Video - replacing the muffler corrugation on an Opel Zafira:
p, blockquote 38,0,0,0,0 –>
p, blockquote 39,0,0,0,0 –>
Any type of elastic element is placed on the exhaust system pipe using the overlap method. The main thing is to take into account the following nuance: if it is not possible to remove the welds, excluding damage to the exhaust system pipe, you should choose a corrugation of the same length as the old part. If they can be cut, then the corrugation needs to be selected 20 or 30 mm longer.
p, blockquote 40,0,0,0,0 –>
In addition to the two main criteria for choosing a corrugation (length, internal diameter), it is also important to take into account its quality, which always depends on the manufacturer. Common brands in the automotive market are the German company Ehler and the Italian manufacturer Hydra. The cost of parts can vary from 800 to 1500 rubles. There are cheaper options, but if you want to save money, you should remember that it is not always justified.
p, blockquote 41,0,0,0,0 –>
Features of the catalytic converter
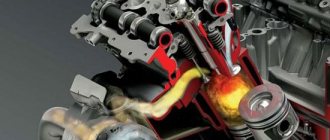
Catalysts began to be installed only on injection engines and with their help achieved more complete combustion of the mixture in the chamber. The VAZ 2114 catalyst consists of a housing, an oxygen sensor, a lambda probe, and a mesh made of special wire, which could help burn out the remaining fuel entering the exhaust system. At the inlet of the catalyst there is an oxygen sensor, which monitors the proportion of oxygen in the exhaust gases, comparing it with atmospheric pressure.
When gases entered the catalyst, the lambda probe assessed the composition of the gas and supplied information to the electronic control unit. The ECU, in turn, adjusted the composition of the mixture so that the content of harmful substances did not exceed the norm. This could go against the engine's requirements for achieving maximum power, but toxicity standards were put at the forefront. The only positive properties of the catalyst include slightly reduced fuel consumption. Although this indicator entirely depends on the condition of the catalyst. The scheme with one lambda probe complied with Euro 2 standards, but today this scheme is already outdated and is no longer used on new cars.
Design and purpose of the exhaust gas system
The gas exhaust system of the VAZ 2114 consists of various functional parts. Folding into one solid chain, it contributes to the normal operation of the car. The system regulates the release of harmful chemicals concentrated in exhaust gases into the surrounding atmosphere. Schematically, this system looks like this, as shown in Fig. 1. The exhaust system of the car model in question includes the following main functional components.
- Exhaust manifold VAZ 2114. Serves to combine gas flows emanating from each cylinder into one common pipe. To withstand increased dynamic loads, the collector is equipped with the most rigid and durable fastening.
- Catalyst. This component of the system significantly reduces the level of toxicity of exhaust gases. To do this, highly toxic emissions are converted into less toxic gas impurities using a chemical reaction.
- Reception pipe. Designed to connect the VAZ 2114 exhaust manifold and the catalyst.
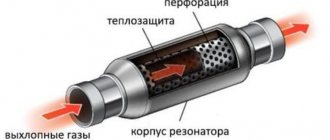
- Resonator. By means of several “acoustic mirrors” built into the body, it reduces the level of noise that occurs during strong exhaust.
- Silencers. Even more than the resonator, they enhance the noise absorption of the entire exhaust system of the VAZ 2114.
- Corrugation. Thanks to its elastic structure, it suppresses vibration transmitted from the engine to the exhaust system.
Muffler replacement
- disconnect the main and additional muffler;
- bend the hooks of the hanging straps;
- remove the brackets;
- remove the main muffler, which is mounted on the cushions.
After this, you will need to reassemble in the reverse order, only instead of the old spare part, hang the new one on the cushions. If the fastenings of the clamp connecting the resonator and the muffler pipe are dirty, clean them with a metal brush.
Before assembling the system, clean the gasket ring thoroughly. You can coat it with heat-resistant sealant to reliably seal the exhaust gases inside the system. The above method of replacing a muffler can also be used in cases where you want to tune your car.
Many car enthusiasts install sports mufflers on their VAZ-2115, which have a qualitatively different sound. In this case, you don’t have to wait for a malfunction to appear. Also, the new muffler can improve the environmental characteristics of the car, that is, after replacing this component, it will release less exhaust gases into the atmosphere. Remember that sport or upgraded mufflers will cost more than the stock replacement part.
If you want to tune your car, get ready to spend a lot of money. Buy only new imported spare parts. You should not try to turn an ordinary spare part into a sports modification using welding. This homemade product will not last long. For the same reason, we recommend replacing entire parts of the exhaust system rather than trying to repair them if malfunctions occur.
How to replace a muffler with your own hands
As soon as the first signs of failure or damage to the muffler appear, measures must be taken to replace it. Signs of a malfunction may include:
- increased noise when the engine is running;
- the appearance of a characteristic smell of exhaust gases in the cabin or near the car;
- the appearance of smoke from under the bottom of the car from escaping gases in the burnt-out part of the muffler.
Before driving the car into the garage into the “pit”, you need to think through the procedure, prepare carefully and then act according to the plan.
- Having noticed signs of a malfunction, it is necessary to determine the location and nature of the breakdown using a preliminary inspection method.
- Having established that the muffler has failed, you need to purchase it from a retail chain, first making sure that it is not a counterfeit part.
This is an important note from the experience of experienced drivers and professional car mechanics. If you do not pay due attention to this, after installation, the muffler, when moving due to vibration, can hit the body, causing serious inconvenience.
Before installation, you must definitely buy rubber mounting pads, even if those on the car give the impression of being fully functional. Rubber parts fail quite quickly, especially in such places, under the influence of dirt and high temperature. You also need to purchase a metal-graphite ring, which is installed at the junction of the muffler pipe, under the clamp, for tightness.
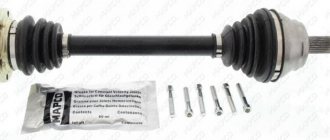
It is recommended to purchase a repair kit for the VAZ 2114 muffler in advance.
Muffler repair kit for VAZ 2114
- Having placed the car in the “pit”, it is necessary to prepare in advance for removal the clamp connecting the muffler pipe to the resonator. To do this, clean the two bolts connecting the clamp with a wire brush and lubricate the nuts on them with WD40, brake fluid or rust remover. As a rule, in such places the threaded connections become clogged, rust, and it can be very difficult to tighten the nuts.
- Prepare two 13mm wrenches. Unscrew both nuts holding the clamp.
If it is impossible to unscrew the nuts, this also happens, cut off the joints using a grinder and replace the clamp.
- Remove the clamp and pull out the metal sealing ring.
- Disconnect the muffler pipe from the resonator and remove the muffler.
- Install the new muffler in the reverse order, after lubricating the gasket ring with exhaust gas sealant. This will ensure a reliable seal of the connection.
Exhaust system malfunctions and their elimination
Due to increased pressure and very high temperatures due to intense fuel combustion, the muffler quite often fails. The level of performance of individual elements and the entire exhaust gas system of the VAZ 2114 is significantly affected by the following unfavorable technological factors:
- rapid heating to very high temperatures and possible overheating of the exhaust system;
- frequent sharp fluctuations in temperature - from heating to rapid cooling;
- permanent vibration during engine operation;
- frequent impacts and mechanical damage to the VAZ muffler;
- frequent pollution;
- scratches and chips caused by small hard particles of the road surface;
- development of internal and external corrosion;
- lack of means that effectively protect the metal surfaces of the VAZ 2114 exhaust system.
All of these factors, to one degree or another, affect the safety and performance of the exhaust unit. If the integrity is broken in any place, a gas flow immediately rushes into the resulting fracture or fistula. Due to its speed and pressure, it quickly expands the emergency hole. And then the malfunction makes itself felt - the system begins to loudly “growl” and clap, exhaust gases come out at the wrong point, and the muffler knocks. In such conditions, it becomes almost impossible to operate the car.
It should be borne in mind that in addition to loud and sharp bangs, defects in the exhaust system of the VAZ 2114 can also affect the operating mode of the engine itself. Therefore, in some cases it will be necessary to carry out repairs of system elements, thanks to which you can temporarily do without completely replacing the entire assembly.
Diagnosis of breakdowns, which precedes restoration operations, is facilitated by the fact that the occurrence of defects is usually accompanied by an unpleasant strong grinding and roaring sound under the car bottom. The owner of the car remains to carefully examine the entire chain and determine the location and nature of the malfunction. Most often, breakdowns occur in the following components.
- Lambda probe. It is an electronic sensor that analyzes the composition of emitted gases in order to ensure optimal combustion of automobile fuel. As a rule, after 100 thousand kilometers of the car, the metal analyzers included in the sensor lose their working properties. Usually in this case, the exhausted lambda probe is not repaired, but replaced with a new one.
- Corrugation. Its elastic hose, taking on engine vibration, stretches over time due to such mechanical vibrations, which negatively affects the mitigation of shaking. If the old corrugation fails, simply replace it with a new one.
- Resonator. This element of the VAZ 2114 exhaust system can periodically burn out under the influence of high temperatures of fuel combustion. Most often this is the result of using a product made of low-quality thin stainless steel. The best way to fix the problem is to replace the burnt element with a new one. However, as a temporary measure, it is also possible to weld the burnout area with a special electrode.
- Connecting gaskets. A sign of their failure is the appearance of strong vibration in the exhaust system area when the engine is running. To eliminate loud rattling, most often it is enough to simply replace the gaskets.
What is the VAZ 2115 exhaust system and how to replace the muffler
Welcome, friends, to the DIY car repair website. The exhaust system of the VAZ 2115 consists of many components and connections.
In today's article we will look at what it is and how to change the VAZ 2115 muffler yourself in your own garage.
Exhaust system VAZ 2115
First of all, you first need to figure out what the exhaust system is for, what parts it consists of, so that later it would be easier to understand which part of the node connections needs to be changed.
So, I think everyone understands that the VAZ 2115 exhaust system is designed to remove exhaust gases from the engine, which in turn pass through all components and are released into the atmosphere.
What does the exhaust system consist of:
- Fastening the exhaust pipe connection (bracket).
- Gasket between exhaust manifold and pipe.
- Bracket pressure plate.
- Reception pipe.
- Metal-graphite gasket (ring).
- Catalyst.
- Rubber mounting pad.
- Additional muffler.
- Main muffler.
- Rear mounting cushion.
- Fastening brackets (clamp).
Having understood the device, you can now understand that all parts of the VAZ 2115 exhaust system are easily separated, which means it is not difficult to change them without the involvement of specialists.
All car enthusiasts know that the muffler is located under the bottom of the car, so it is exposed to various mechanical, atmospheric and other influences, which can lead to its malfunction.
Many people have probably been in such situations when an increased level of noise appears in the car, the smell of exhaust gases, all these reasons are possible due to damage to the additional and main muffler, burnout of the gasket between the connections.
- Mechanical damage.
- Gasket burnout.
- Burnout of the muffler itself.
- Loose connections at the joints.
- Cracks in exhaust pipes.
So, having identified a malfunction of one or another part of some unit, we begin to eliminate it. Of course, before doing this, it must be purchased at a spare parts store. Using the example of replacing a muffler, we will analyze the entire repair process step by step.
Types of car mufflers
Modern car mufflers are mostly divided into 3 types - stainless steel, aluminized steel and direct-flow (sports). The muffler for a VAZ, made of especially durable stainless steel, is one of the most common types.
It has gained such great popularity among motorists due to the simplicity of the material from which it is made, and, accordingly, the relative cheapness of the device itself. This type of muffler seems to be almost universal, as it is suitable for many other brands of cars. Moreover, wherever stainless steel mufflers are installed, they effectively perform their functions.
Devices made of aluminized steel have a higher cost. Nevertheless, it is often more profitable to install them than cheaper analogues, since their guaranteed service life is 7-10 years longer. However, due to their high cost, aluminized mufflers are usually made to order.
The VAZ 2114 sports (direct-flow) muffler is used mainly for technical modifications of the car in order to give it additional speed characteristics. This device, also made of stainless steel, is used on cars for sports (racing) purposes.
How to repair a “glushak” with your own hands
The muffler on the “fourteenth” and “fifteenth” is considered one of the most vulnerable points of the car. The fact is that due to exposure to high temperatures, the metal quickly burns out, that is, the tightness of the system is broken. Therefore, the part must be changed as soon as there is a suspicion that it is not working.
Reasons for failure
Most often, mufflers “burn out” - that is, due to hot exhaust, the metal inside the housing begins to thin out, which ultimately leads to the appearance of holes. However, this is not the only reason why the silencer may fail:
using a homemade device - handicraft products do not differ in quality and long service life;
mechanical shocks from uneven roads - dents and deformations of the pipe also lead to loss of tightness;
Rust and corrosion sooner or later affects even the highest quality original mufflers.
In general, all of these factors influence service life to some extent. The car owner can easily identify all of the above faults - just drive the VAZ into the inspection hole and visually examine the muffler. In addition, when deformations, burnouts and corrosion reach their “peak”, the part will begin to make characteristic sounds when moving - gurgling, sharp pops, knocking.
Why is the muffler knocking?
This part on the VAZ 2114/2115 can make knocking noises only in two cases:
it hits the body;
When moving, it touches the gas tank housing.
In any case, it is necessary to immediately take measures to eliminate this malfunction. Most often, the problem lies in severe wear of the rubber suspensions. It is enough to change them and the muffler will again return to its normal position under the bottom of the car.
Pendants are inexpensive, so you can buy new products without spending any money.
In some cases, the silencer begins to knock when its elements have been installed incorrectly - for example, after replacing the resonator or exhaust pipe. In this case, you will need to double-check that all fasteners and gaskets are installed correctly.
Marseal
https://autolada.ru/viewtopic.php?t=227961
What to do if the plug is clogged
During vehicle operation, dirt, soot, fuel impurities and other sediments will inevitably accumulate in the exhaust system pipes. Gradually, they will settle on the walls of the muffler and clog its working space.
The driver can notice this only by the behavior of his car:
At first, it will be difficult to gain speed when overtaking.
Then, even with uniform movement, the car will have difficulty maintaining the set speed limit.
Black exhaust from the pipe, loss of engine dynamics.
Cleaning the muffler is a tedious and time-consuming procedure. In addition, if the pipes are clogged, then, most likely, after cleaning, other defects will be revealed - such as rust or burnouts. Therefore, it is more advisable to simply install a new one.
Kirusha27
https://forums.drom.ru/mazda-capella-626/t1151289161.html
Thermal insulation is completely burnt out
The car owner needs to carefully ensure that the resonator coating is always sealed. The barrel is covered with special thermal insulation materials, which sooner or later burn out during the operation of the machine. If you do not change the insulation in time, you will soon have to change the muffler itself.
To do this, the pipes are dismantled from under the car and separated in parts. A special heat-resistant cloth is glued to the surface, which can be purchased at any auto store. Such protection will ensure a longer service life and significantly reduce the noise of the motor.
How to put a patch
Quite often, burnouts and holes appear on the muffler pipes. If the hole has not yet increased to a large diameter, it makes sense to weld it, that is, put a patch.
Having such extensive damage, the muffler can no longer be restored
This will require material identical to the pipe body and welding skills. Before applying the patch, you need to properly treat the edges of the pipe: remove rust, clean the body to bare metal and degrease the welding areas with a solvent.
The patch is applied to the hole (the patch must be at least twice the area of the hole) and tacked on several sides. After this, the weld can be applied. After the joint has cooled, you need to clean it of slag and paint the work area with heat-resistant paint.
Thus, all work on replacing and repairing the muffler can be done independently, without seeking help from specialists. The only difficulty can be caused by welding, since this will require both equipment and welder skills.
Main options for resonator malfunction
Stable operation of the resonator ensures proper operation of the car engine. Like all elements and parts of a machine, the resonator is susceptible to failure. In order to avoid operational problems and unexpected breakdowns, regular maintenance and attention to the exhaust system is necessary. The operation of the resonator can be influenced by factors such as:
- general worn condition of the catalyst;
- muffler contamination;
- pipe diameter size.
The resulting metallic vibrating sound may indicate a breakdown of the internal elements of the resonator. For example, loosening one of the cameras. Insufficient motor power during operation occurs when the resonator is completely damaged.
Troubleshooting resonator failures
If the above damage is detected, the resonator must be replaced. Photo: loadik.tw1.ru
There is one of the most common problems that can prolong the operation of the resonator for some time - the appearance of holes in it. They are formed as a result of impacts, chips, cracks and subsequent corrosion. Holes can be patched either at a service station or by a driver who has certain skills and sufficient experience.
Self-repair of resonator holes
First you need to prepare the plate by cutting it out of tin. It should be significantly larger in size than the size of the hole that appears. After this, it is necessary to sand the area near the hole, as well as areas of corrosion. The next step is to use a drill to make several holes in the resonator, which will serve as a place for attaching the tin plate. Next, you need to use putty, which will ensure a strong fixation of the tin plate on the resonator.
After the putty has been applied and the plate on the resonator is firmly fixed, it should be screwed into the holes that were made earlier using self-tapping screws.
Repairs to seal holes in the resonator will allow the resonator to be used in a car for no more than two years. In addition, the service life can be increased. This is ensured by proper maintenance of the resonator, which does not expose it to corrosion and the formation of holes that disable it.
You will find a video guide to repairing holes in the resonator in this video:
Algorithm
We must drive the car onto a viewing hole or a stationary overpass; We turn off the engine, squeeze the handbrake, wedge the wheels with boots or put it in first gear, you can choose any option; Let the exhaust system cool down a little, as it heats up under the influence of exhaust gases. You can easily burn your fingers. We always carry out all work wearing gloves. After making sure that the pipes have cooled down, using capes we unscrew the connecting clamps between the muffler and the resonator, otherwise known as the secondary muffler. From the rubber clamp-holder, remove the hook with which it secures the muffler to the bottom of the car; There will be an O-ring between the connections, be careful not to damage or lose it. Carry out visual diagnostics and replace with a new one if necessary. As a rule, the negative impact affects a short service life; Having removed the muffler, we put it aside so that it does not interfere with the process. We pre-lubricate the new ring with heat-resistant sealant, in this way we extend the service life; Install the system components in reverse order. After installation, be sure to start the engine and test the system
Pay attention to ensure that there are no gas leaks, otherwise your work will be down the drain. If everything is fine, you can continue on your way. If not, eliminate the shortcomings.
Schematically the exhaust system looks like this:
A flow of gases emerges from the combustion chamber through the exhaust manifold, exhaust pipe, neutralizer, resonator, and the muffler itself.
Burnout of the gasket can also be a weak point or “sore”
between the cylinder head and the exhaust manifold. Despite the tight pressure around the perimeter with the help of four stud bolts. The asbestos gasket still burns out, and the engine emits an unpleasant and loud sound.
Modern cars, including the VAZ 2115, use a neutralizer to significantly reduce emissions into the atmosphere, these are oxides of nitrogen, carbon, and hydrocarbons. Structurally, it consists of two parts with catalysts made of platinum and palladium. Passing through these plates, gases react, resulting in a low-toxic oxide, the harmfulness of which to the environment is minimal. According to experts, purification is about 85-95%.
Monitoring the performance of the neutralizer
carries out an oxygen sensor that scans the content of lead oxide in the gas environment. Cars equipped with such a device are strictly prohibited from using leaded fuel.
Faulty ignition or incorrect adjustment can cause premature failure of the converter. Unburnt gasoline coats the ceramic plates, which makes it difficult for gases to flow out and clogs the system. The first sign may be a sudden loss of engine power. Accordingly, repair or maintenance work is just around the corner.
This concludes the discussion of the topic, the exhaust system on the VAZ 2115 is over. Let's hope that our tips and recommendations will help many drivers gain experience and help them quickly find the source of the breakdown.
Causes of breakdowns
- Location and functionality lead to wear and tear of the gas exhaust system. The main negative factors leading to destruction.
- The road surface is not ideal. Stones and foreign objects are blown up by the wheels, air flow, holes, and obstacles contribute to mechanical damage and deformation.
- Driving over rough terrain with a ground clearance of less than twenty centimeters brings hard contact, dents, and scratches.
- External moisture, falling on very hot surfaces, creates a temperature difference. Thermal changes have a negative impact.
- Dirt, condensation, and salt compounds corrode the outer coating.
- Poorly adjusted fuel devices and leaky engine gaskets allow unburned fuel, oils, and coolant to enter the hot exhaust paths.
- Destructive processes as a result of chemical reactions. Use of reactive additives.
- The vibration of the power unit affects the welds and damages the suspension cushions.
- Looseness and wear of connecting components.
- Violation of manufacturing technologies at the plant.
- End of guaranteed resource.
Silencer - purpose, device, operation
An important element of the exhaust system is the muffler; operating a car without it is impossible. As a rule, the muffler is located at the rear of the vehicle and, in conjunction with the exhaust system, serves to remove harmful gases from the engine, bypassing the vehicle interior.
Car mufflers are made from stainless, aluminized and regular black steel. Stainless steel “silencers” are practically not available for sale due to their high cost and long service life (their service life is 10–15 years). Aluminized mufflers are installed on VAZ 2114/2115. They are common in the domestic and European markets (service life 3–7 years). Regular black steel mufflers are cheap substitutes and last only a few months, so are rarely used.
What is a “glushak” for?
Main functions of the muffler:
- reduction of noise during fuel processing;
- reduction in the rate of gas release and their temperature.
The muffler is attached with special rubber pads to curved metal hooks, softening vibrations from the car exhaust
All elements of the exhaust system are exposed to high temperatures, so the coating (anti-corrosion paint, mastic) that is applied to the muffler burns out. The exhaust system of the VAZ 2114/2115 is mounted under the body on the bottom of the car.
An additional muffler or, in other words, a resonator is designed to eject burnt gas into the exhaust pipe and receive the next portion.
The resonator is an important part of the exhaust system; it directly affects engine power. The faster the exhaust gas is removed from the resonator, the faster and more power the car develops.
The design of the pipe consists of all the necessary elements, therefore, when exhausted, the exhaust gas is correctly distributed throughout the exhaust pipe
The muffler on the VAZ 2114/2115 is attached to the bottom of the car with special rubber bands, clinging to flat hooks on the side and top. Why is an elastic band used, and, say, not a metal fastener?
As exhaust gases pass through the exhaust pipe, vibrations intensify, the muffler begins to vibrate, and if the mount is solid-state, the vibration will be transmitted to the cabin. The rubber muffler mount softens vibrations and is therefore used on all cars.
For the VAZ 2114/2115, the muffler is a volumetric sealed metal chamber, divided inside by various partitions. The entire exhaust gas flow passes through the muffler sections and is finally extinguished and cleaned. If you look at the muffler diagram, it will look almost the same on all cars.
The principle of removing exhaust gases from a car muffler
How to replace a muffler on a VAZ 2114/2115
If you start having any problems with the muffler, it is better not to put it off for a long time. The life and health of the driver and passengers depends on how correctly the “glushak” works. In general, the replacement process itself begins with the selection of a new exhaust system kit. It is best not to save money, but to purchase an original factory one. This will delay the need for repeated replacement indefinitely.
In addition, it is recommended to change the fastening bolts during each replacement. It is necessary to choose products made from heat-resistant materials, since otherwise the bolts will quickly stick to the bottom and will be impossible to unscrew.
To ensure reliable operation, it is advisable to buy new rubber suspensions in advance.
What tools will you need?
To work you will need a simple set of tools:
- two open-end wrenches for 13;
- hammer;
- chisel;
- brake fluid or WD-40 lubricant;
- screwdriver with a flat thin blade.
How to remove a muffler without a hole
The easiest way is to use an overpass or inspection hole - in this case, you can more conveniently crawl under the car body and carry out the necessary operations. However, drivers often do not have the opportunity to use such devices, so they use a regular jack.
To remove the “glushak” from a VAZ 2114/2115, you must:
Jack up the rear left edge of the vehicle.
Make sure the machine is stable.
Reach under the body and moisten all pipe connections and bolts with lubricant.
Wait 10–15 minutes until the liquid is absorbed.
After which you can begin to unscrew the bolted connections. If the bolts cannot be unscrewed with regular wrenches, it is recommended to cut them off with a chisel and hammer
However, you need to act extremely carefully so as not to catch the bottom.
After the pipe has been unscrewed, all that remains is to remove the part from several rubber hangers. To do this, the body is raised slightly
If the rubber band is tight, you can pry it off with a screwdriver.
The dismantled muffler is pulled out from under the car.
The muffler on the VAZ 2114/2115 is attached to the bottom with five hangers
How to install a new one and secure it correctly
Before you begin installing a new muffler, you need to clean all strategically important places under the bottom: hooks for attaching rubber bands, brackets for bolts. Install the product in the reverse order:
- First, pull the muffler under the car body and position it in the position in which it will be fixed.
- After this, hang the exhaust pipe and resonator on rubber hangers. Make sure that each connection is secure and the part will not fall off the hooks at the first road pothole.
- Next, start tightening the nuts on the bolts. Screw it all the way, but without fanaticism, as you can break the thread.
- Lower the car from the jack.
After this, it is recommended to check the performance of the VAZ. It will be enough to start the engine and rev it up a little.
Main reasons for failure
p, blockquote 20,0,0,0,0 –>
The muffler corrugation is subject to breakdowns more often than other parts of the exhaust system. Often the corrugation is damaged as a result of mechanical stress. This could be impacts on any hard objects: stones, hummocks, objects protruding relative to the roadway, etc.
p, blockquote 21,0,0,0,0 –>
The cause of the malfunction may be the unsatisfactory technical condition of the transmission. If the engine shock-absorbing mounts are worn out, then due to insufficient fixation of the power unit, a large tensile force acts on the corrugation. In some cases, damage to the corrugation may be caused by improper installation or dismantling of the muffler.
p, blockquote 22,0,0,0,0 –> adsp-pro-2 –>
Don't forget about the catalyst. If it is clogged, exhaust gases will begin to accumulate, causing a critical level of pressure to be created in the system. It’s not for nothing that it was mentioned above that the corrugation resembles a fuse.
p, blockquote 23,0,0,0,0 –>
Video - replacing the muffler corrugation of a Peugeot 406:
p, blockquote 24,0,0,0,0 –>
p, blockquote 25,0,0,0,0 –>
Ultimately, it is she who cannot stand it (electricians will understand), gases break through and often reach the cabin. And this, in turn, negatively affects the health of the driver and passengers.
p, blockquote 26,0,0,0,0 –>
If the corrugation braid is damaged, it cannot be repaired due to the complexity of the design. By and large, this is a disposable part and if the winding is broken, then the entire part needs to be replaced.
p, blockquote 27,0,0,0,0 –>
Since corrugation plays an important role in the exhaust system of every car, it must be made from high-quality raw materials. Typically high alloy stainless steel is used for this.
p, blockquote 28,0,0,0,0 –>
Symptoms of a problem
You can verify that the muffler corrugation is faulty using characteristic signs. This may be indicated by the presence of extraneous noise under the hood when the engine is running. At the same time, the sound is quite sharp and unpleasant, and when the element completely ruptures, it is completely deafening. An additional signal may be the appearance of the smell of exhaust gases in the car interior.
p, blockquote 29,0,0,0,0 –>
Any experienced driver can feel some loss of power. This is especially acute on foreign-made cars. Their exhaust system is usually equipped with an oxygen sensor.
p, blockquote 30,0,0,0,0 –>
If the above symptoms are detected, you should immediately replace the muffler corrugation to avoid destruction of the entire exhaust system.
p, blockquote 31,0,0,0,0 –>
Replacing the resonator yourself
To remove the resonator (additional muffler) you will need: two keys for “17” and two keys for “13”. Before dismantling, it is advisable to treat all fastening joints with a rust-dissolving agent. For example, it could be the popular WD-40.
First of all, we unscrew the clamp through which the additional muffler is connected to the main one. This process was described in more detail a little higher. Now we place some kind of stand under the catalytic converter so that after disconnecting the resonator, the catalyst does not sag and is damaged.
Now, using keys “17”, unscrew the bolts securing the additional muffler to the catalyst. Pull out the bolts and remove the additional muffler.
Installation of a new resonator is carried out in the following order:
1. When installing a new additional muffler, first fix it on the catalytic converter side. To do this, insert the bolts and tighten the nuts with several turns of thread.
2. Next, we connect the main muffler with the additional one. At the same time, we install a new graphite ring-spacer between them. It is imperative to check the tightness of the graphite gasket.
3. Place a new clamp at the connection point, and then completely tighten the bolts securing the resonator to the catalyst.
Exhaust repair
The entire exhaust system is a complex of welded metal elements, the repair of which will necessarily require welding. The main problem with the muffler is the formation of through holes in the pipes and body.
There is an option to temporarily repair damage using a special heat-resistant bandage with an epoxy composition or “cold welding”. However, the service life of such patching is short.
Repair work begins with removing the section of the exhaust system in which the “hole” appeared. Typical places are the resonator or muffler. Regardless of the cause of the fistula, it is treated with the same method - applying patches.
To carry out repairs, pieces of sheet metal should be prepared in advance. First of all, we determine the size of the damage. Places where there is already corrosion must be completely removed by cutting them out with an angle grinder.
It is useful to treat the internal surfaces with a special anti-corrosion compound. Then we cut out a piece of sheet metal that could cover the missing area, but with some margin - 1-1.5 centimeters. Next, you should clean the welding area and weld the patch. For work, it is advisable to use a semi-automatic welding machine, which is used for body welding. It is important that the weld bead is smooth and continuous. In the same way, fault points and burnouts on the pipes are eliminated.
muffler repair
We change the sealing gaskets. The number of sealing parts at the sealing points differs to some extent in different car models. To replace the gasket in the muffler, it is necessary to dismantle the entire exhaust system or a small section of it. Despite the small number of fasteners, dismantling the muffler can take hours. Before starting work, treat the fasteners with a special liquid, such as WD-40.
The process of replacing gaskets itself is not very difficult. The old sealing material should be removed and the joints should be cleaned. The adjacent planes of the two muffler elements must be in close contact with each other. If there are small sinks on the metal flanges, use a heat-resistant sealant.
We repair muffler pipes. There are many pipes in the exhaust system of a car. They are straight and curved. As a rule, burnouts occur in bending areas, which occurs for several reasons:
- Exhaust gases greatly affect the curved part.
- When bending, the pipe wall becomes thinner.
Use a welder to repair a large hole or crack. Sometimes it is possible to avoid dismantling the muffler if it is possible to get to the welding site from below the car. A steel patch is welded to the problem area or a welding seam is applied.
Often, depressurization of the system occurs at the junction of the pipe with the tank or resonator. In this case, the damaged area will have to be removed from the car and an attempt will be made to restore it. To do this you will need: a piece of sheet metal, a metal rod or a piece of wire, a semi-automatic welding machine.
First, we remove corrosion-damaged areas and loose rust from the elements. Next, using welding, the pipe is secured to its original place. Then you should fill the holes and cracks with pieces of wire or install a sheet metal patch.
muffler replacement
- First of all, you should spray WD-40 on the fastening nuts of the muffler connection clamp, since they, as a rule, rust and stick strongly, as a result of which it is quite problematic to unscrew such threads.
- Next, using a 13mm wrench, unscrew the clamp nuts. Use the ratchet handle and socket to get the job done quickly and conveniently.
- It is not necessary to unscrew the second nut completely, since you can move the clamp away.
- Bend the edges of the pipe using a flat-head screwdriver.
- Next, knock the muffler with a hammer from the connection point towards the exhaust pipe.
- At two points where the muffler is suspended, remove the cotter pins with pliers.
- At the last stage of dismantling, it is necessary to remove the muffler outward, for which we turn the pipe inside out and unscrew it in different directions.
- Now install the new muffler in reverse order.
resonator repair
When the outer wall of the resonator burns out, the part can be restored for a while. To do this, thin and rusty metal is cut out in the problem area. It is advisable to make a simple rectangular cutout to make it easier to prepare a patch of the same size. Now we apply a patch to the resonator and scald it around the perimeter.
What's the result?
Taking into account the above information, it becomes clear that on the VAZ 2114 the exhaust system is not particularly complex in design. We also note that if you need to replace a VAZ 2114 muffler, the price of new system elements (both original and analogues) is at a completely acceptable level.
As for replacement and repair, all the work can be done with your own hands in a regular garage. If you have a welding machine and experience in performing welding work, then the entire system can be comprehensively repaired without the need to visit service stations or auto repair shops.
The main thing is that when choosing exhaust system parts (especially among analogues), you should pay attention and purchase only aluminized mufflers, which are the best solution in terms of quality and price. It is also advisable to study in advance the reviews of car enthusiasts for a particular brand and manufacturer before purchasing.
This will allow you to buy a muffler that is most durable in terms of service life.