Replacing the camshaft oil seal of the Lada Granta engine (VAZ 11183, 21116)
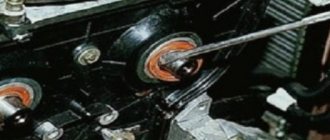
It is convenient to assess the condition of the camshaft oil seal when carrying out routine work to check the condition of the timing belt. We change the oil seal if there are traces of engine oil under the camshaft toothed pulley or on the timing belt. To prevent the camshaft from turning when unscrewing the pulley mounting bolt, insert a “10” head with an extension through the hole in the pulley and put it on the nut securing the rear timing belt cover.
Using a 17mm spanner, loosen the bolt securing the camshaft timing pulley. Set the piston of the 1st cylinder to the TDC position of the compression stroke and remove the timing belt (see “Checking the condition and replacing the timing belt”).
Unscrewing the pulley bolt...
...remove the pulley from the camshaft toe. Remove the tension roller of the timing belt (see “Checking the condition and replacing the timing belt”).
Using a 10mm socket, unscrew nut 1 and two bolts 2 securing the rear timing cover...
...and remove the cover.
Use a screwdriver to pry up the oil seal (do not damage the shaft journal) and remove it from the cylinder head socket. Unlike the camshaft oil seal of the previous generation VAZ-2108, - 21114 engines to increase the service life...
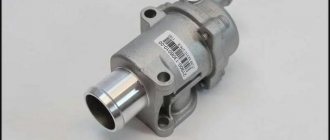
...the manufacturer installs an imported oil seal (with dimensions 28×42×6 mm), made of less elastic material and without a bracelet spring. In the absence of a new imported oil seal, you can install an oil seal (with dimensions 28x42x7 mm) for the camshaft of previous generation VAZ-2108, -21114 engines. Before installing a new camshaft oil seal, apply a thin layer of engine oil to its working edge.
We press in the oil seal using a tool head or a piece of pipe of suitable diameter. Before installing the rear timing cover, we check the condition of the rubber sealing gaskets and the rubber seals of the cover mounting bushings. If gaskets and seals are damaged (ruptures, cracks, deformation) or loss of elastic properties of rubber, the parts must be replaced. To replace...
...remove the gasket from the edge of the cover. Similarly, remove the other sealing gaskets of the cover.
We remove the bushings with rubber seals from the holes in the cover.
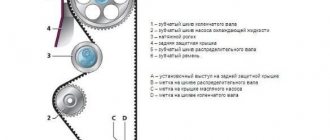
Rear timing drive cover with sealing gaskets and bushings for securing the cover. We carry out further assembly in reverse order.
When installing the camshaft timing pulley, align the groove in the pulley hole...
...with a key on the shaft toe (for clarity, shown on the removed camshaft). We install a new timing belt (see “Checking the condition and replacing the timing belt”).
Video on the topic “Lada Granta. Replacing the camshaft oil seal of the Granta engine”
replacing the camshaft oil seal (VAZ 2108-Kalina)
1. Replacing the camshaft oil seal on the Lada kalina engine
replacing crankshaft oil seal VAZ 8kl
When to replace the timing belt
There are several “symptoms” that indicate the need for replacement. They mainly concern changes in engine operation, namely:
- starting complications;
- noisier operation;
- the appearance of excessive vibration;
- the occurrence of third-party noise;
- reduction in power.
An exhaust with a black tint may also indicate a problem with the timing belt. The degree of wear of a given part can also be determined by visual inspection. If microcracks, worn internal teeth, delamination or other defects are detected, it should be replaced immediately.
On our website you will find:
- current information about Lada, new products in production and news related to the brand;
- statistical data on sales and the place of the Russian automobile industry in both the local and international markets;
- useful tips on operation, repair and maintenance of VAZ cars;
- all the most important information that will help you when repairing VAZ cars;
- reviews of the most common problems faced by machines.
If you have any questions regarding the repair of your car, materials and spare parts for it, you can get advice from a specialist. To do this, go to the CONTACTS section and send your question. You will find this and much more about the features of domestic cars on our portal OLADE.RU
Rating of the best manufacturers of oil reflective caps
The same model of valve stem seal from different manufacturers
A review of valve stem seals with their brief characteristics, positive and negative sides, indication of conveyor applications and current prices will help you choose parts for a specific engine.
The table below contains valve seals from all the most popular manufacturers, available in Russian retail.
Valve seals: manufacturer ratings
| Manufacturer | A distinctive feature of the brand, the caps themselves | Which cars are most often installed on from the factory? | Price for summer 2022 in rubles* per 1 piece |
| Elring | Elasticity of rubber, good wear resistance, which is achieved through the selection of materials for various types of engines and high-quality casting. In addition to classic fluorine rubber, polyacrylic rubber, nitrile rubber, Teflon and other modern materials are used | BMW, Mercedes-Benz, Porsche, Toyota, Volkswagen, MAN, Iveco, DAF, Renault | From 150 |
| Victor Reinz | Good caps made of heat-resistant but flexible fluorine rubber. The original is often green in color (dark shades); it can also be black. They are distinguished by good adherence to geometry, which effectively removes excess oil and prevents its consumption. | BMW, Mercedes-Benz, VAG, Nissan, Opel, Renault, Fiat, Ford | From 150 |
| Corteco | Valve seals from one of the world's largest manufacturers and suppliers of automotive seals. They produce both domestic and discontinued models. They are made mainly from fluorine rubber, which combines elasticity and heat resistance; other fluorine-containing materials are used less frequently. | Alfa Romeo, BMW, Audi, Citroen, Ford, Fiat, Isuzu, Lancia, Iveco, MAN, Nissan, Opel, Peugeot, Mercedes Benz, Renault, Saab, Rover, Volkswagen. | From 100 |
| NOK | Japanese valve seals, factory installed on many local brands. They are distinguished by high quality workmanship and the correct selection of materials. They last a long time, and with gentle operation they last longer than the allotted resource. Often in Corteco packages you can find exactly NOK valve stem seals (as evidenced by the casting mark), because both companies belong to the same concern. | Toyota, Honda, Lexus, Mitsubishi, Nissan, Suzuki | From 150 |
| Goetze | German valve stem seals are often made of fluorine rubber or acrylate rubber. Teflon and other heat-resistant polymers with fluorine are used only for rare product models. | BMW, Fiat, Renault, Ford | From 100 |
| Glaser | Budget valve stem seals of good quality, originally from Spain. Elastic, they cut off oil well under normal operating conditions. Among the disadvantages is the fear of overheating. | Suzuki, Nissan, SEAT, Chrysler, John Deere, Ford. | From 50 |
| Ajusa | Inexpensive, but high-quality valve stem seals made of soft fluorine rubber. They work for 60–100 thousand km without problems, and if you regularly operate the engine in a gentle mode, even more. | SEAT, Nissan, Daewoo, Fiat, VAG and others. | From 100 |
| THO | Japanese THO valve seals combine elasticity, heat resistance, high precision performance and affordable price tags. Original parts serve the allotted 100 thousand km and even more. | Nissan Suzuki, Mitsubishi, Toyota | From 50 |
| Payen | Affordable MSCs made from high-quality fluorine rubber. They are distinguished by elasticity and at the same time have a long resource. They are also notable for the fact that they rarely become victims of counterfeits in Russia. | Ford, General Motors, Mercedes, Renault, Honda, Chrysler | From 70 |
| S.M. | Inexpensive, but high-quality valve stem seals. Viton fluorine rubber is used for production, combining elasticity and durability. | Aprilia, Audi, Bitzer, BMW, Copeland, DaimlerChrysler, Delmag, Deutz, Ducati, Ferrari, Hatz, Renault, Rotax, Voxan | From 30 |
In what cases is it necessary to replace the inner CV joint?
Replacing the internal CV joint on front-wheel drive VAZ vehicles is required if the following symptoms are present:
- Crunching and knocking noises when driving and accelerating in a straight line;
- Vibration and shock when changing gears;
- Significant play when testing by hand;
- If the “grenade” fails completely, the vehicle cannot move further.
» alt=»»> The main reason for the malfunction of the VAZ “grenade” is the entry of water and dirt through the hole in the torn boot. The second possible cause of failure is a sharp press on the gas with the wheels fully turned, although in this case you risk killing the external rather than the internal grenade.
Determining wear
Tightly fitting oil seals precisely measure the amount of engine oil. Over time, due to rubber wear, the caps begin to leak excessive amounts of engine oil. This directly affects the operation of the gas distribution mechanism and lubrication system.
Wear of oil scraper elements can be determined by the following signs:
- Pronounced carbon deposits appear on the spark plug electrodes.
- If you place your palm near the exhaust pipe while the engine is running, oily, dirty droplets remain.
- The consumption of engine oil increases significantly, which gets inside the engine cylinder and burns irrevocably.
- When you press the accelerator pedal, thick, bluish smoke begins to pour out of the exhaust pipe as a product of grease combustion.
As soon as the signs described above appear, you should immediately check the gas distribution system of the car. In this case, special attention should be paid to the valve seals. It is unacceptable to operate a car with worn valve stem seals.
If you ignore the problem without solving it, the car owner will inevitably face the following serious consequences:
- When idling, the engine will periodically stall.
- The compression of the power unit will be significantly reduced.
- Engine power will drop sharply.
- The revolutions will begin to “float” greatly.
- Carbon deposits will appear on the inner walls of the cylinders and pistons.
The listed symptoms are very alarming bells. If you continue to operate the car despite them, this will inevitably lead to an expensive overhaul of the power unit.
Replacement of camshaft oil seal VAZ Lada Granta in auto repair shops in Moscow
18 car repair companies
- TTS Motors
- Pyatnitskoe highway, 2
- +7 (495) 24… show all
- The site of the company
- Lorant
- Tolex tuning Lexus on Taganka
- Bers-auto
- Lexus on the market
- Auto-rad
- Ddcar
- Nivus
- Technical center gm east
- Auto complex
- Psrservice
- Atlant-m
Popular companies
Causes of malfunctions
The main cause of the malfunction is simple mechanical wear. Any oil seal is, by its nature, a consumable - after a certain period of time it begins to deteriorate, since it is made of an elastic material.
The malfunction may manifest itself in the form of changes in shape, swelling, scarring, rupture or chipping of the material from which the consumable is made. Another manifestation of a malfunction may be the cuff being completely squeezed out of the seat.
Other causes of problems with the camshaft oil seal are incorrect selection of consumables, manufacturing defects, or incorrect installation. In these cases, the oil seal also does not perform its functions and needs to be replaced.
Eliminate camshaft knock (axial runout) with your own hands
Many already know that the VAZ 2111 injection engines have the following disease: “Axial camshaft runout”. This disease does not progress and does not cause damage to other timing components, but it manifests itself in the form of an unpleasant camshaft knock. It just so happened that the developers of the 2111 engine missed this point.
Where carburetor engines used to have a fuel pump and distributor, injection engines have a regular plug into which the camshaft rests. The camshaft axial play set by the manufacturer should not exceed 0.15-0.20mm. Over time, as the camshaft pastel wears out, the axial play increases, and a distinct knock begins to be heard from under the valve cover. Of course, you can continue to drive with this knock and not worry, but not every car enthusiast will be pleased.
I am sure that almost any auto repair shop will tell you: “Either ignore this knock, or change the entire head!” But there is one simple and absolutely free way to eliminate this annoying knocking noise by placing a washer between the camshaft and its side cover! Below is a detailed description and photo report of the work done.
Checking the camshaft axial play.
Remove the timing belt cover and start the engine. Then, with the engine running, press the handle of a screwdriver into the camshaft gear bolt. If the knock disappears when pressed, the reason is: Axial runout of the camshaft.
Consequences of element failure
If the drive seals are not replaced in a timely manner, the following occurs:
- An oil leak occurs.
- Contamination of spare parts located nearby occurs, since the oily coating is a magnet for dust and dirt, which is subsequently difficult to get rid of.
- The oil used in a car is a rather aggressive substance and, when it gets on parts and mechanisms, it significantly reduces their service life.
In other words, timely replacement of the drive oil seal is the price for long-term and high-quality operation of the mechanism.
The best valve stem seals
Among the companies that produce valve stem seals, there are several brands that are distinguished by the quality and reliability of their products. Each manufacturer has an individual set of characteristics for their products. These features are noted in reviews by car owners, as well as service station technicians.
Description. The Japanese brand NOK is one of the popular manufacturers of automobile parts. Part of the production goes to the assembly line of Japanese cars.
Aftermarket parts are similar in characteristics to the originals, which leads to a good reputation for the company. Factories are located in several Asian countries. There are also partnerships with a number of European companies. An example would be Germany, where one of the company's offices is located.
Oil seals are considered original spare parts that are installed on some car models, including Honda and Toyota. There are several series of caps on the secondary market that differ in quality.
The characteristics most similar to the originals are those of spare parts that are manufactured in Japanese factories. Production zones that belong to the brand and are located in other Asian countries also produce certified products, but they have reduced characteristics compared to the original.
A distinctive feature of the caps is the use of durable materials that have good resistance to temperature and other negative factors. Separately, they note the impossibility of marriage due to high-tech conveyor production.
Life time. The guaranteed service life is 1 year. Duration of operation exceeds 2-3 years depending on the country of origin or 60,000 mileage.
Source
Replacement instructions
The sequence of actions when replacing the front and rear oil seals is slightly different. This is because the front oil seal can be replaced directly on the engine itself. Getting to the rear seal is usually more difficult.
Front oil seal
The sequence for replacing the front camshaft oil seal looks like this.
- The car is placed in neutral and the parking brake is applied.
- As with any work performed in the engine compartment, the battery terminals are disconnected.
- The plastic timing belt cover is removed.
- The valve cover is removed, for which you need to unscrew the fastening bolts with a screwdriver.
- A marker marks the location of the belt relative to the camshaft.
- Then you need to remove the timing belt. You don’t have to completely remove it - just remove the belt from the camshaft timing pulley. To remove it, you need to unscrew the fastening bolt with a 17 mm wrench, securing the pulley from turning. You can use a pry bar for fixation.
- Using a puller, the pulley is removed from the camshaft shank. If the camshaft has 2 pulleys, then both are removed, and the locations of the pulleys are also marked so that they are not confused during further installation.
- The key located behind the camshaft pulley is removed.
- Then, using a screwdriver or tweezers, remove the used oil seal. You should remove it carefully so as not to scratch the working surface of the camshaft to which the oil seal is attached.
After dismantling the old oil seal, you can proceed to installing a new one and reassembling it.
- The working edge of the new oil seal adjacent to the camshaft is lubricated with engine oil, and the outer part is treated with sealant.
- The oil seal is placed on the camshaft and then pressed using a pressing mandrel.
Further collection of the timing belt is carried out in reverse order.
- A key is placed on the camshaft.
- Then the pulley is installed. If there are two pulleys, then each is installed in the place where it was located.
- The pulleys are tightened using a torque wrench. The voltage torque can be found in the vehicle owner's manual. When tightening, it is necessary to secure the pulleys from turning using a pry bar. First you need to engage fourth gear at the gearbox.
- Then you need to put the belt on the pulleys according to the previously marked marks. You should first inspect the belt for damage, abrasions, etc. Since oil seal leaks are detected when replacing the timing belt, it is often necessary to install a new belt. In this case, it is mounted according to the factory marks.
- The tension roller mounting bolt is tightened. The tension torque can again be found in the car's owner's manual.
- Then the crankshaft is manually turned several revolutions clockwise. This checks the belt tension. If any irregularities are noticed, the tension is further adjusted.
- At the end, the valve cover is secured back and the plastic belt cover is installed.
- After replacing the oil seal, you need to add engine oil to the oil tank to the upper mark.
Rear oil seal
Rear oil seal replacement may vary from vehicle to vehicle. For some models, access to the rear oil seal is only possible when driving the car onto a lift or inspection hole and disconnecting the clutch and gearbox drive.
For other car models, access to the oil seal is limited by the camshaft position sensor, which must be removed. To do this you need:
- disconnect the electrical connector of the sensor;
- Unscrew the fastening screw and remove the sensor;
- Using a 10mm wrench, unscrew the bolt securing the gas hose holder to the sensor wire bracket;
- Unscrew the screws securing the sensor cover, remove the cover and the bundle of wires;
- remove the sensor rotor;
- Remove the sensor cover mounting plate.
After this, you can use a screwdriver to remove the rear camshaft oil seal. Replacement is carried out in the same way. After replacing the cuff, the sensor is assembled in the reverse order.
After installing the new oil seal, you must make sure that no oil leaks appear. If the oil seal is installed correctly, then even at high engine speeds the oil should not leak. Otherwise, the sensor is installed or pressed in incorrectly, or there is a manufacturing defect in the product.
Operating principle and device
The essence of such a sealing device is as follows: inside its body, where the spindle axis passes through it, there is a “box”, inside it there is a special packing - sealing material. It is pressed tightly against the spindle axis.
In this case, compression of the sealant material occurs, as a result of which it fits tightly on one side to the surface of the spindle and to the walls of its chamber on the other.
As a result, complete tightness is created, which does not allow the working environment to escape beyond its housing.
In mechanisms with a small diameter, the sealing material is pressed using a union nut, with a large diameter - using anchor bolts.
How it works?
The oil seal consists of a rigid (outer) surface that is mounted in a hole. Often the kit includes a metal ring that is hermetically connected to the rubber seal. It fits tightly into the landing niche.
The inner part is softer, it seems to envelop the rotating shaft. The oil seal leaks from the inside of the circle. Manufacturers are constantly looking for compromise:
- hard material is more durable, but does not fit tightly around a rotating object;
- soft, elastic rubber provides excellent sealing, but wears out quickly.
To enhance the girth, a ring spring is often installed on the inner side. If it comes off, the grenade seal will leak.
Engine Features
Due to the design of the car's cooling system, the engine does not warm up above 80 degrees. The management of AvtoVAZ does not see anything wrong with this; they have an official information letter on this matter. You can read it in the material: What is the operating temperature of an 8 valve engine.
The engine design is as simple as an axe. There are no hydraulic compensators, no sores were noticed. Mostly problems can arise due to malfunctions in the engine management system.
Video of acceleration to 100 km per hour
I haven’t shot my video yet, it’s winter, so we’ll wait for the weather to warm up. That's when I'll post it on our YouTube channel. In the meantime, here's a video from Grantovodov.
Here's another interesting video. It is interesting because the measurement is made using an application with a navigator, which means that the speedometer readings are more accurate if the navigator is well calibrated. Everyone knows that the higher the speed, the more the car’s speedometer lies.