Since the internal combustion engine is a heat engine, during its operation it generates excess heat that must be removed. A liquid radiator, inside of which antifreeze circulates, helps with this. Due to, for example, high efficiency with relatively small dimensions, automobile engines also have additional forced cooling. Simply put, car engines have a combined cooling system in which the liquid system does most of the work of removing heat. Air cooling elements are activated only at high coolant temperatures.
Please note: when talking about the engine cooling system, they often use the concept of antifreeze temperature. However, there are times when the engine oil also needs to be cooled. The oil comes into direct contact with engine components, which become very hot. If the oil temperature becomes critically high, it will lose many of its properties, which will be critical for the rubbing parts of the engine. The task of cooling the lubricant is taken over by an oil cooler, otherwise called an oil cooler. Avto.pro decided to look into its structure and key features.
Purpose of the oil cooler
The engine oil cooler is designed to protect the power unit from wear, which can be caused by oil overheating. This is especially true these days, when molded engines have become widespread and temperature control temperatures have increased significantly. If previously it was enough to create a reliable antifreeze cooling system, now a separate system for regulating the temperature of the engine oil is required. There are several reasons:
- At high temperatures, the oil begins to boil away, which leads to a decrease in its volume and the formation of deposits;
- Along with the decrease in volume at high temperatures, the viscosity of the oil also decreases - it should be neither low nor too high;
- The lubricant quickly ages and loses its properties.
Despite the fact that modern oils have a well-thought-out set of additives, even they cannot protect it from overheating. As a rule, engine oil heats up a little more than antifreeze: 90-100°C versus 80-90°C . Additives demonstrate their effectiveness up to temperatures of 100°C (with rare exceptions), and when overheated they begin to work or decompose. As a result, after prolonged overheating, the engine oil can only be replaced - ignoring this problem can result in engine failure. The problem can be avoided by using an oil cooler, in which the lubricant is cooled to the optimum temperature.
Why don't they install it on some cars?
It's just not necessary. For example, in passenger cars, high-speed motors perfectly pump antifreeze through the system, removing excess temperature. And there are no such high loads of several tons as on trucks, so there is simply no reason to install an oil cooler there.
This is how the material turned out, I think it was useful to you. Be sure to write your comment, and I say goodbye to you - sincerely your AUTOBLOGGER.
Similar news
- Fuel consumption after oil change. Is there an impact? More details + in…
- Why does a car drive poorly in hot weather? Details + video version
- The timing chain knocks (rattles), whether cold or hot. How to determine...
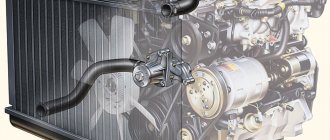
Oil radiator design
At its core, this is still the same radiator with some modifications. Firstly, it should be relatively small, because the engine cooling system already takes up a lot of space, and the oil cooler may even be located right in front of the main radiator. Secondly, the layout of the radiator must be well thought out - there should be no pressure drops . Conventionally, oil radiators are divided into two types:
- With natural cooling. The walls of the radiator are blown with oncoming air as the vehicle moves, which leads to cooling of the oil circulating inside the device;
- With forced cooling. The radiator is blown not only by a counter flow of air, but also by a fan.
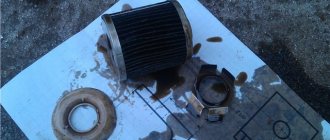
Both types of radiators have the same design. This is a series of steel or aluminum tubes of oval cross-section, and each of the tubes, as a rule, has a spiral wound on it - this allows you to increase the heat transfer area. In some radiator models, cooling plates . Another element of the oil cooler: a pair of tanks (lower and upper). Fittings are welded to the tanks, to which the oil supply and drainage pipes are connected. Of course, the radiator has special fasteners that allow it to be installed on a car.
As practice shows, passing through radiator tubes without a special fan, engine oil is cooled by 10°C . Forced cooling does not seriously increase the cooling temperature when the car is moving at high speeds, but at low speeds it is extremely effective. The main factors influencing the efficiency of the radiator are the following:
- Material (heat transfer efficiency factor);
- Tube geometry;
- The temperature difference between the oil and the air surrounding the radiator.
It is also impossible not to talk about such an important element of a good radiator as an additional turbine. It improves the circulation of lubricant inside the radiator and prevents blockages. As a result, oil of almost any viscosity circulates properly in the radiator. Cases where the oil turns out to be too viscous and its movement through the radiator tubes is difficult should rather be attributed to engine problems - even an oil cooler without a turbine can “drive” the oil through the cooling circuit.
Mayevsky tap or valve?
You can get by with a Mayevsky crane, but then you will need one more protection.
An external emergency thermostat with an operating temperature in the region of 80-90C is mounted on the first section of the battery (counting from the heating element). Moreover, it is connected to the power supply of the heating element itself.
When the heating element’s original thermostat does not work and the water begins to approach the boiling point, the emergency temperature sensor operates. It interrupts the voltage supply and saves the battery from explosion.
Which is better - an emergency valve or an external thermostat? It is still preferable to have a valve.
The design is simpler and more reliable.
Advantages and disadvantages of oil radiators
An engine oil cooler is not a required part of most cars. For example, such radiators are installed on cars with a powerful engine, such as BMW 335i E92 . Also, almost all agricultural machinery, trucks and many van models need oil cooling. the advantages of oil radiators , but let's list them all. The oil cooler provides:
- Stability of lubricant temperature;
- Maintaining normal temperature of the power unit;
- Increasing the service life of engine oil.
Spare parts for BMW 2500
Windshield washer fluid
2500 M30B25 (32/40INAT)
Spare parts for Mazda 2
Rear engine mount (support) 1.4 CD F6JA
Despite the obvious advantages, the oil cooler, as stated, is an optional component for most cars. Consequently, it places an obligation on the driver to promptly diagnose and maintain it. Here are the disadvantages of an oil cooler:
- It needs maintenance, like cleaning the surface;
- More lubricant needs to be poured into the oil system - some of its volume will be “taken” by the radiator;
- Quite a high price (exception: radiators from lower-level packagers and Asian manufacturers).
As you can see, the advantages of oil coolers look more convincing than their disadvantages. For this reason, they are sometimes installed on cars standard equipment did not include such devices. We'll talk about this, but for now let's figure out how to identify a faulty oil radiator.
Height length
When screwing in the heating element, rarely does any of it reach the last section. Usually their length varies between 35-40cm.
There are also exclusive models for all sections, but made to order (for example, Grepan). Here are comparative tables of uniform heating of the same battery (10 sections) with a standard short heating element and an extended one from Grepan.
However, most of us still use short ones. How then can we ensure uniform heating over the entire area?
What you should know about malfunctions
The oil radiator is operated under rather harsh conditions, but the pressure inside the device is not very high, which a positive effect on the service life. As a rule, car enthusiasts are faced with the need to replace radiators every 3-5 years, although in some cases replacement may be required earlier. It is worth paying attention to the following things:
- Increase in oil temperature;
- The appearance of dark deposits on the walls of the expansion tank of the cooling system;
- Presence of oil leaks.
Let us immediately note one important point: the circulation of coolant and the circulation of oil in their respective systems are interconnected . If the circuits become leaky, one fluid can mix with another, which will have a detrimental effect on the engine. For example, oil may get into the expansion tank. It is strictly forbidden to operate a car with such a malfunction - a seemingly insignificant breakdown in the long term will certainly lead to engine malfunction.
It is recommended to carry out a visual inspection of the oil cooling radiator once a year, or even more often. Oil leaks, dark deposits and greasy spots will indicate that the radiator is depressurized. More often you can observe a violation of the integrity of the oil supply and drainage pipes. Oil may leak around the fitting . These elements of the oil system should be checked first. A less common problem is a violation of the integrity of the radiator itself. Although the radiator is made of metal, its tubes have low mechanical strength - gravel from the road can pierce one of the tubes.
Circulation without expander
What role do air pockets play? As it warms up, the liquid inside the battery expands and the pressure increases.
Without air pockets there will simply be no compensation for thermal expansion. There is no expansion tank provided in the design.
These pockets do just that. Homemade expanders only spoil the appearance and help evaporate the liquid from the heater.
This is especially dangerous with anti-freeze agents and their mixtures (50% antifreeze or antifreeze + 50% dissolved).
Also, a closed system without an expander, due to the creation of pressure, helps reduce noise when the heater operates. Noise is a phenomenon of cavitation, when microbubbles of gas are separated when the heating element is heated, and their appearance directly depends on external pressure.
Even 1.5-2 bar will make the battery much quieter.
However, the air inside the sections also poses a hidden threat. If the battery overheats (the heating element does not turn off, the relay contacts are stuck), the pressure will increase more and more.
Having reached a critical point, the radiator will burst. A sharp piece may fly off from it, or you will simply be scalded by hot steam.
What happens if the battery is filled up to the neck, without any remaining air at all? In this case, the pressure will increase much faster, and one of the sections will crack at one “wonderful” moment.
As a rule, this is not accompanied by any explosion. But due to the lack of an expander, we need air pockets in any case.
Selecting an oil cooler
If your car has a standard “supplemented” oil system, then you can search for its components using the VIN code, the parameters of your vehicle, or the radiator code. It’s easier to search for car parameters in online stores - this gives a fairly accurate result. This way you can find codes for both the original radiator and the closest analogues. If the standard equipment of your car did not include an oil cooler, then you will have to select it yourself. Here's what to remember:
- It is better to install the oil cooler together with a temperature sensor and an oil pressure sensor;
- Some models of oil coolers have a built-in fan, but their installation is very difficult, and in some cases it is almost impossible;
- To install the sensors properly, you will need a spacer for the oil filter;
- When choosing between a spacer with or without a thermostat, it is better to give preference to the first option;
- The location for installing radiators must be selected taking into account the fact that the oil supply and drain pipes should not sag.
You can often see branded oil cooler installation kits on sale. This kit may not be cheap, but we do not recommend saving. Also, you should not save on tubes, adapters, fittings and other “little things” that may not be included in the kit - how long the entire oil cooling system will work before depressurization due to mechanical stress or natural aging of materials will depend on the quality of its execution. As for choosing the radiator itself for a non-standard installation, everything will depend on the engine parameters of your car. Many experts advise first installing temperature and oil pressure sensors, and then selecting a radiator based on their readings.
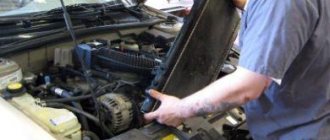
It is better to entrust the installation of the radiator to a specialist. If the device does not have special fasteners, the technician will make them himself. As a rule, the radiator is placed in front of the main engine cooling radiator. The technician will also install a special spacer. It often happens that the spacer does not fit into the regular place of the oil filter - then you will need to install something like a gasket with it. In this case, a fairly long fitting may be required for further installation of the spacer.
Heat dissipation
According to factory parameters, such batteries (with a height or center distance of 500 mm), when integrated into a full-fledged hydraulic heating system, are capable of dissipating slightly less than 200 W of thermal power per section (180 W aluminum, 140 W cast iron).
However, in our case, do not expect such numbers. Firstly, the heat output of 180/140W is provided only by a new battery. And for such a heater, as a rule, used options are used.
Buying a new one for such a homemade product is not economically feasible.
Secondly, such work is only possible in the 90C-supply, 70C-return mode. In this assembly we use heating elements with an optimal operating temperature of 60-65C.
When it’s cold outside down to -25C, you can turn it up to +70-75C. The maximum possible temperature is + 80C.
Therefore, you will never heat such a battery to 90C in NORMAL operation. In principle, this is not necessary, since it entails the risk of a sharp increase in pressure.
Excursion to the manufacturers
When choosing a suitable oil cooling radiator, you should pay attention to the manufacturer. If you understand engine radiators, then everything is simple: look for oil cooler radiators in their assortment - almost all major radiator manufacturers produce them too. Unfortunately, their products cost a lot of money, but the price corresponds to the quality. Radiators from the following companies are worthy of attention:
- Nissens (Denmark);
- NRF (Netherlands);
- Hella (Germany):
- AVA (Netherlands).
Not as high quality, but much cheaper analogues are offered by ]DP Group[/anchor] (Turkey), Polcar (Poland), 3RG (Spain), Vika (Taiwan), Dello (Germany), Thermotec (Poland). In fact, these are packers selling products from Turkish, Chinese and Taiwanese factories. There is nothing wrong with Asian auto parts; the cheapest auto parts from these countries are another matter. As a rule, they have a high percentage of defects and non-compliance with the original geometry. In their production, low-quality raw materials are often used. In the case of radiators, this is critical, so Avto.pro advises buying much higher quality products from companies from the list above.
Electrical connection diagram
As for ensuring safety when connecting voltage, the entire circuit must be powered only through an RCD or differential circuit breaker with a leakage current of 30 mA.
Mistake #14
A simple modular machine is not suitable for this.
Otherwise, you will have to move around this miracle only in rubber boots and gloves. The water shadows are destroyed over time and the heating coil, initially protected by the shell, is exposed.
Upon contact with water, current leaks to the metal body of the heater. As soon as you touch any of the sections, you will find yourself energized.
Something similar happens in electric titans or boilers, when the water from the tap begins to “pinch” and “shock”.
RCD saves you from all this. True, it will only work on its own when the battery is grounded.
Otherwise, the RCD will wait until you touch the battery with your hand. The RCD starts to knock out - immediately change the heating element.
The thermostat itself is connected with a flexible PVA wire 3*2.5mm2.
A Euro plug is mounted on one side of the wire, which is plugged into the nearest socket.
Do not clamp a stranded wire without lugs under the screws of the thermostat.
This is especially true for powerful heating elements of 1.5-2.0 kW. To ensure reliable contact, the ends of the cores must be crimped with NShVI sleeves.
Mistake #15
Another problem is exposed contacts on the thermal relay.
If there are small children and pets in the house, this is very dangerous.
Some craftsmen advise covering the top of the thermostat with a plastic case from the socket box. It's just the right diameter.
Conclusion
An engine oil cooling radiator is not included in the standard equipment of all cars, but it copes so effectively with the task of controlling the oil temperature and protecting the engine that many car enthusiasts decide to install this device on their vehicles. The radiator cannot be called a durable car part - it has little mechanical strength, and the connecting elements of the oil system tend to gradually age and depressurize. An engine oil leak should never be ignored, and in systems with a special cooler it can also be observed in the radiator. If the car requires replacement of the oil cooler, we recommend purchasing spare parts from well-known European manufacturers. Although they will not be cheap, they will guarantee the efficiency and durability of the engine oil cooling system.
Safety valve installation
That is why the design should provide protection in the form of an emergency valve.
Mistake #12
Do not install a standard explosion valve, like on boilers.
You need a device with a response pressure of 3 bar.
The operating pressure of a standard cast iron battery in a central heating system is about 9 atmospheres (1 bar = 1 atm). In our closed battery in normal heating mode it will be no more than 1.0-1.5 bar.
To measure pressure, you can install a small pressure gauge instead of one of the plugs.
You will be able to monitor the operation of your heating system in real time.
Mistake #13
Do not point the “explosive” valve towards the wall where the socket and plug are located.
To prevent liquid from periodically dripping from it, the safety valve can be turned upside down. In this case, the release of gases rather than water will predominate.
Selection of materials
As is clear from the above, to obtain a homemade heater you will need to get the following components somewhere:
- frame;
- oil;
- heating element;
- mobile stand;
- control and automation devices.
As a housing, you can borrow an old radiator from a central heating system, sheet or sectional. A car, or any similar product, the design of which will allow fluid to circulate inside naturally or artificially (using an electric motor), is also quite suitable. You can also make a closed loop from steel pipes with your own hands.
The main thing is not to forget that an indispensable condition for the normal functioning of the system will be to ensure the tightness of the housing. If the liquid begins to leak, then it is unlikely that such a homemade device will bring more benefit than it will cause trouble.
As for the oil, firstly, its quantity should be based on the calculation
85% of the body volume. The rest of the cavity is filled with air. This 15% area is maintained so that during operation the oil does not crush the housing due to thermal expansion.
Secondly, the quality characteristics of the liquid must satisfy at least two criteria: purity and heat resistance. Dirt and impurities will shorten the life of the heating element by causing scale to settle on it. A decent temperature of the heating element indicates that you should select technical oil of the appropriate brand. A suitable option would be, for example, a transformer.
Making a heater for the garage
To maintain a comfortable temperature in the garage, it is not difficult to make your own heater using waste oil. At the same time, the problem of its disposal will be solved, which is also a pressing issue for car owners. To assemble it, almost all the elements and spare parts can be found in your own garage.
When making a heater you will need:
- metal pipes;
- heating element (heating element);
- used oil;
- wire with plug.
Structurally, the body can be made in any form convenient for placement in the garage. The photo shows one of the possible circuits of the device.
Diagram of a homemade oil heater
Metal pipes are used of any diameter. It must be taken into account that the thinner they are, the more of them will be needed. The temperature of the room will depend on the area giving off heat. The length of the pipes is also arbitrary, it is desirable that it be maximum, but at the same time ideally harmonize with the dimensions of the wall where it will be installed. The metal from which the pipes are made is not significant. The thickness of the pipe walls can be any.
Repair of electrical equipment KAMAZ
| Type of repair | price, rub. |
| Diagnostics of electrical equipment operation by visual inspection | 600 |
| Computer diagnostics of the Engine Control Unit | 3000 |
| Computer diagnostics of the Exhaust Gas Neutralization Control Unit (Urea) | 1500 |
| Computer diagnostics of ABS (SCREEN) | 1500 |
| Replacing the fuse and relay box n/o | 2500 |
| Replacing the fuse and relay block | 1500 |
| Replacing the engine control unit | 1200 |
| Replacing the interior climate control unit | 1200 |
| Replacing the ABS block | 840 |
| Computer diagnostics of ABS (WABCO) | 2500 |
| Replacing the brake light switch | 360 |
| Replacing the generator Engine CUMMINS | 2500 |
| Replacing the generator Engine KAMAZ | 1800 |
| Replacing the rear light lens | 360 |
| Replacing the rear light | 840 |
| Replacing the turn signal/repeater | 480 |
| Replacing the side light | 480 |
| Replacing the sound signal | 840 |
| Replacing the turn signal switch | 1200 |
| Replacing the cabin light | 600 |
| Replacing the fog lamp | 640 |
| Starter replacement | 1800 |
| Replacing headlight glass | 360 |
| Replacement Headlights n/a | 1200 |
| Replacing the headlight | 840 |
| Replacing the instrument panel N/O | 1800 |
| Replacing the instrument panel | 1200 |
| Replacing the fuel level indicator N/O | 800 |
| Replacing the fuel level indicator | 540 |
| Replacing the air pressure indicator | 640 |
| Replacing the oil pressure indicator | 720 |
| Replacing the electric heater motor | 1200 |
| Replacement of electrical wiring (complete) | 27000/45000 |
| Checking the operation of the brake light and troubleshooting | 450 |
| Installation of a car radio with 2 speaker systems | 3500 |
| Adjusting the sound signal | 480 |
| Charging the battery | 480 |
| Starting the car with a starting device | 360 |
| Remove and install battery | 960 |
| Replacement of windshield wiper assembly n/a | 2520 |
| Replacing the windshield wiper assembly | 1800 |
| Replacing the mains switch | 840 |
| Installation of a 24/12 convector with output to the cigarette lighter | 2000 |
| Replacing the air pressure sensor | 450 |
| Replacing the speedometer sensor | 840 |
| Replacing the ABS sensor (on the wheel) wheels and brake drum removed | 960 |
| Replacing the ABS sensor (on the wheel) with removing the wheel and brake drum | 3600 |
| Replacing the air filter clogging sensor | 300 |
| Replacing the fuel level sensor | 450 |
| Replacing the reverse light sensor | 360 |
| Replacing the coolant temperature level sensor | 360 |
| Replacing the oil pressure sensor | 360 |
| Replacing the speedometer | 720 |
| Checking the speedometer (calibration) | 2000 |
| Replacing the axle lock sensor | 360 |
| Replacing the instrument cluster | 840 |
| Replacing the fuse | 120 |
| Replacing the bimetallic fuse | 120 |
| Diagnostics of the diarrhea | 720 |
| Railway repair | 3000 |
| Replacement of electric pump PZD | 1600 |
| Replacing the spark plug | 720 |
| Replacing the temperature sensor | 720 |
* 1. For special equipment, a coefficient of 1.1 is applied 2. For vehicles aged 5-10 years, a coefficient of 1.1 is applied
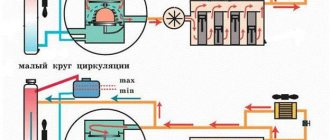
Principle of operation
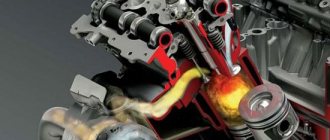
The engine has an oil pump; it circulates oil through all channels, lubricating various rubbing elements.
The pressure in the system is not low, it can reach 4 - 5 BAR, depending on the engine speed. The principle of operation is quite simple. A cooling circuit is cut into or installed into the oil line. By the way, it can be installed either in the block itself, but there are also special adapter inserts for the oil filter.
The system is “closed” by a thermostat and a pressure-reducing valve, as I wrote above, so that the oil does not rush to cold and low pressure.
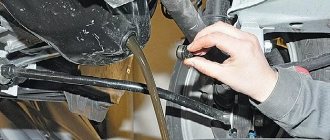
Next are two hoses or tubes that connect the engine and the radiator.
After starting the engine, the following happens:
- Idling (low pressure, low temperature) - the valve and thermostat are closed, there is no circulation through the radiator. Very relevant for winter start-up
- High speeds (long work, heavy load, excessive heating of the oil) - the thermostat is set to a certain temperature and when it is reached, it opens. There is also a lot of pressure in the system, and therefore the pressure relief valve is also open. The lubricant begins to circulate through the radiator, and it, in turn, dissipates heat into the environment.
- The oil gives off excess heat. Does not burn and remains in working condition longer. Which definitely increases engine life
The system is very similar to the automatic transmission radiator and works on the same principle.
Work performed from below:
- Unscrew the bolts securing the propeller shaft flanges and the main gear drive gear, pull back and remove the propeller shaft from the vehicle.
- Unscrew the shell nut of the flexible speedometer drive shaft from its drive mechanism on the gearbox and remove the speedometer cable from the gearbox socket.
- Unscrew the bolt securing the muffler exhaust pipe clamp to the bracket plates on the gearbox housing.
- Disconnect the transmission control drive rods from the levers on the side cover of the gearbox housing.
- Disconnect the intermediate handbrake lever from the bracket (unscrew and remove the pin) and remove the front handbrake cable from the end of the intermediate lever.
- Remove the clutch slave cylinder from the clutch housing by undoing and removing the pin connecting the piston rod to the clutch release fork, unscrew the nuts of the studs securing the cylinder to the clutch housing, and loosen the screw of the bracket securing the pipeline to the engine oil sump. In this case, the clutch slave cylinder, connected to the pipeline going to the clutch master cylinder, remains on the body, which eliminates the loss of brake fluid when they are disconnected and the subsequent bleeding of the clutch release system.
- Unscrew the nuts securing the muffler intake pipe flange to the exhaust pipe flange.
- Disconnect the two electrical wires from the reverse light switch on the side cover of the transmission.
- Place a jack, trestles or other suitable support under the gearbox housing.
- Unscrew the bolts securing the left and right front power unit mounts to the front suspension cross member brackets.
- Unscrew the two nuts of the bolts securing the rear support of the power unit (under the extension) to the removable cross member.
- Unscrew the four bolts securing the cross member to the base of the body and remove it.
- Tie the power unit with a cable and, using a lifting device, remove it from the vehicle and install it on a trolley for transportation.
Installation of the power unit on the car is carried out in the reverse order.