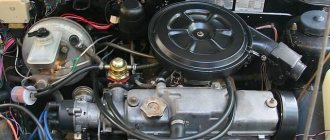
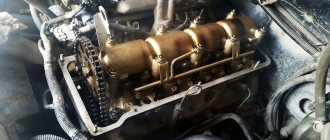
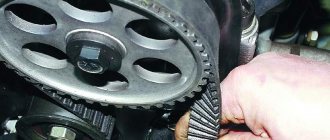
Today I was doing some minor engine repairs; it was necessary to align the TDC marks on the RV and KV. I decided to leave a note here so as not to forget)), and maybe it will be useful to someone else. There is a mark on the RV, there is only one of its kind.
There is also a mount for the phase sensor marker, we don’t need this.
On the HF damper it is a little more difficult, due to its inaccessibility (if the radiator is not removed). But looking at the removed pulley, everything becomes clear. You can find the missing tooth spot by touch, count 20 teeth counterclockwise, and look for the mark there.
And so in a real situation. Opposite the mark you can put a mark with a marker, it will be clearly visible.
To find it, you don’t need to remove anything additional, your hand can go through freely, turn the pulley to a position where you can comfortably draw a line. Well, in conclusion, it’s easier to first set a mark on the RV sprocket and then look for the mark on the damper, it will be somewhere near the crankshaft sensor (DPKV). Since the crankshaft makes two revolutions during one revolution of the RV, you need to look in the area of +- 5 teeth.
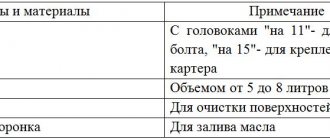
You will need: a screwdriver, keys “8”, “10”, “13”, a special key for turning the crankshaft.
Setting the piston of the fourth cylinder to the TDC position of the compression stroke
The piston of the 4th cylinder is set to the TDC (top dead center) position of the compression stroke so that when carrying out work related to removing the camshaft drive chain, the valve timing is not disrupted.
If the valve timing is incorrect, the engine will not operate normally.
Set TDC according to the mark on the camshaft sprocket (when installing according to the marks on the crankshaft pulley and on the front cover of the camshaft drive chain, the piston of either the 1st or 4th cylinder may be in this position).
After this, make sure that the marks on the crankshaft pulley and the cover match.
When does a belt need to be replaced?
- during scheduled maintenance (if the mileage is 100 thousand km);
- if the marks on the camshaft sprocket do not match the mark on the bearing housing identified during phase diagnostics;
- when the pump that drives the “water pump” fails;
- if the chain is damaged (wear, stretching or cracking), requiring urgent replacement and adjustment according to the marks.
Advice : if the engine does not pull and does not gain speed, you need to check the DPKV and timing marks and set the TDC (engine top dead center) on the flywheel. Both pulleys (inlet and outlet) are placed along the marks with the chain tensioned.
How to determine the offset of the timing chain marks?
A chain is more reliable than a belt. It does not slip; in practice, there are practically no cases of breakage. But over time, it can stretch, which leads to changes in valve timing due to a shift in the position of the crankshaft relative to the camshaft and to a later opening of the valves.
The malfunction can be identified by the following signs:
- A metallic knock at idle is the initial stage of a stretched chain. At first the sound appears “when it’s cold” and as it progresses it becomes disturbing.
- Loss of power and difficult starting - appears when the operation of the gas distribution mechanism is disrupted. If adjustments are not made in time, the engine will stop starting.
Sometimes the valve timing shifts “by one tooth” due to damage to the pulleys, which can play and weaken the timing chain. Do not rush to agree to a major overhaul, but check the marks and carefully inspect the sprockets.
Preparing tools and spare parts for timing belt replacement
Prepare a screwdriver and wrenches for “8”, “13” and “10” , devices for turning the crankshaft and additional parts:
- oil seal (frontal);
- new cylinder head gasket;
- pump gasket;
- tensioner;
- damper bar, limiter and chain stabilizer;
- sealant;
- motor oil and oil filters;
- coolant;
- crankshaft seal;
- gears.
Important! You can install the timing marks of the pulleys with high quality if you have a reliable chain that prevents damage and stretching. If the old chain fails, you need to buy a new one.
Step-by-step adjustment and timing marks of the injection Niva Chevrolet
- Installation of the risk on a VAZ-2123 1.7 with 8 cells (according to the standard) is carried out on an inspection ditch. Put the car on the parking brake. Shoes are placed under the front wheels.
- You need to wash the engine and fender liners.
- The air filter is removed.
- Drain the engine oil, unscrew the oil filter.
- Drain the coolant.
- The valve cover fastenings are unscrewed.
- To prevent engine oil from leaking into the cylinder head area, it is recommended to replace the cylinder head gaskets.
- By rotating the crankshaft pulley, marks are set on the camshaft gear and bearings.
Installation of ignition VAZ 21214 injector Chevrolet Niva
Timing marks VAZ(LADA) 21214 NIVA
Part 2. Valve + piston = repair Niva Chevrolet NIVA Chevrolet 4+4
Late ignition on an injection Niva
Timing belt VAZ(LADA) 21214 NIVA. REPLACEMENT OF TIMING VAZ 21214 NIVA.
Chevrolet Niva timing belt replacement
ICE theory: Motor 2103 with head 21214 with reg. star (modern)
All VAZ Sensors Location. All VAZ NIVA drivers need to know this. DPS, DMRV, DPKV, DPRV, IAC
VAZ21213 repair and assembly of Niva injector head
NIVA VAZ will not start. Replacement, cleaning (DPKV) of the crankshaft position sensor on a Niva VAZ
- Electric power steering for Niva Chevrolet
- Honda cr v 2000 parts
- Suzuki cx4 2012 timing chain or belt
- How to rebuild a caliper on a Mazda 626
- Repair manual for Honda fit aria
- What engines are installed on the Nissan Qashqai?
- 2006 Ford Focus C-Max
- Fiat Stylo diesel owner reviews
- Lexus RX 450h from America installation of navigation
Phase adjustment in case of mismatch
If the notches do not match, work continues:
- The “whiskers” of the lock washer are bent. The fixing bolt is unscrewed using a key set to “13”, and the position of the camshaft sprocket is loosened.
- The first gear on the gearbox is engaged, allowing you to avoid spinning when unscrewing the crankshaft gear bolt.
- The fastener is removed with a lock washer. To prevent the bolts from falling into the engine sump, use a deep-head wrench or unscrew the bolt by hand.
- Remove the chain tensioner using a screwdriver. It should be replaced if it is stretched or strained, during scheduled maintenance, after 60-80 thousand kilometers.
- The camshaft sprocket is removed. If you pull it towards yourself (a distance of 5-10 cm), it will be removed along with the chain. Check for wear on the sprocket teeth, which form an inverted “V” shape. The part must be replaced if there are grooves on the leading part of the teeth.
- On a working mechanism, the chain moves on the teeth. The scrolling step is one tooth.
- The sprocket with chain is placed on the camshaft flange. When the chain moves on the sprocket, its holes will not line up with the pin. The crankshaft should be rotated in the specified direction until the mark and pin match.
- It is important to secure the part with a bolt and washer (without tightening it all the way). After turning the crankshaft twice with a special wrench, check the placement of marks on the camshaft gear and bearings.
- If the marks correspond, their adjustment has been successfully completed. The fastenings of the crankshaft and camshaft sprockets are tightened tightly.
If there is a discrepancy, you must repeat the steps.
For clarity of the obtained result, it is suggested to look at the example in the photo .
In the upper corner is an overview of the notch placed against the DPKV core. Below is an asterisk on the flange. The dot is visible opposite the bed in the aluminum cylinder block.
Important ! The large mark for the phase sensor is ignored in the gear assembly. The work uses small lines. The CPPS (crankshaft position sensor) is installed against the 20th gear tooth. When a match is achieved, the bolts securing the crankshaft and camshaft sprockets are tightened.
What's the result?
As you can see, replacing the timing chain is not the simplest and rather labor-intensive operation. It is necessary to remove many elements; in addition to the chain, a number of parts will also need to be replaced.
It is important to adjust and put on the chain (from the crankshaft through the oil pump to the camshaft), set the marks correctly, and also strictly follow the order of disassembly/assembly and removal, as well as the subsequent installation of parts and assemblies.
Of course, if you do not have the proper experience and skills to perform such work, it is better to give up trying to change the chain yourself and seek help from specialists at a service station.
However, if you have the necessary tools and spare parts, if necessary, such a replacement can be done with your own hands in a garage. The main thing is to study the manual, and also separately take into account certain nuances discussed above.
Fund indicators
To evaluate the performance of a Sberbank fund, you need to analyze profitability, commission percentage, portfolio composition, the possibility of early withdrawal and other indicators.
For convenience, I have reflected the characteristics in the table.
| Name | Prospective bonds |
| Ticker ISIN | RU000A0EQ3T9 |
| Registration number | 0327-76077399 |
| Registration date | 02.03.2005 |
| Type | Open |
| Strategy | Investing in bonds of Russian issuers denominated in rubles |
| Risk | Short |
| Commission | 2,8–5,8 % |
| Profitability for 3 years | 30,62 % |
| Minimum initial deposit | 1000 rub. |
| Subsequent contributions | 1000 rub. |
| Number of shareholders | 13 598 |
| Buy online | Yes |
| Minimum investment period | 1 year |
| Early withdrawal | Yes |
Product description
Branded developments:
Innovative USPK technology was used in the production of oil and petrol resistant rubber:
BNKS-28AMN (synthetic butadiene-nitrile rubber) is used in the recipe.
Benefits for the car enthusiast:
Warranty 2 years unlimited mileage
- Availability: In stock
- Length: 16 cm x Width: 6 cm x Height: 3 cm
- Weight: 0.45 kg
- Product code: 4877
- Cash upon receipt (cash on delivery)
- Online payment by bank cards without commission
- Electronic wallets
- According to the organization's account (excluding VAT)
- Post office
- SDEK | DPD | PEC
- Business Line
- Energy | GTD (KIT)
- Baikal Service
- ZhelDorExpedition
- Dispatch from 1 day
- Delivery from 2 days
- Product didn't fit? Easily return it within 14 days
- Read about other store guarantees
Source
How to adjust the ignition on a Chevrolet Niva video
Ignition installation. It is so simple
Installation of camshaft, chain, ignition, according to marks, VAZ (classic). Do it yourself!
ICE theory: Motor 2103 with head 21214 with reg. star (modern)
How do I adjust the VALVE? injector vaz 2107
NIVA VAZ will not start. Replacement, cleaning (DPKV) of the crankshaft position sensor on a Niva VAZ
Ignition installation according to any requirement. cylinder (with plug)
I removed the distributor how to adjust the ignition of a VAZ 2107 VAZ 2106
Diagnostics and error codes of the Chevrolet NIVA instrument cluster
NIVA CHEVROLET cylinder head gasket replacement
Adjusting the valves of the VAZ 2121 NIVA injector. Adjustment valves of VAZ 2121 NIVA injector
- Radio RP7 Sony Ford Focus 3
- Nissan laptop 2013 right hand drive
- Video review of Skoda Rapid Zhorik Revazov
- Metallic knock in the rear suspension of Ford Focus 2
- What kind of oil is poured into the Citroen C4 engine
- Mercedes with 200 W202 esprit
- Peugeot 605 connection fuel level sensor
- Automatic transmission control unit Hyundai Sonata
- Auto parts Lexus rx 350 automatic transmission
- Doors on Kia Rio 2008
- Hyundai Genesis 2014 owner reviews
- Disassembling the Chevrolet Niva turn switch
- Crossover Daewoo Winstorm test drive video
- Replacing the steering rack Kia SID 2008
- ABS errors ESP Mercedes W220
Home » Video » How to adjust the ignition on a Chevrolet Niva video
Mechanical chain tensioner. Main manufacturers.
Replacing a chevrolet lacetti timing belt, detailed instructions with photos.
The photo shows three main options common in Russia. The first product is made by the people and on the forums of the ANC “auto pilot”. The second product is manufactured by Rusmash, usually called the pilot. The third tensioner belongs to the designer Isaev, colloquially Isay. My team and I personally have installed several dozen of each type of tensioner on cars, so I have the right to talk about statistics and operating features. Something from behind the scenes. The first two tensioners belong to the pen of one person. Designer Igor Medvedev. On motor forums under the nickname Rhodes-M. As far as I know, patents for these inventions or utility models are registered in his personal name. I work with this person on other projects, so the information about the designs and manufacturing features is first-hand.
Autopilot. Principle of operation. Rack. Of the three, this is the undisputed leader. I have not noticed any shortcomings in operation. Cars with mileage of more than 150 thousand have already arrived where I installed autopilots from the very first batches. It is very convenient to work when replacing the camshaft; it does not need to be removed from the cylinder head. Flaw. It is difficult to find an “original” that has passed quality control. Medvedev left and the quality of input immediately dropped greatly. The cost of production has become cheaper.
Pilot. The operating principle is a toothed rack. Good quality tensioner. The big brother of "autopilot". Stable quality. It is also possible to work without removing it from the cylinder head. The main disadvantage is the huge percentage of fakes on the market. This tensioner was the first successful design, and the Chinese grabbed onto it. If Autopilot is impossible to find at all, then Pilot is very difficult to find “original”. Based on the St. Petersburg market, I estimate the prevalence of counterfeits for this tensioner at 70%. I work with Rusmash directly, so this as a “minus” is insignificant.
Isaiah. The operating principle is a clock spring. To avoid questions and insinuations, I contacted the designer directly and in 2022, we installed several dozen of them. The main disadvantage of the product, which the designer passes off as its advantage, is that there are no precision parts. When the rod doesn't move out too much, everything is fine. When the chain is worn out and the rod goes beyond half, it “walks” quite a lot. If we are talking about a production engine without “pretensions” for tuning, this may be acceptable. If the engine is “more serious” this is unacceptable. The tolerance for axial “walking” of the chain and sprockets in the timing tract is only 0.3 mm.
Summary. We try to install Autopilot (if available) on tuned cylinder heads. For the most part, we work with Pilot, but if a client, based on forums or his own views, asks to install Isai, then we do not dissuade him. For double-row chains and -213 engines the situation is similar.
Which camshaft is better to install?
One way to avoid main engine noise is to replace them with adjusting bolts. In this case, it is also necessary to purchase a 213th camshaft, which can improve engine performance.
Problems with the shaft itself include:
- bearing wear;
- bullying in bed;
- cracks, fractures, axial deformation;
- seal damage.
Video 1, the shaft burst 2 times in a row.


