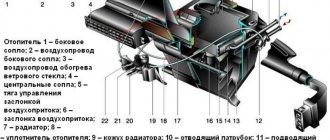
Design and operating principle
Let's look at a more detailed design and operating principle of CV joints using the example of a VAZ-2199 car.
This car has front-wheel drive, so CV joints are used in the drive design.
The external element of this car is made according to the “Birfield” type.
At the end of the drive shaft coming from the gearbox there is an internal race with 6 grooves.
The outer race has grooves on the inner surface. The race itself is connected to a shaft, which has splines that are inserted into the wheel hub.
The inner race fits into the outer one, and metal working balls are placed in the existing grooves of both races. To prevent the balls from falling out, they are inserted into a separator.
This CV joint works like this: when driving, the wheel, due to the independent suspension, constantly moves relative to the car body, while the angle between the drive shaft and the shaft inserted into the hub constantly changes due to road unevenness.
POPULAR WITH READERS: Is it possible to adjust the speedometer with your own hands?
The balls, moving along the grooves, ensure constant transmission of rotation when changing angles.
The design of the internal “grenade”, which in this car is of the GKN type, is the same as the external one, but the outer holder is slightly longer, which ensures a change in the length of the drive shaft.
When hitting a bump, the angle on the outer CV joint changes, and the wheel itself goes up. In this case, changing the angle affects the length of the drive shaft itself.
In the case of using a GKN CV joint, the inner race together with the balls can go deep into the outer race, thereby changing the length of the shaft.
The design of ball joints with dividing grooves is very reliable, but under one condition. They are very sensitive to pollution.
If dust and sand get inside the “grenade,” it leads to accelerated wear of the grooves and balls.
Therefore, the internal elements of this joint must be covered with anthers.
Damage to the boot will result in CV joint grease leaking out and sand getting inside.
It is very easy to identify a problem with these elements - when the wheels are turned completely and the drive wheels begin to move, characteristic clicks will be heard.
IMPORTANT TO KNOW: Why the CV joint crunches, diagnostics and troubleshooting
Lateral clearance in GP and differential bearing preload
According to the instructions, the lateral clearance and preload on the bearing are adjusted using tool A.95688 / R.
In its absence, a caliper of the appropriate size will perform this role.
To ensure the required preload, the distance to the bearing caps is recorded at the beginning and end of tightening. The required difference in values is 0.2 mm.
The side clearance is adjusted by moving the driven gear towards the drive until it disappears. First, one of the nuts is in a loose position, the other (working) is tightened. After eliminating the gap, gradually tighten the feed nut until the caliper jaws are 0.1 mm apart. The backlash adjustment stops when the teeth click slightly. Then both nuts are tightened evenly to a distance of 0.2 mm. Correct operation is indicated by uniform play in any position of the gears.
Removal and installation of front wheel drives (replacing CV joints) Niva Chevrolet
| 2. Raise the car and remove the front wheels. |
| 3. Disconnect the shock absorber struts from the lower arms of the front suspension (see “Replacing the front suspension shock absorber”). |
5. Remove the bolt securing the right front axle gearbox bearing cover to the front suspension cross member.
| 4. Unscrew three nuts securing the bearing housings of the inner hinge of the right and left drives. |
7. Unscrew the nut and remove the bolt securing the left front axle gearbox bearing cover to the front suspension cross member.
| 6. Unscrew the four nuts securing the suspension brackets of the front axle gearbox. |
9. Remove the front wheel hub cap and unscrew the hub nut.
| 8. Raise the front axle gearbox and secure it in this position in any available way. |
niva-chevy.ru
| 11. Compress the suspension spring by jacking up the lower arm. Unscrew the three nuts and remove the ball joint bolts from the lever. |
15. ...remove the right drive.
| 14. Pull the gearbox back and... |
| 16. Remove the left drive in the same way. |
| 17. Install the drives and all removed parts in the reverse order of removal. When tightening the wheel hub nuts, adjust the play in the bearings (see “Checking and adjusting the play in the front wheel hub bearings”). |
When is replacement required?
The replacement operation is carried out when oil leaks from the axle housing. A clogged breather causes lubricant to squeeze out.
If grease drips immediately after stopping (while the gearbox is hot), and then the flow stops, the breather must be cleaned. When it is clogged with dirt, the heated air is not released outside during movement. Under pressure, the working fluid of the gearbox will be squeezed out even through serviceable gaskets and seals.
If the breather is in order, but oil still leaks, you will have to replace damaged cover gaskets or O-rings. of them in the front axle, and they are different:
The oil seal that seals the drive gear axis is located at the rear of the axle, at the location where the front propeller shaft is attached. Oil seals for the right and left drive (inner axle joint).
Attention! The left and right oil seals are not the same; they have a direction of rotation. This must be taken into account when purchasing.
Important! The left and right oil seals are not the same; they have a direction of rotation. This must be taken into account when purchasing.
The oil seal is replaced without removing the front axle. If the work is carried out independently, and it is not possible to use a lift, the car is placed on an inspection hole or overpass . We tighten the hand brake and install supports under the rear wheels. Gearbox and transfer case levers in the “Neutral” position. The front part is lifted with a jack and fixed on stops.
Attention! It is dangerous to work under a car that is only supported by a jack!
We clean the bridge from dirt and leaks of technical fluids. Unscrew the crankcase drain plug and drain the oil from the gearbox. Screw the plug into place.
KINDS
The CV joint was invented quite a long time ago; according to the most common version, it was invented back in the twenties of the last century by Alfred Rzepp. Therefore, it is not surprising that since then many varieties of this part have appeared:
- cracker - installed exclusively on trucks;
- tripod - usually used as an internal CV joint;
- twin hinge – used quite rarely due to its complex design;
- ball, or CV joint, is the most common type, which is most often used on the axles of passenger cars.
It was this invention that became revolutionary for the design of passenger cars with front-wheel drive.
CV joint device
Here you can see a photo of a ball CV joint, thanks to which it will become clearer what this part is like in the assembled state. If we talk about its components, then, in fact, there are not so many of them:
- Housing with outer ring.
- Separator.
- Inner ring.
- 6 balls.
- Shaft.
- Stop ring.
- The anthers are external and internal, they are held in place by clamps.
If you put these elements together, they actually look like some kind of grenade.
All these parts are assembled into an external CV joint and an internal CV joint. The internal one transmits rotational movements to the external mechanism, which results in a change in the angle of the axle shaft relative to the axis.
How to determine when it's time to change?
Under the influence of temperature and aggressive substances contained in the oil, the elastic cuffs become rigid. Rotating shafts gradually wear out rubber or silicone. As a result, the connection loses its tightness. This manifests itself in the form of oil leaks. If there is severe wear after parking, you can find oil drops under the car in the area of the gearbox.
If the input shaft seal is damaged, lubricant leaks onto the clutch disc. As a result, the oil begins to burn, as evidenced by a characteristic odor. In this case, the clutch may slip under heavy load.
Important! Seal wear is also indicated by a drop in oil level. In this case, the parts must be replaced with new ones.
Symptoms of a problem
The CV joint is designed for operation in fairly harsh conditions. Therefore, only proven devices are installed at the car manufacturing plant. Their service life is comparable to the service life of the entire car. But nothing is impossible for Russian roads. The outer CV joint experiences the greatest load. All vibrations associated with uneven road surfaces, sudden braking, and impacts are transmitted to it.
Video - replacing the CV joint boot in Logan, Sandero, Largus and all the nuances:
First of all, you should monitor the integrity of the anthers. Leaks on them are a serious threat to performance.
The aggressive nature of driving with the wheels turned to full is very dangerous for CV joints. This style is taught in extreme driving courses.
Video - replacing CV joint boots:
Failure of CV joints can be determined by play and sound. When under heavy load, faulty outer CV joints produce a squeaking sound similar to the sound of worn-out brake pads. Also, during a sharp start, a characteristic click may be heard on the turned wheels.
The most classic option, when it comes time to replace the CV joint, is the appearance of a characteristic crunch on one side of the car. Such a crunch when turning the steering wheel can only be produced by a constant velocity joint. It is more difficult to determine which CV joint sounds, internal or external.
Video - how to check which CV joint has started knocking:
If extraneous noise appears during straight-line movement, the inner CV joint is most likely worn out. The following procedures may help to make an accurate determination.
Front oil seal: replacement features
Oil leaking from under the crankshaft lip hits the crankshaft pulley and then splashes throughout the engine compartment. One of the reasons for this malfunction may be wear of the front oil seal. Before removing this part, you should make sure that the crankcase ventilation is in good condition, otherwise oil may leak even during normal operation of such an element.
Before replacing the front crankshaft oil seal, you should have the appropriate tools ready. This operation is carried out in a certain sequence:
The oil sump protection and engine splash guard are removed.
The belt responsible for operating the power steering pump is removed.
The nut securing the generator to the adjusting bar is unscrewed, after which this power unit moves towards the motor. This action is necessary to loosen the belt being removed.
Using a socket head, the nut is unscrewed, through which the crankshaft pulleys are secured, after which they are removed.
The worn front oil seal is carefully removed from its place using a flat-head screwdriver by applying slight pressure and displacement.
The nest is wiped with a clean rag, and the oiled new product is installed in place using a mandrel of suitable diameter. It should be borne in mind that this element must be placed inside the engine with the working edge forward.
Reassembling the dismantled components is performed in the reverse order.
Why can the CV joint on a Chevrolet Niva deteriorate?
Such parts tend to wear out, like all others, so they need to be replaced over time. Among the main reasons for which the CV joint will need to be replaced are the following:
- long service life of the outer CV joint - most often the part has to be replaced after 10 thousand kilometers;
- entry of dust or dirt when the rubber boot wears out (therefore you need to check the condition of the protective part).
In addition, a large load is placed on the Chevrolet Niva grenade when the steering wheel is turned at strong turns, and driving occurs on poor road surfaces.
Having become familiar with all the features of the hinges, an experienced driver will be able to correctly replace the outer CV joint for a Chevrolet Niva on his own.
Useful video
Watch information about the design and operation of Chevrolet Niva mechanisms in the video below:
Most Chevrolet Niva owners, due to the simplicity of the design, can independently repair their car. This is especially true for a large number of consumables, including those in the chassis of the car. One of the parts that requires periodic replacement is the Chevrolet Niva front axle oil seal. The need for repairs arises when an oil leak occurs from the axle housing and a knocking noise occurs. The main cause of grease leakage is due to a clogged breather.
It is necessary to monitor at what stage the oil leak occurs. If, after intensive movement, while the gearbox is still hot, and after it cools down, it stops, then it is necessary to clean the breather. It may be clogged with dirt, which prevents the heated air from escaping outside. Therefore, it is possible to squeeze out fluid from the gearbox, even if the gaskets are in good condition.
If the breather is working properly, but oil still comes out, then most likely you will need to replace the cover gaskets and o-rings. Typically, the design of the front axle provides for the presence of three rings: an oil seal located on the axis of the drive gear, axle bearings and oil seals for the right and left drive - the axle shaft hinge.
It is important to remember that the left and right oil seals are designed for different directions of rotation, so when purchasing, you should carefully check the package. The direction can be determined by the marked arrow. If installed incorrectly, there may be increased oil leakage outward due to the location of the oil scraper notches.
The main types of such hinges
"Trakta" (cam-disc)
The CV joint consists of 2 liners, 2 knuckles and a disc. The inserts have cylindrical necks. There are grooves inside. The necks are covered with fists, the discs fit into the grooves. The working angle of movement does not exceed 450.
"Weiss" (four plus one)
This means the presence of 4 main and one guiding (centering) ball.
This hinge is installed on the GAZ-66 and other off-road vehicles. Its main drawback is the maximum angle of rotation of the wheel is only 320. The service life of such balls is low, since the load during movement falls on only 2 balls (the other pair is used when reversing).
Six - ball CV joint by Alfred Rzepp
In this mechanism, rotational motion is transmitted by all balls. The design consists of a dividing lever, a separator, 6 balls, a housing that includes a spherical cup with a driven shaft, and an inner race that includes a spherical cam with a drive shaft. Rzepp CV joints have several modifications.
The classic constant velocity joint can transmit significant forces with a working angle of up to 370. It has a high efficiency and high load capacity.
Three-spike - tripod
This constant velocity joint is sometimes called a “tripod”. Available in two versions - hard and universal. A rigid CV joint implies no movement along the longitudinal axis, the angle is up to 430, they are used as external CV joints. The universal one has a smaller angle; they can be used as internal hinges.
Chevy Niva blower shaft malfunctions
The parts of the shaft gradually wear out under the influence of load, temperature and chemical exposure. The last two factors concern the rubber coupling and boot. These problems manifest themselves as follows:
- Vibration when starting to move or during acceleration. The reason may be deformation of the bolts or flange of the elastic coupling, or loose bolting of the intermediate shaft.
- Vibration when driving. At speed, the shaft vibrates due to incorrect relative positions of parts, poor assembly or wear of the hinges, or loss of balancing washers. Such manifestations are also typical for deformation of the coupling, flanges or loose threaded fasteners. Another reason for vibration is that the cardan crosspieces turn tightly.
- Traces of oil on the boot. A lubricant leak is possible in two cases: the fastening clamps are loosened or the rubber of the intermediate shaft joint cover is torn.
To troubleshoot problems, it is necessary to check and tighten threaded connections, replace the boot, balance the shaft or replace individual parts. Most of the listed operations require dismantling the industrial shaft. If repair is impossible, all that remains is to replace the assembly part.
Tools and preparation for replacement
To change a part, you need to install the machine on a lift or inspection pit. To replace it yourself you will need:
- new oil seal;
- standard set of wrenches;
- hammer;
- pliers;
- a powerful wrench (without it it will not be possible to unscrew and tighten the shank nut);
- large flat screwdriver;
- puller;
- universal or key for fixing the shank flange;
- durable elastic cord;
- canter scale or dynamometer;
- torque wrench.
Instead of a wrench, you can use a homemade device in the form of two M8 bolts and a wrench to hold the shank flange. With their help, it will be possible to reliably keep the part from turning. To do this you need to: insert the bolts into the holes in the flange and place the knob between them.
It is important to use this improvised device correctly. The driver must be inserted in front of the flange, not behind it. Otherwise, you may accidentally knock down the mud deflector.
What is a CV joint in a car?
A constant velocity joint (CV joint) is a moving part of the chassis of front-wheel drive and all-wheel drive vehicles. There is no clear version of the history of the development of the part and its first installation in a car. Most likely, the first such mechanism was designed and patented by A. Rzepp in the 20s of the last century. The auto suspension unit became widespread in the mid-20th century.
The invention of the CV joint made it possible to solve the following problems:
- Overcome uneven transmission of wheel rotation;
- Remove vibration;
- Level overloads on gears and shafts while the vehicle is moving.
General view of the CV joint in a car
The CV joint made it possible to transmit torque to the steered wheels without loss of power. In the modern automotive industry, homo-kinetic hinges are installed on all front-wheel drive and some all-wheel drive car models.
What is it needed for
In motorist slang, the assembly is called a “grenade” because it is shaped like this ammunition. CV joint is a car suspension part that provides rotational energy and allows you to control the wheels turning up to 70 degrees. The hinges transmit torque to the drive wheels, which allows them to rotate and steer at the same time.
The grenade allows the vehicle's wheels to turn 70 degrees.
There are two CV joints on the wheel: internal and external. The simultaneous operation of two hinges allows the wheels to rotate freely, regardless of the vertical deviation of the axle shaft, turns, and wheel alignment. Straight grooves on the internal joints allow parts to move along the axis, which compensates for engine vibrations and front suspension vibrations. External radial grooves increase the angle of rotation of the CV joint and the wheel connected to it.
Varieties
The designers have developed 4 types of hinges.
Cam
Includes a pair of shaped discs and forks. The increased adhesion area of the parts allows this type to withstand increased loads. A car with cam CV joints moves exclusively at medium speeds.
Cam CV joint parts
Tripoid
The main part of this variety is a three-spoke plug placed in a housing. On each beam there are rollers rotating on needle bearings. The fork is pressed onto the splines of the shaft connected to the gearbox. There are grooves on the inside of the CV joint housing that allow the part to rotate. Tripoid joints are divided into universal and rigid. Universal ones are used as internal CV joints, while rigid ones are used as external ones, since they provide transmission at a large angle.
Tripoid joints in disassembled condition
Ball
The most common model, consisting of a body, a separator, a cage and balls. Moving along the grooves, the balls transmit torque to the wheels.
Ball grenades include 6 metal balls of the same diameter
Cardan pairs
They consist of a pair of cardan joints that align each other's movement.
Cardan joints are not popular due to their complexity
What does a CV joint consist of?
The design of the CV joint depends on its type. All types are based on a body and a clip. Inside the main structural elements there are grooves for the movement of balls that rigidly connect the parts of the part.
The outer CV joint transmits torque at various angles without loss. Less movable (with a rotation angle of 20 degrees) internal hinge. The inner CV joint is a tripoid with rollers on bearings that move along grooves in the mating sleeve. It compensates for suspension travel and ensures shaft continuity.
Main CV joint components
Working principle of the part:
- The number of grooves in the inner race coincides with the number of bearings in it;
- The cam and housing are separated by bearings that hold the cage;
- The bearings move along the larger diameter of the housing and the smaller diameter of the fist;
- As a result, a torque arises that is transported to the inner race and driven shaft;
- When the angle between the axle shafts changes, the bearings move along the internal grooves and transmit torque.
Transfer case device
The Chevrolet Niva transfer case redistributes engine torque between the drive axles and, if necessary, changes the gear ratio and locks the center differential. The parts of this assembly require significant force. Therefore, RK gears and bearings operate in an oil environment.
To prevent oil leakage from the transfer case, oil seals are installed at the joints of the housing and rotating drive shafts. They consist of two parts: a metal body and a rubber cuff, tightened by a spring. The latter ensures sealing of the connection due to the tight fit of the rubber to the shaft.
Replacement procedure: step-by-step algorithm
There is no point in repairing a worn-out unit, so the outer CV joint of a Niva Chevrolet is always replaced. Replacing a damaged “grenade” is a labor-intensive operation. You will need a set of wrenches, pullers, and experience in performing plumbing work.
Outer CV joint
The damaged unit is replaced using an axle shaft with grenades removed from the vehicle. The body is raised with a car jack, a reliable stand under the car and wheel chocks are installed. This helps protect the repairman from possible injuries. Before lifting the car body, loosen the hub nut. You will need a head and an extension for the key. Next, you need to remove the wheel and unscrew the lower mount of the front shock absorber. Take it to the side and secure it with improvised means. Also unscrew the bolts on the ball joint.
Then they completely remove the nut on the hub and, pulling it towards themselves, take out the “grenade”.
Release the boot mounting clamp and move it as far as possible on the axle shaft. A hammer with an extension is used to hit the body of the “grenade” until it is removed from the axle shaft. Before installing a new part, be sure to change the retaining ring on the axle shaft, since it is disposable. Installing the hinge is done in the reverse order.
Inner CV joint
This faulty unit on a Chevrolet Niva can only be replaced after the axle shaft with constant velocity joints has been completely removed. The “ear” and skis are released, which will allow you to rotate the bridge when removing the axle shaft. For ease of operation, the dismantled axle shaft with “grenades” should be clamped in a vice. Replacing the internal CV joint of a Niva Chevrolet occurs as follows:
- Remove the clamps securing the protective boots and move them as far as possible.
- Use a hammer and extension to remove the damaged “grenade”. A few blows are enough to dismantle the faulty part.
- Before installing a new hinge, carefully clean the splines and install a new retaining ring, since it is disposable.
- A new CV joint is installed on the axle, the protective cover is additionally filled with lubricant, and the boot is clamped with a clamp.
The axle shaft with new grenades is assembled and mounted in the reverse order. The process is fully presented in the video:
It will be possible to extend the service life of constant velocity joints if you monitor the condition of the protective covers on the grenades, avoid bad roads and use only high-quality spare parts.
Replacing the rear axle axle seal on a Chevrolet Niva. A little easier than it seems"
Replacing the rear axle axle seal on a Chevrolet Niva. A little easier than it seems
Replacing the rear axle axle seal on a Chevrolet Niva
occurs when there is visible transmission fluid leaking from the axle. To do this, after parking, pay attention to the condition of the car’s drums. If there are problems with the seals, small leaks will be noticeable on the wheels. If it is not brake fluid, then most likely the problem is in the oil seal and should be replaced. A transmission fluid leak will cause serious problems with axle components.
To carry out the work you will need a regular set of tools. The only special tool you will need is a puller for the axle shaft, but if you don’t have one, you can do without it.
Before carrying out work, ensure that the machine is as motionless as possible. To do this, wheel chocks are installed under the front wheels. First gear is engaged. The work is carried out in the following order:
- The wheel fastening becomes loose. The car is raised on a jack. The wheel is completely removed. Supports are placed under the thresholds in case of problems with the jack; ordinary blocks or several wheels folded in a stack will do;
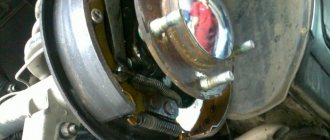
Before removing the brake drum, make sure the wheel is completely released. In this case, the handbrake lever must be lowered, the wheel rotates freely;
The decorative cap is removed. To do this, disconnect it by prying up the fasteners with a screwdriver;
The gap between the flange and the drum is moistened with penetrating lubricant (liquid wrench, WD-40);
The brake drum is secured with two screws, they must be unscrewed. For this you will need a key “12”;
Gently tap the drum with a hammer so you can move it relative to the axle shaft;
In some cases, the drum can be removed quite easily. But sometimes you have to shoot him down. To do this, it is necessary to strike the rim of the drum with a hammer from the back side. Just do this through a block, otherwise you can damage the drum;
The screws holding the axle shaft and the drum casing are unscrewed;
The bridge rises slightly;
The shock absorber bracket should be removed from the axle bearing plate;
The axle shaft is removed; for this you will need a special puller. If it is not there, then you can do without it. To do this, put the wheel on the axle shaft. Screw on 3 nuts, but so that there is free space between them. We press the wheel against the axle and pull it harder towards us. After several passes, seasoned with strong words, the axle shaft should move. All that remains is to extract it;
Now you can change the oil seal. Remove it using a screwdriver. Just pry the oil seal in a convenient place and pull it out;
- To install, the new oil seal is pressed back in, and the removed part is used as a mandrel.
Auto parts for foreign cars, auto repair
Chassis Replacement of CV Joints on a Chevrolet Niva Every car has equal angular joints, which are called grenades; they have this name because of their similarity to a military object.
Thanks to it, when turning while driving, torque is transmitted from the engine to the inner CV joint. This element in the car appeared when they began to produce cars with front-wheel drive, and before that, torque was transmitted through a conventional cardan.
Further, it will intensify even with small turns of the steering wheel. Replacement procedure: A set of wrenches, pullers, and plumbing experience will be required.
Replacing the Inner CV Joint Niva Chevrolet Video
The body is raised with a car jack, a reliable stand under the car and wheel chocks are installed. This helps protect the repairman from possible injuries.
Before lifting the car body, loosen the hub nut. Initially, torque was transmitted to the drive wheel using a conventional cardan. At the same time, the service life of the hinge was short, since it was constantly working under load.
Inner right CV joint on a Chevrolet Niva - how much does it cost to replace a grenade
This problem gave impetus to the invention of a special CV joint unit that could transmit torque to the wheels at different angles of rotation. It's mostly front-wheel drive. Due to the CV joint, there is a uniform transmission of torque, taking into account the fact that the wheel is located under the corner of the car.
On a Chevrolet, a grenade can be: Outer CV joint Inner CV joint Like all other parts in the car, this unit has its own specific service life.
The cost for spare parts was rubles. And by the way, it’s also cheap, I called 3 stores in our city in advance and the prices are different everywhere. So don’t rush to run to the first store you come across.
For example, I saved rubles on these same spare parts if I bought them in a store; the Chevrolet Niva inner CV joint is closest to service. Photo of the entire set: By default, the oil that is poured into the automatic transmission during the production of Opel Astra N cars is designed entirely for its service life.
Russian conditions, climate, quality of roads, etc. Replacing the Timing Belt Logan 1.
You just need to look at what exactly is coming in years. And according to the regulations, the Chevrolet Niva inner CV joint with the belt always changes a few more parts, not all of them are related to m Replacing the Rear Hub of a Skoda Fabia Replacing the rear hub bearings Replacing the rear hub bearings Hub assembly of the rear wheel 3 - Brake drum 7 - Bolt securing the trunnion to the lever 11 - Castle washer 1.
Remove the brake drum, see Chapter Brake system.
Using a flathead screwdriver, remove the oil seal from the brake drum assembly - try How to replace the cabin filter in Ford Focus 1, 2 and 3 Replacing the Ford Focus cabin filter is an integral part of the technical work of each car of this line.
Typically, failure of this component indicates a problem with your furnace or air conditioning. At the same time, they begin to work much weaker than the inner CV joint.
In addition, the filter is broken
Front axle structure.
To replace the oil seal, it is not necessary to dismantle the front axle. When replacing oil seals yourself, it is not recommended to use a lift; it is better to carry out the work on an inspection pit or overpass. The rear wheels must be secured with supports. The gearbox and transfer case levers must be adjusted to the neutral position. When using a jack, it is better to hang the front part on special supports.
First, the replacement area is cleaned of drips and traces of technical fluids. After this, the crankcase plug is unscrewed and the oil in the gearbox is drained into a special container. After this, the plug is installed in place.
To carry out the replacement, you need to stock up on the following set of tools:
- set of socket wrenches and hexagons
- hammer and pry bar
- Screwdriver Set
- puller with two or three legs
- pipe sections equal to the diameter of the seals
- Liquid for removing oil residues, such as kerosene
- metal mesh
- rags
Instructions for replacing the CV joint with your own hands.
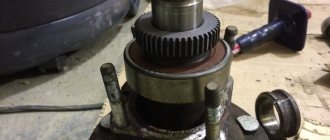
- First you need to hold the hinge in a vice and turn out the inner part of the cage until it stops, remove the balls in pairs. In this case, you should help yourself with a screwdriver and tap with a hammer.
- After removing all the balls, proceed to install the separator, which is placed in a vertical position, and its windows should intersect with the end of the body.
- Next, remove the fist with the separator, rotating it and at the same time retracting one of the protrusions that are located in the separator window. After this work is done, you need to separate the specified parts.
- Now you need to look through all the parts and be sure to wash and dry them. If there are no chips, wear or discoloration in the areas, then the device can still serve for some time. But one of the defects on the parts was still discovered, which means they should be replaced with new ones.
The mechanism must be reassembled only in the reverse order, but before doing this, all parts must be lubricated. This assembly begins by inserting the inner race with the separator into the outer one (here you should not forget about the marks that were placed at the very beginning). The balls are placed in pairs. The hinge must be filled with lubricant, for example, “CV joint-4”, approximately 80 - 100 grams of the product per hinge. You can also use “litol” and other similar consistencies.
Remember, you shouldn’t skimp on them, since the performance of the CV joint largely depends on the amount of lubricant you apply to it. By the way, you still need to put it in a case, 40 - 50 grams. Next we knock out the hinge along the splines, put on the boot and tighten the clamp. This is the only way the boot will ensure a good seal on the joint. In addition, when lubricating, try to rotate the CV joint so that the lubricant is distributed evenly. Well, at the very end of the assembly, experts recommend checking whether there will be strong resistance during rotation. If everything is in order, then the CV joint replacement procedure was successful.
When and how do you need to change the seals of the VAZ 2123 transfer case?
Reference! Parts must be replaced if transmission oil leaks occur at the interface between the drive shafts and the transmission housing.
If this is not done, the transmission will leak. Without lubrication, transfer case parts will quickly fail.
Step-by-step instructions for replacing the oil seal of the Niva Chevrolet
To work, you need to have free access to the bottom of the car. Therefore, replacement of the oil seals will be carried out on an inspection ditch, overpass or lift.
You will need the following tool:
- hexagon 12;
- open-end or socket wrench 24;
- waste container;
- flat screwdriver;
- hammer;
- mandrel;
- syringe for filling transmission oil;
- new self-locking nuts for fastening the flanges.
The algorithm for replacing the Niva Chevrolet transfer case oil seal is as follows:
- drain the oil from the transfer case into the prepared container;
- unscrew the bolts securing the cardan, the drive shaft oil seal of which is to be replaced;
- engage the gear, lock the differential and put the car on the handbrake;
- Unscrew the nut securing the propeller shaft drive flange.
- remove the washer;
- pull the flange off the shaft;
- use a screwdriver to remove the old oil seal;
- clean the seat and apply sealant;
- lubricate the rubber seal of the new oil seal with oil;
- using a mandrel and a hammer, press the part into place;
- install the flange and washer, tighten them with a self-locking nut;
- secure the cardan.
Important! The self-locking design does not allow for reuse of parts. Therefore, the flange nuts must be replaced with new ones.
After completing the work, it is necessary to fill the transfer case with fresh transmission oil.
Replacing the internal CV joint of a Niva Chevrolet
All parts of the unit are in constant motion during operation, as a result of which they wear out and fail. Therefore, most car owners are faced with the need to replace a faulty internal CV joint of a Chevrolet Niva with a serviceable one. Below is material for the step-by-step implementation of this work.
- The front of the car must be in an upright position. To ensure safety, it is necessary to place protective devices under it to ensure the immobility of the mechanism.
- At the very beginning you need to remove the wheel and the lower ball joint.
- Next, disconnect the shock absorber and the lower arm on the suspension, from which the spring is removed.
- The fist and hub are not removed, it is slightly hung to the side. To do this, you can adapt a generator belt or something similar.
- Then the cap and bearing nut are removed from the hub.
- The bolt that secures the right suspension bracket is unscrewed.
- At the assembly itself, you need to unscrew the nut and remove the grower, freeing up access to a larger threaded length. Using keys and a hammer, the SR is dismantled, removing it from the hub.
The hinge assembly on a Chevrolet is mounted in the reverse order.
Replacement of the Niva Chevrolet rear axle gearbox oil seal. Simple repair
Download PDF
Sooner or later, your car will need to replace the Niva Chevrolet rear axle gear oil seal.
The reason is the technical features of this vehicle unit. The rubber-metal cuff located in this part of the machine tends to wear out quickly, which is affected by aggressive environmental conditions, as well as the insufficiently high quality of the part. Therefore, any driver should be prepared to work to eliminate this problem. You should not delay the solution; a lubricant leak may lead to the need to completely repair the bridge, which is not only more difficult, but also more expensive. Replacing the Niva Chevrolet rear axle gear oil seal is a simple job. Even a beginner can handle it. But you should still carefully follow the technology. This will reduce the likelihood of problems in the future.
Content
- Technical features
- What will you need?
- Replacement process
Technical features
The oil seal is located in front of the bridge. Its function is to prevent oil leaks at the junction of the cardan and the axle. Since this part of the car bears a large number of loads, it turns out that this element fails most often. The constant exposure of this part to reagents in winter also has a negative effect.
Reasons for accelerated wear
The service life of the part is greatly reduced in the following cases:
- The gearbox breather is clogged. Under air pressure, oil is squeezed out through the cuff, breaking the internal stiffener.
- The universal joint flange nut is not tightened correctly. Backlash or increased friction leads to rapid wear of the oil seal.
- The transmission oil contains aggressive additives.
- The rubber of the cuff was exposed to chemicals from the road surface.
- The gearbox overheats due to poor quality or lack of lubrication.
The oil seal can also be damaged if a hard object gets between it and the shaft. It could be a splintered gear tooth, a piece of a retaining ring, or simply sand that accidentally got into the oil.
Article, size and manufacturers of reinforced cuffs
Initially, oil seals with an outer diameter of 68 and an inner diameter of 35.8 mm were installed in the transfer case. two types:
- 2121-2302052 — one oil seal. A similar part is installed on the drive gear of the front axle;
- 2101-2402052-01 — two oil seals in the Republic of Kazakhstan. The same part is located on the drive gear side of the rear axle.