Comments: one Published: 07/11/2016
Rating:
Tags:Philips ledDaytime running lightsClassic 2101/2103/2106/2107LED running lights
Daytime running lights have nothing to do with dimensions and are lighting devices that improve the driver's visibility during the daytime.
The standard DRLs are LEDs, which shine brightly and have a long service life. When you use daytime running lights on a VAZ 2107, you should not additionally turn on the low beam or fog lights.
Daytime running lights for VAZ 2107
Requirements of GOSTs and other regulatory documents for the location of DRLs
Regulatory documents regulating the location of DRLs on a car are:
- Resolution of the Government of the Russian Federation dated May 10, 2010 No. 316. Moscow “On amendments to the Resolution of the Council of Ministers - Government of the Russian Federation dated October 23, 1993 No. 1090.”
- GOST R 41.48-2004 (UNECE Rules No. 48) “Uniform regulations concerning the certification of vehicles with regard to the installation of lighting and light signaling devices.”
- "Road Rules of the Russian Federation."
The basic requirements for installing DRLs on a vehicle can be formulated as follows:
- placement height from the ground surface – 250-1500 mm;
- the distance between DRLs in the horizontal plane is at least 600 mm;
- radiation area – 25-200 cm2;
- brightness – 400-800 cd.
For your information! If DRLs are placed on a small car whose body width is less than 1300 mm, then in this case it is allowed to place daytime running lights at a distance of 400 mm in the horizontal plane.
Schematic placement of DRLs on the car body
Eventually
The daytime running lights are connected to the vehicle’s on-board network via either a four-pin relay or a five-pin one. In this case, the “+” of the power circuit is taken from terminal D of the generator. In this state of affairs, the headlights are activated when the engine is turned on. The relay allows you to turn off the LED lights when the side lights are turned on. In particular, you can turn off the running lights when you turn on the low beam by taking the “+” from the positive contact of the low beam instead of the “dimensions”.
Daytime running lights (DRLs) in headlights, fog lights, turn signals, installed separately, and wherever they are not installed. Are there any rules at all that govern the installation of DRLs? Can I install DRLs myself? They also say that they consume several times less energy, and therefore you save on gasoline.
What are DRLs and what are they for?
“Daytime running lights” have nothing to do with side lights. This new concept appeared in the rules due to the fact that modern cars began to be equipped with them. This term refers to external lighting devices designed to improve the visibility of a moving vehicle from the front during daylight hours. On new European cars you can often find lights in the headlights that stand out structurally. Most DRLs are LED bulbs. When using daytime running lights, it is not necessary to turn on additional light signals (fog lights or low beams).
DRL installation rules
Requirements for daytime running lights APPROVED by Decree of the Government of the Russian Federation dated September 10, 2009 No. 720 Extract from the technical regulations ON THE SAFETY OF WHEEL VEHICLES
6.19 Daytime running lights
6.19.1 Installation Optional on vehicles. Prohibited on trailers. 6.19.2 Number Two. 6.19.3 Installation diagram There are no special requirements. 6.19.4 Placement of DRL placement rule (GOST) 6.19.4.1 Width - the point of the surface visible in the direction of the reference axis, furthest from the median longitudinal plane of the vehicle, must be located at a distance of no more than 400 mm from the edge of the overall width of the vehicle. The distance between the inner edges of two visible surfaces must be at least 600 mm. This distance may be reduced to 400 mm if the overall width of the vehicle is less than 1300 mm. 6.19.4.2 In height - at a distance from 250 to 1500 mm above ground level. 6.19.4.3 Lengthwise - on the front of the vehicle. This requirement is considered to be satisfied if the emitted light does not interfere with the driver directly or indirectly as a result of reflection from rear-view mirrors and/or other reflective surfaces of the vehicle. GOST placement of DRL 21106.19.5 Geometric visibility Horizontal angle beta = 20° outward and inward. Vertical angle alpha = 10° up and down from horizontal. 6.19.6 Direction Forward. 6.19.7 Functional electrical diagram If installed, daytime running lights must turn on automatically when the engine start/stop control is turned to the “on” position. It must be possible to activate and deactivate the automatic activation of daytime running lamps without the aid of a tool. Daytime running lights must turn off automatically when the headlights are turned on, except when the headlights are turned on for a short period of time to signal road users. 6.19.8 Pilot signal Optionally in closed loop form. 6.19.9 Other requirements None.
Requirements of UNECE Regulations No. 48 and No. 87: the area of luminous elements must be in the range from 250 to 2000 mm², luminous intensity - from 400 to 1200 cd (for Russia - up to 800 cd).
In the end, taking all this into account, I got it like this: - turn on automatically from the ignition - turn off when you turn on the low beam.
The nuances of turning on running lights
The basic requirements regarding installation, technical parameters and connection of navigation lights are listed in paragraph 6.19 of GOST R 41.48-2004. In particular, the electrical functional circuit of the DRL must be assembled in such a way that the running lights turn on automatically when the ignition key is turned (the engine starts). In this case, they should automatically turn off if the headlights are turned on.
Clause 5.12 of this standard states that headlights (FGS) should be turned on only after the lights are turned on, with the exception of short-term warning signals. When connecting DRLs yourself, this feature must be taken into account.
Correct connection of DRLs is not limited to a well-thought-out functional diagram. It's time to think about the stabilization unit for LEDs. In the running lights themselves, resistors act as a current limiter; however, due to voltage drops, resistors cannot limit the current to the same level. That is why a voltage stabilizer in the running lights connection circuit is extremely necessary. Otherwise, the service life of LED DRL modules is significantly reduced due to constant changes in on-board voltage. Some car enthusiasts claim that it is possible to connect running lights without a stabilizer.
Connecting and installing an LED driver is a waste of time, because the DRLs on LEDs shine regularly for months without any stabilization...
However, this statement is easy to dispute. The fact is that with each voltage surge, more than 12 V appears on the LED module, the forward current through the LEDs exceeds the nominal value, which leads to overheating of the emitting crystal. The brightness of the LEDs decreases, such DRLs will no longer be able to fulfill their immediate task - to warn oncoming drivers from afar, and over time they will begin to flicker and fail.
Using LED DRLs without a voltage stabilizer means spending at least several hundred rubles every year on new modules and wasting time replacing them.
For ease of understanding, the circuits below are shown without using a stabilizer.
It couldn't be simpler
This is the simplest scheme, which involves connecting to a battery or generator as a power source.
Springs for a passenger trailer: which ones to choose and how to install them yourself Category: Passenger trailers
The scheme provides that the DRLs will be activated simultaneously with the engine starting. The point is to connect the plus to the positive terminal from the ignition switch of your Renault Logan or the same Lada Largus, and fix the minus on the car body in any convenient place. Everything looks simple and extremely logical. But you should not rush to conclusions, nor should you make such a connection. After all, it has an obvious drawback.
If the system is assembled according to this scheme, the diodes from the DRLs will start working constantly while the key is in the ignition switch. There is no question of any coordination with other headlights here. Therefore, such a connection contradicts GOST and traffic regulations.
All connection diagrams for daytime running lights
On the territory of the Russian Federation, amendments to the rules of the road (TRAF) have been in force for more than 8 years, according to which a moving vehicle during daylight hours must be indicated by low beam headlights, fog lights (FTL) or daytime running lights (DRL). Using headlights and fog lights for these purposes has a number of disadvantages. Therefore, drivers prefer to buy ready-made running light modules and install them in their cars themselves. How to properly connect daytime running lights so that their operation is safe and does not contradict current laws?
Low beam or dimensions
You can also connect to the side lights or low beam headlights. In theory, everything here also looks quite simple, interesting and promising.
The first of the schemes under consideration provides that you will use an electrical circuit that powers the size lamps. Here the plus from the DRL is connected directly to the battery as a power source. But the minus goes to the plus of the dimensions. At such a moment the latter will be electrically neutral. Thus, the current flows from the plus of the battery through the diodes to the dimensions, and then through the lamp to the housing, where the latter acts as a minus of the created electrical circuit.
Since the level of current consumption will be small, the diodes will start to work, but the size lamp will not turn on.
As soon as the driver switches to the dimensions, a voltage of 12V will appear on its positive side, the potentials will be equalized on the DRL wiring and the diodes will go out. The circuit will begin to operate in normal mode, supplying current to the dimensions.
Everything seems to be fine. But again, conclusions were drawn hastily.
The scheme is simple and working. It just has a few drawbacks:
- The drive trains will remain active when the engine is switched off. This directly contradicts current laws;
- If the dimensions are equipped with LED lamps, such a circuit will immediately become inoperative;
- Operation will not be correct when using powerful SMD diodes as part of DRLs;
- To provide additional safety, you will have to add a fuse to the circuit.
To avoid the first drawback, the circuit is slightly altered. The positive from the LED module is taken not from the positive of the battery, but through the positive of the ignition switch.
The second scheme involves activating the DRL using a low beam lamp. The point is that when the low beam is turned on, the walkers are turned off, and the rest of the time they work.
There are the same disadvantages here as for the previous scheme. That is, it contradicts GOST and traffic rules.
Does it make sense to install DRLs into standard car headlights yourself?
New traffic rules oblige drivers to operate vehicles during the daytime with low beam lights or daytime running lights turned on. The latter, of course, is preferable, but, unfortunately, this option is only available in cars released relatively recently. This is where all sorts of handmade ideas arise, especially since their advantages are quite objective:
- Organizing DRLs from the main beam with your own hands only requires modification in the form of connecting an electronic relay.
- Self-tuning is much cheaper than purchasing branded lighting fixtures.
- Extending lamp life.
- Reducing the load on the generator and saving fuel.
Let's not forget about the practical benefits - the car immediately becomes more noticeable, this is especially important when driving against the sun. Some lazy car enthusiasts may argue that low-beam headlights are quite suitable for the role of running lights, except that the dimensions and license plate lights will be on. And, you know, if we keep in mind the owners of “stale” models, then such thoughts are in a sense natural.
Philips LightGuide
Philips LightGuide New for winter 2012. Philips LightGuide daytime running lights consist of two LED strips that produce a continuous light, as opposed to individual LEDs. Compact size and compliance with GOST requirements. Our technicians will install Philips LightGuide at an affordable price.
- Depth: 20 mm.
- Width: 163 mm.
- Height: 34 mm.
Attenuation - yes. Price with installation: 8800 rub.
Legacy Philips models:
- Philips LED 4
- Philips LED 5
- Philips LED 8
Installation rules
Installation of additional lighting on a domestic car does not require qualifications or experience. However, if installed incorrectly, you risk running into a fine from traffic cops, becoming the owner of an administrative violation.
To prevent this from happening, connect the running lights yourself, following the rules:
- read GOST R 41.48-2004. It concerns the rules for installing lighting devices on a car and vehicle certification in this regard. All the parameters that you must consider when installing these devices are written there;
- select the appropriate DRL body shape. Keep in mind that not all lighting devices are suitable for the VAZ 2107. Drivers consider Philips Led Daylight 9 DRLs to be the best choice in terms of price-quality ratio;
Philips LED DayLight 9 daytime running lights
- Check the housing size for correctness, taking into account the blocks of adjacent Daytime Running Lights. Install lighting fixtures in the air intake or on the bumper, depending on the situation;
- The height of the framed product body is 250–1500 mm from the road surface. The width between the inner edges of 2 surfaces visible on the car must be at least 600 mm;
- the products are located in front of the machine, and the beam of rays is directed forward;
- Consider the overall brightness of the LED lighting. It ranges from 150 to 330 lumens.
Main advantages
The main colors of LED lights used by drivers are bright blue or white. The advantage of this coloring is good illumination and efficiency.
Types of daytime running lights
Front lamp emitters, unlike ordinary headlights, are special industrial devices. They have many advantages, for example: reducing fuel consumption and saving battery power. Installation of DRLs does not cause any difficulties.
What to do if the reverse lights do not light up? More detailed information can be found here.
Options for running lights for VAZ classics
Currently, there are quite a few models of DRLs from both domestic and foreign manufacturers on the car lighting market. Therefore, it is always possible to choose the right optics in accordance with the tuning of the car and in a given price range.
Daytime running lights on the VAZ 2107 are also presented among others, here are some of them:
- Vympel series, model “DRL-L8 3528 SMD” (Russia/China).
Specifications:
| Voltage, V | Number of LEDs | Length, mm | Width, mm | Height, mm | Weight, kg |
| 12,0 | 8 | 12,0 | 19,0 | 2,0 | 0,17 |
The average cost in retail trade as of the third quarter of 2022 is 400.0 rubles.
- Vympel series, model “DRL-НТ3-18W” (Russia/China).
Specifications:
| Voltage, V | Number of LEDs | Length, mm | Width, mm | Height, mm | Weight, kg |
| 12,0 | 3 | 196,0 | 55,0 | 145,0 | 0,39 |
The average cost in retail trade as of the third quarter of 2022 is 700.0 rubles.
- Vympel series, model “DRL-HP-L9” (Russia/China).
Specifications:
| Voltage, V | Number of LEDs | Length, mm | Width, mm | Height, mm | Weight, kg |
| 12,0 | 9 | 276,0 | 150,0 | 48,0 | 0,72 |
The average cost in retail trade as of the third quarter of 2022 is 1300.0 rubles.
Instructions for repair and assembly of running lights
If the DRLs on your car stop working, this is not a reason to throw them away and install new ones. You can always try to repair running lights - this way you can save money and gain skills in repairing optics. The repair procedure itself includes several stages - dismantling and opening, replacing failed elements, as well as subsequent assembly of the structure.
READ Floating Speed VAZ 2107 Carburetor Daaz
DRL repairs are carried out as follows:
As for the cost, it all depends solely on the quality of the products purchased. As you know, Chinese diode running lights will always cost less, but their quality and efficiency are generally lower. Moreover, they cannot boast of a high service life. If you want DRLs to work for a long time, then you should not save when purchasing.
How to change the reverse sensor on a VAZ 2107
Before replacing the sensor, it is advisable to clean the gearbox of dirt. If this is not done, it may get into the oil, which is located in the crankcase. Replacement of the VAZ 2107 reverse sensor is carried out in the following sequence:
Note: if the sensor is “stuck” and cannot be unscrewed with a wrench, you can try to unscrew it using a chisel and hammer. However, this must be done extremely carefully so as not to damage the gearbox housing, which is made of a fragile aluminum alloy.
We perform the installation step by step
This guide explains how to install universal LED daytime running lights on any vehicle. Installation is quite simple, you just need to devote a little time to this procedure.
Step 1: Insert the wire into the bracket.
Let's start the installation procedure
Step 2: Install the bracket. Since these are versatile daylight lights, you can install them anywhere you like. The most common location is at the bottom of the bumper.
Most often they choose a place on the bumper
Step 3. After installing the bracket, you can fix the daytime running lights to the bracket.
Carefully attach the lantern
Step 4 . Once you install the DRL using the bracket, connect the wires and route them near the battery/fuse box.
We connect the wires
Step 5: Use plastic zip ties to secure the wire along the bumper. You can choose a different “wired path” if you wish.
Securely secure the wire using clamps
Step 6: Locate ACC on your fuse box, and press the red wire there. You can find the location of the ACC fuse using an electronic meter by clamping the black wire to the battery negative. Insert the tester pen into the fuse box in any unoccupied slot and note the places where the tester pen does not light up. Start the engine and check the slots that do not light up. Find a spot that only lights up when the engine is running. This is the ACC place.
Use a special search tester
Basically, when the engine is turned on, the indicator light comes on. When the engine is turned off, the indicator is also turned off.
Step 7: Once you have found the ACC location, you can press the red wire against the metal fuse plate and insert it back.
Slowly approaching the final stage
Step 8. Press the black wire to the negative of the battery.
Press the black wire to the negative terminal of the battery
Step 9: The pictures in the installation guide will help you follow this procedure with ease.
The result of the work done will pleasantly surprise you
Having information on how to install daytime running lights in accordance with all standards and requirements, you can save yourself from possible problems with traffic police representatives and increase the level of safety. Performing such “tuning” will have virtually no effect on the amount of fuel burned (consumption).
Installation instructions
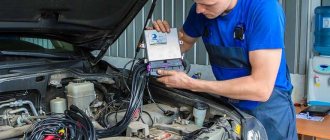
The installation of daytime running lights on a VAZ 2107 can be done in a specialized workshop or independently, if the car owner has an understanding of the car’s electrical circuit and knows how to work with hand tools.
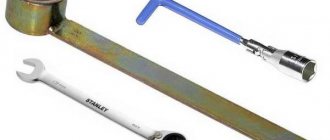
In order to install DRLs on a VAZ 2107 with your own hands, you will need:
- electric drill or screwdriver;
- set of screwdrivers and wrenches.
As a rule, the DRL on classics is mounted on the front bumper of the car, so initially markings are made on it.
Important! When marking, you should be guided by documents regulating the dimensions of the location of the DRLs relative to each other and the road surface.
One of the options for placing DRLs on the bumper.
In the places where the lighting devices are located, holes are drilled according to the holes on the mounting brackets of the purchased DRL model.
After this, using fasteners (bolts, screws), the mounting brackets are installed, onto which the daytime running lights are attached.
Expert opinion
Alexey Bartosh
Specialist in repair and maintenance of electrical equipment and industrial electronics.
For your information! If the DRL model does not require mounting using brackets, then fastening the lighting devices can be done using self-tapping screws or by cutting corresponding holes directly “in the body” of the bumper. Additionally, glue can be used to ensure secure fastening.
One of the options for placing DRLs on a VAZ 2107 is presented in the following video:
Standard five-pin relay
Front lights
The front part of the car usually attracts more attention, so amateurs begin to tune primarily the headlights.
Evil headlights
It’s very easy to give your car a menacing, gloomy and even evil look: just perform tuning like “evil headlights”. This is one of the easiest ways to give the “seven” an unusual appearance.
Depending on the owner’s capabilities, tuning can be done using a variety of materials:
- thin plywood;
- sheet metal;
- tinting film;
- paints.
The “evil” squint of a car gives you goosebumps.
The essence of this tuning is as follows: cover part of the headlight so that the remaining uncovered headlight resembles evil eyes. If any materials from plywood or metal are selected, then a blank is cut out in advance and glued into the cavity of the headlight. Using film or paint is even easier - just remove the headlight and apply darkening on the inside.
Tuning headlights from plywood painted black
Angel eyes
In tuning, angel eyes are the luminous rings on the “face” of a car - like a BMW. Today everyone can afford this lighting option - it’s inexpensive and fast. In addition, the body of the VAZ 2107 will somewhat resemble an expensive BMW and thereby increase the status of the owner.
Headlights that are very unusual for the “Seven”
There are several technical solutions for making angel eyes with your own hands. The easiest option is to use LEDs. To work you will need:
- white LEDs 5 mm - 2 pcs.;
- 0.25 W resistor;
- wiring;
- transparent rod made of organic glass or plastic (diameter 8–10 mm);
- auxiliary materials (soldering iron, hair dryer, drill and glass jar).
The work is quite painstaking:
- Take the rod and clamp it in a vice.
- Using a drill, drill holes for the LEDs at both ends of the rod.
- Give the rod the shape of a ring - bend it around the jar and heat it with a hairdryer so that the workpiece remains in this shape.
- Solder wires to the LEDs, connect a resistor to one of the wires.
- Assemble an electrical circuit similar to the circuit of lighting devices that is already available on the “seven”.
- Insert the LEDs into the holes of the workpiece and glue them with superglue.
Video: how to make angel eyes
You can buy ready-made angel eyes at a car store - this will make it much easier to connect new lighting fixtures to the standard equipment of the car.
Using LEDs of different shades, you can achieve an even more impressive effect.
The main thing is to start
Gorbachev’s famous phrase helps with motivation to achieve a specific goal like nothing else. The beginning of our installation process is to purchase the required running lights from an auto parts store. There are many different manufacturers and even more models, so an inexperienced person can easily get confused.
When approaching the procedure, motorists must take into account certain requirements:
- brightness of LEDs and their rated power;
- technical characteristics and distinctive features of their vehicle model;
- size, shape and type of front bumper.
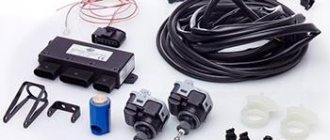
DRL installation kit The installation location will depend on the block (meaning its size and shape), but this does not create problems, since regardless of the shape (rectangular or oval), the dimensions of the block are small. When considering the main and “favorite” places to install emitters, one cannot fail to mention the air intake and bumper, where motorists most often install LEDs.
Read more: Description of the instrument panel Lada Priora and Kalina » Lada.Online || Instrument panel on Lada Priora description tuning troubleshooting
DRL installation kit
DRL control unit
The most reliable and simplest option is to connect DRLs without a relay, but using a special running lights control unit. It ensures that the DRL turns on after starting the engine, guarantees safe operation, protects against overloads and can be installed on cars with any type of lamps, including LEDs.
Unfortunately, among the variety of industrially manufactured DRL units, the vast majority do not comply with GOST and have mediocre build quality.
This applies, first of all, to products from AliExpress, which do not meet the requirements in almost all respects.
Among all the diversity, only 2 options can be noted: the Russian DayLight+ DRL control unit and German products from Philips and Osram. The DayLight+ control unit was developed by Russian radio engineer Fedor Isachenkov, taking into account all the features of the vehicle’s on-board network and has a number of positive aspects:
- there is built-in voltage stabilization;
- full compliance with GOST;
- the maximum long-term load power is 36 Watts (significantly less is required for DRLs);
- simplest connection diagram.
In addition to the points described above, the DayLight+ unit is universal and is suitable for all cars with an on-board 12-volt network, and also has good build quality and a high degree of protection from moisture and dust.
German products from Philips and Osram also have all the above-described advantages of the DayLight+ unit, however, German control units are supplied only together with daytime running lights and are more expensive.
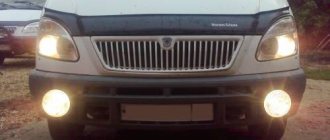
More recently, Russia introduced requirements for the use of fog lights, either low beam or daytime running lights, during daylight hours. Many service stations offer assistance in installing additional optics on your car. However, connecting daytime running lights with your own hands is not very difficult, and below we will tell you how to do it.
We will talk about how to choose daytime running lights, describe how to install them and provide a diagram for connecting the DRLs.
At the end of the article, watch the video instructions for connecting DRLs via an oil pressure sensor.
Daytime running lights (DRL or DRL) are additional lighting devices that are installed in the front of the car. They can be combined with standard optics or used separately. When turning on the low or high beams, as well as the side lights, it is advisable to turn off the DRLs.
Installation methods and connection diagram for daytime running lights
Installation of daytime running lights can be done in different ways, it all depends on the skills of the car owner.
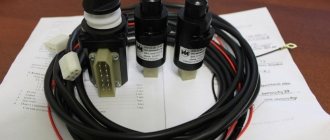
When purchasing daytime running lights, please note that the kit must include two lights, connecting wires, installation materials and installation and operating instructions. In this case, the car owner will not have to rack his brains and look for DRL connection diagrams.
- For people who are afraid or do not want to engage in car maintenance or repair, it is preferable to contact a specialized car service center. An experienced auto electrician will quickly and efficiently handle the DRL connection.
- Those who are able to perform simple car tuning operations can be advised to buy a ready-made set of running lights. For example, Philips and Hella DRLs performed well.
- Fans of soldering irons and electrical circuits can completely make LED lights with their own hands and connect them.
The running lights can be connected using different electrical circuits (the simplest circuit is through a relay and oil pressure sensor). The main thing is that the DRLs turn on after starting the engine and go out when the low and high beam headlights are turned on. It is convenient to use a DRL controller for connection (a wiring diagram will also be provided for it).
Connection via a 4-pin relay from a generator or oil sensor
The following two methods have a common basis and imply the operation of daytime running lights only after the engine is started. The circuit for switching on DRL from the generator is based on switching a four-contact relay and a reed switch.
The DRL relay contacts are connected as follows:
- 30 – to the positive terminals of LED modules;
- 85 – to the positive wire to the dimensions;
- 86 – to any reed switch output;
- 87 and the second terminal of the reed switch - to the “+” of the battery.
After checking the reliability of all contacts, proceed to setup. To do this, start the engine and, by moving the reed switch near the generator, achieve its activation and a stable glow of the DRL. Then the reed switch is hidden in a thermal tube and fixed in the found place using nylon ties.
At the moment of starting the engine, and then the generator, the contacts of the reed switch and relay close, supplying power to the LED running lights. In this case, the side lamps remain turned off, since the current through the relay coil is small to light them.
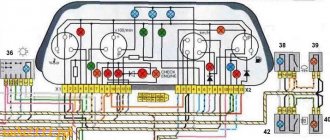
Installation of DRL 2107 — DRIVE2
First, I want to say that this is a long and tedious job, during the work you will need: Soldering iron, solder, tin... the whole set! (Be sure to have straight hands!) Campers - (to taste), and all the available tools (file, electric jigsaw, etc. etc. if you cut it in like me) I’ll say right away that I won’t describe how I removed the bumper, how I cut in the DRLs! I’ll describe the process of connecting the DRLs (Daytime Running Lights). I’ll say right away that there are similar articles on this site)
ATTENTION BEFORE WORKING WITH ELECTRICITY IN YOUR CAR, DISCONNECT THE BATTERY!
To begin with, in any case, you need DRL (550 rubles in the City of Sarapul, Udm Republic)
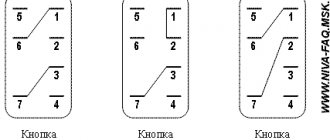
1
buy a 5-contact relay (in my case, 52r. Needed for automatic switching between headlights and DRLs) Fig. 1
1
The second thing you need to do is buy a platform for the relay (a platform is required) (costs 40 rubles)
2
Need wires (I took a lot of them at work!)))
(this is what the relay and pad look like)
3
Connection diagram (in my opinion, the best and most convenient option (the diagram is not mine, taken from lada2107spb.my1.ru/publ/t…gnej_na_vaz_2107/20-1-0-6
5
Connection: 1) to the 30th contact we take the plus from the button for heating the ground glass (right (A) platform) (yellow wire) 2) connect the 86th contact to the low beam, headlights (left platform) (B) (red wire) (I personally have this) 3) We throw the 85th contact to ground (black wire under the heated rear window pad) (B) Minus DRL there
4) Pin 88 goes to our DRLs (+ DRL wires (+ red), black (-minus)_
6
Something like this:
8
We isolate everything well (EVERYTHING SHOULD NOT BE ON THE SNOT, DON’T BE LAZY WITH SINGING) - safety is paramount) And that’s it!
7
www.drive2.ru
Self-connection of non-standard DRLs from the car generator via a four-pin relay
The instruments and materials used for the operation are:
- crimping device or pliers;
- wire cutters, soldering iron and knife;
- lighter or hair dryer (necessary for laying shrink tape);
- two-core wire for connecting a pair of lights to each other;
- single wires;
- four-pin 12 V relay;
- heat shrink tape;
- plastic clamps;
- 10 A fuse;
- button for forcibly turning off “automation”.
The simplest ideology for connecting DRL is no more complicated than installing a heated separator for diesel fuel. It involves activating the lights when the ignition is turned on, and turning them off when the car engine is stopped. A noticeable disadvantage of this solution is that it does not meet the requirements of GOST, because daytime running lights light up regardless of the activity of the head lighting and cannot be deactivated with a button.
Let's look at how to connect DRLs from the generator via a four-pin relay :
- The 87th contact is connected to the plus of the daytime running lights;
- The 86th contact extends to the plus side lights;
- The 85th contact is connected to the positive terminal from the ignition switch;
- The 30th contact is connected to the positive terminal of the generator (D+) through a 10A fuse.
Bolt terminals are soldered and crimped directly to the negative terminals of the lamps. The insulation is made by heat shrink and the terminals are firmly attached via a bolted connection to the ground of the vehicle. The DRL forced shutdown button is built between the generator and the four-pin relay, i.e. between pin 30 and pin D.
The system operation scheme is as follows:
- When the engine starts, the plus from the generator goes to the relay and the LEDs light up.
- When the lights are turned on, the DRLs go out.
For your information
- An alternative to connecting from a generator is the technology of connecting from a battery. In this case, the 30th contact is connected to the positive terminal of the battery and the running lights come on when the ignition is turned on.
- You can additionally connect “+” from the handbrake to the 86th contact of the relay. Then, when the parking brake is activated, the DRLs will go out.
How to make daytime running lights with your own hands
To make your own DRLs, you usually use cheap fog lights, LED strip, aluminum plates, silicone sealant and a soldering iron. The assembly sequence will be approximately as follows:
- First, the old fog lamp is disassembled and the internal filling is removed.
- Next, an aluminum plate is cut to the size of the flashlight body.
- A piece (or 2 pieces) of LED strip is cut to the size of the plate.
- An adhesive-sealant is applied to the degreased aluminum surface, and the LEDs are attached.
- All that remains is to use a soldering iron to connect the pieces of luminous tape and the electrical wire in series.
- The headlight is already assembled with a new filling.
To connect such DRLs, select one of the circuits suitable for a given car (it is better to connect via a DRL controller or via a relay and oil pressure sensor, as in the video below).
Installing daytime running lights on a car with your own hands becomes not only an interesting pastime. The result of the work will be a reason for pride for the car owner, because he managed to create a new image for his iron horse on his own.