3.7/5 — (68 votes)
This article will talk about how to replace the gasket and tighten the cylinder head of a VAZ 2107. In fact, it’s not difficult to do it yourself, although you’ll have to tinker a little. The head gasket is a small and cheap element, but it affects the operation of the entire internal combustion engine. And first, it’s worth finding out what symptoms of a damaged gasket may appear.
Features of the work performed using the example of some cars
To prove the proposition that each power plant has its own characteristics of tightening the cylinder head, let’s consider the nuances of performing work on specific models.
VAZ-2112 16 valves
A number of modifications of the VAZ-2112 were equipped with two types of 16-valve power plants (factory indexes - 21120 and 21124). These two motors, despite some design features, have identical head tightening technology.
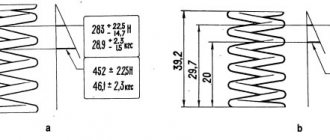
These units use 93mm long tension bolts. In this case, reuse of fasteners is allowed, but under one condition - if their length does not exceed 95 mm (if it is longer, they should be replaced). 10 bolts are used to secure the head.
Tightening is carried out in three approaches:
- The bolts are tightened according to the order with a force of 2 kg/m;
- Turning 90 degrees;
- Repeated tightening to 90 degrees.
The drawing diagram is shown below.
Between the 2nd and 3rd approaches you need to take a 20-minute break.
Since these engines use tensile bolts, additional tightening is not required during vehicle operation.
VAZ-2107
On the VAZ-2107, all installed modifications of power units are 8-valve.
The block head is attached to them with 11 bolts, 10 of which are main, and 1 is an auxiliary side bolt (installed in the side protrusion).
On this car, tightening fasteners is also performed in three approaches:
- 10 main bolts are tightened in order with a force of 3.5-4.0 kg/m;
- The same bolts reach with a torque of 11.5-12.0 kg/m;
- The auxiliary is tightened with a force of 3.5-4.0 kg/m.
Additional tightening of the cylinder head is not required when operating the VAZ-2107.
"Samara", 10th family, Priora
On models of the Samara family (2108-21099), as well as VAZ 2110-2112 with 8-valve units, tightening is already performed in 4 approaches:
- Tightening with a force of 2.0 kg/m;
- Reaching with a moment of 7.5-8.5 kg/m;
- Turn 90 degrees;
- Repeated rotation by 90 degrees.
The break between points 3 and 4 is 20 minutes.
As for the VAZ of the “tenth” family, which are equipped with 16-valve engines, their tightening technology is the same as that of the VAZ-2112 (described above).
The same applies to the Lada Priora; on 8-valve units, a method with 4 approaches is used (VAZ 2108-21099), and on 16-valve units, 3 approaches are used (VAZ 2112 with a 16-valve engine).
"Volga"
On ZMZ-406 engines installed on the Volga, according to the automaker’s technical documentation, tightening the engine block head bolts is carried out in two approaches:
- With a force of 4.0-6.0 kg/m;
- With a moment of 13.0-14.5 kg/m.
But many car owners of this car note that this technology does not allow the cylinder head to be properly tightened, so they use techniques with a large number of approaches.
A common method is the cross method, performed in 4 stages and with the following efforts:
- 4.0-4.3 kg/m;
- 7.5 kg/m;
- 11.0 kg/m;
- 14.3-14.5 kg/m.
Subsequent tightening of the bolts is not required when operating on this engine.
Price list
- Special offers
- KAMAZ spare parts
- Spare parts KAMAZ-5490
- Spare parts MAZ, YaMZ
- ZIL spare parts
- Spare parts ZMZ, for GAZ vehicles
- Spare parts for Volzhanki cars
- Spare parts for Gazelists
- Spare parts for trucks Lawns
- Spare parts for GAZ-71 caterpillar
- Spare parts UAZ, UMZ
- Spare parts KrAZ, BelAZ
- Spare parts URAL
- Spare parts BUSES
- AMAZ spare parts
- IKARUS spare parts
- KAVZ spare parts
- LAZ spare parts
- LIAZ spare parts
- NEFAZ spare parts
- PAZ spare parts
- Other buses
- Tractors, computer equipment, attachments
- Tractors and walk-behind tractors
- Municipal vehicles
- Attachments and trailed equipment
- Spare parts for TRACTORS and SPECIAL EQUIPMENT
- JCB - spare parts for special equipment
- Truck crane (KS-3577, KS-4517, etc.)
- AMZ (A-01, A-41, D-440, D-442, D-447, D-461, D-467)
- Amkodor (TO-18, TO-28, TO-30, etc.)
- ATZ (T-4A, TT-4M)
- VgTZ (DT-75)
- VMTZ (D-120, D-144, D-130, D-145T)
- VTZ (T-25, T30A-80, VTZ-2048)
- LTZ (T-40, LTZ-55, LTZ-60)
- MKSM, UNC, DETVAN
- MTZ - spare parts for tractors
- OTZ (TDT-55)
- PTZ (K-700/701/702/703/704)
- KhTZ (T-150, MT-LB)
- ChTZ (T-130, T-170, B-10, B-12, B-170, T-10M, DET-250)
- YuMZ - spare parts for tractors
- Other special equipment and tractors
- RVD - high pressure hoses and sleeves
- MMZ spare parts and engines
The nuances of replacing the gasket
Some resources advise studying the gasket to find out what kind of damage has occurred on it. This, in fact, is just a waste of time, because the specified element cannot be repaired. Just throw away the old one and install a new one.
It is necessary to stop at the last point. After removing the old sealing element, thoroughly clean the surface underneath it. If necessary, treat with fine sandpaper - only on an ideal, even base does it make sense to install the purchased gasket. The slightest bulge, even with proper tightening, will cause a leak.
Before replacing the head, make sure that all the valves of your VAZ car are in good working order.
Pay special attention to the oil seals - it is better to replace worn ones immediately. If a new type of gasket is used on the machine, then it is mounted on sealant - apply it around the perimeter on both sides
Tightening torque for cylinder head of VAZ 2107
Replacing the gasket
A 10 wrench, preferably a head with a wrench or ratchet A 13, 17 and 19 socket head Flat and Phillips screwdrivers Extensions Wrenches and ratchet handles A torque wrench is the main tool that is required to perform this job
Step-by-step guide with photos on replacing the head gasket
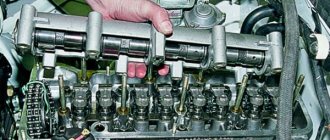
I’ll say right away that the photographs presented in this article show the process of completely removing the carburetor, intake and exhaust manifold. But in fact, you can do without removing all these nodes. You can completely dismantle the cylinder head with the carburetor and manifolds installed on it.
So, first read the instructions for removing the camshaft on a VAZ 2107. After that, unscrew the coolant supply pipes:
And after that we take it aside:
Also, do not forget to disconnect the wires from the oil pressure sensor:
We check that all hoses and pipes are disconnected so that nothing is damaged when removing the cylinder head. Then you can unscrew the bolts securing the head to the cylinder block, first we tear them off with a wrench, and then you can twist them with a ratchet to make things go faster:
After all the bolts are completely unscrewed, you can carefully lift the cylinder head:
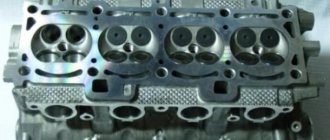
And finally we remove it from the block, the result of which can be seen in the photo below:
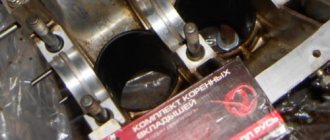
Carefully inspect the surface of the head from the inside to understand why the gasket burned out and antifreeze passed between the joint (if such symptoms were present on your car). If there are traces of corrosion close to the channels, then this is not allowed and it is advisable to replace such a cylinder head. If the traces of corrosion are not very deep, then you can grind the surface of the head to even out the grooves over the entire area. Of course, after such a procedure it will be necessary to select a thicker gasket in order to maintain the compression ratio.
If everything is fine with the cylinder head and you just need to replace the gasket, then be sure to thoroughly clean its surface. I do this with a special spray for removing gaskets, which is applied for 10-15 minutes and then cleaned off with a brush.
After this, carefully wipe the surface dry, install a new gasket on the block so that it lies exactly along the guides and you can install the cylinder head. Next, you need to tighten the bolts in a strictly defined sequence:
It is also worth noting that this should only be done with a torque wrench. I personally use an Ombra ratchet. It is suitable for most work on domestic cars, and the torque varies in the range from 10 to 110 Nm.
As for the moment of force when tightening the cylinder head bolts on the VAZ 2101-2107, it is as follows:
first stage - tighten with a torque of 33-41 Nm; second (final) from 95 to 118 Nm.
The photo above does not show the assembly process itself, so please do not pay too much attention to the repair conditions. It just shows clearly how all this is done. Ideally, everything should be clean so that no debris gets into the engine.
Ideally, everything should be clean so that no debris gets into the engine.
How to remove
— drain the coolant from the radiator and cylinder block and remove the air filter;
— disconnect the wires from the battery, spark plugs and from the coolant temperature gauge sensor; disconnect the choke cable from the carburetor;
— using wrench 67.7812.9514, remove the spark plugs and coolant temperature sensor;
— disconnect the throttle drive rods from the intermediate lever on the cylinder head cover of VAZ 2107, VAZ 2105, VAZ 2104 and remove the cover;
— turn the crankshaft of the Lada Classic until the mark on the pulley aligns with the long mark on the camshaft drive cover, and the marks on the camshaft sprocket align with the mark on the camshaft bearing housing;
— disconnect the hose from the fluid supply tube to the heater, and from the exhaust manifold - the bracket securing the fluid drain tube from the heater;
— disconnect the hoses from the carburetor, the intake pipe and from the outlet pipe of the cooling jacket of the VAZ 2107 cylinder head;
— disconnect the starter protective shield and the exhaust pipe of the mufflers from the exhaust manifold;
NOTE It is better to leave the exhaust manifold and intake manifold with carburetor on the head. They can be removed later when disassembling the cylinder head.
Reasons for proper tightening
As noted above, tightening is carried out after disassembling the cylinder head, and it, in turn, is most often performed when it becomes necessary to replace the gasket in model 2107. In most cases, a malfunction of the element in question is grounds for prohibiting further operation of the vehicle.
A very common problem is wear of the gasket in the area between the lubrication channels and those responsible for the circulation of antifreeze. In this situation, mutual contamination of working fluids occurs. The characteristic symptoms are:
- oil dilution and a drop in its level;
- change in the shade of antifreeze (it begins to look like tea).
Such a breakdown requires urgent repair.
The second variant of the VAZ-2107 malfunction is loss of tightness in the area between the cylinders themselves and the coolant supply system. Typically the culprits here are:
- defective cylinder head gasket;
- insufficient tightening torque.
Regardless of this, the same thing happens - air enters the cooling system, and after that:
- coolant temperature rises;
- The distribution tank is literally boiling.
Much less often, the gasket is destroyed in the space between the cylinders. Signs of a malfunction include a drop in compression and unstable operation of the engine.
Many people look for the reasons for the failure in other places if they have recently replaced the cylinder head gasket, but this is just a waste of effort. The fact is that now such elements are often of low quality, and are sometimes produced in artisanal conditions. As a result, the seal fails in a matter of months. Take a close look to see if there are any leaks of antifreeze in the space between the cylinder block and the engine. If so, try tightening the bolts. When this measure does not help, then most likely the problem is an uneven gasket.
Dismantling the unit and preparing for repair
Carrying out work of this kind requires fairly high qualifications and special equipment. Removal of the cylinder head is carried out in the following sequence:
- The car is installed in a garage box, the battery is disconnected.
- The following elements are removed from the engine: air filter housing, carburetor and head cover.
- The upper timing sprocket is unscrewed from the camshaft and removed.
- Using a socket and a powerful wrench, the head mounting bolts are removed.
- After this, the assembly is carefully removed from the cylinder block.
- The gasket, or rather its remains, remains on the surface; they must be removed using a non-metallic tool to avoid damage.
VAZ 2107 engines use gaskets made of fire-resistant composition. After dismantling the head from the cylinder block during the repair process, it is necessary to transfer it to a workbench for inspection and repair. It is necessary to start with a thorough inspection and testing of all components to identify parts with significant deviations from the nominal values. All such parts will require replacement with spare parts.
The VAZ 2107 block head is installed on a wooden stand on the desktop. It plays the role of a fixing valve device during their disassembly. Defective parts are removed and replaced; all sealing gaskets are also subject to renewal. At this stage, preparation for repairs can be considered complete.
Start of work
The very first step is to remove the air filter. Of course, on a carburetor engine it is somewhat easier to remove it. If you have an injector, you will have to tinker with its rubber fasteners. But the essence remains the same - it is necessary to disassemble the fuel system completely to get to the cylinder head. But we will look at the example of not an injection, but a carburetor seven. Still, there are many more classic cars with such a power system.
It is advisable to dismantle the carburetor, since if you remove the head along with it, you can accidentally damage it. On all classic series cars, the carburetor is removed in the same way. This procedure is quite simple, but it will take some time. Now you can unscrew the nut securing the distributor and remove the distributor along with the wires. Getting closer to the engine, all that’s left to do is drain the antifreeze from the system.
And then turn off all the pipes that you see. After this, it will be possible to dismantle the cylinder head cover. It is secured with nuts and shaped washers. Don't lose them during repairs. That's all, the preparation is complete, you can begin the most difficult part - dismantling and installing the cylinder head.
Scheme and procedure for tightening the cylinder head on VAZ cars
Fasteners must be tightened in a specific order. This technique allows for correct joining of the main block with the cylinder block, without creating distortions and unnecessary stress on metal surfaces. Tighten the cylinder head bolts in two stages:
- From the first fastening unit to the tenth, tighten with a torque of 3.5-4.1 kgf*m.
- The same hardware is already tightened with a torque of 10.5-11.5 kgf*m.
- Lastly, hardware No. 11 is tightened, the tightening torque is 3.5-4.0 kgf*m.
The procedure for tightening the cylinder head bolts of the VAZ 2108.
The procedure for tightening the cylinder head of the VAZ 2108 is similar to the classic model range. Work should begin in the same way from the central point; the procedure for tightening the cylinder head is carried out in 4 stages.
- The fasteners are tightened to a torque of 2.0 kgf/m.
- Continue tightening with a torque of 7.5-8.5 kgf/m.
- The hardware is turned 90 degrees.
- Make a final 90 degree turn.
Tightening the cylinder head of a VAZ 2110. Sixteen-valve engines of the Volga automobile industry begin to be tightened according to the same principle as all other models - from the central one. Tightening torques:
- The indicators are 2.0 kgf/m.
- The hardware is rotated 90 degrees.
- Repeated rotation by 90 degrees.
Important information! On 16-valve engines, it is allowed to re-use the MCC mounting bolts. The main thing is that their length without a head does not exceed 9.5 cm. If the dimensions exceed the norm, it is recommended to replace the fastening units.
Tightening rules
Before starting work, it is recommended to check the condition of the hardware. They must have a good thread, and the length must meet the standards.
Important information! The full length of the cylinder head bolts is 135.5 mm. If the elements unscrewed during the process of replacing the gasket correspond to this indicator, then they can be used a second time. If the fasteners are extended during engine operation, it is not recommended to use them; it is better to purchase new ones. For example, VAZ 2112 cylinder head bolts are M10×1.25 and M12×1.25.
The bolts are installed in place and tightening begins. The work takes place step by step; you will need a torque wrench from the tool. If you tighten it in a chaotic manner, this will lead to unpleasant consequences that will damage the engine.
- 7, 3, 1, 4, 9;
- 8, 6, 2, 5, 10.
The work is carried out in 4 stages, each step is carried out according to the above scheme:
- Each fastener is tightened with a tool - a force of 2 kgf/cm 2.
- Twisting in force mode 8 kgf/cm 2.
- The bolts are tightened by turning each fastening unit at an angle of 90 degrees.
- At the fourth stage, each of the bolts is again turned at an angle of 90 degrees in the order of the given diagram.
Required Tools
- Torque wrench.
- Set of socket heads.
- Extension.
- Ratchet/wrench.
A torque wrench is required to tighten the bolts to a certain torque. The work must be done carefully, and it is also advisable to have certain skills in using the tool. Instructions for using the key:
- The holder must be set to the “zero” position.
- They begin to smoothly rotate the instrument and at the same time monitor its readings.
- If there is no reading on the indicator when using the wrench, this indicates stretching of the bolts. The peculiarity is noted at the initial stage of work. You should continue to turn the tool.
- When the tightening torque is reached, the tool should be turned off.
Step-by-step instruction
The procedure for tightening the cylinder head bolts on a VAZ 2107:
- Remove the wires that are connected to the emergency oil level and coolant temperature sensors.
- Drain the coolant.
- The thermostat is dismantled.
- Remove the air filter housing.
- Disconnect the exhaust pipe inlet element from the manifold.
- Remove the camshaft casing and belt.
- The drive rods of the two dampers are removed from the carburetor.
- Disconnect the wiring connected to the cylinder head.
- By loosening the clamps, disconnect the hoses located on the cylinder head.
- The cylinder head is dismantled.
- Remove the used gasket.
- The surface plane of contact of the cylinder head is cleaned of residual particles of the gasket.
https://youtube.com/watch?v=SkwB_3Kj0Nw
To install a new gasket and assemble the cylinder head, you should assemble it in the same sequence as above, only in reverse order.
When is it necessary to puff?
First, let's look at the cases in which it is necessary to tighten the bolts of the cylinder head of a VAZ 2106 car engine:
- If engine oil comes out from under the cylinder head. The problem indicates damage or natural wear to the head gasket. It is necessary to remove and replace the seal. The leak may also be due to loose cylinder head bolts. The presence of a problem is indicated by oil stains that appear at the junction of the head and the motor block.
- After repairing the power unit. If you removed the fastenings in a Niva or any other car and rebuilt the engine, then for successful assembly you should take into account the order of tightening and the diagram, as well as the tightening force of the screws.
- For prevention purposes. Experts recommend tightening the bolts on the cylinder head every 2-3 thousand kilometers. When the engine is operated under vibration conditions, this can cause the screws to loosen, so they must be periodically checked and tightened with proper force.
The Ilyich Garage channel has published a video that will help you understand the process of tightening the cylinder head bolts on the “six”.
Different bolts and tightening degree of the VAZ-2107 cylinder head. What is the difference
The “classic” was originally equipped from the factory with ordinary M12x120x1.25 bolts for a 19mm head. Their original catalog number was 2101-1003271 or 21213-1003271. The second number suggests that such bolts were also used on the VAZ-21213 Niva, which is why they are also called “Niva bolts”. Another colloquial name is “penny”. But most often they are simply identified as “cylinder head bolts for an old-style classic.”
On VAZ-2108 and VAZ-2109 cars, torsion bolts of a new type began to be used, which are also suitable for the “classics” - M12x115x1.25. They were unscrewed and tightened with a 12mm hexagon. It is noteworthy that AvtoVAZ’s catalog number remained the same, 21213-1003271. And it is the bolts of the new type that are sold in the original packaging. Their difference is that they “stretch” - and if correctly, they undergo elastic deformation. Actually, this is why you need to turn it twice by 90 degrees.
Old style cylinder head bolt
New sample cylinder head torsion bolt
Pay attention to the length of these bolts, encoded in the markings. 5mm difference with regular bolts
It is by these 5 millimeters that the bolt is deformed, completely filling the internal thread.
What is the difference between these bolts, other than the first ones are not sold in the original packaging and different bolts require different torque patterns? Classic bolts can be reused many times if their condition allows it. But on the other hand, you need to remember to do preventive tightening of the cylinder head bolts. About once a year, or more often, you will have to check the tightening torque of all the head bolts of your VAZ-2107 and tighten them if necessary.
The new type bolts do not require such a procedure, because due to elastic deformation they provide constant pressure on the cylinder head cover. But such bolts are disposable. When disassembling the cylinder head, you will have to buy a set of new ones. And unscrewing such bolts can be complicated by the fact that bolts tightened without a torque wrench can break.
Judging by the reviews of car owners, very often they can be unscrewed only by welding the nuts to 19. Therefore, many try to find old-style bolts, which are less troublesome.
Article: 2101-1003265
Order code: 013316
- You may need
- show more
- Passenger cars / VAZ / VAZ-21021 drawing
- » href=»/catalog/vaz-3/legkovye_avtomobili-30/vaz_2102-4/blok_cilindrov_i_golovka_bloka-77/#part6277″>Washer 12Engine / Cylinder block and cylinder head
- Passenger cars / VAZ / VAZ-21042 drawings
- » href=»/catalog/vaz-3/legkovye_avtomobili-30/vaz_2104-5/blok_cilindrov_i_golovka_bloka-54/#part13471″>Washer 12Engine / Cylinder block and cylinder head
- » href=»/catalog/vaz-3/legkovye_avtomobili-30/vaz_2104-5/blok_cilindrov_i_golovka_bloka-55/#part13495″>Washer 12Engine / Cylinder block and cylinder head
- Passenger cars / VAZ / VAZ-21061 drawing
- » href=»/catalog/vaz-3/legkovye_avtomobili-30/vaz_2106-7/blok_cilindrov_i_golovka_bloka-57/#part19715″>Washer 12 Engine assembly / Cylinder block and cylinder head
- Passenger cars / VAZ / VAZ-21211 drawing
- » href=»/catalog/vaz-3/legkovye_avtomobili-30/vaz_2121-13/blok_cilindrov_i_golovka_bloka-46/#part58453″>Washer 12Engine / Cylinder block and cylinder head
- Passenger cars / AZLK / Moskvich-21411 drawing
- » href=»/catalog/azlk-9/legkovye_avtomobili-30/moskvich_2141-53/blok_cilindrov_i_golovka_bloka-59/#part148625″>Washer 12Engine mod. 2106 / Cylinder block and head
- Passenger cars / IZH / IZH 2126 with VAZ1 engine drawing
- » href=»/catalog/ij-7/legkovye_avtomobili-30/ij_2126_s_dvigatelem_vaz-307/blok_cilindrov_i_golovka_bloka-9/#part945826″>WasherEngine / Cylinder block and cylinder head
- Passenger cars / IZH / IZH 27171 drawing
- » href=»/catalog/ij-7/legkovye_avtomobili-30/ij_2717-607/blok_cilindrov_i_golovka_bloka-33/#part1693573″>Washer VAZ-2106 engine / Cylinder block and cylinder head
- Passenger cars / VAZ / VAZ-21011 drawing
- » href=»/catalog/vaz-3/legkovye_avtomobili-30/vaz_2101-3/blok_cilindrov_i_golovka_bloka-77/#part1793″>Washer 12Engine / Cylinder block and cylinder head
- Passenger cars / VAZ / VAZ-21031 drawing
- » href=»/catalog/vaz-3/legkovye_avtomobili-30/vaz_2103-106/blok_cilindrov_i_golovka_bloka-52/#part10144″>Washer 12Engine / Cylinder block and cylinder head
- Passenger cars / VAZ / VAZ-21052 drawings
- » href=»/catalog/vaz-3/legkovye_avtomobili-30/vaz_2105-6/blok_cilindrov_i_golovka_bloka-54/#part16577″>Washer 12Engine / Cylinder block and cylinder head
- » href=»/catalog/vaz-3/legkovye_avtomobili-30/vaz_2105-6/blok_cilindrov_i_golovka_bloka-55/#part16601″>Washer 12Engine / Cylinder block and cylinder head
- Passenger cars / VAZ / VAZ-21072 drawings
- » href=»/catalog/vaz-3/legkovye_avtomobili-30/vaz_2107-8/blok_cilindrov_i_golovka_bloka-59/#part23085″>Washer 12Engine / Cylinder block and cylinder head
- » href=»/catalog/vaz-3/legkovye_avtomobili-30/vaz_2107-8/golovka_bloka-58/#part23056″>Washer 12Engine / Block head
- Passenger cars / VAZ / VAZ-212131 drawing
- » href=»/catalog/vaz-3/legkovye_avtomobili-30/vaz_21213-731/golovka_bloka-51/#part2008903″>Washer 12Engine / Block head
- Passenger cars / AZLK / Moskvich-23351 drawing
- » href=»/catalog/azlk-9/legkovye_avtomobili-30/moskvich_2335-688/blok_cilindrov_i_golovka_bloka-6/#part1902846″>Washer 12Engine / Cylinder block and cylinder head
- Passenger cars / IZH / IZH 21261 drawing
- » href=»/catalog/ij-7/legkovye_avtomobili-30/ij_2126-606/blok_cilindrov_i_golovka_bloka-35/#part1690459″>Washer VAZ-2106 Engine / Cylinder block and cylinder head There are no reviews for this product yet.
Today, the next article in the series “Crystal VAZs or typical breakdowns of domestic cars” is dedicated to the “classics”: VAZ-2101, 2103, 2104, 2104, 2105, 2106 and 2107. These cars have been driving along our roads for decades and, despite Despite all the shortcomings that we will talk about, their popularity is still high.
Let's start replacing
DIY cylinder head tightening torque for Lada Priora 8 and 16 valves
We will need: a special wrench for 36 and a universal pulley clamp.
This car is carburetor, but if an injector is installed, the replacement procedure is not much different.
View under the hood.
Remove the air filter housing from the carburetor. Unscrew the three 10mm and four 8mm nuts securing the housing to the carburetor.
Be careful not to drop anything into the carburetor, otherwise you will have to remove it, and maybe the intake manifold too. Because if, with the car running, they get under the intake valve, then you can go straight to repair the head. Remove the fuel line and distributor cap
Unscrew the eight nuts 10 securing the valve cover and remove the washers with the plates
Remove the fuel line and distributor cap. Unscrew the eight nuts 10 securing the valve cover and remove the washers with the plates.
Remove the choke cable and throttle valve drive. Then remove the valve cover along with the gasket; it is also better to replace it.
Remove the protection from below.
Drain the antifreeze.
Loosen the nut 19 securing the generator.
Unscrew the clamps on the pipes and remove the latter.
Loosen the clamp on the lower pipe of the pump and remove it with a slight movement of your hand.
Disconnect the power wires for the cooling fan and the temperature sensor on the radiator. We remove the radiator along with the pipes and thermostat.
Loosen the generator tensioner nut and use a pry bar to move it forward. Remove the generator belt.
Now we rotate the crankshaft by the pulley with a magic wrench of 36 and ensure that the marks on the pulley and the cover match, as well as on the camshaft sprocket and the ebb of the latter bed.
Now comes the fun part. Unscrew the nut 36 holding the crankshaft pulley. We lock the pulley with a special key and unscrew it. If there is no such thing, you can turn on the fifth speed, ask a friend to press the brake and lightly turn the key to unscrew it.
We remove the pulley. We unscrew the six bolts and three nuts 10 on the side, three bolts from the bottom of the camshaft drive cover. Let's take the last one.
- Unscrew the two nuts securing the chain tensioner and remove it.
This machine was equipped with an automatic tensioner. Finally someone got it!
- We unscrew the bolt securing the camshaft sprocket and, having removed it, remember or mark the hole for alignment.
- An amazing picture appeared before us.
- 1 – fuse that prevents the circuit from jumping.
- 2 – fastening the timing chain tensioner shoe.
- 3 – crankshaft sprocket.
- We unscrew the fuse using a 10mm wrench and the tensioner fastening, as well as the bolt securing the auxiliary drive sprocket (pig).
We remove all the sprockets and the old chain. We check the matches of the marks. The crankshaft key should be opposite the ebb on the cylinder block.
We install new sprockets on the crankshaft and the drive of auxiliary units. Lubricate the new timing chain and install it in place.
- We place any tool under the chain on top so that it does not fall down.
We install the camshaft sprocket in the chain in such a way that when installed on the camshaft, the descending branch of the chain is tensioned and all marks coincide.
We turn the camshaft counterclockwise at a small angle and return it back by the crankshaft, this way the chain is tensioned and you can evaluate the correct installation of the marks.
If the marks do not match, transfer the chain to the tooth and repeat the procedure again.
We install the chain tensioner in place and activate it. Tighten all the sprocket mounting bolts and lock them. We turn the crankshaft two turns and if the valves do not meet the pistons and all the marks fall into place, we congratulate ourselves on completing the most important operation.
Lubricate the crankshaft cover gasket with sealant and install it in place.
We install the pulley, tighten it and turn the crankshaft again and check all the marks. It’s better to play it safe than to tear your hair out all over the place and look for the mechanic’s phone number.
We unscrew the nut 13 of the distributor and, having taken it out, turn the slider so that it faces the contact of the fourth cylinder. We put the distributor in place, but remember that after final assembly we will have to turn on the ignition. We will not dwell on this, since this procedure can easily be found on the Internet. If you are interested, there is a video about installing the ignition at the end of the article.
We put back everything that was removed, in the reverse order of removal. Fill with antifreeze, start, adjust the ignition. Your first timing chain replacement has come to an end.
Basic faults
There is damage to the gasket in which the operation of the VAZ 2107 is strictly prohibited. But there are also breakdowns in which it is still possible to drive. So, here is a list of the main breakdowns:
- Destruction of the gasket between the lubrication and cooling channels. With such a breakdown, antifreeze begins to seep into the engine sump. Of course, mixing with engine oil occurs. If there is a suspicion of a gasket failure, then you need to remove the dipstick and check the lubricant level. It's also worth looking at the consistency of the oil. In this case, the antifreeze turns light brown. In the event of such a breakdown, it is strictly forbidden to even start the engine, as this can quickly lead to jamming.
- Destruction between the cylinders and the cooling system occurs if the cylinder head gasket is of poor quality. It is quite possible that there was a weak tightening torque of the VAZ 2107 cylinder head during assembly. Under pressure, the integrity of the gasket is destroyed. The result is that air gets into the engine cooling system, and something terrible happens in the expansion tank. The temperature rises, there are huge bubbles and seething in the tank. Of course, it is undesirable to continue driving in this case.
- Sometimes (much less often than in the two previous cases) destruction occurs between adjacent engine cylinders. The result is a significant decrease in compression and unstable engine operation.
- And, of course, one cannot help but mention the banal marriage. In this case, the cylinder head gasket of the VAZ 2107 simply collapses, literally before our eyes. In this case, you can see how antifreeze begins to leak between the cylinder head and the engine block. In this case, tightening the bolts has no effect. Most likely, there is unevenness in the gasket itself, which leads to a similar result.
And now you have decided that you really need to replace the gasket, your car has one or more symptoms. What to do? Arm yourself with keys and other tools, and then begin preparation.
Features of the work performed using the example of some cars
To prove the proposition that each power plant has its own main characteristics, let’s consider the nuances of carrying out work on specific models.
VAZ-2112 16 valves
Numerous modifications of the VAZ-2112 were equipped with 16-valve power plants of two types (factory indexes - 21120 and 21124). These two motors, despite some design differences, have the same head clamping technology.
These units use 93mm tension bolts. In this case, reuse of fasteners is allowed, but under one condition: if their length does not exceed 95 mm (if longer, they must be replaced). 10 bolts are used to secure the head.
Tightening is carried out in three approaches:
- Bolts are tightened to order with a force of 2 kg/m;
- 90 degree rotation;
- Repeated extension to 90 degrees.
The traffic pattern is shown below.
Between the 2nd and 3rd approaches you need to take a break for 20 minutes.
Since these engines use traction bolts, no additional tension is required when operating the vehicle.
VAZ-2107
On the VAZ-2107, all installed modifications of power units are 8-valve.
The block head is attached to them with 11 bolts, 10 of which are main and 1 are auxiliary side bolts (installed in the side bar).
On this machine, fastener tightening is also performed in three approaches:
- 10 main bolts are tightened to order with a force of 3.5-4.0 kg/m;
- The same bolts reach a torque of 11.5-12.0 kg/m;
- The auxiliary is tightened with a force of 3.5-4.0 kg/m.
There is no need for additional tightening of the cylinder head when operating the VAZ-2107.
"Samara", 10th family, Priora
On models of the Samara family (2108-21099), in addition to the VAZ 2110-2112 with an 8-valve unit, tightening is carried out in 4 approaches:
- Clamping force 2.0 kg/m;
- Traction with a moment of 7.5-8.5 kg/m;
- Rotate 90 degrees.;
- Return 90 degrees.
The break between points 3.4 is 20 minutes.
As for the “tenth” VAZ family, equipped with 16-valve engines, their clamping technology is the same as that of the VAZ-2112 (described above).
The same applies to Lada Priora, on 8-valve units a method with 4 approaches is used (VAZ 2108-21099), and on 16-valve units - 3 approaches (VAZ 2112 with a 16-valve engine).
"Volga"
On ZMZ-406 engines installed on the Volga, according to the automaker’s technical documentation, the cylinder block cylinder head bolts are tightened in two ways:
- With a force of 4.0-6.0 kg/m;
- With a torque of 13.0-14.5 kg/m.
But many car owners of this car note that this technology does not allow the cylinder head to be properly tightened, so they use techniques with a large number of approaches.
The most common is the crossover method, which is performed in 4 stages and requires mandatory actions:
- 4.0-4.3 kg/m2;
- 7.5 kg/sq.m;
- 11.0 kg/m2;
- 14.3-14.5 kg/m2.
When working with this engine, no subsequent tightening of the bolts is required.
How to tighten correctly?
You can tighten the bolts with the help of specialists or yourself. If you have never encountered the need to perform this task before, then below we will look at how tightly you should tighten the screws and in what sequence you should do it.
Be sure to strictly observe the tightening torque, since if the head bolts are overtightened, this will lead to cracks and damage to the cylinder head. If this happens, the car owner will have to carry out major repairs to the unit. The working surface of the hole, as well as the threaded connection of the screw, must be as clean as possible. A wire brush can be used to clean the cylinders.
If during the task you find “blind” holes for the head screws, use a cleaning lubricant carefully. If the volume of the substance is greater than required, it will be difficult to install the pin all the way
It is recommended to lubricate the threads of new bolts with a small amount of engine oil or another type of lubricant.
Tools and materials
To tighten the cylinder head, prepare only one tool - a torque wrench, which will allow you to determine the tightening force of the screws. It is best to purchase a key in a specialized store or rent it at a service station, since this tool can only be used for tightening and tightening. Using a regular wrench will not allow you to determine how many kilograms the tightening force is.
When purchasing bolts, it is recommended to give preference to branded parts. Be sure to look at the threaded part - it must be intact, without damage or defects; if any, the fasteners are replaced.
Channel “Engine Repair! And interesting!” published a video that describes all the nuances of the stretching process.
Algorithm of actions
The order and strength required when pulling the cylinder head bolts is as follows:
- In accordance with the diagram below, tighten all bolts using a torque wrench. The tightening torque on the first round of tightening the fasteners will be about 3.5 - 4.1 kgf/m. First, the bolts are tightened, which are located in the center of the block head - top and bottom. After this, the two upper and lower fasteners are screwed in, installed on the side of the screws located in the center. Then the two outer bolts are tightened. Please note that you need to tighten the left pins first, and then the right ones. Screw number 11, located at the bottom left, does not need to be touched.
- This is the first stretch circle. At the second stage, the bolts are tightened in a similar order. Only the force with which the fastening elements are tensioned by the tool will be 10.5 - 11.5 kgf/m.
- At the third stage, the bolt is tensioned, which is marked with number 11 in the diagram. The tightening force of this screw should be 3.5 - 4.0 kgf/m.
Loading …
Torque Tips and Common Mistakes
- Do not jerk the cylinder head bolts. Tightening should be done smoothly.
- When installing cylinder head bolts (especially old ones), carefully examine their condition - there should be no damage to the threads. Exactly the same as inside the installation site.
- If necessary, the part must be cleaned of contamination.
- It is better to lubricate the threads with oil, but pouring them into the mounting holes is not recommended. If the wells are blind, then the lubricant must be applied very carefully. Fluids do not compress and excess lubrication will prevent you from tightening the bolt all the way.
- Failure to use a torque wrench may result in inaccurate tightening torques and incorrect gasket operation or damage to the cylinder head.
Replacing the front wheel bearing
Work on replacing a wheel bearing begins with the preparation of tools and materials. You will need:
- set of socket wrenches;
- screwdriver;
- chisel;
- hammer;
- pliers;
- extension for knocking out the bearing race;
- new bearing, seal and lubricant;
- rags;
- kerosene.
How to remove
To dismantle the part, lift the front wheel using a jack. In a service station, work is carried out on a lift. When replacing a bearing, the following sequence of actions must be performed:
- Unscrew the fasteners and remove the wheel.
- Unscrew the fastening and dismantle the caliper.
To avoid damage to the brake hose after removing the caliper, the latter is carefully suspended and secured with wire.
Rest
For other threaded connections, the tightening torques are as follows:
- M6 - 10 Nm;
- M8 - 25 Nm;
- M10 - 50 Nm;
- M12 - 105 Nm;
- M14 - 180 Nm.
Let us remind you that we previously published a collection of technological instructions for Lada Vesta. With it you can repair your car yourself.
Keywords: Lada Vesta engine | Lada Vesta clutch | gearbox Lada Vesta | front suspension of Lada Vesta | rear suspension of Lada Vesta | steering mechanism Lada Vesta | Lada Vesta brakes
5
Found an error? Select it and press Ctrl+Enter..
Coronavirus has an impact on AvtoVAZ, new details
What is the maximum speed of Lada Granta Lux
Replacing ignition coils and spark plugs on LADA cars
AvtoVAZ explained what to do if the symbols of the Lada Vesta instrument cluster flicker
Camshaft VAZ 2107
The camshaft is the main element of the gas distribution mechanism of a car engine. This is an all-metal part, made in the form of a cylinder with support journals and cams placed on it.
The camshaft contains cams and journals
Purpose
The timing shaft is used to control the processes of opening and closing valves in the combustion chambers of the engine. In other words, it synchronizes the operating strokes of the power unit, promptly admitting the fuel-air mixture into the combustion chambers and releasing exhaust gases from them. The camshaft of the “seven” is driven by the rotation of its star (gear), connected through a chain to the crankshaft gear.
Where is it located?
Depending on the design of the engine, the timing shaft may have a different location: upper and lower. With its lower location, it is installed directly in the cylinder block, and with its upper location, it is installed in the cylinder head. For "sevens" the camshaft is located in the upper part of the cylinder head. This arrangement, first of all, makes it easily accessible for repair or replacement, as well as for adjusting valve clearances. In order to get to the timing shaft, just remove the valve cover.
Operating principle
As mentioned, the camshaft is driven by the crankshaft gear. At the same time, its rotation speed, due to the different sizes of the drive gears, is reduced exactly by half. The full operating cycle of the engine occurs in two revolutions of the crankshaft, but the timing shaft makes only one revolution, during which it manages to let the fuel-air mixture into the cylinders one by one and release the exhaust gases.
The opening (closing) of the corresponding valves is ensured by the action of the cams on the valve tappets. It looks something like this. When the shaft rotates, the cam with its protruding side presses the pusher, which transmits force to the spring-loaded valve. The latter opens a window for the intake of the combustible mixture (exhaust of gases). As the cam rotates further, the valve closes under the action of a spring.
The valves open when the protruding parts of the cams press on them
Consequences of incorrect cylinder head installation
Correct tightening of the cylinder head is very important, since the performance of the motor directly depends on it. The cylinder head acts as a cylinder cover, and any violations in its fit affect the processes occurring inside the power unit.
Insufficient tightening of the head leads to a drop in compression due to loss of tightness at the junction of the cylinder head with the cylinder block, burnout of the gasket, breakthrough of working gases from the cylinders and their entry into the channels of the lubrication or cooling systems, penetration of technical fluids into the combustion chambers, which in turn is negative affects the functioning of the power unit and can cause very serious damage.
Excessive tightening also does not bring anything good; in this case, damage to the head often occurs - cracks appear, or fasteners are destroyed - bolts break, threads break, etc.
Uneven or incorrect tightening often causes warping of the head, due to which gaps appear at the junction of it with the block, which leads to the same consequences as insufficient tightening.