Torque and sequence of tightening the camshaft bed
Why is it necessary to properly tighten the beds of camshafts and other parts of the cylinder head? Correct tightening determines the normal functioning of all components and assemblies. In order to properly tighten threaded connections, a standard tightening pattern and a torque wrench are used.
Before installing the bolts in place, they must be thoroughly washed and lubricated with silicone grease. To properly tighten the bolts you need to know the sequence. The sequence starts from the middle part and gradually moves to the edges. It is best to familiarize yourself with the process via video.
Part Features
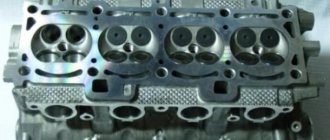
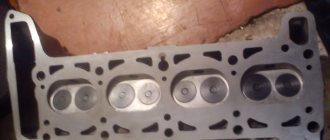
The cylinder head is a structurally quite complex part. It is a massive plate in which there are channels for the circulation of fluids of the lubrication and cooling system, and technological holes - spark plugs, for injectors (in diesel engines), mounting holes.
Also on top of the cylinder head there is a so-called “bed” of the camshaft - a seat for its installation.
Despite its massiveness, the block head is a fragile part due to the voids inside, so excessive tightening force often leads to cracks in the walls and bridges.
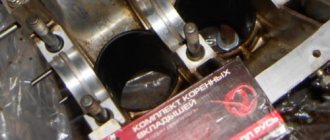
For the manufacture of cylinder head, two types of metals are used - aluminum (the most common) and cast iron.
To secure the latter, steel bolts or studs with nuts are used. For example, the head of the UAZ 31519 block is secured with studs.
The difference in the materials used to make the head and its fasteners has one negative factor - different thermal expansion of the components when heated, especially for aluminum cylinder heads.
Uneven tightening of fasteners (nuts, studs, etc.) during thermal expansion leads to the appearance of excessive stress in the metal structure, resulting in warping of the head.
Consequences of improper tightening
- Oil leakage (due to the formation of a gap or a loose connection).
- Air getting inside the cylinder head.
- Malfunction of the engine or cylinder head.
- Ingress of water, dirt, dust.
No sealants are used when installing the gasket (including no lubricants - grease, cyatim)! The task is to degrease the metal. The cylinder head gasket itself must be new.
All these factors can adversely affect the operation of the cylinder head and main power unit.
Source
How to adjust valves on a VAZ 2106?
On a VAZ 2106 car, it is recommended to adjust the valves every 10-15 thousand km. mileage The optimal value has been selected, because all this time the engine will operate stably. When the gap changes, minor “defects” will begin to appear: valve knocking with a sharp increase in speed, a decrease in throttle response and engine power.
The problems go so far as to cause the engine to stall at high speeds at operating temperature. It is also necessary to adjust the valves after carrying out work related to repairing or replacing the camshaft. In this case, adjustment is inevitable, since the 2 camshafts may differ from each other. To work you will need the following tools:
- a set of keys;
- open-end wrench 17 with good leverage;
- special key 38 for turning the crankshaft;
- flat probe 0.15 mm thick.
If you look closely at the case in which the dipstick is stored, you will see several numbers indicating the sequence of valve adjustment. Pay attention to the temperature: 20 °C is optimal for setting. But if before this the VAZ camshaft was replaced, and the weather is warm, then you don’t have to look at the temperature.
So, first remove the cylinder head cover. Please note that the valves should be counted from the front edge of the internal combustion engine. After this, put the piston of the 4th cylinder in the upper position using a 38 key. Valves “6” and “8” are closed, therefore, the gap between the lever and the cam will be the largest. Place the dipstick and check the gap. The optimal one is one in which the probe can be moved with some effort. If the gap is smaller or larger, the dipstick does not move or passes freely, then proceed with adjustment.
To do this, you need to work with two 17mm wrenches: with one you loosen the lock nut, and with the second you turn the bolt to adjust. Moreover, you should not make many turns with the adjusting bolt; you need to slowly move the feeler gauge while unscrewing or tightening it, so as not to miss the permissible gap value. Afterwards, the locknut must be tightened and once again make sure that the gap is correct. If necessary, the valve is re-adjusted. Valve adjustment procedure:
The crankshaft rotates 180°, which corresponds to a quarter turn of the camshaft. To control the position, it is necessary to use the marks on the crankshaft pulley, as well as on the camshaft. As a last resort, simply remove the distributor cover and perform control using the slider.
Please note that one revolution of the crankshaft is half a revolution of the distributor axis. After the adjustment is completed, assembly is performed. If the rubber gasket is damaged, it should be replaced with a new one.
Prior valve cover tightening torque
Many motorists have heard that it is necessary to correctly tighten the threaded connections on the 16-valve VAZ-2112 engine, but they have never done it themselves. Thus, the tightening torque is determined by the manufacturer and is indicated in the service repair manuals.
Video about installing camshafts and split gears on a 16 valve engine
The video will tell you how to properly tighten the threaded connections on the camshaft beds
Replacement Guide
The work of removing the crankshaft on a VAZ 2106 is somewhat labor-intensive, but a driver with little experience can do it. We do not need special equipment or special tools to work.
Set of tools
- set of heads;
- ratchet;
- knob;
- extension;
- a set of keys;
- rags.
Wrenches for tightening and loosening bolts
Sequencing
- To get to the crankshaft, you first need to remove the air filter and housing.
- Next, disconnect the choke cable.
- Gas damper drive.
- Clean and wash the valve covers thoroughly. Usually dust and dirt accumulate on it, otherwise they may get inside the motor.
- Now you need to unscrew all the nuts and remove the valve cover. Experts recommend replacing the gasket when removing the valve cover. When purchasing, buy a rubber-cork one, as it holds oil much better than rubber.
- By removing the cover, we gain access to the camshaft; in most cases it is very dirty.
- Now you need to loosen the camshaft sprocket fasteners. To prevent the motor from turning over, insert a screwdriver between the sprocket and the chain.
- Important! Be sure to align the mark on the crankshaft and the camshaft sprocket. You must strive to ensure that the mark on the crankshaft pulley is against the long mark, and the mark on the camshaft sprocket is against the protrusion on the camshaft bed.
- After alignment, we proceed to removing the chain tensioner.
- Unscrew the nuts with a wrench.
- Remove the tensioner.
- We remove the star, which is located on the guide pin.
- After unscrewing the bolt securing the sprocket, remove the sprocket. A hammer may be needed here.
- We tie it to a chain.
- Now you need to unscrew the nuts securing the crankshaft and remove it.
- By the way, it will be noted that if a stud with a nut is turned out, then it is screwed back in with a special stud turner.
- Next, we inspect the camshaft and replace it if necessary.
- The shaft is clamped according to the diagram. The tightening order must be observed. The tightening torque is also important. On a VAZ 2106 car, the tightening torque is 18.3 N/m.
- When assembling, be sure to check that the marks are aligned correctly. If they are out of order, they need to be set correctly.
- Finally, adjust the tension of the chain and valves.
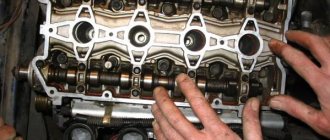
Torque and sequence of tightening the camshaft bed
Camshaft cover tightening sequence
Correct tightening of the camshaft bed, as well as other parts of the cylinder head, determines the normal functioning of all components and assemblies. So, in order to tighten threaded connections, a standard tightening pattern and a torque wrench are used.
Before installing the bolts in place, they must be washed thoroughly and lubricated with silicone grease.
In order to properly tighten the bolts, you need to know the sequence. It starts from the middle part and gradually moves directly to the edges. The detailed sequence can be seen in the photo below.
Tightening diagram for each camshaft bed bolt with numbering
As for the tightening force itself, it is 8.0-10.0 Nm . After the bed is installed on the block head, the connection bolts are tightened by hand or without much force using a ratchet with a head.
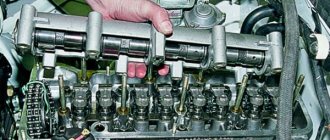
We tighten all the bolts by hand, but do not tighten them
When all the bolts are in place, you need to take a torque wrench and tighten them according to the standards in the order indicated above.
Torque wrench for tightening threaded connections
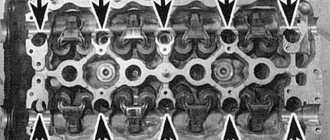
In what cases is it necessary to tighten the camshaft bed?
The bolts are tightened. Marked with arrows
Tightening the camshaft bed will be necessary if it was previously dismantled for restoration and repair work. So, in what cases will you need to remove the bed, let’s look at it in more detail:
- Replacing camshafts, lifters or valve seals.
- Overhaul of the block head.
- Engine repair operations.
- Replacement of individual elements of the cylinder head.
Installation and replacement of VAZ-2112 camshafts 16 valves: photo, video
Replacement of camshafts on the 16-valve VAZ-2112 engine occurs when they wear out and the support journals wear out. Most often this happens when the time for a major overhaul of the power unit or cylinder head passes. This is a rather complicated procedure, but you can really do it yourself.
The video below shows the installation of camshafts and split gears on a 16-valve engine of the VAZ family
The video material will tell you how to replace camshafts on a VAZ-2112 16 valves, and give some recommendations and advice.
Camshaft replacement process
Camshafts with gears and fasteners
In order to install camshafts on the VAZ-2112 16 valves, they must first be dismantled. Like any spare part, they are installed in the reverse order from disassembly.
So, let's look at the step-by-step process of removing and installing the intake and exhaust camshaft.
Removing camshafts
- To begin with, as with any repair operations, it is necessary to remove the “minus terminal” from the battery.
- Remove the timing belt cover.
After unscrewing the mounting bolts indicated in the diagram, remove the timing cover
Now, you need to remove the valve cover. Please note that the bolt tightening order must be followed during assembly.
Unscrew the fastening nuts and remove the valve cover.
Disconnect the wires of the emergency oil pressure sensor, and then unscrew it.
Disconnect the emergency oil pressure sensor
Using a socket wrench or 8mm socket, unscrew the 20 bolts securing the camshaft cover.
Scheme for dismantling and tightening the camshaft bearing housing bolts
- We dismantle the camshaft bearing housing.
- Now, there is free access to two plugs that are located on the rear side of the cylinder head. We take them out.
- We take out the intake camshaft.
- We take out the exhaust camshaft.
You need to be careful with the camshaft plugs; if you install them incorrectly, oil will leak out. If you don’t notice it in time, you’ll shorten the engine’s lifespan or end up in need of a major overhaul.
Remove the two rear cylinder head plugs
We remove the camshafts from their seats
We press the seals out of the camshafts.
Remove the seals from the camshaft. If it does not come off, carefully cut it or pry it off with a screwdriver.
Installation of camshafts
Now that everything is removed, you can proceed to installing new camshafts on the car:
conclusions
The torque and sequence of tightening the camshaft bed on the 16-valve VAZ-2112 engines must be correct, since this factor affects the operation of the cylinder head and the engine as a whole. Thus, incorrect implementation of the procedure can lead to more serious consequences. If the car enthusiast is not able to do this on his own, then it is necessary to contact a car service, where everything will be done quickly and efficiently.
In the VAZ 21126 engine, the joint between the cover and the cylinder head of the VAZ 2170 is sealed with sealant applied to the mating surfaces of the parts.
If the oil leak from under the cylinder head cover cannot be eliminated by tightening the cover nuts, replace the sealing layer of sealant.
You will need: a socket wrench “8”, wrenches “10”, “13”, screwdrivers with a flat and Phillips blade, wire cutters or a knife.
1. Disconnect the ignition coil wiring harness connectors...
2. ...and the injector wiring harness.
3. Squeezing the latches with your fingers, disconnect the wiring harness block for the VAZ 2171 ignition coils.
4. ...and the wiring harness block for the Priora injectors from the front bracket.
Indications for replacing the camshaft
The condition of the camshaft must be monitored regularly and carefully. Its malfunction can also cause large-scale damage to the engine of a Japanese car itself. Usually the camshaft begins to “mope” with a dull knock when the engine starts. On cold engines, noise can be heard in the valve cover area.
Experienced drivers understand the inner voice of their car, quickly identify the rumbling of the engine and “left”, uncharacteristic noises. They are able to immediately distinguish the quiet and even sound of the camshaft, which changes frequency depending on the engine speed. If a part is faulty, this is accompanied by dull tapping sounds reminiscent of hammer blows.
malfunctions also indicate:
- deterioration in the smooth running of the machine;
- drop in engine power;
- unstable operation at idle speed;
- strong vibration of the motor;
- Difficult to start in cold weather.
Particular attention is paid to the camshaft seals - they should not have ruptures, cracks or abrasions. The integrity of the drive must also be inspected. However, it is difficult to determine camshaft wear by indirect signs. It is much easier to do this on a removed part, inspecting it visually from all sides. There should be no potholes, scuffs, or aluminum leaks from the bearings anywhere. A sign of undoubted wear is grooves and irregularities on the surfaces of the rocker arms and cams.
Checking camshaft wear
When dismantled, the camshaft can also be listened to. To do this, you need to hold it parallel to the ground with one hand, and tap on top with the other. There should be no knocking. A mandatory condition: the camshaft should not “walk” on the bed! Otherwise, clinging to the limiter, it will inevitably create noise, which can be mistaken for a malfunction.
High-quality camshafts are rarely damaged prematurely. But Chinese products or those repackaged in this country have a hardness 1.5 times lower than that of the original ones. A good shaft is made from forged steel.
Adjusting the tightening torque of bolts for a 16 valve car
Adjusting the tightening torque is a simple process, and after reading the material and video in this article, you can handle it yourself. It is enough to tighten it once and then you will be able to do it yourself and at the same time you will be able to help your friends if necessary. It is important to adhere to the diagram for cars with a 19-valve engine and observe the timing.
Required Tools
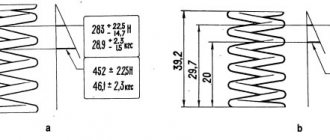
Torque wrench Shtengel compass
Scheme
The pattern for tightening on a 16-valve engine differs from the pattern for an 8-valve engine, so we will present both one and the other so that you can compare them.
Just don't get confused when you install. In any case, before starting work, check the instructions that came with the car. Tightening with different torques on a 16 valve unit occurs in 2 circles with different torques, and then another 2 circles with a rotation of 90 degrees. Nothing is difficult, which means you can cope on your own.
Stages
In order for self-tightening of bolts to be completed successfully and to last for a long time, a number of simple rules should be followed:
- It is better to use new bolts, since during operation they are under constant tension and lose their properties over time. There is no guarantee that the old bolt will not withstand the stress and will burst.
The length should not be more than 9.5 cm
- It is not advisable to reinstall the gasket, even if it is in reasonable condition.
- Strictly observe torque when tightening.
- The sequence of tightening the bolts should be exactly the same as in the diagram for 16-valve power plants.
- Before installing the cylinder head, carefully inspect all parts for damage and deformation. If any are found, do not ignore them, but be sure to replace them. Often, small breakdowns lead to major damage, and sometimes even to the complete destruction of systems and mechanisms.
- Do not use tools of dubious quality and manufacture. This is especially true for a torque wrench.
Features of the work performed using the example of some cars
To prove the proposition that each power plant has its own characteristics of tightening the cylinder head, let’s consider the nuances of performing work on specific models.
VAZ-2112 16 valves
A number of modifications of the VAZ-2112 were equipped with two types of 16-valve power plants (factory indexes - 21120 and 21124). These two motors, despite some design features, have identical head tightening technology.
These units use 93mm long tension bolts. In this case, reuse of fasteners is allowed, but under one condition - if their length does not exceed 95 mm (if it is longer, they should be replaced). 10 bolts are used to secure the head.
Tightening is carried out in three approaches:
- The bolts are tightened according to the order with a force of 2 kg/m;
- Turning 90 degrees;
- Repeated tightening to 90 degrees.
The drawing diagram is shown below.
Between the 2nd and 3rd approaches you need to take a 20-minute break.
Since these engines use tensile bolts, additional tightening is not required during vehicle operation.
VAZ-2107
On the VAZ-2107, all installed modifications of power units are 8-valve.
The block head is attached to them with 11 bolts, 10 of which are main, and 1 is an auxiliary side bolt (installed in the side protrusion).
On this car, tightening fasteners is also performed in three approaches:
- 10 main bolts are tightened in order with a force of 3.5-4.0 kg/m;
- The same bolts reach with a torque of 11.5-12.0 kg/m;
- The auxiliary is tightened with a force of 3.5-4.0 kg/m.
Additional tightening of the cylinder head is not required when operating the VAZ-2107.
"Samara", 10th family, Priora
On models of the Samara family (2108-21099), as well as VAZ 2110-2112 with 8-valve units, tightening is already performed in 4 approaches:
- Tightening with a force of 2.0 kg/m;
- Reaching with a moment of 7.5-8.5 kg/m;
- Turn 90 degrees;
- Repeated rotation by 90 degrees.
The break between points 3 and 4 is 20 minutes.
As for the VAZ of the “tenth” family, which are equipped with 16-valve engines, their tightening technology is the same as that of the VAZ-2112 (described above).
The same applies to the Lada Priora; on 8-valve units, a method with 4 approaches is used (VAZ 2108-21099), and on 16-valve units, 3 approaches are used (VAZ 2112 with a 16-valve engine).
"Volga"
On ZMZ-406 engines installed on the Volga, according to the automaker’s technical documentation, tightening the engine block head bolts is carried out in two approaches:
- With a force of 4.0-6.0 kg/m;
- With a moment of 13.0-14.5 kg/m.
But many car owners of this car note that this technology does not allow the cylinder head to be properly tightened, so they use techniques with a large number of approaches.
A common method is the cross method, performed in 4 stages and with the following efforts:
Subsequent tightening of the bolts is not required when operating on this engine.
practical guide
1. Remove the camshaft pulleys.
2. Remove the tension and guide rollers.
3. Using a 10 mm socket wrench, unscrew the six bolts securing the rear timing belt cover.
5. Remove the cylinder head cover.
6. To avoid damage, remove the oil pressure sensor or disconnect the wire tip from it.
7. Using an 8 mm socket wrench, evenly, half a turn, unscrew the 20 bolts securing the camshaft bearing housing.
8. Remove the camshaft bearing housing.
9. Remove the exhaust camshaft 1 and the intake camshaft 2.
10. We remove two plugs for technological holes from the mounting holes in the cylinder head (near the rear ends of the camshafts).
4. Remove the keys and seals from the shafts.
5. Inspect the shafts. The journals and cams of the shaft should not show signs of heavy wear, scratches, cracks, or traces of metal envelopment.
If the camshaft fails
The camshaft on the VAZ 2106 model is rarely dismantled. Typically during repair or disassembly. Sometimes to replace it.
Signs
First, let's talk a little about the signs that indicate that the camshaft is faulty, its journals or beds are worn out. It is difficult to determine whether the shaft or something else is knocking in the VAZ 2106 engine, but it is possible. The knock of the camshaft is dull and clearly audible. As engine speed increases, the knocking becomes more frequent.
Some drivers determine knocking in this unit using a stethoscope or a stick through the valve cover. But often it is difficult for an inexperienced driver to do this. Therefore, the best way to diagnose the camshaft is to remove it, wash it and inspect it.
If the camshaft is faulty, the following symptoms may occur:
- a dull knock, reminiscent of hammer blows;
- it is impossible to adjust the valve clearances; while the crankshaft is turning, the camshaft is constantly in different positions.
This video shows how you can eliminate longitudinal runout of a camshaft.
The most reliable method for diagnosing problems with the VAZ 2106 camshaft is to dismantle it from the car and wash it. You can wash it in gasoline or other cleaning liquid. Next, you need to hold the shaft and hit the bed, when you hear the slightest knock, we determine whether the mechanism is worn out. Be sure to make sure that the shaft does not move in bed, because when it hits the limiter it will make a dull knock.
Removed shaft
The camshaft has a great influence on the pressure in the lubrication system. If the gaps between the bed and the camshaft are large, then the pressure will be low, and as a result, unsatisfactory lubrication of other parts.
Causes
The main malfunctions that result in the need to replace the camshaft are its wear, the appearance of various scuffs and grooves on the bearing journals. Likewise, replacing the camshaft is necessary if it is found to be deformed or cracked. When such malfunctions occur, the power unit loses power and also begins to function intermittently. Problems with the camshaft are identified by a knocking sound in the cylinder head.
The camshaft on the “six” is rarely removed. In addition to the above reasons for replacing and reconfiguring the power unit. After this, you can notice a significant increase in power, like in sports cars.
Engine assembly 2112 VAZ 2110 Lada
2.18.3. Engine assembly 2112
Warnings
When assembling the engine, you must always install a new head gasket. Used gaskets are not permitted. Before installing the gasket, it is necessary to remove oil from the mating surfaces of the block and its head. The gasket must be clean and dry. Oil should not come into contact with the surface of the gasket.
The cylinder head mounting bolts may only be reused if they have been extended to a length L of no more than 95 mm. If the bolt is longer, replace it with a new one. Before assembling the engine, lubricate the threads and bolt heads in advance by dipping them in engine oil. Then allow excess oil to drain by letting the bolts sit for at least 30 minutes. Remove oil or coolant from the cylinder block head bolt holes.
During installation, sharp bends of the toothed belt with a radius of less than 20 mm are not allowed, so as not to damage the cord. The procedure for tightening the cylinder head bolts and the diagram for applying sealant to the camshaft bearing housing
Camshaft drive diagram
Removing and installing the camshaft
Removal is most often necessary either during a major overhaul or for replacement in cases of failure. To carry out the work, the following tools are required:
- heads for 10, 13 and 17;
- handle with ratchet;
- knob;
- extension cord with cardan;
- socket wrench 13;
- device for mounting and dismantling the VAZ camshaft.
First, the valve cover is removed, which is bolted to the cylinder head and has a rubber gasket. Try not to damage it, otherwise oil may leak in the future. After this, the timing chain tensioner is unscrewed. It is located on the right side of the engine when viewed from the interior. The camshaft gear is turned by the head to 17.
For convenience, place the car in gear and place wheel chocks under the rear wheel. Move the gear to the side; if necessary, you can pry it off with a convenient tool. Now all the nuts that secure the camshaft housing must be unscrewed. To make the job easier, use a wrench first.