The VAZ 2110 uses a kind of small on-board computer that indicates the presence of fluids in the vehicle system. This bookmaker is located on the center console next to the clock. Its functions include readings of coolant and oil levels, lamp integrity, etc. One of the useful functions of the BC is to indicate the oil level, which is measured using a special sensor, and it is called an oil level sensor. This article is about this sensor.
Purpose of the sensor
It is considered the norm among car owners to open the hood as soon as possible and check the engine oil level on the dipstick. However, in critical situations, oil can leak out of the engine very quickly. This happens if an unexpected blow to a stone breaks the oil pan or if the crankshaft oil seal leaks.
In such a situation, the engine must be turned off as quickly as possible, because seconds count. Relying solely on the pressure sensor in the lubrication system is not always reasonable. If the oil pump is working properly, it can maintain operating pressure until the last drop of oil.
Therefore, on modern passenger cars, in addition to the pressure sensor, a DUM is also installed. It does not replace the usual dipstick, since it is not able to inform the driver about the amount of oil in the engine and that it is time to top it up. The only function of the DUM is to signal in the car interior that an emergency situation has occurred when the amount of oil has dropped to a critical level and an immediate stop is required.
Replacement
The entire oil change process can be divided into three main stages:
- Draining old lubricating fluid;
- Washing;
- Filling with new lubricant.
We will go through each stage in more detail in order to understand all the nuances of the procedure.
Removing the plug
Drain
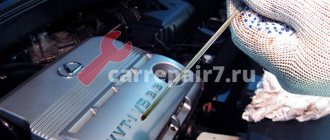
In order for the new lubricant to show its best side, the car owner’s first priority is to drain the old oil. For this:
- Unscrew the oil filler plug. This will get rid of a possible vacuum, the liquid will be able to drain better from the crankcase;
- Do not forget the above recommendations regarding a warm engine. Heated oil has a lower viscosity and therefore flows out more efficiently and in larger volumes;
- Place an empty container with a volume of at least 5 liters under the drain hole;
- Remove the plug from the drain hole;
- Allow the oil to drain into the prepared container for some time;
- This usually takes about 10 minutes;
- Do not try to keep the plug in your hand when unscrewing at the cost of exposing your skin to the stream of oil. It is hot, so you can easily get burned. If the stopper falls into the container when the liquid has cooled, you can easily remove it and clean it;
- When the grease completely stops draining, the draining can be considered complete.
Drain the grease
Flushing
Whatever one may say, even the most thorough draining of the lubricating fluid will not allow you to fully clean the system. Therefore, we recommend flushing before filling.
- Screw the plug from the drain hole.
- Pour a special flushing solution into the oil filling hole to the minimum mark.
- Turn on the engine and let it run for about 15 minutes.
- Stop the engine and drain the fluid through the drain hole, as when removing old oil.
- Remove the oil filter and wait until the remaining lubricant is completely drained. Then install a new filter in its place.
- Be sure to fill the filter with about 100 ml of fresh new oil.
Filling the filter
Fill
Now we have reached the last step - adding new oil to your car's engine. The procedure for the VAZ 2110 looks like this:
- The oil filter installation area is thoroughly wiped with a rag;
- A little oil is poured into the new filter. We have already told you about its quantity;
- Using the same lubricant, treat the o-ring. It must be new. Never use the sealant from an old filter;
- Screw in the drain hole using a plug;
- Install the oil filter in its rightful place. Do this manually, without using tools. Otherwise, the filter may be damaged;
- Gradually pour new fluid through the filler hole. This should not be done quickly, since the oil must have time to distribute throughout the system;
- If the canister turns out to be inconvenient with a wide neck, use a simple household funnel;
- Fill in about 3 liters of lubricant, then check the level with a dipstick;
- You will most likely need to add a little more liquid;
- Ideally, the dipstick should show a level between the minimum and maximum indicators;
- Tighten the filler hole with a plug;
- Reinstall the dipstick;
- Start the engine and let it run for a while;
- As soon as the oil level light on the dashboard stops lighting, the engine can be turned off;
- We take the dipstick again and check how much oil is in the system at the moment. If necessary, add lubricant;
- Be sure to wipe off any surfaces that may have oil on them. This is especially true for the engine. Do not allow any traces of grease to remain on it. When the engine heats up, this is fraught with consequences.
Checking the lubricant level
If you strictly follow the instructions and also correctly select the lubricant for your VAZ 2110, the replacement procedure will become an easy task for you, which you will cope with on your own in literally an hour.
So that you understand, the cost of such a procedure, not counting washing, at a service station will cost you at least 500 rubles. So the ability to change the lubricant in the engine with your own hands is also a great way to save your budget. Considering that replacement is carried out approximately once every 8 thousand kilometers, you can save a lot of money over the entire period of ownership of your VAZ 2110.
- Why do you need oil in the gearbox?
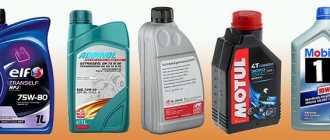
- Types of oils and their choice
- Substitution rules
- Replacement procedure
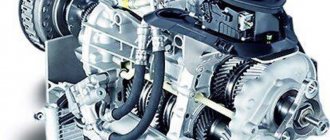
In order for the car to work properly, it is necessary to periodically perform certain preventive maintenance, scheduled repairs, replacement of consumables, and so on. Moreover, the frequency is indicated in the repair and operating manual for your car. A procedure such as changing the oil in a VAZ 2110 gearbox does not take much time and effort. This will take you about an hour, but you won’t have to hire specialists or pay them money for it.
Marking
All engines of the VAZ-2110 family use one type of part, the catalog number of which is: 21083-3839210-03.
The price of spare parts, depending on the retail chain, is 250–400 rubles. You can find products from domestic manufacturers, as well as Chinese parts. In appearance, they can be easily distinguished by the color of the float. For repairs, original spare parts bearing the LADA brand are preferred.
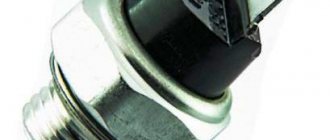
Part device
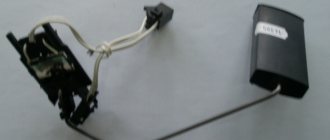
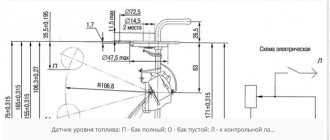
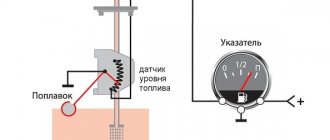
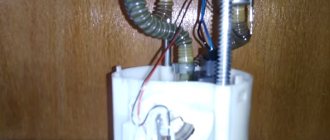
The design of the product itself is elementary. It is a normally open sealed contact (reed switch) connected to the on-board control system warning lamp.
The contact is located inside a curved tube, outside of which the float slides freely. There is a magnetic washer inside the float, the field of which is capable of closing the reed switch contact. When the sensor tube is immersed in oil, the float floats and the electrical circuit opens. But if there is no lubricant in the crankcase, the float drops to the lower position and the magnet acts on the reed switch contact, closing the circuit. The sensor connection is single-wire, the second wire is the engine ground.
Oil level sensor VAZ 2110: how it works and why it is needed
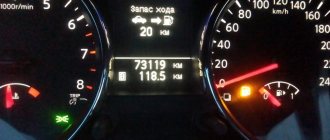
Even a novice among car enthusiasts, while driving a car, will find the oil level sensor light on the dashboard without any problems. But not everyone is able to adequately respond to a situation when this light is on and does not want to go out.
As soon as the oil level sensor on a VAZ 2110 stops working, many car owners try to get to the nearest service station as quickly as possible to fix the breakdown. But is it worth doing? If you have at least basic knowledge in the field of repair, and also have an instruction manual at hand, it is quite possible to solve the issue yourself. At the same time, the financial costs will be incomparable compared to what you will pay at a car service center.
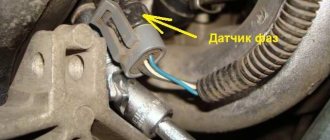
Where is the sensor located
The part is located at the bottom of the cylinder block, to the left and below the oil filter. To get to it, you will need to drive into an inspection hole or lift and dismantle the pallet protection. To check the condition of the wiring, you will need to clean the connector from dirt and oil residues that inevitably fall on it when unscrewing the filter.
Functionality check
More or less experienced drivers can determine that it is the sensor that is causing confusion in the car’s operation, since there are no noticeable signs of oil leakage. Therefore, the first priority is to check the condition of the device that monitors the lubricant level.
The check is performed as follows:
- The car is placed on an overpass or inspection hole;
- The motor protection is removed. It can be put aside for a while;
- Now find the oil level sensor in the underbody space;
- Turn on the car's ignition. This way you can supply power to a device that may have failed;
- Disconnect the wires going to the sensor;
- Using a voltmeter, connect the probes to ground and the connecting block;
- If the voltmeter shows 12 volts, then the sensor is working normally.
But in the absence of tension, we can talk about one of three reasons for such a situation:
- The display unit is broken;
- There are defects on the contacts;
- There is a break in the wiring in the sensor circuit.
Therefore, if the wiring is in good condition and the contacts are clean, then further actions will consist of replacing the fuel level sensor on your VAZ 2110.
How to check serviceability
The need for checking arises more often if, when the oil level in the engine is sufficient (controlled by the dipstick), a warning light turns on in the cabin. Or, on the contrary, it does not light up when the ignition is turned on before starting the engine.
To understand that the problem is in the sensor and it needs to be measured, a multimeter is enough, and if it is faulty, replace it. Having removed the block from the terminal, turn on the ignition. Check if there is 12 V voltage on the wire.
Important information that everyone should know
It also happens that when replacing the DDM, oil leaks out again. If you change the sensor again, believing that this is the reason, oil will flow out of it after a certain time. What is the reason? It turns out that in most cases the reason for this lies in sensors that are produced either in the country of the Celestial Empire or in fake workshops. Specialists, car mechanics, drivers - they all often complain about defective sensors purchased on the market. Such fake DDMs have to be changed two or even three times.