The article will talk about the timing marks on the Priora 16 and 8 valves. "Lada-Priora" is one of the new developments of AvtoVAZ engineers. They are equipped with the power unit model 21126, which is the main one for the vehicle configuration. They used literally everything possible on it - all the cylinders were honed, the pistons had a lightweight design. All this contributed to a significant increase in power. But a simple break in the timing belt disables the engine, despite all these innovations.
Timing belt on Priora 16 cl: its purpose
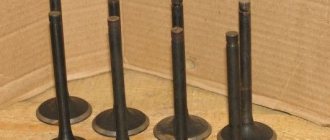
The timing drive part of the mechanism is made of high-quality materials. Provides synchronization of the operation of the intake and exhaust valves (16 pieces, two for intake and exhaust) with the engine operating strokes by transmitting the rotation of the crankshaft to the camshafts. At the same time, the belt drives the cooling system pump (pump). For improved adhesion to the surface of the pulleys, to avoid displacement along the camshaft marks on the inside, it has a toothed structure.
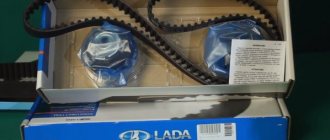
Standard belt - article number, price. Priora cars with engine 21126 are equipped at the factory with a LADA brand part, article No. 21126-1006040-00, 22mm wide. has 137 teeth, 22mm wide. Price is approximately from 1800 - 2200 rub.
Price
The timing belt itself on a Priora can be purchased in our stores at a price of 1,000 rubles, depending on the manufacturer. The cost of the set (belt + 2 rollers) varies from 2 to 3.5 thousand rubles. Replacement work at a service station will cost from 800 to 1200 rubles.
If you don’t want to spend money on paying for work at a service station, you can change the belt and rollers yourself. This does not require any special skills or tools. But first, let's decide on the choice of spare parts. Below is a table that shows the manufacturers and catalog numbers of the original and best similar timing kits for the sixteen-valve Lada Priora engine.
| Model | Code |
| Lada | 211261006040 |
| Bosch | 1987949662 |
| Conti | CT1137 |
| Contitech | CT1137 |
| Gates | 5631XS |
| Lynx | 137FL22 |
| Optibelt | ZRK1593 |
It is undesirable to use spare parts of questionable quality or unknown manufacturers.
We set the timing marks of the Priora engine 16 valves VAZ 21126
The timing marks on the 126 16-valve engine of the Priora vehicle are set to ensure that the engine works perfectly. The order consists in the distribution of parts of the four-stroke engine of the Priora vehicle. The notches themselves are located on the rear casing, camshaft, and flywheel. They are used when changing the timing belt, which activates this entire complex gas distribution mechanism.
Diagnostic procedure
Checking the drive should only be performed on a cooled engine and consists of the following manipulations:
- Using a hex wrench, unscrew the cover fasteners (there are 5 in total) and remove the protection.
- Inspect the motor and determine whether the belt needs to be replaced. To do this, you need to turn on the 5th speed, lift the right front wheel and make several revolutions clockwise. There should be no cuts, cracks or peeling on the belt. If there are any defects, the drive must be replaced.
- Inspect the condition of the tension roller - it should also not be damaged.
- Check if the belt tension is as required. To do this, you need to press it between the camshaft gears. The deflection should be approximately 5-7 mm, if more or less, adjust the tension.
- Check the timing marks on the Priora.
Why are tags needed?
The gas distribution mechanism of the power unit 126 from the Lada Priora, as already mentioned, must work in a certain order. If this order is violated, starting problems begin, or the motor completely fails. Often the cause of engine failure is incorrectly positioned marks after changing the timing belt. Such mistakes are made by novice car enthusiasts and mechanics who have just graduated from college.
The manufacturer has created the necessary phases on the sixteen-valve 126 engine so that the valves open and close alternately. These actions are carried out through the movement of the cams of the switchgear. The phases must not be disrupted under any circumstances.
Attention! The belt must be replaced before it breaks and destroys the engine. Changing this part is done only by experienced mechanics and not by beginners “on the knee” in a garage environment.
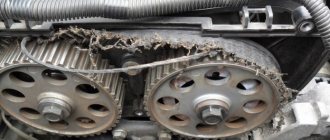
A broken belt leads to sharp contact of the valves with the pistons, because there is a mismatch in the angular location of the crankshaft and camshafts. As a rule, the car is brought for major repairs to the service center on a tow truck in case of a broken belt.
Experienced mechanics carry out checking and adjusting the belt on a cold engine. And the timing drive notches can be found in the following places on the 16-valve Lada Priora engine:
The following tools are used to straighten notches:
To start changing the belt, you will need to read the instructions for the 126 engine and see where the marks are so as not to forget any.
Camshaft marks
The VAZ 21126 engine uses two switchgears. One of them is needed for optimal operation of the intake valves, and the second is installed in order to regulate the movement of the exhaust valves.
Each camshaft has its own pulley, which is not recommended to be replaced with another. This pulley allows the camshaft mechanism to operate correctly. A phase sensor is installed on the right side of the pulley.
The marks are located on the pulleys. They are located on the crown of the ledge at the bottom. Experienced mechanics call them movable because they move with the rotation of the camshaft.
Attention! Beginning car owners should remember that the marks have different sizes. It all depends on the manufacturer who made the pulley.
To see the marks, experienced mechanics advise wiping the pulley with a clean rag to get rid of dirt and dust. Then you will notice a small notch in the metal.
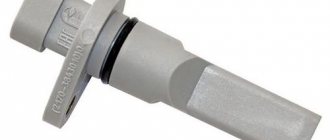
But the crankshaft marks will help all parts of the 126 engine from the Lada vehicle work equally. At the output of the crankshaft there is a gear. And this gear is connected to the device by means of a key. This is where the mark for correct installation of parts is located. Because if the position is incorrect, the key simply will not fit as expected.
The notch is made in the form of a slot or a conical hole. It is found on the outside of the engine pulley.
Additional guidelines are also applied to the outer engine housing so as not to make mistakes when setting marks. To do this, install another mark on the rear side of the timing belt housing. It is needed for the correct alignment of the camshaft pulleys.
Similar article Engine for Niva from a foreign car without modifications
Another notch is located on the engine oil pump. It is needed for the correct orientation of the crankshaft. And it will be difficult to find the last mark. It is located on the flywheel.
There is a small cutout in the flywheel housing. According to the standard, it is covered with a rubber plug. It is pulled out and inserted with pliers.
How to set timing marks VAZ-2112 16 valves: photo and video
Car: VAZ-2112. Asks: Kostikov Vladimir Igorevich. The essence of the question: I can’t fix the timing marks, how can I set the marks on the timing belt?
I have a problem. When replacing the timing belt, the upper pulleys were not fixed, and now it is not clear how to align them. The marks on the pulleys do not “look” in exactly the same direction. Maybe it would be easier to tighten all the pulleys to the TDC position in cylinder 1? If we are talking about 16 valves, I am familiar with setting the marks on the VAZ-2112: I performed this operation on the timing belt 21124. Well, I have a 1.5 engine. Are there any differences?
Set the timing marks correctly - otherwise you will bend the valves!
The VAZ-21124 engine has a special feature: no matter how its pulleys are turned, it does not bend its valves. With the 21120 engine (16v 1.5 l) such jokes will not work! If the pulley positions are not too far off, try putting on the belt and turning the mechanism to the “TDC 1 and 4” position. From now on, always use the following instructions:
- The crankshaft is set to the required position by checking the mark on the generator drive pulley (photo 1) or on the crankshaft pulley (photo 2);
Alternator drive pulley and crankshaft pulley - Let us clarify: there should be 20 teeth between the DPKV sensor and the “pass”;
- The marks on the “upper” pulleys should point straight up (photos 3 and 4).
These pulleys must be fixed, after which the tension can be released; Exhaust and intake shaft pulley - When the belt is loose, the crankshaft cannot be rotated.
In theory, on the VAZ-2112, marking is carried out the same way, no matter what engine we are talking about. Here are photos for engine 21120.
What it looks like in reality and in the instructions
Take the time to find the inspection window on the gearbox housing. There is another mark under the plug.
Additional information:
- The number of belt teeth between the “upper pulley” marks is exactly 16;
- The mark on the crankshaft pulley sometimes breaks off - use the control method “1” (photo 1) or “3” (lower photo).
For those who don't understand anything
The number of teeth on the crankshaft pulley is 21, on the camshaft pulleys – 42. When the crankshaft rotates 360 degrees, the camshafts rotate 180. In general, the full engine operating cycle consists of two crankshaft revolutions (720 degrees).
If there is no fixing device, you can make it yourself. Even a suspension spring remover will do.
How to replace the timing belt on a Priora with your own hands
An unscheduled replacement on a Lada Priora with a 16 cl engine may be necessary if grease is found on the belt. Or mechanical damage is detected that can lead to a break. How long it takes to change is an individual matter, but you need to treat this with full responsibility, since the consequences of a break can cost you very dearly.
What is a timing belt
This element is designed to ensure synchronization of the rotation of the cranked camshaft of the power unit. Synchronous and correct operation of the shafts is very important, since the intake of the combustible mixture and the exit of exhaust gases through the valves depend on it. The timing belt on the Priora is made of high-strength rubber with special notches on the inside.
Which belt is better to choose for a Priora with 16 valves
Replacement kit in case of breakage
Now on sale you can purchase not only a separate belt, but also a whole timing belt kit for replacement. The assortment for Lada is large, which one is better to choose, the original or an analogue, and what to install is up to you.
But the ones that have proven themselves best, for engines with any number of valves, are sets or separate original belts from Gates. The original replacement kit is more expensive, but its service life is much higher than its analogue and the possibility of breakage is much lower.
How to make a replacement yourself
The replacement process is simple, and after studying the instructions we offer, you will be able to handle the installation yourself when you need it.
When to change: consequences of untimely change
It is recommended to replace the timing belt on a Priora after different periods of time. The manufacturer claims that it can withstand one hundred thousand mileage, but experience shows that a change may be needed much earlier.
The optimal period is every fifty thousand kilometers. Some argue that over such a short service life, rubber is simply not capable of failure. However, no one takes into account the conditions - roads, fuel quality, etc.
Also, during the operation of the mechanisms, it wears out, the rubber stretches, and therefore does not provide the correct tension of the timing belt, and slippage is possible. The teeth can wear off - because of this, traction with the gears is not ensured.
There is no exact time for a change that would suit all motorists. Some take good care of their vehicles, drive carefully, and use only high-quality fuel. Others use a more extreme type of driving, foreign liquids get on the rubber, etc.
In order not to lose your car during the repair period and not to spend a fortune on restoring the mechanics, write down or remember the date of the last timing belt change on the Priora. Next, regularly check the condition of the rubber; if worn, replace it with a new device.
Signs of possible failure
There are several characteristic signs that should alert the driver:
- When the engine is turned on, extraneous noise occurs. Sometimes drivers confuse a timing belt malfunction with a poorly functioning tension pulley.
- If the color of the exhaust gas has changed.
- The engine doesn't start well.
- An unusual vibration is felt.
Pay attention to these “symptoms”, even if the Priora’s mileage with a new timing belt has not yet reached 50 thousand km
It may fail earlier if foreign liquid gets onto the drive - oil, coolant, as well as dust or dirt.
It’s worse if it’s the coolant that gets onto the drive. Firstly, this means that the gasket that ensures the pump is sealed has failed, or there is a problem with the pump. Then the rubber is damaged and service life is reduced tenfold.
Even if the belt is new, but coolant or antifreeze gets on it, it will fail even after operating for 10 thousand miles. You will have to replace the Priora timing belt and figure out why foreign substances get on it.
How to check the serviceability of the belt yourself
If you suspect that it is time to replace the Priora timing belt, it would not hurt to check the serviceability of this rubber product. Visual diagnostics will allow you to check the serviceability and absence of scuffs on the Priora timing belt.
You should have a choice of one of the tools at hand, or two at once - a 5-point hex key, or a T-30 sprocket bit. If one doesn't work, try the second.
- Open and lift the hood.
- You will see the front panel covering the mechanism and timing belt.
- Take the key and unscrew the five bolts that hold the front panel, remove it.
- In front of you you will see a mechanism, including a tension roller.
- Place a jack on the passenger side and place the wheel in a suspended position. Engage fifth gear while it is working, look at the surface of the belt for damage, even small defects.
- If you notice cracks of any size, mechanical cuts, or threads sticking out, be sure to replace it by contacting a specialist or yourself.
- Check the pump. If any traces of coolant leakage from the pump are noticeable, then the rubber will also have to be changed, even if there is no mechanical damage.
- Check the tension roller. Auto mechanics advise changing it less often than tires. The average lifespan is approximately one hundred thousand kilometers. Change it every other time you change the belt.
- Measure the belt tension. To do this, press on the stretched rubber in the area between the gears of the two camshafts. You need to press with a force of about ten kilograms. Correct tension of the timing belt should not bend more than seven millimeters.
- Check that the rubber is not too loose. Make sure that the Priora timing marks match the original condition. The first, similar to a recess, is located on the outer race of the tension roller. The next one is located at the base of the roller. The maximum deviation is four millimeters; if the tension does not meet the standards, the product will have to be changed.
Found a discrepancy with the standards? Change the product. A belt set with rollers for the Priora 126 engine costs only five thousand rubles. This is a much smaller amount than the cost of a major repair if a component ruptures.
The basis of the operation of the gas distribution mechanism
When the mixture is compressed, a spark enters the working cylinder and the mixture explodes, pushing the piston. He pushes the connecting rod, the connecting rod pushes the crankshaft. Everything is known. The valves, by timely opening and closing, ensure tightness in the cylinder at the right moment and free inlet and outlet in other cycles. The camshaft controls these devices by pressing the valve mechanism with its cams. The Priora engine has 16 valves. They are controlled by two camshafts. And the camshafts are driven by the crankshaft via a timing belt.
To ensure that the valve timing matches and the drive is installed correctly, special marks are applied.
Timing timing marking points
They are applied by the manufacturer in several places and are divided into movable and stationary:
- On the body of the Priora engine
- On camshaft gears.
- On the crankshaft gear.
- On the engine flywheel.
Now in more detail about these tags.
On the engine body of a VAZ 2170
Here the mating marks are installed in three places. They are immovable:
- On the lip of the oil pump housing.
- On the flywheel housing.
- Marks on the plastic protection of the Priora timing belt
The first two types of marks are intended for mating the crankshaft.
That is, the risks on the gear and on the flywheel must coincide with them. The crankshaft drive gear is located in the oil pressure pump housing. This is a slot in the metal skirt that half-encircles the gear from above. It is clearly visible in normal lighting. Sometimes it can be “bombarded” with oil and dust. Then you need to wipe this place with a rag, and everything will be visible.
There is a special arrow installed on the flywheel housing, in the viewing window in the starter area. It must be taken into account that the top dead center is determined only by the average of the three marks.
Causes and consequences of a break in the timing mechanism drive
The reasons may lie in the following:
- Untimely replacement of a worn out drive.
- The belt tensioner or pulley is jammed.
- Natural “aging” of the belt material.
- Oil getting on the drive surface.
- Initial low drive quality.
- Defects in the form of cracks that appear during operation.
- Climatic conditions.
- Manufacturing defects.
Consequences of a break:
- Damage to valves.
- Failure of pistons and cylinder heads.
- Stopping the camshaft and crankshaft.
Replacing the timing belt
Tool you will need:
- Ratchet with two extensions
- Head on "17" and "15"
- Hexagon "6" or Torx T30 (asterisk)
- Wrench for tensioning timing belt and alternator belt
- Open-end wrenches "13"
- Timing belt and rollers
Work process
- Prepare the car, fix it in its original position, jack up the front right wheel, placing stops under the rear wheels.
- Remove the wheel and protective covers of the engine compartment
- We remove the generator belt; to do this, you need to use a key to “17” to loosen the tension roller and dismantle the roller; the belt will remain hanging on the cushion because To dismantle it you need to remove the engine mount.
- Remove the decorative engine cover by pulling it upward on each edge.
- We unscrew the 5 bolts of the upper timing belt protective casing using a hexagon “6” or Torx T30, depending on the year of manufacture of the car, and remove it.
- We unscrew the 2 bolts of the lower timing belt protective cover using a hexagon “6” or Torx T30, depending on the year of manufacture of the car, and remove it.
- Next, you need to unscrew the crankshaft pulley; to do this, you will need a ratchet with two extensions and a socket set to “17”.
- To unscrew the bolt securing the generator pulley, you need to put the car in gear and insert a screwdriver into the vent hole of the brake disc.
Attention
Unscrew the generator pulley bolt counterclockwise.
- Remove the generator pulley and washer.
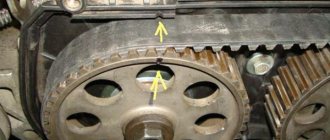
- Before you remove the alternator belt from the gear, you need to set the marks. The marks on the camshafts must be set as in the picture.
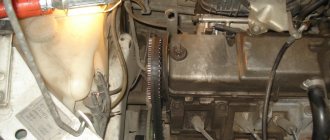
- Not all car modifications have a mark on the crankshaft gear, so it is best to find the mark on the flywheel, it is located under the rubber plug, under the thermostat.
Mark on the flywheel
Mark on the crankshaft pulley
- Next, use a 15mm wrench to unscrew the tension roller and remove the timing belt.
- Using a 15mm wrench, unscrew and remove the deflection roller.
Installing a new belt
- We install the new rollers in place, tighten only the idler roller.
- We set the timing marks and put the belt on the pulleys.
- Next, when the belt is put on and the marks are set, you need to tighten the belt.
- The timing belt is tensioned automatically by the roller itself, but initially the roller needs to be given spring tension; to do this, you need to align the marks on the rollers, as shown in the picture.
- After tensioning the belt, you need to check the timing marks; to do this, screw in the bolt securing the pulley and turn the crankshaft clockwise 2-3 turns and check the marks again.
- Next, the assembly and installation process occurs in the reverse order of removing the timing belt.
- Let's start the engine.
The process of replacing the timing belt has been completed, as you can see there is nothing complicated about it.
Possible damage due to untimely replacement of the belt
- Malfunction of valves that stop when ruptured. At the same time, the crankshaft pushes the pistons - the valves bend from the impact.
- Such a malfunction can lead to deformation of internal elements and even replacement of the engine.
- Broken valves will damage the cylinder head. The consequences will be especially severe if this happens under heavy load or at high speeds.
- Holes in the pistons and damage to the piston mechanism. If the problem worsens, the piston may fall out through the block wall; mechanical defects of the camshaft appear.
How to check if labels match
To correctly set the timing gear drive of the Lada Priora engine, you need to check all the marks on the camshafts, crankshafts and flywheel. To do this, dismantle the protective housing of the gas distribution mechanism drive. Remove the car generator pulley.
The crankshaft is turned by turning the front wheel. To do this, you will need to lift the front part of the Lada Priora vehicle on a jack. The assistant must turn on fifth speed. And only then spin the wheel. Turn the wheel until the marks on the crankshaft and the camshaft are facing each other.
They also check that the marks match when adjusting the belt tension. Just like that, without properly setting the marks, it is not recommended to tension the timing belt.
Self-replacement of Priora timing belt 16 valves
When installing the belt, careful and precise approach is required. If the belt is replaced incorrectly, a mismatch occurs in the actions of the shaft and camshafts. After which the pistons will contact the valves of the cylinder head. When the valve stems bend, compression may be lost. After which the valves and other mechanisms will have to be changed.
you need to turn the crankshaft
If you need to turn the entire timing mechanism during work, then you can only turn the entire system using the crankshaft. When scrolling the camshaft, you can damage the entire system, since the crankshaft is the leading one in the mechanism.
no need to crank the camshaft
External signs of the need to change the timing belt
- Changes in exhaust color. Typically, the exhaust in this case is black and accompanied by popping noises.
- Uneven operation of the motor or the motor does not start. There are dips in traction and an uncertain start.
- Additional noise and unnecessary sounds when the engine is turned on.
- A cracked timing belt causes a characteristic clicking and ticking noise inside the casing.
- An increase in sounds is observed with increasing engine speed.
- Side vibration of vehicles.
If dirt, oil and other elements get on the timing belt, the belt will need to be replaced before the time stated in the instructions. If the opposite occurs, the belt life will be significantly reduced. To begin with, if available, the causes of coolant leakage are eliminated.
Gas distribution mechanism
Lada Priora boasts a 16-valve engine producing 106 hp. With. and a working volume of 1.6 liters (there is also an 8-valve one, but it is not popular). The timing belt drive is the weak point of the timing belt. If it breaks, the pistons will inevitably bend the valves, and this will lead to large expenses for repairs.
Unlike the power unit with 8 valves, the Priora engine with 16 valves is equipped with two camshafts, each of which has its own gear. The mechanism is designed to remove exhaust gases and timely supply the fuel-air mixture to the combustion chambers due to the synchronous raising and lowering of the pistons (opening/closing of valves).
Due to the design features of the 16-valve engine, the timing belt of the Lada Priora is longer. In addition to the tensioner roller, the drive has an additional support roller.
Belt faults
Like any other car with a timing belt drive, the Priora belt may have the following malfunctions:
- cracking;
- delamination;
- deformation;
- break.
Cracking and delamination of the timing belt working surface is a consequence of:
- long-term operation;
- frequent temperature changes;
- contact with oil or coolant;
- malfunction of the water pump (pump);
- malfunction of the tension or support rollers.
These same factors, as well as improper tension adjustment, can cause belt deformation and breakage.
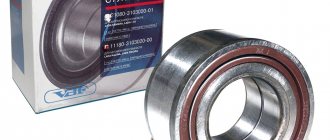
Weak link: pump, roller, belt
The reasons for repairing the timing unit are most often broken bearings of the tensioner roller and pump, as well as the timing belt. The pump also has to be changed if the seal of the structure is lost, causing loss of coolant. To replace it, you will have to remove the camshaft pulleys and the rear protective cover of the casing. Remove the generator roller tensioner fasteners (3 bolts), unscrew the 6 bolts (10mm) securing the casing, two of which are located under the camshaft pulleys. After removing the casing, unscrew the 3 bolts securing the pump.
The marks on the pulleys must match
When is it necessary to replace the timing belt on a Priora according to the regulations?
The mechanism requires constant attention to itself. The regulations for checking and replacing the timing belt of a Priora car with engine 21126 (16 valves) indicate regular condition checks every 10 - 15 thousand km. If you find any defects or damage to the structural integrity of the rubber part, replace it immediately.
Every 50 - 60 thousand mileage, it is necessary to change the spare part, regardless of its condition. Compliance with the regulations will help to avoid a number of extremely negative consequences that, in the most terrible scenarios, lead to almost a major overhaul of the car’s piston engine.
Necessary tools for replacement
Having decided that you need to replace the timing belt on a Priora, you should prepare the necessary material and tools. The materials will require a new timing belt. Moreover, you can buy both the original belt and analogues. The original belt product is also equipped with two rollers: a tensioner and a thrust roller. The cost of such a kit is about 5 thousand rubles.
Original kit for timing system on VAZ-2170
If necessary, you should purchase a new pump if the car’s mileage exceeds more than 100 thousand km and the product has never been changed. If you are replacing the pump, you will also need to replace the coolant.
This is interesting! Antifreeze needs to be replaced every 2 years, and antifreeze every 4-5 years.
Of the tools to replace the timing belt on a Lada Priora, 16 valves will be needed:
- Head at "17".
- Set of open-end wrenches.
- Screwdrivers.
- Hex key or T-30 sprocket, depending on the year of manufacture of the car.
- Special key for adjusting the roller. Comes with a set of belt and 2 rollers.
It is not necessary to install the Priora in the inspection hole, since most of the actions will be performed in the engine compartment. Once all the tools and materials are ready, you can start working.
Checking the condition of the belt
The inspection regulations for this unit require an inspection in a cold engine state. Remove the outer protective casing to allow visual contact with the surface of the gas distribution unit parts. Having gained access directly to the timing belt, rotating its drive, inspect both sides of the consumable in detail for the presence of any kind of defects (wear, broken teeth, protruding cord, rubber delamination, etc.). Tensioner rollers are subject to careful inspection; in the presence of mechanical damage and large play, they contribute to increased wear of the consumables. The presence of oil stains on the surface of a rubber technical part, which contribute to the destruction of its structure, is not allowed. If found, immediately remove from surface.
Replacing the timing belt and rollers on a Priora with 16-cl. motor
The Lada Priora engine is quite problematic in the sense that if the timing belt breaks, you will have to spend a considerable amount of money on repairing the internal combustion engine. If anyone doesn’t know, if the belt breaks, a collision of pistons and valves occurs.
At this moment, in most cases, it not only bends the valves, but also breaks the pistons, so there is no point in delaying replacement if there are strong signs of wear or the mileage has exceeded 70,000 km.
If you decide to carry out this procedure yourself, then you should keep in mind that to carry out this Priora maintenance you will need a lot of tools, namely:
- Hexagon 5
- Socket heads for 17 and 15
- Spanners for 17 and 15
- Thick flathead screwdriver
First you need to remove the protective plastic casing, under which the entire timing drive system is located. To do this, you need to unscrew several bolts of the upper and lower covers, after which we have the following picture:
After this, you need to turn the crankshaft and ensure that the marks on the camshaft sprockets align with the marks on the upper casing body, as shown in the photo below for greater clarity:
Many manuals talk about turning the crankshaft using a key, but you can do it differently. Raise one part of the car with a jack so that the front wheel is suspended and, with 4th speed engaged, turn the wheel by hand, thereby rotating the crankshaft and camshaft.
When the timing marks match, it is also worth looking at the flywheel mark so that everything is even there too. To do this, use a screwdriver to pry off the rubber plug in the gearbox housing and make sure that the marks in the window match. Visually it will look like this:
After everything is done, you can proceed further. The first step is to remove the belt from the generator, since in the future it will interfere with us. Next you will need an assistant.
You will need to unscrew the crankshaft drive pulley, and at this time an assistant will have to hold the flywheel from turning.
To do this, just insert a thick flat-head screwdriver between the teeth and hold it in one position to prevent the timing marks from moving,
When the pulley is free, you can remove it:
Also, do not forget about the support washer, which must be removed. Now you need to loosen the tension roller to loosen the belt:
After which you can remove the Priora timing belt, first from the camshaft gears, the water pump (pump), and from the crankshaft pulley:
If it is necessary to replace the tension and support rollers, then unscrew them with a 15mm wrench and install new ones. The price for them is about 1000 rubles. If you decide to buy a timing belt and roller assembly, the price will be approximately 2,000 rubles. This is for a GATES brand kit.
Now you can begin the procedure for installing and replacing the belt, and this procedure is performed in reverse order. The only thing worth noting is the belt tension. This is done using a tension roller. And we do the tensioning itself using a special wrench, or these pliers for removing the retaining rings:
Please note that over-tightening a belt is extremely dangerous and can lead to premature wear, but a weak belt is also dangerous. If you are not confident in your own abilities, then it is better to entrust this work to service station specialists.
Timing belt on a Lada Priora car
According to the factory technical regulations, it is necessary to check the condition of the timing belt at least every 105 thousand km. If possible, it is worth performing this operation a little more often - every 45 thousand km. Since when the belt breaks, the valves come into contact with the pistons. The reason for this is the mismatch between the crankshaft and the camshaft. The result is the need for expensive repairs.
Main elements of the gas distribution mechanism:
- mark on the back cover;
- the back cover of the drive itself;
- pulley;
- phase sensor disk;
- camshaft pulley mark;
- exhaust camshaft pulley;
- support roller;
- tension roller;
- belt;
- coolant pump pulley;
- mark on the oil pump;
- crankshaft mark;
- crankshaft pulley.
The belt check procedure should be carried out on a cold engine – 15-35 0 C. The check procedure is carried out as follows:
Using a Torx-30 wrench, you need to unscrew the 5 screws that secure the protective cover;
- the cover is detached;
- the crankshaft rotates clockwise: engage 5th gear;
- we push the car forward.
Signs of severe wear that require immediate replacement:
- there are folds, cracks, peeling;
- exposed cord threads, traces of soot.
It is also worth checking the belt tension:
- the crankshaft rotates until marks 1 align;
- If the pulleys are returned, the shaft must be returned.
In the case of normal belt tension, the rectangular protrusion of the tension roller coincides with cutout 1 on its outer part.
If the belt tension is normal and if there is a slight discrepancy, it is worth adjusting the tension. To do this you need to arm yourself with a special key. Tension - turn counterclockwise, loosening - clockwise.
The key needs to be inserted into the slots
It is necessary to ensure that the marks on the camshaft timing pulleys coincide with the cutouts on the roof at the rear of the timing drive. Next, be sure to check the coincidence of the rectangular protrusion of the special bushing with the cutout of the outer race.
What kind of belt is used?
On Priora cars with a 16-valve engine 21126, a toothed rubber belt with a number of teeth of 137 pcs is used. The width of the belt is 22 mm.
The article number of this element is 137-22 HNBR
This is what the timing belt used on Priors looks like
Also, many owners speak well of Gates belts.
How to choose a belt for Priora?
In order for the gas distribution mechanism to work reliably on the 16-valve Lada Priora 21126 engine with or without air conditioning, you must choose the right product. You can purchase a factory version; according to owners’ reviews, it is considered the best for VAZ cars. Below we will analyze the types of timing belts by size, markings and prices.
Timing belt size for Priora
For Lada Priora cars, the length and overall size of the strap depends on the number of teeth installed on it. You can accurately determine which timing belt is installed in your car by identifying the engine modification and reading the user's service manual. Or you can remove the old belt and measure its size to purchase a new one.
Straps that can be used in Prioras:
- with 111 teeth, the width of such products is 19 mm, installed on Prior engines from VAZ 2108;
- with 137 teeth, the width of such straps is 22 mm, they are mounted on engines 21126 and have article number 137-22 HNBR.
Company and prices
The brand of the company plays an important role. When deciding which timing belt for Priora 16 cl. It’s better to choose, most consumers prefer the originals.
Below is a list of timing belts for the VAZ Priora with their cost:
- The original strap is produced by AvtoVAZ, its average cost is about 1800 rubles.
- The product is from the manufacturer Gates, the cost varies around 1,500 rubles. If you want to buy a complete repair kit, it will cost the buyer approximately 3,500 rubles.
- Daiko, the cost of such a product is about 1,400 rubles.
- On average, a Kontitek belt will cost the buyer one thousand rubles.
- Products from the manufacturer Bosch have proven themselves to be positive. Their cost on average is about 1200 rubles.
- One of the most budget options is the Lynx strap; it will cost the buyer approximately 700 rubles.
The “techno-056” channel provided a video that describes all the differences between original Gates timing belts and fakes.