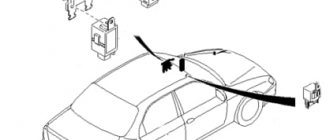
The operation of electrical equipment involves the risk of short circuits due to damage to wiring or devices. Renault Megane 2 fuses provide timely protection of electrical circuits. They are located together with the relays in special switching units.
Block in the interior of Renault Megane 2
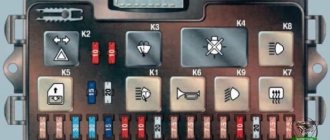
It is located on the lower left side of the dashboard. On the back of the protective cover there will be current information with a decoding of the circuit.
Scheme
Purpose
| 1 | Reserve |
| 2 | Reserve |
| 3 | Reserve |
| 4 | 3A Fan electric motor and interior air temperature sensor, interior rear view mirror, rain and light sensors |
| 5 | 20A Heated seats for driver and front passenger |
| 6 | 20A Electric locks for all doors |
| 7 | 15A Cigarette lighter |
| 8 | 7.5A Heated exterior mirrors |
| 9 | 10A ABS control unit |
| 10 | 15A Audio system head unit, on-board computer, electric motor for headlight washers, wind window and tailgate glass (hatchback, station wagon), fuel heating (K9K engine), heating (air conditioning) and interior ventilation control unit, security alarm control unit |
| 11 | 15A Stop light |
| 12 | Reserve |
| 13 | 25A Driver's door window motor |
| 14 | 25A Electric window motor for the front passenger door |
| 15 | 20A Instrument cluster, electric exterior mirrors |
| 16 | 15A Horn, diagnostic connector, windshield wiper motor |
| 17 | 15A Tailgate wiper motor |
| 18 | 20A Interior electrical control unit, additional equipment relay |
| 19 | 30A Electric motor of the heating (air conditioning) and interior ventilation system |
| 20 | 40A Electric motors for rear door windows |
| 21 | 20A 40A Electric sunroof motor, electric folding roof |
| R1 | Power window motor relay for all doors |
| R2 | Accessory relay |
Fuse number 7 at 15A is responsible for the cigarette lighter.
By all indications, the fuse for the left side dimensions has blown.
But where is he, how to find him?
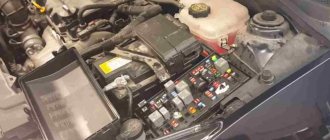
In the engine compartment there is another relay and fuse box, which bears the proud name “protection and switching unit”.
Of course, I understand the manufacturers of this car. They are so confident in the reliability of all components that they remove fuses in places that simply cannot be reached without a certain skill.
The table shows the circuits that these “hidden fuses” protect.
Fuse protection circuits
Fuse location
And on the way, on the road, anything happens.....
Well, enough lyrics, let's get to work.
Open the hood. To the right of the battery is the box that we need.
We unscrew 2 screws, lift the protective casing up and remove it.
Unscrew these screws and remove the cover
Removing the terminals
Here it is - the protection and communication unit, but in order to pull it out and get to the blown fuse, you have to do a little work.
Remove the terminals from the battery. Be careful! Don't forget to remove the keys from the ignition and store them in the interior. There were cases when, during assembly, you put the terminals on, and the central locking clicked and all the doors were closed. This is how some alarms behave when power is applied. I also removed the indicated wire from the negative terminal; it is short and prevents me from moving the terminal to the side in the future. Remove the battery mounting bracket and take out the battery. It is necessary to remove the connectors from the brake fluid level sensor and the mass air flow sensor. When removed there is more freedom of movement for the tourniquet. Unscrew the engine control unit mounting bracket. We remove the upper connector from the control unit and move the unit along with the bracket to the side. We unscrew 2 more bolts and a nut (it holds the wiring harness), remove the platform for the battery. In front of us is the air filter housing, you can change the filter. (Not a bad idea; to change the air filter, you need to remove the battery, engine control unit, battery platform). Next, we disconnect and move aside the 2 connectors above the block we need. We unscrew the bolt securing the supply of the positive bus to the block. Slightly squeezing the back wall, there is a latch, and pull out the block. It turns out that the fuses that we need are located upside down and in order to change them or simply check them, it was necessary to carry out all the work described above. Having pressed the latches on both sides, remove the protective casing. Here we are! We replace the burnt fuse with a new one and begin the return journey. Collected. We put on the terminals and check. Everything works great. Presumably, the cause of the blown fuse could be a short circuit in the left front side lamp socket. Well, we figured out the “secret” fuses. Let's hope that there are no more secrets for us on the Renault Scenic II, and if they suddenly appear, we will find answers to them too. Below the protection and switching unit there are several more fuses. Their purpose can be found here page 58-60. Until next time. If you are interested in this article and have something to say (good or not) please leave your comments below. I would be very grateful for your participation in the discussion of the article.
Circuit breakers
| GENERAL INFORMATION |
Location of the fuse box on the left side of the instrument panel
Visual check of fuse integrity
Using tweezers to remove the fuse
Location of fuses on the fuse block
Location of the fuse box on the left side of the instrument panel
The location of the fuses and the electrical circuits protected by the fuses are shown on the sticker located on the inside of the fuse box cover.
Always replace the fuse with another fuse of the same capacity. Each fuse has an inscription indicating the value of the protected current. Never replace a fuse more than once without determining the cause of the blown fuse.
Additional fuses are available on the relay box, auxiliary relay box, and electronics box. The relay block is located in the car interior on the left side under the instrument panel. The electronics unit is located on the left side near the partition of the engine compartment.
On diesel engine models, the diesel engine preheat fuse is located on the relay bracket in the electronics module.
To replace fuses, open the cover by inserting a screwdriver into the groove on the bottom side, which is marked with an arrow, and press the cover.
If the fuse is blown, it means that the conductor connecting the fuse contacts is broken, see fig. Visually check the integrity of the fuse.
To remove the fuse, use tweezers to remove the fuse from the connector (see Fig. Using tweezers to remove the fuse). Remove the fuse from the tweezers. The wire inside the fuse is easily visible and will be severed if the fuse blows.
Install a new fuse rated for the same current. On the reverse side, each fuse has an inscription indicating the value of the protected current. In addition, the color of the fuse also corresponds to the amount of current being protected.
| Current | Color |
| 5 | Light brown |
| 10 | Red |
| 15 | Blue |
| 20 | Yellow |
| 25 | White |
| 30 | Green |
Warning
The fuse marked on the fuse block as number 24 on the car's electrical diagrams is designated as number 224, that is, on the electrical diagrams the number 2 is added to the fuse number in front.
| № | Current consumer | A |
| 1 | Heated windshield washer jets | 5 |
| 2 | Direction indicators | 10 |
| 3 | Headlight cleaners, glove box lighting, climate control controls, automatic transmission selector | 5 |
| 4 | License plate light | 5 |
| 5 | Heated seats, air conditioning | 10 |
| 6 | Lamps and reading lights, luggage compartment lamp | 5 |
| 7 | ABS control unit | 10 |
| 8 | Automatic headlight leveling for gas-discharge lamps, telephone | 5 |
| 9 | Heated mirrors | 10 |
| 10 | CD changer | 5 |
| 11 | Cruise control with automatic transmission | 5 |
| 12 | Self-diagnosis system power supply | 10 |
| 13 | Brake lights | 10 |
| 14 | Installation of mirrors, power windows, central locking | 15 |
| 15 | Instrument cluster, automatic transmission | 10 |
| 16 | Free | |
| 17 | Navigation system | 7,5 |
| 18 | High beam right | 10 |
| 19 | High beam left | 10 |
| 20 | Low beam right, right headlight leveling adjustment | 10 |
| 21 | Left low beam, left headlight range control | 10 |
| 22 | Side and parking lights right | 5 |
| 23 | Side and parking lights left | 5 |
| 24 | Windshield washers | 25 |
| 25 | Ventilation system fan, air conditioning system | 30 |
| 26 | Heated rear window | 30 |
| 27 | Free | 15 |
| 28 | Fuel pump | 15 |
| 29 | Engine Electronic Systems | 20 |
| 30 | Tilt-and-slide sunroof panel | 20 |
| 31 | Reversing lights, automatic transmission, cruise control with manual transmission | 15 |
| 32 | Engine Electronic Systems | 20 |
| 33 | Cigarette lighter | 15 |
| 34 | Engine Electronic Systems | 15 |
| 35 | Plus" long-term trailer power supply | 30 |
| 36 | Fog lights, rear fog lights | 15 |
| 37 | Telephone, radio | 20 |
| 38 | Installation of mirrors, remote control for locking the fuel filler flap, power windows, central locking | 15 |
| 39 | Alarm | 15 |
| 40 | Sound signal | 25 |
| 41 | Free | |
| 42 | Free | |
| 43 | Free | |
| 44 | Seat heating | 30 |
How to remove the safety block
If you install an insert that does not match the one required in terms of capacity, the fuse seats may simply burn out. Then you have to replace the safety block with a new one. How it's done?
In principle, the French Megan models of the second and third series are no different in terms of replacing the fuse box. All actions are performed in the following sequence:
- The first step is to lift the hood and disconnect both battery terminals. All work must be done with the power source turned off. If this is not done, the result may be disastrous.
- On the right side of the engine compartment there is a fuse mounting block.
- Remove the battery.
Unscrew the four screws on the battery platform.
In the corner of the platform there is one screw securing the clamp with wires. It is unscrewed and the clamp is completely released.
Using a wrench, unscrew the screw that secures the car's fuse box.
Pull the power supply out a little and disconnect all the connectors with wires.
You get a block like this with security elements.
Now nothing prevents the free replacement of fuses on the block. The procedure for removing old fusible elements onto new ones is carried out using tweezers. After replacing the devices, the power supply unit is assembled and installed by performing the operations in the reverse order.
The Renault Megane III fuse box performs a very important function - it is responsible for the correct operation of the vehicle's electronic system. Therefore, any driver should know the location and purpose of each fuse in order to promptly eliminate malfunctions that arise during vehicle operation.
Switching unit Renault Megane 2
This block is located on the left side of the engine compartment and is covered with a protective cover.
Depending on the vehicle configuration, by removing the protective cover you can immediately replace the required fuse. In some configurations you will also need to disassemble some parts:
- remove the battery and unscrew the fasteners from its stand, get to the computer.
- unscrew its fastening and move it to the side. We remove the air duct near the radiator and lift up the ECU holder.
- We unlearn the bolt in the block itself. And now we can extend the block. Don't forget to disconnect the power plugs.
Fuse box diagram under the hood of Renault Megane 2 option 1
Description
| 1 | 7.5A Side light lamp of the left headlight unit, cigarette lighter, central locking and hazard warning switch, headlight range control, heating (air conditioning) and ventilation control unit |
| 2 | 10A Left headlight high beam lamp |
| 3 | 10A High beam lamp for right headlight |
| 4 | 10A Low beam lamp for the right headlight, front and rear body height sensors, headlight range control, right headlight range control motor |
| 5 | 10A Low beam lamp of the left block headlight, electric motor for the corrector of the left block headlight |
| 6 | 20A Fog lamps |
| 7 | 7.5A Low beam lamp of the right headlight, right side marker, automatic transmission selector position indicator, control unit for window lifts of all doors |
| 8 | 15A Electric locking mechanism of the steering column anti-theft device |
| 9 | 5A Driver airbag module, electric power steering |
| 10 | 7.5A Automatic transmission selector position indicator, diagnostic connector |
| 11 | 5A Electric steering column anti-theft mechanism |
| 12 | 5A Automatic transmission |
| 13 | 10A LPG power system control unit |
| 14 | 10A Reversing lamps |
| 15 | 20A LPG solenoid valve relay |
| 16 | 10A Electromagnetic clutch of the air conditioning compressor |
| 17 | 10A Reserve |
| 18 | 40A Electric engine cooling fan |
| 19 | 25A ABS control unit |
| 20 | 30A Heated tailgate glass |
| 21 | 25A Starter Relay |
| 22 | 25A Windshield wiper motor |
| 23 | 25A Reserve |
Fuse box diagram under the hood of Renault Megane 2 option 2
Description
| 1 | 10A Fuse for right side light lamps (172-226) - cruise control-speed limiter switch (1081) - trajectory stabilization system switch (1106) - automatic transmission selector lever position indicator (1129) - left seat heating switch (1514) - heating switch right seat (1513) - hardtop switch |
| 2 | 10A Fuse for the left lamps of the central electronic communication unit for side lights (173-227) - cigarette lighter (101) - switches for electric door locks and hazard warning lights (1391) - headlight range control switch (1390) - climate control panel (319) - audio system (281 ) - multifunction display (653) - central electronic communication unit |
| 3 | 10A Right headlight fuse (low) (226) - rear body height sensor (1372) - front body height sensor (1373) - headlight range control switch (1360) - right headlight range control motor (538) |
| 4 | 10A Left headlight fuse (low beam) (227) - left headlight leveling motor (537) |
| 5 | 20A Fuse for right and left fog lights (176-177) |
| 6 | 10A Left headlight fuse (high beam) |
| 7 | 10A Right headlight fuse (high beam) |
| 8 | 25A Fuse for ABS ECU (113) or stability control system (1094) |
| 9 | 25A Windshield wiper motor |
| 10 | 5A Circuit fuse “+” after the ignition switch for airbags and electric power steering (756-1232) |
| 11 | 15A Fuse for electric steering column lock |
| 12 | Reserve |
| 13 | Reserve |
| 14 | 15A Injection systems, Protection relay |
| 15 | 10A Reserve |
| 16 | 5A automatic transmission |
| 17 | 7.5A Fuse '+' after the ignition switch in the passenger compartment: selector lever position indicator (1128) - automatic transmission shift mode switch (129) - cruise control-speed limiter switch (1081) - instructor controls on the training vehicle (459) - fuse and relay block in the passenger compartment (260) - additional heating relay 1 (1067) - additional heating relay 2 (1088) - diagnostic connector (225) - headset microphone ' free |
| 18 | 5A Electric steering column lock |
| 19 | 10A Reversing lamps |
| 20 | 20A Fuel heating relay |
| 21 | 15A Fuel washer pump |
| 22 | 10A A/C compressor clutch |
| 23 | 30A Rear window heating elements |
How to replace a fuse?
The most labor-intensive way to change fuses on a Renault Megane 2 is in the engine compartment block.
For this you will need:
- TORX keys T40, T30;
- regular key for 10 and 13 mm;
- a screwdriver with a flat and thin blade;
- spare fuses;
- removal pliers, they are located under the block cover in the passenger compartment.
To directly access the fuse links, it is necessary to remove a number of elements from the machine.
For example, on a Megane with a station wagon you need to do the following:
- Disconnect the terminals from the battery and remove it from the car.
- Behind the battery there is a controller unit with wires. They are secured on top with a plastic casing that must be removed.
- Remove the plastic battery plate secured with three T40 screws and one regular 10 mm nut.
- Remove one bolt from the controller body.
- Disconnect the wire connectors on the controller. To remove them, press the latch with your finger and pull the rotary lever up.
- Disconnect the wiring harness by carefully disengaging it with the tip of a screwdriver.
- Remove the battery pad.
- The fuse box cover will be visible underneath, secured with two T30 screws. You need to unscrew them and remove the cover.
- Below it are two wiring connectors. To remove the distant one, you need to move the latch up and pull the block with wires to the left. The second small connector has a latch in its design that you need to press and disengage the block.
- To disconnect the first block, to do this you need to pry and pull out the lock located on the side.
- Remove the mating part of the second connector block from the block body and unscrew the bolt securing it.
- Then you need to press the housing latches with the tip of a screwdriver and remove the block. This may require removing the air filter housing. It is better to drag the block from the near corner and slightly press up the plastic casing around the mounting block. This procedure is quite lengthy and requires careful execution.
- The removed part is the block itself with a box put on it, which serves for tight fixation. You need to release the latches located on the sides and remove this box.
- Disconnect the connectors of the unit and remove it from the car.
- After this, you can replace failed elements, for example, dimensions or low beam, in accordance with the diagram.
In addition, if necessary, it is necessary to replace the inserts in a small block of highly loaded circuits. This block is visible in the lower part of the body, which is not removed from the vehicle.
The entire process of replacing a fuse on a Renault Megane 2 is described in detail in a video provided by the Useful China channel.
When replacing fuses, it is necessary to take into account that on Megan of the first and second generations the part is simply pulled up using standard pliers. On the third generation Megane, it first moves to the side and only then is removed.
When searching for a faulty fuse on Megan 3, you must carefully study the diagram. For example, each car brake light receives power via a separate circuit and has a separate fuse in the interior unit.
Access to electrical equipment on such machines is easier.
In order to dismantle the block you must:
- Unfasten the four latches at the corners.
- Remove the two red fasteners.
- Remove the wiring plug.
- Remove the unit and replace the necessary parts.
How to replace the block?
Blocks may need to be replaced if the seats burn out or become damaged. Such cases occur when using fuses of the wrong rating. Replacing the block in the engine compartment is carried out according to a scheme similar to replacing fuses. In the new unit it is necessary to install the fuses in the same places as in the old one. It is important to check that the rating of the inserts matches the requirements of the electrical circuit for the car's fuses. Replacing the unit on Megan 3 is much more difficult, since the car has a more complex electrical circuit, so it is better to entrust the work of changing the device on this version of the car to professionals.
What should you pay attention to before replacing the starter relay?
The following two tabs change content below.
Without exception, on all Renault models, if such or similar reasons exist, it is necessary to check the functionality of the following circuit:
- First of all, pay attention to the integrity of the wires going to the battery, to the absence of oxides, short circuits and contamination.
Check the battery and power cables - Next, check the 25A fuse - F3 under the hood of the car (starter traction relay).
Fuse box under the hood - Then, check the condition of the terminal on the starter solenoid relay, which is best reached from below the car, since access to it is not blocked in any way. (If the nut is poorly tightened, a short circuit occurs, and, consequently, the fuse blows).
And only after these manipulations have led nowhere can you pay attention to the solenoid relay itself.
Electrical design of Renault Megane 2
Engine control diagram F4R Renault Megane 2 (Link to photo source) Click to enlarge
The electrical diagram of Renault Megane II is mounted on a single-wire system. This means that the negative terminal of the sources and receivers of electricity is directly connected to the car body (ground). It serves as the remaining part of the conductor. The power circuits of the control program of the power unit are mounted according to a multi-wire circuit. The connection to ground is made through the computer. Plus is supplied to the contacts of Renault Megane 2 equipment through fuses and relays from the battery and generator. The battery carries the load when the engine is turned off, and the generator when the engine is running.
Switching of the main circuits of the machine is provided through a special reading device.
Reader (Link to photo source)
Data transfer between Renault Megane 2 node devices is carried out using multiplex CAN buses (ConTROller Area Network) at speeds of up to one Mbit/s. It consists of a twisted pair of conductors that connect the ECU. A gateway is used to interface individual CAN buses. The use of CAN buses helps reduce the total number of conductors in the car.
If a fault is detected in the diagnostic CAN bus, information in the form of a specific malfunction code is recorded in the memory of the ECUs that are connected to the bus. To read codes using scanners, there are two diagnostic connectors connected to the CAN bus. One connector for connecting diagnostic equipment is mounted in the interior space, and the second is in the engine compartment of the Renault Megane II.
Diagnostic connector in the interior of Renault Megane 2
Warnings
Before carrying out any work on the electrical circuits of the Renault Megane II, you must disconnect the battery. Operations to disconnect or connect the battery are carried out with the ignition turned off. If the battery is disconnected while the power unit is running, there is a high probability of damage to the voltage regulator or electronic devices of the 2nd generation Renault Megane.
It is prohibited to check the functionality of the power circuits by shorting the negative wire to the body. This is fraught with failure of electrical appliances. You cannot use fuses of a different design, designed for higher current, as well as jumpers instead of fuse links.
Operations for changing Renault Megane 2 fuses must be carried out without screwdrivers to prevent short circuits.
If you plan to carry out electric welding work, you will need to disconnect the output not only from the battery, but also from the generator and controller. When charging the battery, you should disconnect the power wires from the Megan 2 battery.
Periodically it is necessary to clean oxide and dirt from the terminals and tips of the battery wires.
Location of the starter retractor relay
On Renault Megane 2 it is located directly on the starter housing itself. Its malfunction occurs in the following cases:
- The contact plates located inside the relay housing burn out.
- The relay coil has burnt out.
- The internal parts were destroyed.
In order to independently diagnose its condition when it is on the car, you just need to use a small piece of wire to close the two contact bolts located on the back of the case. If the relay is working, you will immediately know about it, but if nothing happens, then this means that it needs replacement.
Broken starter relay
The original number of the starter retractor relay is 594653, produced by Valeo and has a price in the range of 2000-2400 rubles. However, as many Meganovods say, this spare part has analogues, the price of which, unlike the original, is almost three times less. Such elements include a solenoid relay from the Danish company GARGO with article number 235869 .
Layout diagram under the hood in the engine compartment and in the cabin, description
All electrical circuits of a Renault car are protected in the form of fuse links of various ratings. In the event of a sudden failure of headlights or other components of the electrical system, in order to understand the problem and fix it, the driver should first check the functionality of the fuses on Renault Megane 1, 2 and 3.
Where is the power supply and its circuit
All generations of Renault Megane use electrical wiring with two separate fuse blocks. One of them is located at the bottom of the instrument panel near the knee of the driver’s left leg. The second is installed in the engine compartment.
Salon block
The location of the interior unit fuses on Megan 1, 2 and 3 cars may differ.
Block under the hood
Depending on the generation of the car model, the blocks in the engine compartment are located in different places.
How to replace a fuse?
The most labor-intensive way to change fuses on a Renault Megane 2 is in the engine compartment block.
For this you will need:
- TORX keys T40, T30;
- regular key for 10 and 13 mm;
- a screwdriver with a flat and thin blade;
- spare fuses;
- removal pliers, they are located under the block cover in the passenger compartment.
To directly access the fuse links, it is necessary to remove a number of elements from the machine.
For example, on a Megane with a station wagon you need to do the following:
- Disconnect the terminals from the battery and remove it from the car.
- Behind the battery there is a controller unit with wires. They are secured on top with a plastic casing that must be removed.
- Remove the plastic battery plate secured with three T40 screws and one regular 10 mm nut.
- Remove one bolt from the controller body.
- Disconnect the wire connectors on the controller. To remove them, press the latch with your finger and pull the rotary lever up.
- Disconnect the wiring harness by carefully disengaging it with the tip of a screwdriver.
- Remove the battery pad.
- The fuse box cover will be visible underneath, secured with two T30 screws. You need to unscrew them and remove the cover.
- Below it are two wiring connectors. To remove the distant one, you need to move the latch up and pull the block with wires to the left. The second small connector has a latch in its design that you need to press and disengage the block.
- To disconnect the first block, to do this you need to pry and pull out the lock located on the side.
- Remove the mating part of the second connector block from the block body and unscrew the bolt securing it.
- Then you need to press the housing latches with the tip of a screwdriver and remove the block. This may require removing the air filter housing. It is better to drag the block from the near corner and slightly press up the plastic casing around the mounting block. This procedure is quite lengthy and requires careful execution.
- The removed part is the block itself with a box put on it, which serves for tight fixation. You need to release the latches located on the sides and remove this box.
- Disconnect the connectors of the unit and remove it from the car.
- After this, you can replace failed elements, for example, dimensions or low beam, in accordance with the diagram.
In addition, if necessary, it is necessary to replace the inserts in a small block of highly loaded circuits. This block is visible in the lower part of the body, which is not removed from the vehicle.
The entire process of replacing a fuse on a Renault Megane 2 is described in detail in a video provided by the Useful China channel.
When replacing fuses, it is necessary to take into account that on Megan of the first and second generations the part is simply pulled up using standard pliers. On the third generation Megane, it first moves to the side and only then is removed.
When searching for a faulty fuse on Megan 3, you must carefully study the diagram. For example, each car brake light receives power via a separate circuit and has a separate fuse in the interior unit.
Access to electrical equipment on such machines is easier.
In order to dismantle the block you must:
- Unfasten the four latches at the corners.
- Remove the two red fasteners.
- Remove the wiring plug.
- Remove the unit and replace the necessary parts.
How to replace the block?
Blocks may need to be replaced if the seats burn out or become damaged. Such cases occur when using fuses of the wrong rating. Replacing the block in the engine compartment is carried out according to a scheme similar to replacing fuses. In the new unit it is necessary to install the fuses in the same places as in the old one. It is important to check that the rating of the inserts matches the requirements of the electrical circuit for the car's fuses. Replacing the unit on Megan 3 is much more difficult, since the car has a more complex electrical circuit, so it is better to entrust the work of changing the device on this version of the car to professionals.
Where is the power supply and its circuit
All generations of Renault Megane use electrical wiring with two separate fuse blocks. One of them is located at the bottom of the instrument panel near the knee of the driver’s left leg. The second is installed in the engine compartment.
Salon block
The location of the interior unit fuses on Megan 1, 2 and 3 cars may differ.
Megane I
Access to the interior unit of this car is through a removable plastic cover. Machines can have two types of blocks - standard and extended. Externally, they are almost identical, the only difference is the location and rating of the fuse links.
Standard Megan 1 Extended Megan 1
The photo describes the purpose of the fuses.
Megan 1 salon unit, part 1 Megan 1 salon unit, part 2
Megan 1 salon unit, part 3
Megane II
The fuse box in the Renault Megane 2 interior is located under a large cover located under the steering wheel and to the left. Fuse designations, their ratings, spare inserts and pliers are located on the cover.
Direction of force when opening the lid
Diagram and spare parts
This block contains, for example, fuses for the stove fan (position C, 30 A) and the cigarette lighter (position V, 15 A). According to reviews from a number of owners, fuses V and G may be swapped on cars. When you remove a part of the standard radio, it will reset the settings and, when turned on, will ask you to enter the code that comes with the documentation for the car. In addition to these fuses, the block contains the elements shown in the photo below.
Wiring diagram Purpose and ratings, part 1
Purpose and denominations, part 2
Megane III
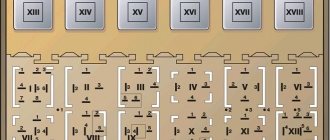
In the mounting block of the Renault Megane 3 car interior there are fuses and several relays. The fuses include a 40-amp heated rear window insert (position F42). The diagram below shows the maximum layout of inserts. At the bottom there are two connectors for supplying voltage from the on-board network (the positive pole of the battery is connected to all of them). In reality, not all cells in cars are filled.
General block diagram
Purpose of fuses, part 1 Purpose of fuses, part 2 Purpose of fuses, part 3
Relays can be installed in the block.
| Number | Current, A | Purpose |
| a | 70 | Power supply without shutdown during engine start |
| b | 70 | Power supply with shutdown during motor start |
| C | 40 | Heated glass |
| D | 20 | Sound signal in the steering wheel |
Additionally, Megan 3 uses a relay that is responsible for supplying voltage from the positive terminal of the battery when the engine is running. This relay, rated for current up to 40 A, is mounted under the front passenger seat. When installing a standard additional heater, two additional relays are installed on the climate control unit in the cabin - 40 and 70 A.
Block under the hood
Depending on the generation of the car model, the blocks in the engine compartment are located in different places.
Megane I
The block of the first generation of machines is the smallest in size. The location diagram and decoding of the fuses are shown in the photo.
Element installation diagram Explanation
Megane II
The block in the engine compartment is located under the installation site of the 12-volt battery and the vehicle's electrical circuit controller. The design of this block depends on the year of manufacture of the car of the so-called phase - phase 1 was produced until 2006, phase 2 - from 2006 to 2009. An example is the location of the rear window heating fuse in the blocks of cars of different phases, while the fuse rating is unchanged and is 30 A .
Block on a 1 phase machine
Unit on a 2 phase machine
Below in the photo in the tables there is a description and explanation of the fuses in different phases.
First phase, part 1 First phase, part 2 First phase, part 3
Second phase, part 1
Second phase, part 2
Megane III
This machine is characterized by the placement of fusible links and relays in different places in the engine compartment. Under the hood, fuses are located in two groups - in the main block (consisting, in turn, of two parts) and an additional one, in which power fuses are installed. In fact, under the hood of the Megana 3 hatchback there are three different blocks.
The purpose of the fuses is shown in the tables in the photo.
Main block pinout
Assignment of fuses, part 1
Assignment of fuses, part 2
It is in the main block that there is a fuse responsible for the operation of the starter (position 19, nominal 25 A). Part 21 (20 A) protects several circuits at once - the fuel pump, ignition coils and the liquefied gas supply system (optional). Under the main unit there is an expansion board, on which relays and fuses are also installed.
Expansion of the main unit Purpose of the fuses in it Relays in the expansion unit
The additional unit is located behind the car battery.
Additional block Fuses in such a block
Next to this block there is a separate module that serves to disconnect the battery at high overloads. It contains two large fuses for the starter and generator (300 A each for a diesel engine and 190 A for a gasoline engine). If they fail, the entire module is replaced; only the small fuse, indicated in the diagram as F7, must be replaced separately.
General module diagram
The layout of the fuses in the module is the same for both Renault Megane 3 with a diesel and gasoline engine.
Petrol version
Diesel option
A relay is separately installed on the radiator to turn on the fan drives, rated for a current of up to 70 A.
Replacement of non-working elements
Almost all supply lines for Renault electrical appliances. The most powerful consumers of electricity are connected via relays. Fuses and relays are located in two mounting blocks located in the passenger compartment and in the engine compartment. The mounting block under the hood is located on the left side along the direction of the car. This block contains the air conditioning relay, which is also the electromagnetic clutch of the air conditioning compressor, which is designed for a current of 10A.
Replacing this clutch with Megan 2 can be divided into the following stages:
- Unscrew the screws of the mounting block cover;
- separate the cover of the mounting block;
- remove the battery;
- remove the bolt securing the switching unit and move it to the side for easy replacement;
- according to the drawing on the back of the cover, you need to select the required compressor clutch and pull it out by hand;
- insert a new coupling and return the block to its place, then install the battery back and close the mounting block with the lid.
During the use of the Megan 2 car, the performance of the air conditioning elements decreases, both due to mechanical damage and wear and tear of the equipment. So, over the course of a year, the volume of coolant in the system can decrease by 10% -15%. In view of this, it is necessary to periodically check the operation of system components and replace the cabin air filter.
Don’t forget about cleaning the condenser and evaporator. Some automakers recommend turning on the system for a short time, even at low temperatures, so that parts and lines are automatically lubricated.
Location
The Renault Megane 2 model has two fuse mounting blocks:
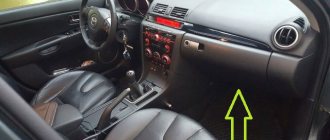
The main one (cabin) is located inside the car in the lower left part of the dashboard in the driver’s seat. To access the devices, simply remove the cover, first disconnecting the latches.
Figuring out which fuses are responsible for which electrical equipment is quite easy. To do this, you need to carefully study the diagram on the block cover. In Renault Megane 2, protective elements that ensure safety often fly out:
- heating system;
- air conditioning;
- stoves;
- radios;
- cigarette lighter.
The first three positions are represented by fuse number 30, and the circuit itself is marked SP3.
Most of the equipment is responsible for the fuse designated BCP3 with cell number 25. Nearby is BP77 (cell 20), which completely protects all electrical devices in the car interior. The purpose of each element is detailed in the table.
| Marking | Decoding |
| C | Responsible for the operation of the heating system fan |
| D | Controls the functionality of the rear side door power windows |
| E | Provides operation of electric sunroof |
| F | Responsible for the performance of ABS |
| G | Protects several devices at once: - audio system; - headlight and glass washer; - cigarette lighter; - heated seats; - car alarm. |
| H | Brake lights |
| L | Front door windows |
| M | Front door windows |
| N | Multimedia, rear view mirrors and instrument panel |
| Sound signal | |
| O | Rear window wiper performance |
| P | Air conditioning and climate control |
| R | Ensures the temperature sensor is working correctly |
| S | Heated front seats |
| T | Door lock control |
| W | Heated rear view mirror in the car interior |
| A | Power window relay |
To replace a failed fuse, knowing the layout of the devices, just carefully use non-metallic tweezers (included under the unit cover) to remove the faulty device and insert a new one. By the way, spare devices must be attached to the back of the cover by the manufacturer.
The second block is located in the engine compartment of the car closer to the shock absorber strut. It is in it that protective devices for low beam and other optical equipment are installed.
Fuse blocks in the engine compartment
Fuse box location
Fuse block diagram No. 1
Assignment of fuses in fuse box No. 1 in the engine compartment.
No.Description
| F3 | 25 | Starter solenoid |
| F4 | 10 | A/C compressor clutch |
| F5A | 15 | Electric steering column lock |
| F5C | 10 | Reversing lights |
| F5D | 5 | Injection computer + power supply after ignition switch – electric steering column lock |
| F5E | 5 | Airbag + after ignition switch and electric power steering |
| F5F | 7,5 | Passenger compartment + after ignition switch: gearshift display – gear shift pattern control – cruise control / speed limiter on/off control – driving school monitor control – passenger compartment fuse and relay box – auxiliary heater relay 1 – auxiliary heater relay 2 – diagnostic connector - hands - free telephone radio microphone - rain and light sensor (on E84) - interior temperature sensor (on E84) |
| F5F | 15 | Passenger compartment + ignition: Gearshift display - Shift mode switch - Cruise control stop/start control - Driving school instructor control unit - Interior fuse and relay box - Auxiliary heater relay 1 - Auxiliary heater relay 2 - Diagnostic connector - Vehicle telephone speakerphone microphone |
| F5H | 5 | Automatic transmission + after ignition feed |
| F5G | 10 | Gas injection computer + after ignition switch |
| F6 | 30 | Heated rear window |
| F7A | 7,5 | Right side marker light – cruise control, stop/start – ESP stop/start button – gear lever display – left heated seat control – right heated seat control – hardtop switch – simultaneous windshield control – LPG or petrol selector switch |
| F7B | 7,5 | Left side lamp - Cigarette lighter - Hazard warning and door lock switch - Headlight range control switch - Air conditioning control panel - Radio - Multifunction display - CCU - CD changer - Front dual power windows - Power rear view mirrors - Rear power window locks - Dual Rear Window Control Driver - Passenger Power Window Control - Right Rear Power Window Control - Left Rear Window Control |
| F8A | 10 | Right high beam headlight |
| F8B | 10 | Left high beam headlight |
| 8s | 10 | Right low beam headlight – rear height sensor – front height sensor – headlight leveling rheostat switch – right headlight leveling motor |
| F8D | 10 | Left low beam headlight – left headlight adjustment motor |
| F8D | 15 | Left low beam headlight – left headlight adjustment motor |
| F9 | 25 | Wiper motor |
| F10 | 20 | Front left and right fog lights |
| F11 | 40 | Engine cooling fan assembly |
| F13 | 25 | Computer ABS or electronic stability program |
| F15 | 20 | Automatic transmission + battery power or gas solenoid valve relay + battery power |
| F16 | 10 | Not used |
Fuse block diagram No. 2
This block is located in the motor connection block, under the protection and switching block.
Assignment of fuses in fuse box No. 2 in the engine compartment.
No.Description
| F1 | 40 | K9K724: 460W engine cooling fan |
| F1 | 60 | K9K732: 550W engine cooling fan |
| F2 | 70 | Pre-heating block |
| F3 | 20 | F9Q: Diesel filter heater relay. |
| F4 | 70 | Fuse and relay box in the passenger compartment |
| F5 | 50 | Computer ABS |
| F6 | 70 | Electric power steering or auxiliary heater relay 2 |
| F7 | 40 | Auxiliary heater relay 1 |
| F8 | 60 | Fuse and relay box in the passenger compartment |
| F9 | 70 | Auxiliary heater relay 2 or electric power steering |
Fuse/relay box in the engine connection block, under the protection and switching unit
Fuse/relay box in the engine connection block, under the protection and switching unit
No.Description
| A | 25 | Headlight washer pump |
| IN | 25 | Headlight washer pump 2 |
| Engine F9Q | ||
| A | 20 | F9Q: Diesel heater |
| IN | 20 | F9Q814: Electric coolant pump. |
| 983 | 50 | F9Q814: Injection control unit feed relay. |
| Engine K9K | ||
| F1 | – | Not used |
| F2 | – | Not used |
| F3 | – | Not used |
| F4 | 15 | + power supply to the main injector relay (power supply protection for the air flow meter) |
| 234 | 40 | K9K724: 460W Engine Cooling Fan Relay (with A/C) |
| 234 | 50 | K9K732: 550W Engine Cooling Fan Relay (with A/C) |
| Engine K4M | ||
| A | 20 | Fuel pump |
| IN | 20 | LPG fuel pump shutdown |
| WITH | 20 | LPG solenoid valve |
| D | 20 | LPG tank |
| E | 20 | Gas expansion valve solenoid valve |
| F | – | Not used |
Types of lamps, their quantity, types and power
Renault Megane 3 has two H7 lighting fixtures in the high and low beam headlights with a power of 55 W. The front marker light and side turn indicators have 2 W5W 5 W each.
The daytime running light contains 2 P21W with a power of 21 W. The front and rear turn signals each have 2 PY21W with a power of 21 W. Fog - 2 H11 55 W. And the side light/brake light has 2 lamps of types 5W and P21 with a power of 5 W and 21 W, respectively.
The rear fog lights, reversing light, license plate light and additional brake light have a P21W 21 W lighting element.
Fuses and relays Renault Megane 2 (phase 1 and phase 2)
Like all cars, Renault Megane 2 is no exception in terms of circuit protection and power signal management. For these purposes, the car has relay and fuse blocks. One in the cabin, three in the engine compartment: one on the battery terminals, the second on the casing in the fuse box, the third on a retractable slide. It is about these blocks and installation locations, and even more precisely about the location of the fuses, their ratings and functionality that you will be told in this article. Information will be provided for Renault Megane 2 sedan, hatchback, station wagon 2003, 2004, 2005, 2006, 2007, 2008 models with gasoline (K4J, K4M, F4R) and diesel (F4R) engines.
Where is the fuse and relay box located in the Renault Megane 2 interior?
The interior fuse box is located in the instrument panel at the bottom left. For clarity, take a look at the photo; you can clearly see where this block is located. This block is easy to reach and it is easy to check the integrity of the fuses in it.
The block itself looks like this...
...and the fuse designations and ratings are as follows.
| Number | Current strength, A | Fuse/relay name | Protected circuit |
| 1 | — | — | Spare |
| 2 | — | — | Spare |
| 3 | — | — | Spare |
| 4 | 3 | AP1A | Fan motor and interior air temperature sensor, interior rear view mirror, rain and light sensors |
| 5 | 20 | BPR1 | Heated driver and front passenger seats |
| 6 | 20 | BR3 | Electric locks on all doors |
| 7 | 15 | — | Cigarette lighter |
| 8 | 7,5 | 15RP | Heated exterior mirrors |
| 9 | 10 | SP15 | ABS control unit |
| 10 | 15 | SP2 | Audio system head unit, on-board computer, electric motor for headlight washers, wind window and tailgate glass (hatchback, station wagon), fuel heating (K9K engine), heating (air conditioning) and interior ventilation control unit, security alarm control unit |
| 11 | 15 | SP17 | Stop signal |
| 12 | — | — | Reserve |
| 13 | 25 | BP55 | Driver's door window motor |
| 14 | 25 | BP70 | Passenger's door window motor |
| 15 | 20 | VSRZ | Instrument cluster, electric exterior mirrors |
| 16 | 15 | VR32 | Horn, diagnostic connector, windshield wiper motor |
| 17 | 15 | VR25 | Tailgate wiper motor |
| 18 | 20 | BP77 | Interior electrical control unit, additional equipment relay |
| 19 | 30 | SP3 | Electric motor of the heating (air conditioning) and interior ventilation system |
| 20 | 40 | BP87/BP48 | Rear door window motors |
| 21 | 20, 40 | BP93 | Electric sunroof motor, electric folding roof |
| R1 | — | Power window motor relay for all doors | |
| R2 | — | — | Accessory relay |
Now we can talk about blocks and places in the engine compartment. Let's start with what is simpler.
Where is the fuse and relay box located in the engine compartment of Renault Megane 2
The first fuses can be found directly on the battery labels. There are only 3 things.
Instructions, books, manuals for car repairs
Unscrew the nut with a 10mm wrench and remove the clamp with the bundle of wires, unscrewing the screws that secure the fuse block. There is no need to write down the location of each device; they can only be put back in their original place. After replacing the block, put everything back in the reverse order. MBP table in the engine compartment of Renault Megane 2 Fuse diagram under the hood This block contains elements responsible for the engine electrical equipment and external lighting.
For example, if there are interruptions in the lighting of the low-beam headlights, then using the circuit it is possible to easily find the failed fuse.
The power supply table under the hood of the Renault Megane 2 LPG has a brown color, which is responsible for the climate control in the car interior, the cigarette lighter, the hazard warning switch button, and the central locking. The fuses that are located under the hood are responsible for all lights, the windshield wiper, and the liquefied gas supply.
One of the systems that most often fails is the heating and air conditioning system, or simply the furnace. The cell numbered is responsible for this. In this case, the part itself will have the factory marking SP3, so it will not be so easy to confuse it with something else.
In addition, in the cabin there is a safety element for the instrument cluster, marked BCP3 and a cell number. Next to it is the most important relay for controlling the electrical equipment of the cabin.
Thanks to the BP77 marking and strictly defined cell 20, if you have a diagram, it will be quite easy to find the relay. In addition, it is worth paying attention to cell 10 and the SP2 marking.
The operation of the standard head unit, the headlight washer motor and the power windows of all doors will depend on the serviceability of this fusible element.
Engine compartment The second unit is located under the hood of the car. It contains fusible elements responsible for the electrical equipment of the engine, all electronic systems and external lighting.
Fuses and relays in the interior of Renault Megane 2
The mounting block in the cabin is located at the bottom of the control panel on the driver's side. There is a block diagram on the inside.
Sources
- https://logan-50.ru/inomarki/predohraniteli-i-rele-renault-megane-2-faza-1-i-faza-2.html
- https://AvtoKart.ru/diagnostika-i-remont/reno-megan-2-predohraniteli-pod-kapotom.html
- https://gyroscooter-izhevsk.ru/pro-salon-i-kuzov/predohraniteli-reno-megan-2.html
- https://avtoblokrele.com/blok-predohranitelej-i-rele-renault-megane-2/
- https://autodvig.com/diagnostics/predohraniteli-reno-megan-42057/
- https://carenault.ru/megane/megane-2/izuchaem-predohraniteli-reno-megan-2/
- https://KrymShina.ru/korobka-peredach/predohranitel-zadnego-hoda-megan-2.html
- https://fuse-box.ru/predohraniteli-i-rele-renault-megane-ii-2003-2009/
- https://autonissancar.ru/renault/megane/megane-2/izuchaem-predohraniteli-reno-megan-2
[collapse]