Blocks in the cabin
Fuse box
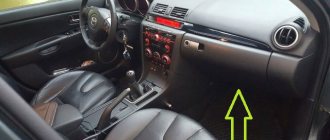
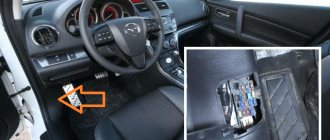
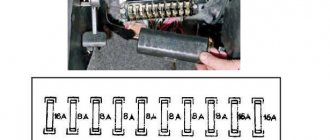
It is located on the left pillar under the instrument panel on the driver's side, behind the protective cover.
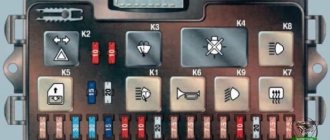
Scheme
Description
| A/BAG | 10A Airbag |
| TURN LAMP | 10A Turn signal lamp |
| METER | 10A Instrument cluster, reverse lamp, warning horn |
| ILLUMI | 10A Switch Light |
| POWER SOCKET | 15A Luggage compartment lamp, power socket |
| HAZARD | 15A Hazard warning lamp |
| STOP | 15A Brake light, ABS |
| TAIL (RH) | 10A Side light (right rear/left front), switch illumination |
| TAIL (LH) | 10A Side light bulb (left rear/right front) |
| CIGAR | 15A Cigarette lighter |
| AUDIO | 10A Audio system, power rear view mirror, clock |
| WIPER (FRT) | 15A Glass cleaner, washer (front), sunroof |
| WIPER (RR) | 15A Glass wiper (rear). Washer (rear) |
| WARMER | 15A Front seat heating |
| MIRROR DEF | 10A Heated outside rear view mirror |
| START | 10A Engine control unit, ECAT unit (electronically controlled suspension) |
The cigarette lighter fuse is designated CIGAR 15A.
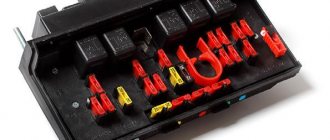
Relay block
Attached behind the fuse box. The number of elements in it may vary and depends on the level of electrical equipment. The immobilizer module is located nearby.
Photo
There may be relays here such as: hazard warning and turn signal relays, signal relays, central locking relays, engine control relays, fog lamp relays, etc.
Removal and replacement process
Required tools:
- 7 mm socket head,
- thin material.
- Socket extension,
- Wrench 10 mm,
- slotted screwdriver,
Under the hood
The procedure is performed as follows:
- Apply the parking brake, turn off the ignition, remove the terminal from the negative terminal of the battery.
- Open the cover by pressing the latch on the air filter side.
- Unscrew the nut on the left side of the fender and remove the terminal from the stud.
- Press the latch and remove the part from the holder.
- Remove the safety screw from the blue square leg and remove it.
- Repeat step 5 with the remaining large blocks.
- Disconnect the smaller units by pressing down on their handles with a screwdriver.
- Move the wires to the side and remove the bracket by pressing the latches at the base with a screwdriver.
- Reconnect the terminals and install the removed parts in reverse order.
In the cabin
To disassemble the main and auxiliary units, follow step #1 from the previous section:
- Follow step #1 from the previous method.
- Remove the lower dashboard trim by removing 3 screws: 2 to the right of the steering wheel (at the left corners of the trim) and 1 at the left end of the dashboard.
- Remove the A-pillar cover: Remove the driver's door sill trim by prying it off with a screwdriver wrapped in a cloth.
- Unscrew the piston located on the left driver's footrest.
- Unscrew the 2 nuts securing the fuse box to the body using socket 7.
- Loosen the housing nut using a 7mm socket.
Troubleshooting sequence
Considering that there are many possible reasons for the failure to start the Kia Spectra engine, when troubleshooting a malfunction you should be guided by a single search algorithm. Only in this case a positive result can be achieved in the shortest possible time.
Sequencing:
- Check the residual voltage on the battery. If it is less than 10.5 volts, the battery should be recharged.
- Check all fuses. If there are burnt ones, change them. It is better to first study the fuse layout. In this case, you can control only those elements that are responsible for the power unit systems. This will reduce the verification time. You also need to check the relays to see if any of them are burnt or melted. The main relays responsible for starting: main, fuel pump, starter.
Just in case, you can move all the relays in the connector, the contact may be broken.
- If the starter does not work, try to start it by applying voltage from the positive terminal of the battery to the contact of the solenoid relay (thin wire going to the starter). In this case, the manual transmission must be switched to neutral.
- If the starter rotates the crankshaft, check the condition of the spark plugs. Spark plugs covered with soot, with a damaged electrode, or flooded, should be replaced. As a last resort, they can be cleaned and calcined. It is also necessary to check for spark on all cylinders. This can be done using a control candle.
- Check the performance of the fuel pump. To do this, apply 12 volts to the fuse via the fuel pump power circuit. A characteristic sound should be heard in the rear seat area. You can check the flow of gasoline by disconnecting the fuel line (be sure to place an empty container at its outlet).
- If previous measures have not brought results, computer diagnostics should be performed. Without it, further search occurs blindly. You can try to temporarily disable the mass air flow sensor, clean the damper, and inject “quick start”.
How to recognize faulty car fuses
The Kia Spectra electrical circuit is an extensive system: the battery powers dozens of devices. When one breaks, the protective device takes on the load, melts, and breaks the circuit. This saves the entire system and the node for which it is responsible.
The “Defender” burned out, this alarms the owner: there was a power surge in the system, and the relay did not extinguish it. If the new distributor also burns out, look for the cause.
It may be hidden in the protective device itself. If the seat has oxidized, each new element will be regularly melted. Therefore, when the unusable one is removed, the terminals are inspected. The black coating is oxide: it will not allow current to pass through. Clean the contact area and install a new element. If it burns out immediately, they look for the problem node.
To do this, turn off all consumers one by one. The one on which the protection burned out is the culprit of the accident in the electrical network.
There are many fuses in the block. How to find a burnt one if they all look intact? Take a tester or an indicator screwdriver. Remove the device from the socket, apply a tester pen to the diode, and probes to the contacts. If the element is intact, the device light will light up.
Another way to recognize a faulty Kia Spectra 2008 fuse is simpler. Turn on the consumer that did not work (headlight, air conditioner).
Using an indicator screwdriver, touch the terminal of one terminal, then the other. If one shows voltage and the other does not, a burnt-out element has been found.
Replacing the fuse box on a Kia Spectra car with your own hands
Any vehicle equipment needs protection. It is for this purpose that the Kia Spectra uses fuse blocks that protect the vehicle’s electrical equipment from overvoltage and failure. We invite you to find out where the Kia Spectra fuses are located, what equipment they are responsible for and how to replace them.
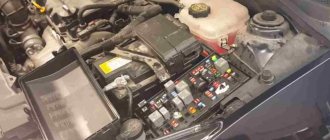
Most of the fuses in the Kia Specta car are located in a block, which, in turn, is installed in the engine compartment of the car. Once you open the hood, you can see it right away. The fuse box is located opposite the driver's seat and is hidden by a protective cover.
Sorry, there are no surveys available at this time.
However, this fuse block does not contain all the elements responsible for the functionality of the equipment. There is another additional power supply that can be found inside the vehicle.
Looking under the dashboard, you can see this power supply on the right. On the return covers of the fuse boxes there is a diagram of the assignment of the circuit components.
But if you have problems deciphering the assignments on the diagram, then below are diagrams for each individual Kia Spectra power supply.
The request returned an empty result.
As for the salon power supply:
The request returned an empty result.
Removing the power supply in the cabin
- Disconnect the battery from the power supply; to do this, remove the negative terminal from it.
- Next, you will need to remove the lower dashboard trim. To do this, use a wrench to unscrew the two bolts that secure the cladding on the right side. On the left side you also need to unscrew one bolt. After this, remove the lining.
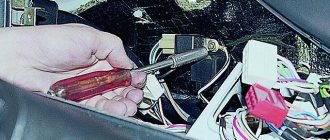
- Now you need to remove the lower trim of the front pillar. This way you get open access to the power supply.
- Now remove the two nuts that secure the Kia Spectra device. You can pull out the power supply along with the bracket. Now, using a screwdriver, you need to release the clamps and remove the interior power supply from the installation location.
- The location of the wires should be remembered, or better yet, marked so that during further installation they can be connected correctly. Disconnect all wires from the device and replace it with a new one. Then reconnect all wires and install the fuse box in the reverse order of removal. This completes the replacement procedure.
The request returned an empty result.
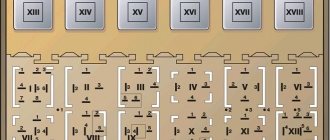
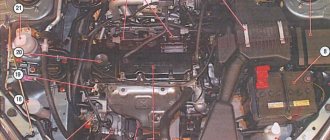
Removing the power supply under the hood
- As in the previous case, first of all, you should disconnect the battery.
- Open the hood and find your PSU. Press the lock and remove the power supply cover.
- Using a wrench, unscrew the fastening nut and remove the wiring from the stud, as shown in the photo.
- Now press the lower latch directly on the power supply itself and remove it from the installation site. The screw securing the power supply to the bracket must be unscrewed, after which the wires connected to it can be disconnected from the power supply.
- Then take a screwdriver and use it to pry out the fastener that secures the remaining wire harnesses.
Move them aside so they are out of the way. - Next, you can remove the power supply itself directly.
As in the previous case, all wiring blocks should be marked so that when installing a new device they do not get mixed up. After completing the installation, performing the steps in reverse order, do not forget to connect the battery.
The request returned an empty result.
Recommendations for use
A few recommendations regarding the operation of the device:
- Always use power supply elements only of the rating you need. If the part says 10 Amps, then it must be replaced with an identical one with the same rating. Otherwise, it will often fail.
- Do not use homemade fuses to avoid short circuits and even fire. You should always have a supply of power supply elements on hand so that if necessary, you can immediately change them.
- Do not allow moisture to enter the power supply unit installed under the hood. The entire system must be carefully sealed, and the power supply cover must fit snugly against the unit itself.
Compliance with these recommendations will help increase the service life of the device.
Video “Replacing PSU components”
How to change the fuses of the unit using Renault as an example is described in the video - the procedure will be similar for the Kia Spectra.
Do you have any questions? Specialists and readers of labavto.com will help you. Support the project - share the link, thank you! Rate the benefit of the article: Rate the author (1