The dashboard of the VAZ 2114 car helps the driver to timely monitor all the necessary data about the state of the power unit, the availability of fuel, the time period of the route, and the speed of the vehicle.
It is important to keep the panel in good condition so that the driver can easily see the readings of all the sensors found on it. If the panel malfunctions, emergency situations may arise, since the driver will not be able to check the status of all car systems, including the car alarm, the operation of the brake system, will not be able to take into account engine speed, determine the speed of the car, etc.
The panel also displays time, temperature, and indicates the operation of indicator lights and warning lamps. This is why you should always check that this device is working properly.
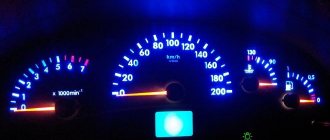
Dashboard lighting VAZ 2114
Why did the instrument panel illumination disappear on the VAZ-2114: does it not work and does not light up?
The dashboard is the driver’s first indicator of the car’s health, as well as a way to control various on-board systems. During the day, by and large, the instrument lighting is not needed, but at night it is a necessary component for safe driving. Thus, a malfunction of the backlight can even lead to an accident, so if a malfunction occurs, it must be eliminated as soon as possible.
Fuse box tracks burnt out
In a situation where the device “blinks” and periodically turns off completely, you should check the condition of the tracks in the fuse box. A short circuit, moisture and dirt getting into the block body - all this can lead to breakdowns on the tracks. The photo below shows a typical picture of a faulty fuse box in the “four”.
Because the price of a new block board exceeds 2000-3000 rubles; it is much more profitable to try to re-solder the tracks yourself. This problem is not critical, so if you have the skills to use a soldering iron, you can restore damaged tracks. For prevention, you can treat all contacts to remove oxides and dirt. It is also possible to treat contacts with dielectric grease.
If a lighting malfunction occurs due to a blown fuse, before replacing it, you should determine the cause of its failure. Most often this is a short circuit. Damage to the tracks on the unit board also causes the fuse to constantly blow.
If one of the lighting bulbs blinks, check the reliability of its contact. When driving on a bad road, the contacts in the device may come loose. The introduction of new lighting elements instead of standard ones is an intervention in the design. If new diode lamps are installed incorrectly, problems may occur with other components of the panel. Of the problems listed in the article, the “easiest” one is a blown fuse, while the most undesirable one is a malfunction of the board and mounting block. In any case, the availability of new and used spare parts for the “four” makes this problem insignificant.
The instrument panel backlight has disappeared, what should I do?
The dashboard going out is a nightmare for any driver, since with the disappearance of the light, other malfunctions may follow, such as non-functioning speedometer and other indicators.
Therefore, it is worth understanding that if the instrument panel does not light up, then this problem must be eliminated immediately , but not all car enthusiasts are capable of this.
It is worth understanding that if the backlight disappears, then the problem lies somewhere in the electrical circuits. This is where you need to look for the problem. This will require design knowledge of the vehicle's on-board circuit, a tester and related tools, such as electrical tape, a soldering iron or more. Of course, it is not always possible to eliminate the problem locally, and faulty products have to be replaced completely.
Causes of malfunction
Where does the problem lie? As mentioned earlier, it is worth looking for problems in electrical circuits. Let's look at the main locations where problems may be hiding:
- Fuse.
- Backlight bulbs and their electrical circuit.
- Wiring.
- There is a fault in the fuse box.
- Damage to the board.
Solutions
So, when all the main reasons are, so to speak, “in the face,” you can try to determine the exact location of the breakdown, and also fix it yourself. As always, it is worth noting that if a motorist does not know the design of the car or is not confident in his abilities, then it is recommended to contact a specialist car service center.
Fuse
General view of a blown fuse
Probably the first cause of all electrical circuit malfunctions is the notorious fuse.
This is where you should start troubleshooting. To find out which fuse is responsible for the instrument lighting, as well as its location in the mounting block, you should refer to the technical documentation. Also, on the fuse cover it is written which element should be checked. If the fuse is found and replaced, but the problem does not go away, then you should look for the source in another place.
Source
Solutions
First of all, you need to check the backlight bulb; if it does not work, it needs to be replaced. Also, the reason why the instrument panel in the VAZ 2114 does not light up may be a violation of the integrity of the wiring. You should call her. A damaged fuse and electrical circuit, as a rule, cannot be repaired - they only need to be replaced. Let's look at quick ways to solve these problems.
One or more light bulbs do not light up
One of the most common reasons why the dashboard lighting on a VAZ 2114 has stopped working is burnt out light bulbs. The electrical circuit of this model is designed in such a way that if one light source fails, they all stop working. To accurately determine the broken element, you will need to ring the entire system using a tester. Another reason for the lack of lighting may be the independent installation of LEDs instead of standard incandescent lamps. In this case, errors are often made in power distribution or the electrical parameters of LED elements are calculated incorrectly.
Wiring
Damage and cable breaks in the on-board power system are not uncommon on a VAZ 2114 car. To detect the break point, it is necessary to check all possible wires, which can only be found in the environment of the dashboard lighting. Also, the light bulbs may not light due to oxide deposits formed on the linings. To fix the problem, you need to take it apart and clean the entire pin group.
Fuse
Before you start calling a VAZ 2114 electrician, you need to disassemble the fuse box. Otherwise, the diagnostics will be incomplete and will not reveal the complete picture of faults in the instrument cluster lighting system. The cause of the breakdown should be sought both inside the wiring system and outside - in the seat. If during the inspection it turns out that the module is faulty, it should be replaced with a new one, since such equipment simply cannot be repaired.
The board is damaged
Violation of the connection diagram of the instrument panel system board on a VAZ 2114 is a more serious problem than the above. Despite the fact that many radio amateurs still repair and eliminate such a defect, in practice it is better to immediately replace it with a new one. The main reason why the backlight does not turn on in this case is a previous short circuit in the circuit. External signs of this will be as follows:
- If the light source is an incandescent lamp, the wiring to the board will be black.
- If LED elements are installed, a darkened place where they connect to the base will indicate the destruction of the microcircuit.
Important! After removing the panel, ensure that the surrounding area is as clean as possible to prevent moisture, dust, and debris from entering the electrical circuit.
Reasons for turning off the dashboard on the VAZ 2114
Turning off the dashboard lights does not bode well for either the driver or the car. Because this malfunction is usually followed by others. Therefore, the backlight should be repaired immediately.
Many drivers install LED lights instead of standard incandescent lamps. It should also be understood that if the lights on the dashboard go out, then the problem must be looked for somewhere in the on-board electrical network. This means you can’t do without a multimeter, a soldering iron and electrical tape. Here are the main reasons for turning off the backlight:
- fuse burned out;
- the light bulbs have burned out (or LEDs - in later VAZ 2114 models the panel is illuminated by them);
- the wiring in the on-board electrical network is damaged;
- The common contact board of the instrument panel burned out.
Let's consider these points in more detail.
Additional recommendations
If the dashboard on a VAZ 2114 does not light up, then the reasons for this are most often quite simple. In most cases, this is caused by oxidation of the contacts, and a little less often - by burnt-out light bulbs. Damage to wires and electronic components is quite rare.
That is why, before checking the entire electrical circuit of the dashboard, you must first clean all the contacts, even if they do not seem oxidized, and also test replace the light bulbs with new ones.
Sometimes the problem may be the wear of the cartridges themselves, in which case they will need to be replaced as well.
Burnt fuse
80% of cases when the backlight turns off is due to a blown fuse. It is located in a safety block installed under the steering column of the car. Usually the fuse indicated in the documentation as F10 is lit.
In the block, the fuse is located on the right and is designated as F10. It is responsible for the dashboard illumination, the operation of the side lights and the license plate lighting. On early VAZ 2114 models, fuse F10 was brown or red.
On early VAZ 2114 models, F10 fuses were brown; later cars began to have green fuses. It is not difficult to understand that the fuse has blown. It's enough just to inspect it. The housing of a blown fuse may be slightly blackened or melted, and the conductor inside the housing may be severed. The faulty fuse is replaced with a new one. Typically this solves the problem.
Lada 2114 2005 - breakdown
Cars for sale
Lada 2114 Samara, 2011
Lada 2114 Samara, 2003
Lada 2114 Samara, 2007
Lada 2114 Samara, 2010
Comments 7
I've had the same problem for about a week now - I've already burned two previous ones. The first suspicion was the left headlight, yesterday I took it apart and found two problems - the fastening of the low beam lamp fell out and the size diode melted, I’m not sure if this is the problem, but after fixing it, it seems to be holding up, it’s set to 10A. The weather has been dry and hot for a week now. The whole difficulty is that it doesn’t burn right away, but maybe it will last a day or two, so looking for or turning off something is pointless in my case.
hi, did you find the problem? ?
Same problem. On F10 everything works except for the instrument panel backlight. What could it be?
hello everyone, I have a 2004 Taz 2114. I had an electrical problem. Yesterday the instrument panel stopped lighting and the front left indicator light stopped working today, changed the fuse, the indicator light worked and the instrument backlight panel does not work, I thought the regulator turned on right away since the fuse was on, there was a short circuit somewhere
look at the lamp on the cigarette lighter...most likely because of it
Hello. fuse F10 at 7.5 A. It is responsible for the following networks: tidy, left dimensions (front, rear), license plate illumination and interior button illumination. We need to look for a short circuit. The rear light unit board often burns or frays.
Burnt out light bulbs
Dashboard lights operate under less than ideal conditions. They are regularly exposed to shaking, power surges in the car's electrical network and temperature changes. All this significantly reduces their service life.
Especially if these are not LEDs, but ordinary incandescent lamps, which were equipped with the first VAZ 2114 models. There are a total of 19 lamps (but this number also varies depending on the year of manufacture of the car, and the number of lamps should be specified in the technical documentation for the car).
Another reason for light bulbs to burn out is their improper installation. This is most often observed on early VAZ 2114 models, where drivers decide to independently replace obsolete incandescent lamps with new LEDs, making some changes to the electrical circuit. Without proper qualifications, this operation is not so easy to perform. Here's what the sequence for replacing light bulbs looks like.
- The steering column is lowered to the bottom position until it stops. Above it is the dashboard cover with four mounting screws. They are unscrewed with a Phillips screwdriver. To move the dashboard cover, just unscrew 5 bolts
- To the right of the panel there is a row of buttons. Next to it there is another screw hidden by a plastic plug. It is pryed off with a knife (or a flat screwdriver). The screw is unscrewed.
- Now you need to remove the car radio from the niche by unscrewing its mounting bolts, and also remove the plastic handles from the heater controls.
- The instrument panel casing is freed from its fasteners. It should be pulled towards you, extending it 15–20 cm. This will be enough to gain access to the rear wall of the instrument unit.
- A number of recesses with light bulb sockets are visible on the wall. They are removed manually. To do this, the socket together with the lamp is turned counterclockwise until a characteristic click is heard. The arrow on the back wall shows the socket with the light bulb; it is unscrewed by hand
- Burnt out lamps are replaced with new ones, then the instrument panel is reassembled.
Reasons for failure of dashboard lights
The dashboard lighting performs several important functions in parallel:
- control. The lamps light up when failures or malfunctions of individual components occur;
- informational. Notifies the driver in real time about the status of important vehicle systems;
- decorative In a dark interior, beautiful lighting on the instrument panel decorates and enlivens the front part of the cabin.
The main reason for the failure of light bulbs in the instrument panel is difficult operating conditions - heating, vibration, power surges. This significantly reduces the life of the lamps and causes a lot of problems:
- burnout of filaments in halogen devices, burnout of current-carrying paths in LED lamps;
- broken wires or the appearance of an oxide film on the contacts;
- problems with the fuse box or contact board;
- somewhere shorted to ground.
Before you try to change the lamps, you should accurately determine the cause of the problems that have arisen, otherwise you will not be able to get the expected result
It is important to know the condition of the fuses and the condition of the wires. The insulation on them often frays and begins to short to ground.
It is necessary to inspect the wiring and replace problematic connections.
Burnt-out lamps complicate driver control over car instrument readings
- We release the decorative cover of the front panel. For this we need screwdrivers: a short Phillips and a flathead one. Lower the steering column to the lower position using the height adjustment lever to keep it out of the way. The photo shows the mounting locations for the casing:
- There are four screws on the bottom of the visor and above the steering column. Unscrew them with a short Phillips screwdriver.
- Using a flathead screwdriver, pry off the decorative cap to the right of the row of switches. There is another fastening screw under it.
- Also, remove the handles from the heater switch and damper control sliders by pulling them towards you.
- If you have a car radio, you will also have to remove it. Unfortunately, complete dismantling is not possible. Arrows indicate locations for removal
- Pull the front panel cover towards you. He must move. There is no need to remove it completely - there will be enough space to access the mounting screws on the sides of the instrument cluster. Carry out your actions carefully
- Unscrew the fastening screws with a long screwdriver. The combination will be released and you can tilt it towards yourself. Pull out the two blocks with wires. Don’t be afraid to mix them up - there is a color marking, and the asymmetrical shape of the connector will prevent you from connecting it incorrectly. The arrow indicates the location of the cartridge handle
- On the back cover of the instrument cluster there are cartridge handles. Arm yourself with small pliers. This will make it easier to unscrew them. To release the cartridge, half a turn counterclockwise is enough. You can safely take out all the cartridges - they are the same. Next, you can check the lamps with a tester and replace the burnt ones, or replace them all with LEDs at once. Try to ensure that they fit tightly in the cartridge, otherwise the contact will be unreliable.
- We reassemble in reverse order. We insert the cartridges into the seats so that the antennae fall into the grooves, carefully turn them with pliers until they stop. We connect both blocks to the connectors of the instrument cluster.
- Let's check if all the lamps are working:
- raise the handbrake and turn on the ignition: so let’s check the handbrake, generator, oil pressure and check lamps,
- turn on the hazard warning lights - check the warning lamp and direction indicator lamps,
- pull the headlight switch lever towards you - temporarily turn on the high beams, check the warning lamp,
- turn on the dimensions - see if the scales are evenly illuminated, and if the warning lamp, if any, is on.
If everything works correctly, we fix the instrument cluster and the front panel casing, and replace the heater switch handles and damper controls.
Check the brightness and functionality of all devices
Congratulations, now the instrument lighting and warning lights are working properly, and you will always be aware of what is happening with the car. The overall aesthetics of the front panel will also improve - the evenly lit front panel looks beautiful.
As they say: neither nail nor rod!
Wiring damage
Problems with electrical wiring are the worst case. To figure this out on your own, the driver needs to have serious knowledge of electrical engineering. In particular, he must be able to read automotive electrical circuits well. Not all car enthusiasts can boast of such skills. It is for this reason that it is better to entrust the search for a damaged section of on-board electrical wiring to a qualified auto electrician.
His actions boil down to the following: he determines the key sections of the circuit and sequentially “rings” them using a multimeter until he finds a broken section of the wiring. Completing this work may take several minutes or several hours - it all depends on where exactly the circuit break occurred.
Panel contact board problems
If all of the above measures do not lead to anything, the last option remains: damage to the contact board in the dashboard. This part is a combination of several microcircuits. It is not possible to repair it in a garage without special diagnostic equipment. So the car owner has only one option - to replace the entire board. You can purchase it at any auto parts store. It costs about 400 rubles. Let us list the stages of its replacement.
- First, all the steps mentioned above in the paragraph on replacing light bulbs are performed.
- But instead of unscrewing the bulbs, you should unscrew the four bolts at the corners of the rear wall of the dashboard.
- The rear wall is carefully removed along with the board, which is attached to the wall with plastic latches. The contact board in the VAZ 2114 dashboard is held on by simple plastic latches
- The latches are bent with a knife, the damaged board is removed and replaced with a new one. The panel is then reassembled.
So, the owner of a VAZ 2114 can solve most problems with the dashboard lighting on his own. All that is required is the ability to use a screwdriver. The exception is the case of damaged wiring.
It is strongly recommended that you contact an electrician to identify the damaged area. This will save a lot of time and nerves, which, as we know, are not restored.
Removing the dashboard
Light bulbs have their own service life. They often last longer than what the manufacturer promised, but more often they burn out much faster. In the case of the VAZ-2114, the last trouble occurs quite often. Fortunately, the designers of the Volzhsky Automobile Plant realized this, and therefore provided the possibility of a quick replacement.
To do this, you only need two screwdrivers - a Phillips and a flathead one. Instead of the latter, it is permissible to use a regular knife.
At the first stage of disassembly, remove the decorative overlay of the panel. In the VAZ it is held in place by 5 screws. Moreover, the screw located at the top right is covered with a plug. It is not difficult to pull it out - just pick it up with a screwdriver and pull it towards you.
Next comes the turn of the levers that provide control of the heater itself and its dampers. If you have a radio or multimedia center, it will also have to be removed.
What to do if error 14 appears on the VAZ-2114 panel
After this, you will be able to slide the cover towards you - the cable loops are long enough to do this without difficulty. As a result, you will have direct access to the instrument panel itself. It is fixed with two screws on the sides. Unscrew them with a Phillips screwdriver.
Next, pull the panel towards you as well. Try not to pull - the power wire harnesses are connected to it, and they can easily come off at the soldering points. Their connectors should be carefully uncoupled, after which the element in question can be pulled out freely.
The procedure is as follows:
- a burnt-out light bulb is rotated 90 degrees;
- stretches out towards itself with fingers;
- a new one is put in its place - it is slightly pressed inside the cartridge and rotated clockwise until it stops.
Troubleshooting steps
To diagnose and repair the backlight system for the instrument panel on a VAZ 2114, you will need a pair of wrenches, sizes 8 and 21, and a set of screwdrivers. The general procedure for dismantling and adjustment work boils down to the following steps:
- Remove the trim by first unscrewing the three fastening screws and removing the protrusion from the body part bracket.
- Remove the five mounting screws from the right side of the console and remove the screen.
- Disconnect the terminal with the battery suitable for the negative power source, as well as the block with the bundle of wires from the cigarette lighter system.
- The handle of the lever mechanism is removed.
- The stove ventilation system clamp is dismantled.
- The screws securing the steering column brackets are removed.
- The sockets are unscrewed, the light guide and the decorative panel insert are removed.
- The light bulb for illuminating the hydraulic corrector is removed using a 21 key.
- Finally, the screws that secure the top and bottom of the instrument panel itself are unscrewed so that it can be removed.
Replacing the backlight
In analysis
To improve the quality of your dashboard lighting, it is advisable to install new LEDs in place of the old ones. They provide excellent illumination, consume minimal energy, and guarantee a high level of data reading.
- Buy a set of LED lamps, having previously calculated the number of devices needed for each sensor.
- After removing the block, install the resistors and lamps in specially designated places on the VAZ 2114 - in the sockets. To dismantle the cartridges, they are carefully unscrewed counterclockwise. New sockets are installed in their place and light bulbs are inserted. Respect the polarity and position the LED heads. They will have to be carefully ground off.
- Connect the power and check how the new backlight works.
- Reassemble step by step. Be sure to route the wiring to the board and carefully secure it to it. This way, the backlight components will not interfere with the reassembly process.
- Make sure the instrument panel arrows are positioned correctly. When trying to quickly complete a job, they often become deformed and bent.
- The backlight structure is fixed with screws.
- The power for the LEDs is connected to the power supply for the light bulbs, the arrows are put on and set to zero.
- Using the on-board computer, check the operation of each sensor and device. If the IDs are functioning correctly, return the instrument panel to its original condition. That is, assemble the entire assembly.
Main conclusions
If the instrument panel backlight on a VAZ 2114 car does not light up, most likely the light bulb has burned out or the LEDs have failed. However, there are several other possible causes for this problem:
- The wiring is damaged.
- Oxides have formed at the contact points.
- The safety side has failed.
- The electrical circuit burned out.
To establish the exact reason why the backlight does not light, you must, following the instructions, carefully disassemble the instrument panel and sequentially ring the entire circuit using a tester. The found faulty element, depending on the degree of damage, must be repaired or replaced with a new one.
Source
What kind of light bulbs are needed?
The instrument panel lighting of the VAZ 2114 consists of 13 lamps. But you can only change eight of them. The device uses 12 Volt 1.2 W lamps. From the factory, the car is equipped with ordinary cheap light bulbs with an incandescent filament, popularly called sunflower seeds, and in the spare parts catalog they have an article number 210613709500.
But some drivers prefer to change the light bulbs on the VAZ 2114 instrument panel to LED lamps. They can be multi-colored or even capable of changing the color of the glow; they shine somewhat brighter than usual. This allows you to change the appearance of the dashboard. In addition, they consume less electricity.
Useful : Do-it-yourself tuning of VAZ 2114 tidy
Experts recommend not buying the cheapest light bulbs for tidying, but purchasing more reliable ones. Among the halogen ones, products from the Philips and Osram brands performed well. If you buy LEDs, it is advisable to replace the cartridges as well, since they may not work well in old ones. The “fourteenth” uses 2W2 type cartridges. As for LED lamps, we can recommend the Korean Sho-Me SM-T5. They come in red, blue or white. White Sho-Me SM-T5-cap-super diodes from South Korea are also suitable. You can install a Chinese-made SMD LED module.
Let's look at the problem: the backlight of the VAZ 2114 instrument panel does not light up
An element such as the dashboard is very important for the driver - because it is thanks to it that he can control the most important parameters of his car while driving. And that is why a serviceable instrument panel ensures not only comfortable driving, but also the safety of the motorist and his passengers.
For a clearer perception of instrument readings on the panel, especially at night, it has a built-in backlight. True, situations often occur when the backlight of the VAZ 2114 fails. We’ll talk about why this happens and how to restore its functionality with your own hands below.
Replacing light bulbs with LEDs in the instrument panel
I decided to change the light bulbs in the instrument panel due to the fact that they began to burn out, since an alarm was connected to the dimensions. I decided to buy LED bulbs so I don’t have to climb anymore.
In the store I decided to buy regular white ones; there were red and green ones to choose from. I also bought bases for them, since in my device, and it is from AP. The bulbs are soldered to the bases. If you need to change all the light bulbs, you need 12 pieces, if only for the backlight, then 7... I decided not to save money and change everything.
Causes of malfunctions
There are a number of reasons why the instrument lighting of the VAZ 2114 may stop working correctly.
The most common of them are:
- light bulbs have burned out or diodes have failed (with LED backlighting);
- contacts and connectors have oxidized;
- fuses are blown;
- damage has occurred in the wiring itself;
- the integrity of the common contact board has been compromised;
- Lost contact with the “mass”.
In order to find out the exact cause, you will have to perform dismantling work and carry out diagnostics. You don’t need any complicated tools for this—it’s enough to have a simple tester (multimeter) or voltmeter.
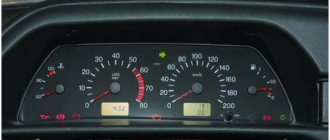
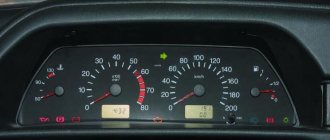
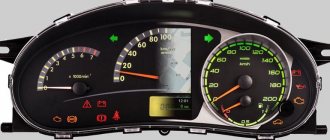
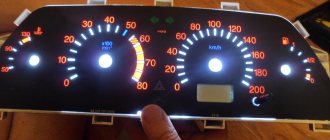
Purpose of VAZ 2114 devices and interpretation of the symbols on them
Located on the left side of the dashboard, directly in front of the driver's seat, the VAZ 2114 instrument cluster plays an important role in driving. It contains pointer instruments, VAZ 2114 indicators with electronic digital windows and signal lights for various purposes.
- An induction speedometer, which receives speed readings from a sensor located directly in the gearbox, shows the actual speed of the car from zero to two hundred kilometers per hour. The division price is 10 km/h. It must be borne in mind that such devices have a permissible error of at least 5 km/h. In the lower, central part of the device there is a window with an electronic display, in which two lines reflect the total mileage for the entire period of operation of the car and the current mileage.
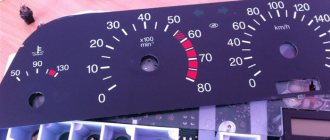
- To the left of the speedometer is the tachometer. This is an electronic device that, receiving a signal from the on-board computer, shows the current crankshaft speed at that particular moment. The scale has divisions of 5 units, digitization is done after 10 units, the maximum value is 80. When multiplied by 100, the real number of revolutions is obtained, for example, 30 multiplied by 100, the result is 3000 rpm. The range of 55 - 60 is shaded in red - this signals that the critical speed is approaching. The critical range 60 - 80 is shaded in red. If the speed increases to these values, the engine may fail. In the lower middle part of the device, an electronic display displays the time and real ambient temperature.
- To the left of the tachometer there is a dial gauge for the coolant temperature. It receives a signal about the actual condition from the coolant temperature sensor, which is located between the cylinder head and the thermostat. The division value is 20 degrees. Digitization of the device begins at 50, after two divisions it is 90 and the divisions end at 130 degrees. The red, danger zone starts at 105 degrees. If the arrow falls into this zone, then the engine must be turned off immediately, no matter what mode it is operating in. Due to overheating of the engine, failure of the main blocks of the power unit is possible. At the top, near the number 130, there is a graphic temperature icon. To the right of the speedometer is a device indicating the presence and level of fuel in the car’s fuel tank.
The numbers on the scale indicate:
- 0 is an empty tank.
- ½ - half a tank.
- 1 is a full tank.
The graphic symbol of a gas station at the top of the device indicates a fully filled tank. At the bottom right, an indicator in the form of a gas pump lights up in orange, indicating that the remainder in the tank is less than six liters.
Diagnostic procedure
In order to remove the instrument panel, you will need a set of screwdrivers and two wrenches - 8 and 21.
The entire procedure is performed in the following order:
- Unscrew the three screws and remove the trim.
- Unscrew the five screws on the right side of the console and remove the screen.
- Disconnect the negative cable from the battery.
- Disconnect the wiring harness that goes to the cigarette lighter.
- Disconnect the heater fan mount.
- Unscrew the bolts responsible for fixing the steering block brackets.
- Remove the light bulb sockets, light guide and decorative insert.
- Remove the lamp responsible for illuminating the hydraulic corrector.
- Unscrew the screws of the top and bottom rows of the panel and completely dismantle it.
Panel backlight upgrade
If the original dashboard lighting of the VAZ 2114 does not suit you, you can always modify it, thus improving its functionality and making it more pleasing to the eye. The first thing you need to do is purchase a new set of light bulbs. It is best to opt for LED ones - they have lower power consumption, have a higher light output, and also make instrument readings more readable.
True, you should first calculate the required number of LEDs to illuminate each device and alarm icon (there are 13 regular light bulbs in the dashboard, but more LEDs may be required. In case the replacement is made not with individual LEDs, but with LED blocks (lamps) , then their number will also be 13).
The process of upgrading the panel backlight is performed in the following order:
- dismantle the block;
- unscrew (counterclockwise) the original sockets, install the sockets for the LED backlight;
- install resistors and lamps in special sockets;
- bring the wires from the backlight to the common board and fix it on it;
- check the functionality of the new backlight;
- If everything works, reassemble it.
During such tuning, you should definitely monitor the condition of the instrument needles - they are a rather fragile element and, if handled carelessly, can easily bend, break or deform, as a result of which instrument readings may be incorrect. In addition, upon completion of the entire process, you should check whether the arrows are set to “zero” and, if necessary, adjust their readings.
Also, immediately after completing the installation of the new backlight, you should check the functionality of all electronic devices and components using the on-board computer. If all identifiers work correctly, then you can reinstall the instrument panel (proceeding in the same order as its dismantling (see above), but in reverse order).
INSTRUMENT PANEL TUNING
If you want to somehow improve the appearance of the dashboard or make it functional, you can tune it.
The most common type of dashboard tuning is installing new lamps in the instrument lighting or installing additional lighting. Most often, lamps are replaced with lamps with a different color of luminous flux (for example, green or blue). The color selection should be such that it does not irritate the eyes, especially in the dark. Additional lighting is used mainly for the lower part of the panel at the feet. To do this, you can buy a ready-made set of LEDs and connect them to the car’s on-board network.
Another tuning method involves changing the appearance of the instrument scale. To do this, you can print ready-made solutions on a color printer, glue them to hard cardboard and install them instead of the old scale. It is worth considering that the lighting of the new scale may differ slightly from the factory one. Therefore, important criteria will be the color of the scale and the material to which it will be glued.
A more serious modernization involves changing the appearance of the panel itself. To do this, it can be painted or covered with new material. If you decide to cover the panel, then use only approved materials. Ordinary fabric and fur are prohibited, as they are flammable. The color of the upholstery should be chosen in accordance with the general background of the interior. A combination of two colors at once (for example, beige and brown) looks great.
If you decide to paint the panel a different color, it must be removed. After this, it is cleaned with sandpaper and degreased. First of all, a special sealant is applied, and then car paint. Do not use paint materials that are highly sensitive to high temperatures. If you paint the plastic with any other paint, then when the car is left in the sun for a long time, the paint will melt and simply come off. Another trouble may await you when washing the panel - ordinary paint tends to be washed off with ordinary water, or even better - with soap. Be prepared for the fact that at first the salon will smell like paint.
Didn't find the information you are looking for? on our forum.
We recommend reading:
VAZ 2110 stalls while driving, 8-valve injector, possible causes and solutions
Adjusting the electronic ignition on a VAZ 2106
How to adjust the rocker on a VAZ 2114, varieties, repairs
12124 VAZ
Replacing the float in the gas tank of a VAZ 2107, removal and installation with photo
How to remove the starter on a VAZ 2110, replacing the starter, retractor, bushings
How to close the starter on a VAZ 2110, reasons for starter failure, three ways to start the car
Connection diagram for tow bar for VAZ 2104