2. After access to the center console mounting screws is open, use a screwdriver to unscrew them (There are two screws in total, one on the driver’s side and one on the passenger’s side, see photo below), that’s all, you can consider that you’re done with the lower part, move on to the top.
3. Regarding the upper part of the center console, in general, take a flat-head screwdriver and, using it, remove the small trim, as shown in the photo, under it there will be a screw for a Phillips-head screwdriver, so take the screwdriver that will be needed and unscrew this screw completely and proceed to completion.
4. And finally, without screwdrivers, purely with your hands, remove the heating fan switch handle and all three plastic covers that are attached to the levers, but only they are secured with clamps, so you don’t need to pull them with all your might, in this case, by the way, you will need a screwdriver, The clamps are located at the ends of these plastic covers; if you look closely you can see them.
Note! You can, of course, disconnect all the wires if you want, but this is purely at your discretion, we will immediately note that if you disconnect the work will take a long time, when reconnecting the wires, do not confuse them and before installing the center console, turn on the light and thereby you will know if everything is the buttons will light up, correct this if necessary!
7. That’s all, install the lamps, check the operation, if everything works then put the center console in its place, if it creaks or rattles on bumps, you can glue it, for more details on how to do this, see the video below (Only this The video refers to the VAZ 2109, but the principle is essentially the same):
What kind of lighting do you prefer?
Built-in Chandelier
Expert opinion
It-Technology, Electrical power and electronics specialist
Ask questions to the “Specialist for modernization of energy generation systems”
VAZ 2114 dashboard - malfunctions, repair methods, how to disassemble The required wire is called back, the location of the break or poor contact is determined and, if necessary, replaced or cleaned. Ask, I'm in touch!
Car dashboard tuning
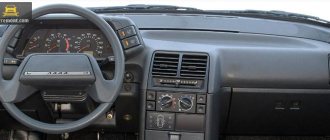
The dashboard is a source of important information for the driver, located directly in front of his seat. This is a multifunctional unit in which control and measuring instruments are mounted that reflect engine temperature, oil level, machine speed, crankshaft speed and other parameters. In addition to the main indicators, the panel is equipped with a light alarm. With its help, you can easily determine the mode and operating features of various vehicle components.
Many manufacturers spend more time on designing the exterior of a car, paying less attention to interior design. That's why the standard option rarely satisfies the driver's needs. The panel is not always convenient and does not fit well into the interior design of the car. High-quality dashboard tuning is a way to correct the situation, transform the interior, make it unique and easy to use.
Decorative tuning
When making changes to the design of a car's dashboard, it is necessary to ensure a harmonious combination of the updated panel with the overall appearance of the interior. The tuned instrument panel should fully ensure the safety of the driver while he is in the car.
Tuning the dashboard allows you to move away from the classic design and change the interior design of the car for the better. Decorative design helps to cope with this task, which consists of the following:
- Application of leather substitute to cover the surface of the panel.
- Changing the appearance of instrument scales by choosing a different color palette (brighter colors are used).
- Installation of decorative overlays.
To solve the assigned problems, partial or complete disassembly of the panel is necessary (how to remove the instrument panel). Therefore, be prepared for such work, set aside time and prepare everything you need (tools and finishing materials).
How to change color?
To adjust the color palette of your fixtures, start by determining the dimensions of your old fixtures.
The next step is to prepare a new scale, and then apply the required numbers to its divisions. Alternatively, use a graphics editor on your computer to create unusual shapes and sizes. Watch the video “LED backlighting of the dashboard of VAZ 2114 (2113, 2115, Niva, Chevrolet Niva)” below.
The advantages of this option for tuning the dashboard are the absence of financial costs, the ability to personally select the font of interest and set the appropriate size of the inscriptions.
Glue the finished template to the blank, which acts as an updated scale. As a material, use self-adhesive film, plastic or vinyl film. Alternatively, you can use colored tape.
If you are changing the design of the tachometer and speedometer, then remove the arrow before applying a new scale. After completing the work and smoothing the new pattern on the surface, return the pointer to its place.
Please note that tuning the dashboard is a labor-intensive process that requires accuracy, attention and a certain amount of time.
Rules for covering the instrument panel
An equally popular option for changing the dashboard is to cover it using special materials. This tuning method is good if there is damage to the surface or if the appearance is lost. Dermantin is considered one of the best materials, characterized by its solid appearance and wear resistance.
Before performing work, cut out the product, taking into account the shape and size of the dashboard. Thanks to preliminary preparation, it is possible to avoid many problems - excessive stretching of the material or, conversely, the appearance of wrinkles.
Before starting work, remove the panel to ensure high-quality seams and joints of various pieces of material. To cut, use cardboard, then combine all the parts and check the correctness of the workpiece. Sew the elements into a common fabric so that the seams are on the inside.
The last stage of this option for tuning the dashboard is fixing the finished leatherette fabric with a special adhesive and self-tapping screws.
Choose your material carefully. Focus on several criteria, including appearance, wear resistance, lack of glare when the surface is exposed to sunlight. Also make sure that the product does not emit unpleasant odors when exposed to high temperatures.
Technical tuning: what are its features?
For many car enthusiasts, improving the appearance of the dashboard is not enough. They plan to go further and change the functionality of certain elements. Here we are talking about a more “deep” technical tuning of the dashboard. This work is aimed at replacing incandescent lamps with LEDs, installing other (in size and shape) control devices, and installing additional devices and switches. Changing the icons on the panel is also part of the tuning.
To achieve a high-quality result, prepare a panel diagram and decide on the end goal. The correct connection of additional devices to the machine’s on-board network depends on the accuracy of the tasks assigned. This reduces the risk of errors and short circuits in the secondary circuit when performing work.
How to install LEDs?
One of the most popular tuning methods among car enthusiasts is replacing standard light bulbs with more reliable and brighter LEDs. To implement the task, proceed as follows:
- Remove the instrument panel panel.
- Remove the bulbs and sockets that were installed at the factory.
- Determine the mounting points for LED lamps. As a rule, products are installed around all indicators and instrument scales.
- Carefully choose the shade of LEDs. Ideally, it should be comfortable for the eyes and not create obstacles to normal visibility. In addition, the emitted light should not put pressure on the eyes and lead to fatigue when moving in the dark. On the other hand, the backlight should provide high-quality illumination of instrument scales and indicators.
- Drill a hole to match the diameter of the LED and install a new lamp in it.
- Install all the LEDs and solder them together using a soldering iron and small pieces of wire.
- To adjust the brightness of the backlight, connect an adjustable resistor and install it in a convenient place. Some cars already have a rheostat, which is installed from the factory.
Correct overexposure of the buttons of the new VAZ 2113/2114/2115
Hi all. While my interior was half disassembled, the box was snotty and the body was rotting, I decided to start re-lighting the buttons. Don't ask why. Necessary.
On DRIVE2 I read a huge number of posts about changing the backlight of the buttons, but still decided to post the result of my work, and also called this replacement CORRECT
.
First, a few thoughts. This portal is primarily TECHNICAL for me and, as a technician, I am interested in various modifications, especially in terms of electronics. Really interesting material about alterations and necessary modifications constantly has to be painfully searched for. The records found about modifications and alterations turn out to be both hastily (the majority) and very competent with the corresponding investments. I have no right to criticize anyone, but I am a supporter of competent and careful alterations. When I started looking for information about overexposing buttons, I found a lot of records with reports on the work done, but something was missing everywhere. That is why I decided to leave my post, combining here all the necessary (in my opinion) information.
So, what is the component of the correct overexposure of LED-backlit buttons?
1) Making changes to the scheme. An LED is not an incandescent lamp and has a completely different operating principle. For an LED, the current passing through it is important, so selecting a current-limiting resistor is point No. 1. It should be noted that the parameters of LEDs also differ depending on the color of the radiation and their standard size. Even LEDs that look the same can have significant differences. 2) Accurate execution of work. Vandal soldering or an attempt to “shove something that cannot be shoved” into the criterion of correct overexposure does not fit this criterion. Replacement elements are selected exactly the same size as in the buttons themselves. The most accurate soldering. It is also correct not to leave traces of the sting on the plastic. 3) Understanding the purpose of button illumination. This is very important, because in many entries I did not see this from their authors. I didn't see it at all. The backlight in the buttons is clearly not intended to burn out the eyes and illuminate the interior. Despite this level of light, many write that it is not bright enough. 4) Combination of button illumination with interior design. A controversial point, but... The green backlighting of the buttons goes well with the green backlighting of the instrument panel, but it doesn’t go well with the color of the car.
Everyone has their own tastes and everyone has their own choice, but personally, I would never install blue LEDs in Vinishko. This point is a matter of taste. My vision of the correct replacement of buttons is exactly this. If you disagree, leave a comment. Always open to criticism and discussion.
The new type of buttons with indication use SMD LEDs and resistors. The standard size of LEDs is always 0805, but resistors come in both 0805 and 1206. To find out which ones you have installed, you need to remove the top cover of the button. If you do not see resistors on the board, this means that 1206 resistors are soldered on the back side of the board. Regardless of the color of the light, the button illumination LED consumes 6mA at a voltage of 12.55V, the power-on LED consumes 16mA at the same voltage. I obtained this data experimentally on different buttons. From this I conclude that the button manufacturers determined the brightness of the emission only by the current consumption, therefore, during the modification, all other parameters of the LED will not be used.
Before starting work, it is advisable to figure out what you need to buy. I used a calculator for calculating a resistor for an LED (for example, the ElectroDroid application) and the parameters of commercially available LEDs (in this case, the drop voltage is sufficient) to calculate the resistor for your LEDs for a current of 6mA and 16mA, respectively. I went further and decided to find out the real value of the voltage drop of the purchased LEDs using Transistor Tester, and then I purchased the necessary resistors.
In this way, the voltage drop value of a particular LED is determined
Having received the calculation results, you can purchase the necessary components and prepare the buttons. To remove the buttons, it is better to remove the front part of the dashboard (no need to try to pick them from the front), disconnect the pads from the buttons (you can mark them first if you wish), clamp the petals on the sides that hold the button and push it towards you. Repeat this operation with all buttons preparing for overexposure. If you have worn out buttons, put them aside for donation. At the end of the post you will understand why.
I collected some of the test subjects, they will soon shine with new colors
Next, we proceed to disassembling the buttons themselves. It's best to start from the top of the button. To do this, pry up the button cover latches with a small screwdriver or other flat object and remove it.
Pry up the latches of the button cover and remove it by moving it towards you
Before us is the following picture:
What's under the button cover?
With this method you can determine in advance whether you are lucky or not. The fact is that the new type buttons come in two varieties: those with a backlight board simply put on the contacts, and those with a backlight board soldered to these same contacts. There is also a hybrid version, where conductors are soldered to the board and touch the contacts inserted into the button. We'll talk about this button sometime in future posts.
Next, you need to remove the moving part of the button from the base. To do this, you need to use a flat object to bend the body on the sides to release the latches and pull the moving part towards you.
Here and on the opposite side we unbend the body and push the moving part towards us
This is the picture:
This is how the base of the button and the moving part look separately
Pay attention to the button lock and spring, do not lose them!
The next step is to remove the backlight board:
- For buttons without soldered contacts, push the contacts out from the side of the board and pull them out, after which the board should fall out.
- For buttons with soldered contacts, the situation is a little more complicated. It is necessary to simultaneously pull the contact and heat the soldering area without damaging the plastic. When the solder melts, the contact comes out of the button without any problems. We repeat the steps for all contacts, after which we remove the board. At this stage, you can remove excess solder from the contacts on the boards in advance for easy installation back.
I soldered the contacts using this method: holding the contact, at the same time pulling the moving part in the other direction and at the same time heating it with a soldering iron. Immediately after the solder melted, the contact went out.
All buttons are prepared, disassembly takes a few minutes.
Test subjects are ready
Well, here we come directly to the goal of our work. Further, you don’t need a lot of text, you only need skills in working with soldering equipment. By this moment, the soldering hair dryer (or, in extreme cases, a soldering iron) should be heated. We unsolder the LEDs and resistors and solder new ones in their place.
Below are some photos of the replacement process:
Please note that the LED has an anode and a cathode. This is kind of a plus and a minus. If you mix it up, the LED will not light up! The existing diodes on the board, connected parallel to the LEDs in the opposite direction, perform a protective function. When soldering, we rely on the cathode designations on the LEDs and on the board (if any)
Having finished soldering the elements, it is advisable to check the correct operation of the backlight before assembling the button. To do this, we apply a voltage of 12-14V to the necessary contacts and make sure that it is working.
We assemble the button in reverse order.
Button with redesigned backlight. The board is in place.
This completes the overexposure of the buttons. The result was a soft and natural light for them. It's a pity that the quality of the pictures leaves much to be desired. LEDs operate in the mode allowed for them. Since the same LEDs and resistors designed for the same current were used for all buttons, the backlight turned out to be even on all buttons. I have already tested the perception of backlighting at different times of the day in different weather conditions and I was very pleased with the results. The red power indicator is clearly visible on a sunny day and does not hurt the eyes on a dark night, just like the white backlight of the button designation. The chosen palette is dictated primarily by the color of the car, as well as the smooth overexposure of interior elements using red and white LEDs.
The final result There was a fly in the ointment. Worn buttons allow light to pass through the entire lid, so the light may appear brighter. Not really. Another negative point is the different manufacturers and, as a result, the difference in buttons. Now we're talking about filters.
In the photo below we see both of these shortcomings:
Well, it’s a complete fail with the buttons of the ESP Grants and Kalinas: they are both worn out and quite bright. I will recalculate the resistors.
The red color penetrates well into all crevices, and here too it penetrated through the abrasions of the button.
Of course, for correct overexposure, it is necessary to measure the luminous flux, and based on this, select the necessary parts, since at the same current one LED can be much brighter than another... I am still satisfied with the result of the work, however, the soldering could have been of better quality, and the selection The resistor could have been approached from the other side.
We continue to work on the remaining light sources in the cabin.
Have you done or are you ready to do overexposure of the buttons? I look forward to your comments and criticism.
Why does the backlight in the VAZ dashboard not light up?
The contact between the board and the lamp must be well connected, otherwise the ends of the contacts should be cleaned, bent, and if necessary, replace the lamp socket. If the backlight stops working or the radio is faulty, the fuse must be replaced. Maybe the damage is not in the fuse, but in the wiring, which also requires replacement. Although this is a troublesome task, it is worth it.
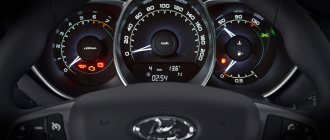
Everyone strives to make the salon spectacular and cozy. The dashboard is a favorite place for tuning. To make the panel devices look stylish and modern, they can be modernized. Let's look at how backlight tuning is done. You can improve the appearance of a vehicle yourself, since the process is not at all complicated. The first step is to replace regular yellow light bulbs with bright LEDs.
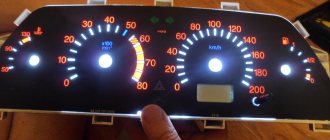
Chinese diodes are cheaper, but they will not last long. To ensure that the light comes directly from the diodes, heat shrink is put on them, and the arrows will be clearly visible even in the dark.
The diode wires are connected to the backlight from the machine stove. To change the color of the arrows, a red diode is placed under each arrow.
The light from the arrows will acquire a rich, bright red color, which will noticeably update the panel. Blue light bulbs are popular. The central panel is also subject to tuning, respect is guaranteed. The glow becomes soft and irritates the eyes when driving.
FakeHeader
Comments 84
Who can tell me, I changed the tidy to blue, how to make the arrows bright red, otherwise they are not visible at night
I borrowed scarlet nail polish from my wife and painted the arrows with a thin layer on all sides.
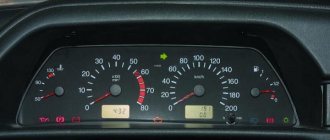
normal, 7000 on the tachometer 180 on the speedometer