Basic faults
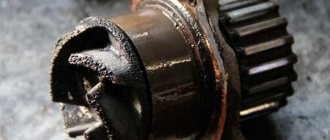
The main problem due to which a CV joint can become unusable is the ingress of a large amount of dirt into it. This happens when the anthers are damaged, so their integrity should be checked regularly. To do this, you just need to look under the car, first turning the wheels completely in any direction, and if you find lubricating fluid, ruptures or cracks in the cover, replace the damaged part. By shaking the drive shaft a little by hand, you can check the condition of its play.
Also, the reasons for the failure of the CV joint may be its expired service life, since it is limited, and poor quality of the part (defective).
Less common is damage to the retaining ring, in which the axle shaft comes out slightly from the part during sharp turns. This contributes to the appearance of damage on the “grenade”, and after some time to its complete failure.
Cracking and knocking noises when turning the wheels are harbingers of external joint malfunctions. Signs of damage to the internal grenade are crackling clicks and strong vibration that transfers to the body during acceleration.
VAZ 2114 grenade: signs of malfunction and diagnostics
So, the CV joint, which is actually a ball bearing, has races with transverse grooves to change the angle between the drive and driven axle shafts. It should be noted that on a car with front-wheel drive, it is the grenade that is the weak point for a number of reasons. Even taking into account the fact that all components of the part are made from materials of increased strength, signs of CV joint failure may appear as early as 50-60 thousand km. mileage
Failure occurs for various reasons, the most common being:
- damage to the CV joint boot and ingress of dirt and water;
- low quality or complete absence of CV joint lubrication;
- severe vehicle operating conditions, heavy loads;
At the same time, the main sign that the CV joint on a VAZ 2114, 2115 or other car needs to be replaced is the crunch of a grenade. This sound is made by balls rolling along ditches as wear and tear occurs.
As a rule, the CV joint crunches during acceleration, cornering, etc. Problems with the grenade are also indicated by slight jerks at start-up or when changing speed. As part of the initial diagnosis, it is possible to detect shaft play between the CV joints when moving in different planes.
By the way, there are two CV joints in the design (outer CV joint VAZ 2114 and inner CV joint VAZ 2114). Although both elements perform the same function, the external grenade fails much faster and more often. The reason is higher loads and rotation angles of the hinge in the hub area. So, signs and symptoms in the form of a crunch often point specifically to the external hinges.
In turn, the internal CV joint can make noise when driving in a straight line and manifests itself when overcoming bumps. Such a hinge will have play when tested. You can also hang the front wheels and engage 1st gear so that the wheels rotate in a suspended state. In this case, the inner CV joint becomes bent and a crunching sound appears from the faulty joint. All the signs discussed above indicate that the CV joint of 2114 or another car needs to be changed.
Why change
If damaged anthers are found, they must be replaced. Otherwise, dirt will penetrate into the “grenade” through cracks and tears and over time the part will fail, and there will be a need to purchase a new element and then replace it.
What do you mean it will fail? When the car moves at any turn, the CV joint will fall apart into two parts. It will be impossible to continue operating such a machine. In addition, all the oil may leak out of the box.
To avoid unpleasant consequences, it is necessary to promptly replace the damaged part.
An outer CV joint will cost 1000 - 1500 rubles, depending on the manufacturer. The price of the internal “grenade” is slightly higher than 1400 – 2200 rubles.
Device and appearance
Even before you encounter problems with your car, it is important to understand how it works. That is why, before talking about malfunctions in the external grenade or methods for eliminating them, it is necessary to show the general structure of the wire
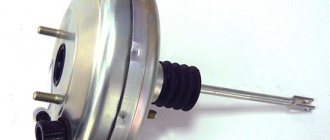
This paragraph will be especially informative for those who are encountering the concept of a constant velocity joint or the abbreviation CV joint for the first time. So, the photo below shows the CV joint drive assembly. All the main elements of the drive are labeled in the photograph.
Of course, it is not enough to look at something to understand its design and operating principle. In the next photo you can see a cross-section of the CV joint drive, with all the parts that make up its design indicated.
As can be seen from the photographs above, the drive has two CV joints: one external or external, the second internal. When it comes to CV joints in a conversation, you may hear the term “grenade” - this is the popular name for CV joints (obviously, due to a certain external similarity).
We also invite you to watch the video, which shows the operation of all the elements of the CV joint:
The principle of operation of the CV joint drive is very simple: the shaft is engaged with the differential, which transmits torque from the transmission to the front wheels. The inner CV joint is attached to the gearbox, the front one is connected to one of the drive wheels. Obviously, the external grenade will experience greater loads and interact with the environment more often. Such operating conditions can lead to increased wear in the grenade and its faster failure.
Therefore, it is especially important to monitor the condition of the outer CV joint and observe changes in its operation and possible malfunctions
CV joint replacement
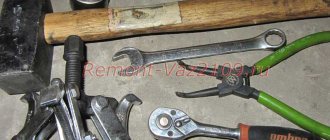
You can make the replacement yourself; to do this, you need to stock up on the necessary tools:
- key at 17, 19;
- heads at 13 – 17, 30;
- balloon;
- mounting blade;
- knob;
- jack;
- pliers and lubricant.
Having prepared the tools, we move on to the car.
For convenience, we drive the car onto an overpass or inspection hole. We put the handbrake on and engage the gear. For greater safety, you can put clamps under the wheels; only the rear two are enough.
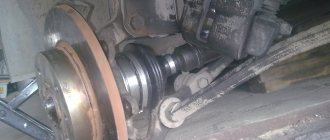
The inner and outer CV joints are located on the shaft drive, therefore, the technology for replacing them is almost identical.
CV joint replacement
- We remove the crankcase protection; to do this, unscrew two bolts at the front to 17 and 2 nuts at the back to 19.
- Drain the lubricating fluid from the box (about 1/3 of the total volume).
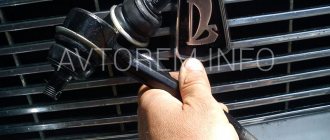
- We use a wheel wrench to remove the wheel bolts of the side of interest.
- Take the 30mm head and unscrew the outer CV joint nut.
- Raise the car using a jack.
- We take a 13mm wrench and unscrew the two bolts (you can knock out one of the pins) from the hub that hold the ball joint.
- Using a mounting blade (mount), we move the hub away from the reaction rods.
- Pull the strut towards you and pull the CV joint pin out of the hub.
- Move the shaft drive to the side.
- Open the hood and use a pry bar to remove the inner CV joint from the box. To do this, you need to insert a mounting blade between the parts and pull it sharply towards the box.
- After the CV joint has moved a little, we move to the wheel arch and pull out the shaft drive with two “grenades”.
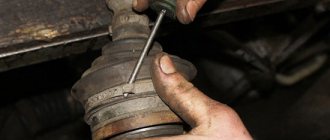
- We take pliers and remove the large and small clamps of the protective cover from the grenades.
- If the boot is damaged, we tear it off, and if not, then we move it to the center.
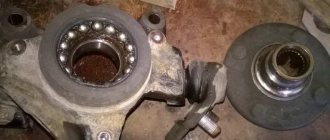
- We hit the inner race of the inner CV joint as hard as possible with a hammer until it falls off. We do the same thing, on the other side.
- Remove the rings from the shaft drive.
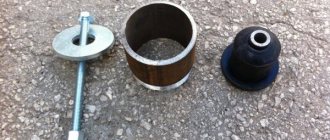
- We put rings from the new CV joint kit on the shaft and a new boot.
- We hammer in a new “grenade” with a hammer.
- Lubricate the CV joint with grease, and squeeze the remainder into the boot.
- Using clamps, we fix the boot on the “grenade” and the shaft.
- We do the same with the other CV joint.
- We take the shaft drive, screw the nut onto the outer CV joint and use a hammer to hammer it into the box.
- We assemble the parts in reverse order.
Features of replacing the internal unit
If the internal CV joint 2108 is being replaced, then complete removal of the drive is required. To do this, first disconnect the outer joint (described above), but do not need to remove it from the shaft.
Then we take the pry bar and drive its flat end between the outer frame of the hinge and the box body. Using the pry bar as a lever, overcoming the force of the locking ring, we remove the joint limit switch from the gearbox.
It is worth noting here that it is not recommended to remove both drive shafts at once, so as to avoid displacement of the gears in the box; the joints should be replaced one at a time.
Related link:
Homemade pre-heater for a VAZ car engine
Next, replacement work is carried out, identical to operations with an external CV joint. After this, the drive is put in place.
In this case, you still need to correctly insert the CV joint into the VAZ-2108 box. The hinge must be seated in the gearbox as far as it will go; however, blows to the end of the assembled unit must not be struck, so as not to damage the new boot.
To insert a CV joint, you can first insert it into the hub, and then insert it into the box. And to overcome the force of the locking ring, we make pushing movements with the hub, that is, in essence, we hammer the end of the inner CV joint with the strut. Such impact movements will not cause any harm to the hinges, and the anthers will remain intact. But you can simply hammer the shaft assembly using a spacer and a hammer.
Before assembling the car, you should make sure that the internal hinge has entered the gearbox all the way and is fixed with a locking ring (it should fit into the groove inside the box), otherwise the CV joint may simply fall out during operation of the car.
And then we put all the removed elements on the car. The operation to replace CV joints on a VAZ-2108 can be considered completed.
Replacement results
Failure to replace the boot in a timely manner will result in the “grenade” breaking, which in turn will make it impossible to use the car. Regular inspection of boots and CV joints will prevent dirt from getting into the part.
If you find breaks in the boot, you should purchase new ones and install them. When replacing boots, you should inspect the CV joint to make sure it is in good condition. This will not take much time, but will preserve the integrity of the CV joint and save money.
If you nevertheless looked at the cracks and tears in the protective case and did not have time to replace it at the initial stage, but realized the problem from the characteristic sounds, then it is necessary to replace the damaged “grenade” as soon as possible. After the repair has been carried out, it is recommended to check the car; to do this, you need to drive it in a circle and accelerate a little on a straight road. The absence of creaking and tapping sounds is a sign of correct installation.
Removal and installation of VAZ front wheel drives
Step-by-step procedure for removing and reinstalling front wheel drives on a VAZ 2110. Step-by-step procedure for removing and reinstalling front wheel drives on a VAZ 2110.
The front wheel drives consist of two joints (CV joints) and a shaft that connect the joints. The cause of drive failure may be worn-out spare parts in the hinge, a torn or damaged cover that is needed to seal it, or if the wheel drive shafts are deformed.
If there is any malfunction of a spare part, it should be replaced. To do this, remove and then install the front wheel drives.
First you need to remove the protection on the crankcase and drain the oil in the gearbox. And then proceed to the next steps.
Removal
3. Drain the oil from the gearbox (see “Gearbox - oil change”).
4. Remove the hub cap and loosen the hub nut (see “Front wheel hub bearing - replacement”).
5. Loosen the wheel bolts (see “Wheel - replacement”).
6. Place the car on a reliable stand and remove the front wheel (see “Wheel - replacement”).
7. Loosen the three self-locking nuts securing the upper support of the suspension strut and unscrew the nuts a few turns (see “Front suspension strut - removal and installation”).
17 mm socket wrench
unscrew the two bolts securing the ball joint to the steering knuckle (see “Ball joint of the strut - removal and installation”).
30 mm socket wrench
Finally unscrew the wheel hub nut (see “Front wheel hub bearing - replacement”).
10. Remove the shank of the outer hinge from the hub. If necessary, knock it out through a wooden block or press it out using a universal three-jaw puller (see “Front wheel hub bearing - replacement”).
Note: When removing the left drive, turn the steering wheel all the way to the right; When removing the right drive, turn the steering wheel all the way to the left.
11. Remove the brake hose from the bracket on the suspension strut. Carefully, without allowing too much tension on the brake hose, pull the lower part of the strut outward, remove the shank of the outer joint from the hub and carefully lower the drive onto the wishbone of the suspension.
12. Using the mounting blade as a lever (resting its end against the end of the internal hinge body), we move the hinge outward, overcoming the resistance of the locking ring.
13. Supporting the internal joint, carefully (being careful not to damage the drive oil seal with the splines of the joint shank) remove the joint from the gearbox and remove the drive assembly from the car.
Required spare parts
Each car is equipped with two grenades: internal and external. The first joint transmits rotation to the shaft from the gearbox, the second – to the hub from the shaft. Depending on the scope of the repair, you may need:
- internal hinge (article 302315, 2108-2215056);
- external CV joint (article 3107K, 2110-2215012);
- front wheel drive shaft (article 2110-2215070, 21100221507000);
- cover (article 2110-2215068, 21100221506800, 2108-2215068);
- buffer (article 2108-2215073-01);
- hinge clamp (article 2108-2215086);
- internal hinge retaining ring (article 2108-2215104, 21080221510400, 2121-2215084);
- thrust ring (article 2121-2215082);
- clamp (article 2108-2215034Ч, T-00040, 2108-2215036, 2108-2215034-31, 2108-2215034);
- protective ring (article 2108-3103060, 21080310306000).
Attention! It is better to purchase a new hinge using an old grenade, so the risks of purchasing the wrong part will be reduced to zero. It’s better to go to a trusted store for a CV joint.
First type
Let's start with the most popular. This is the so-called “Ford” clamp. Recently, it can increasingly be found in kits from various manufacturers of grenades for the VAZ 2110 and other domestic cars. Among its advantages, of course, is the full connector, that is, if you accidentally forget to put it on in advance, you can do it at any time. In addition, you can’t “tighten” it. Among the disadvantages, of course, is its disposability; you can use it a maximum of 2 times. Many may think that there is always a new one in the kit, but they would be extremely mistaken. It also happens that he is not there. Anything can happen. To install it you will need pliers or regular side-cutting nippers. We just tighten it as much as we can with our hands, then squeeze it.
Second type
These are purebred Chinese clamps. As soon as you see them, you will immediately understand why there is such an opinion about them. These clamps are simply made almost from foil. That is why they are tightened in two turns. To install, simply place the screwdriver into the plastic to avoid turning, then tighten it, bend it, bend the antennae, cut off the excess. The advantages include ease of installation; absolutely no tool is needed except a screwdriver. Well, the downside, as with the previous option, is that it is disposable, since after installation you will have to cut off the extra tail of the clamp with scissors.
Third type
The third type can only be found on grenades for domestic cars. On the one hand, they are the most convenient, since they are made of thick metal, which, by the way, is quite soft; installation takes about five seconds. It can be installed at least 10 times, it all depends on accuracy. Of course, there is one drawback - the need for a special clamp, the cost of which is several times higher than the cost of replacement at a service station. Of course, if you plan to buy only the same grenades, then you can buy the necessary thing.
Installation
1. Replace the retaining ring of the splined shank of the inner joint housing with a new one.
2. Apply grease to the spline and smooth surfaces of the shank.
3. Carefully insert the shank into the oil seal, trying not to damage the working edge of the oil seal with the shaft splines. At the same time, we direct the locking ring with the gap upward.
4. We vigorously insert the drive into the gearbox and make sure that the retaining ring of the inner joint shank is securely fixed and the drive does not move out of the gearbox housing.