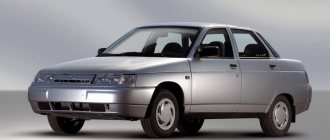
VAZ-2114 belongs to the Samara modification of the second generation. The side lights in them are located, in accordance with technical regulations, at the edge of the front and rear parts of the body, next to the turn signals. These lamps are included in the headlight units.
- Unlike the front side lights, the rear ones are painted red.
- The button to turn on these headlights is located in the exterior lighting control unit. It is located in the center of the dashboard above the on-board computer. If the dimensions are turned on, the green light on the switch lights up.
If the lights refuse to work on the left side, then fuse F11 must be replaced.
Expert opinion
It-Technology, Electrical power and electronics specialist
Ask questions to the “Specialist for modernization of energy generation systems”
VAZ 2114 lamps: what base are used in the high and low beam headlights? To get to the instrument panel, you need to carry out some preparatory work, which will allow you to easily access the main device. Ask, I'm in touch!
Why might the tail light not light up?
Not a single motorist is insured against faulty side lights. It is important to quickly understand what the reason is and carry out repairs. Most often one of the lamps fails, then we can assume the reason for the failure:
The first occurs most often; in this case, it is enough to replace the failed lamp. If the lamp only works if you hit it, then there is a problem with the contacts (although physical impact does not always help). If during testing you find that the light bulb is intact, and there is no oxidation or carbon deposits in the socket, then you need to check the conductors.
Replacing a damaged lamp in the rear headlight unit is carried out according to the instructions:
- turn off the lights and open the trunk;
- remove decorative upholstery;
- squeeze the latches and pull out the flashlight contact panel;
- click on the burnt out lamp and turn it counterclockwise;
- Check the light bulb on the tester and install a new one if necessary.
Assembling the lanterns is carried out in the reverse order. The lamp can also be replaced as an assembly. To do this, it is only important to purchase a high-quality version that is no different from the original. Car enthusiasts often recommend purchasing stock components or paying attention to. We recommend replacing the assembly if there is significant damage to the structure.
Often, taillight lamps do not immediately burn out or refuse to work, but indicate problems with a faint glow. First, clean the group of contacts located in the mounting block, and then, if the fault cannot be corrected, check the groups leading to each lamp.
reasons, what to do and how to fix the problem
Lighting devices are extremely important on cars, and this applies not only to headlights, but also to signal lights. Turn indicators, side lights, brake lights - all this helps surrounding drivers to better distinguish the outlines of the car and predict the driver’s maneuvers. When the brake lights on a car do not work, this can lead not only to a collision, but also to a fine if the malfunction is noticed by the traffic police. It is better to fix this problem immediately after it occurs; moreover, most often the reasons why the brake lights do not light up are quite trivial, and the malfunction can be easily fixed without contacting a service center.
Why don't the brake lights light up?
Almost any problem with electronics in a car can be solved in the same way. You need to look for the problem either in the device itself, which is faulty, or in the power supply system to it. The situation is similar with the main reasons for the breakdown of brake lights. If they do not light up, it may be due to one (or several) of the following reasons:
- Problem with the brake light fuse: its oxidation or failure;
- Malfunction of the lamp(s) installed in the brake light;
- Problem with the brake light activation mechanism when pressing the brake pedal;
- Oxidized contacts in the socket for installing the brake light lamp;
- Damage to electrical wiring.
As you can see, among the problems listed above, only one can cause serious problems for the driver if he wants to repair the brake lights himself, and we are talking about wear and tear on the electrical wiring.
Modern cars are equipped with dozens of electronic devices, and a worn, torn or improperly clamped wiring harness can cause your brake lights to turn off. If none of the troubleshooting steps below resolve the problem, it is most likely a wiring issue. In such a situation, you will need to find a detailed plan for the car's electrical wiring and check with a tester for the presence of voltage in the sections, and after finding the problem, solder or replace the wires. But don’t rush to get a tester, most often the brake lights don’t light up due to much more mundane faults, the elimination of which will be discussed below.
Checking brake lamps and brake light sockets
The most reliable way to check whether the cause of the malfunction is burnt out lamps or oxidation of the contacts in the socket for installing them is to replace them with new ones. It is not always possible to determine by eye whether the lamps have burned out or not, so it is better to acquire new light-emitting devices in advance and install them. If it turns out that no new copies of the required size were found, you can remove the working lamps from the turn signal indicators, side lights or other lighting devices of the car. Try them, and if the problem is solved, then it is enough to buy new lamps and replace them so that the brake lights begin to work as before.
Important: Some car models are designed so that if one brake light fails, the second one turns off automatically. Accordingly, when checking, it is better to screw the lamps into both brake lights to make sure that the problem is not related to their malfunction.
When replacing the lamps does not resolve the problem, you need to make sure that there is no oxidation of the brake light “cartridges”. Also check that the sockets are connected to the vehicle's wiring. If there is any doubt about this, you can disconnect the wiring contacts, clean them with fine-grit sandpaper, lubricate them with electrically conductive grease and reconnect them.
Please note: To check the sockets after performing the above manipulations, use new (removed from other lighting devices) lamps, since it is possible that previously installed lighting devices have become unusable simultaneously with damage to the contacts.
Problem with fuse for brake lights
In a car's electrical circuit, a malfunction often occurs due to fuses that may fail. There are several ways to check fuses in a car, including visually or using a multimeter. In this case, there is one “household” method for diagnosing the brake light fuse.
You can make sure that the brake lights are not on due to a failed fuse. To do this, just start the car and press the horn. If the sound is heard, then the fuse is good and the brake light malfunction is due to another reason. If there is no sound, you need to determine from the fuse block diagram which one is responsible for the brake lights and horn, and then replace it.
What lamps are in the dimensions of the VAZ 2114
The standard equipment of VAZ 2114 cars includes installation of the following lamps in the dimensions and front/rear headlights:
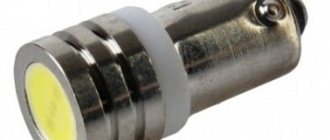
Recently, users are increasingly replacing standard light bulbs in the dimensions of the VAZ 2114 with LED ones, since they have a much longer resource, consume less energy and shine with a beautiful color. In order for the diodes to produce spectacular side lights with a bluish tint, weak 1-5 diode lamps are not suitable. It is better to use 12-15 diodes.
They will give a bright white glow in the daytime, and in the dark this glow will be blue-white. It is advisable to replace all side lights, or at least the front or rear lights on both sides, with such lamps at the same time. In this case, the car looks organic, and the difference in the shades of the glow of the dimensions will not mislead other road users.
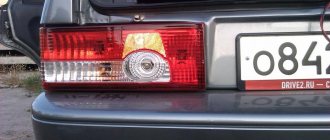
Tail light bulb VAZ 2114.
What else are they checking?
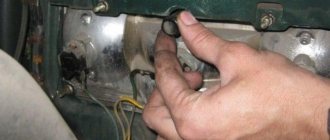
With the brake pedal depressed, check the voltage supply to the rear light connectors. Their design is far from perfect and often creates problems for owners of this model. The printed tracks at the connector connection points oxidize, which leads to a loss of power supply to the lamps. Some owners take a soldering iron and resolder the connectors, others change the rear light board assembly.
The sockets for connecting electric lamps are also not very reliable. Quite often it is necessary to disassemble the taillights to eliminate contact oxidation or troubleshoot other problems. Rarely, but sometimes the problem can be a break in the wires of this circuit, which break off at the places where they bend.
When driving at night or in fog, side lights are indispensable, especially if they are located at the rear. When moving or while parked, they show other motorists where your vehicle is. If the rear lights on a VAZ-2114 car do not light up, then it will not be difficult to do the repair yourself. To do this, just find out the reason and follow the instructions below, or watch the video.
How to change the lamps on the dashboard yourself?
- 1. Disconnect the wire directed to the cigarette lighter;
- 2. Remove the casing from the panel in the same way as it was disconnected from the radio. After this, you will see the screws that need to be unscrewed.
- 3. Carefully, but using little force, detach the cover.
- 4. Disconnect the wires from the clock, headlights, alarms and other things.
- 5. Remove the instrument panel by unscrewing the screws that hold it in place. To protect the wires from damage, it is better to disconnect them on one side.
- 6. Before replacing the light bulbs themselves, it is necessary to remove their sockets, which is done by rotating the latter counterclockwise. Then the defective lamps on the panel are replaced with new ones, and the structure is assembled in the reverse order.
If you find that one of the low beam lamps has stopped working, then you should not start replacing it right on the highway, creating an emergency situation. It is better to drive to the nearest gas station or parking lot, where you can fix the problem in a calm environment.
If one of the low beam lamps stops lighting while driving, you can temporarily turn on the fog lights (to easily get to the place of replacement). The low beam lamp of the VAZ 2114 is replaced quite simply. The tools you will definitely need are a screwdriver (thin) and an awl.
For an experienced car enthusiast, the entire procedure will take 3-7 minutes. However, those who are faced with such a replacement for the first time should not rush. It is important to complete all the steps listed below correctly. Replacing a failed lamp is done as follows:
- Unscrew the bolts on the protective cover (2 pcs.).
- Remove the cover (under it you can see the lamp holder mechanism (spring) and the 3-pin headlight power connection block).
- Disconnect the 3-pin block.
- Gently compress the spring of the fastener (holder) and remove the non-working light bulb.
- We insert a new lamp into the holder.
- We install the protective cover in place, and then secure it with bolts.
Make sure that during the replacement process you do not touch the glass surface of the bulb with your fingers (this can lead to rapid failure of the new lamp). If this happens, fingerprints must be carefully removed with alcohol.
It is preferable to replace low beam lamps in pairs (if one of the headlights burns out, insert new ones into both). In this case, the same luminous flux (in terms of brightness and intensity) from each headlight will be provided.
Replacement process
The rear lights are attached to the body of a VAZ 21099, 2108 or 2109 car using 4 nuts. To dismantle the lighting system you will need:
The operating algorithm is as follows:
- To access the nuts, remove the 21099 luggage rack at the appropriate location (if the rack is installed).
- Disconnect the power plug that is attached to the board.
- Unscrew the 4 nuts using a wrench.
- When removing the last nut, hold the taillight outside to prevent it from falling and breaking.
- After removing all 4 nuts, remove the light.
When installing a new headlight on the rear of model 21099, do not forget to connect the wiring to ground, which is attached to one of the studs.
In such cases, the ride becomes quiet, calm and relaxed, but how everything changes when at least one light bulb burns out. This causes inconvenience and emergency situations, and you can also get a fine from a road service employee.
The dimensions on the VAZ 2109 do not light up, then look for the reason in the wiring. Even experienced drivers recommend carefully checking the functionality of all devices and components before leaving. The nine is no exception, in which optics can often fail for various reasons, including:
The rear lights (headlights) of the VAZ 2108, VAZ 2109, VAZ 21099 have the following bulbs: 1) Brake lights. 2) Dimensions. 3) Reverse. 4) Turns. 5) Fog lamp.
Rear light board for VAZ 2108, VAZ 2109, VAZ 21099
A wiring harness goes from the mounting block to the rear lights. The purpose of each individual wire in the harness can be understood by its color: 1) Brake lights - red 2) Dimensions - yellow 3) Reverse - green. 4) Turns - blue. 5) Fog light - orange-black.
We remove the connector from the rear light board of VAZ 2108, VAZ 2109, VAZ 21099
Naturally, you need to understand that if the car VAZ 2108, VAZ 2109, VAZ 21099 is old and there are a lot of people doing the wiring, then the color match of the wire to its purpose may be violated. That is, the red wire can be converted not to brake lights, but, for example, to dimensions. But in general this is a very important point: the developers of the VAZ 2108, VAZ 2109, VAZ 21099 specifically marked the functional purpose of the wires with a certain color to make it easier to use.
Flashlight board VAZ 2108, VAZ 2109, VAZ 21099
If some light signal in the taillight of a VAZ 2108, VAZ 2109, VAZ 21099 does not work, then before climbing into the mounting block and opening the electrical circuit, we check the following: 1) The reliability of fastening the mass of the taillight to the body of the VAZ 2108, VAZ 2109, VAZ 21099.2)
We check the reliability of fastening the wire connector to the headlight. 3) Integrity of the light bulb 4) Quality of contact between the light bulb and the flashlight board. It often happens that everything is intact, the light bulb and the mass are good, and 12 Volts come to the light bulb, but it does not light. The reason is poor contact between the light bulb and the board. In this case, you need to clean both the light bulb base and the area on the lantern with fine sandpaper.
As one smart person said: “Electrics is the science of contacts.” To disassemble the rear light of a VAZ 2108, VAZ 2109, VAZ 21099, first remove the protective plastic cover. Then disconnect the black wire of the flashlight from ground. Then we remove the connector from the flashlight board and remove the board itself with the bulbs from the headlight housing. If it is necessary to replace the headlight itself, then unscrew the remaining bolts securing the headlight to the car frame and remove it.
Reasons for failure of side light bulbs
There may be several reasons why a particular light bulb of the VAZ 2114 dimensions stopped lighting, namely:
What kind of lighting do you prefer?
Built-in Chandelier
- open circuit (no voltage at the headlights);
- the side light bulb has failed for some reason;
- the corresponding fuse has blown;
- the fuse box has failed;
- The lights button is broken.
Most often, the cause of failure is a malfunction of the light bulb itself. Fixing such a malfunction is quite simple; it is important to know exactly how to do it.
How to change side light bulbs on a VAZ 2114
Malfunctions and their elimination (rear and front dimensions)
Now we just have to figure out why such problems occur and how to solve them, for example, how to replace a side lamp on a VAZ 2114 in any part of the car. So, first of all, let’s figure out why the lights don’t light up and what reasons there could be for this:
- No voltage on headlights;
- The lamps are burnt out;
- The fuse has blown;
- The fuse box has failed;
- The button to turn on the lights is broken.
So, now we need to understand each specific option in more detail, for example, why the left rear light does not light up. The first and most logical reason is that the lamp simply expired and burned out, just as happens with ordinary household light bulbs. Now it needs to be replaced; this is done in the same way in all parts of the car:
- First you need to find where the headlight housing or collar housing is located from the inside and remove the protective cover; on the VAZ 2114 it is clearly written on it how this is done. Everything will come out together with the base;
- Now you need to find the size in the base and carefully pull it out;
- We take out the lamp, it is simply inserted here with a latch;
- We insert the new one so that it clicks and assemble everything in the reverse order.
As for the fuses, if the rear right indicator light does not light, then in order to do without special tools and diagnose the cause, you just need to replace the suspicious fuse with a new one and see if the situation improves. If the lamps light up, then it was the problem, but if not, then you will have to look for the cause further. The tail light is always off. A very weak point is a design flaw in the contact group in the headlight.
To understand why the rear lights on a VAZ 2114 don’t light up, you need to look at the car’s electrical circuit; power to the lights goes along with the headlights, and if they don’t light up only at the front or rear, then it’s the wiring. It will have to be checked, but without the special knowledge of an electrician, it is unlikely that you will be able to find an open circuit or some other reason on your own. But if the right indicator light on a VAZ 2114 or only the left one does not light up, then it’s all a matter of fuses, replacing them is simple - take out the old ones and insert new ones in the same place. Checking the button is also quite simple - you need to remove it from the panel and short-circuit the wires; if the lamps light up, then it’s the problem. You will need to find a new button that will fit there and install it.
Main conclusions
The VAZ 2114 headlights have halogen lamps with an H4 socket by default. These are two-strand designs in which one thread is responsible for the high beam and the other for the low beam. In addition to halogen, the following can be used:
Most users prefer LEDs, but according to the rules it is necessary to use standard halogen designs. Express your thoughts about lamps for the VAZ 2114 in the comments.
- Luminous flux: 1500 / 1800 lm
- Power: 15 / 16 W
- Warranty period: 1 year
- Luminous flux: 1800 lm
- Power: 18 W
- Warranty period: 1 year
- Luminous flux: 1600 lm
- Power: 20W
- Warranty period: 1 year
- Luminous flux: 80 lm
- Power: 0.8W
- Warranty period: 1 year
- Luminous flux: 800 lm
- Power: 5W
- Warranty period: 2 years
- Luminous flux: 25 lm
- Power: 0.4W
- Warranty period: 1 year
- Luminous flux: 150 lm
- Power: 1.3W
- Warranty period: 3 years
- Luminous flux: 150 lm
- Power: 1.3W
- Warranty period: 3 years
- Luminous flux: 120 lm
- Power: 0.85W
- Warranty period: 1 year
- Luminous flux: 2000 lm
- Power: 17 W
- Warranty period: 3 years
- Luminous flux: 1100 lm
- Power: 11 W
- Warranty period: 1 year
- Luminous flux: 800 lm
- Power: 21 W
- Warranty period: 1 year
- Luminous flux: 260 lm
- Power: 4.3 W
- Warranty period: 1 year
- Luminous flux: 80 / 400 lm
- Power: 0.6 / 3.6 W
- Warranty period: 1 year
- Luminous flux: 80 / 260 lm
- Power: 1.5 / 4.3 W
- Warranty period: 1 year
- Luminous flux: 150 lm
- Power: 1.3W
- Warranty period: 3 years
see also
Comments 29
Please tell me the dimensions do not work anywhere, only on the instrument panel the low beam works and the license plate light works. The fuses are intact and the track is also what could it be
Jumper in the fuse block. It is also called the “side light fault monitoring relay.” Try changing it, it will probably go away!
No power to the chip(
Replace the relay in the black box
the front ones are “parallelized”. Roughly speaking, the right is powered from the left. The branching of the wires occurs in the mounting block.
PARALLELED BUT SEPARATED RELAYS
I have one relay, one fuse)
THE PROBLEM WITH THE REAR WAS SOLVED BY REPLACING THE HEADLIGHTS WITH OSVAR (later we will tell you in detail about the replacement and obstacles on the way), BUT THE FRONT STILL DOESN’T BURN (
I had this kind of garbage today, the fuse seemed to be intact, I changed it and everything worked
Is there power to the fuses?
Hello. The symptoms look like a mounting block. If the fuse is intact, then it is. You need to take it off, open it and look. Fourteen have this disease.
Hello) yes, I’ve already encountered www.drive2.ru/l/9719498/, my installer was constantly flooding before, in the end it oxidized and I had to install a new one, I don’t think the reason should lie in the new one
if the bulbs and previous ones are intact, then the relay for monitoring the health of the bulbs remains, located in the mounting block under the hood in the air intake compartment on the left. This relay is also called a centipede. Either it died or contact was lost.
I'll try to change it tomorrow, thanks
you can pull out this relay, turn on the dimensions and place jumpers one by one and check whether the dimensions will light up. jumper from pin 7 to 8 - left front, from 7 to 1 - left rear. jumper from 10 to 11 - right front, from 10 to 9 - right rear. Jumper 4 and 5 + pressed stop - brake lights. if everything burns like that, then the relay is to blame, it’s in the firebox
Thank you, your advice helped me) I disassembled the entire mounting block, but the reason is just over there)
In the mounting block, remove and reinsert the lamp health monitoring relay (which is the largest), the contacts there often oxidize. If this does not help, you need to replace the lamp health monitoring relay.
Pulling it out and inserting it didn’t help, I’ll try to replace it tomorrow, there are no other options yet, thanks
trick, the board is most likely the same garbage, I changed it to OSVAR
But if 2 dimensions fail at the same time, then the front and rear left ones, and even the license plate illumination, then the problem lies in the mounting block. Namely, in fuse F10, which is responsible for the left dimensions, interior lighting, license plate lighting, and panel lighting. But keep in mind that fuse F10 is directly responsible for the left dimensions; if others do not work for you, then look for the corresponding fuse in the article Fuses.
We analyze the fuse block, namely the blocks of all tires to the fuse and relay block. Most often they oxidize, become detached, and make poor contact. We clean the contacts and connect them well. Don’t forget about the contact group on the headlight block; perhaps the contacts there have also oxidized.
Manufacturers of lamps for VAZ 2114
Since lamps with an H4 socket are used in headlights of many models from different manufacturers, all manufacturers of car lamps produce such lamps. Among them are the following companies:
- A world-famous Dutch company, known for its low prices and good quality products;
- A German company with a long history and rich technological experience;
- Narva. This is another manufacturer from Germany, known for the quality and durability of its products;
- Bosh. Another German company that does not need any special introduction;
- Company based in Hong Kong and Germany. Produces a wide range of reliable lighting equipment.
Expert opinion
It-Technology, Electrical power and electronics specialist
Ask questions to the “Specialist for modernization of energy generation systems”
Types of lamps for PTF If you still find moisture in the block, clean the drainage channel, which you can find near the mounting of the lamp for turning the car on the left or right. Ask, I'm in touch!
When is it possible?
- To replace it, you need to disconnect the block with wires and remove the contact panel from the flashlight. Here you just need to squeeze the side latches to remove the plastic panel;
- Apply a little pressure on the cartridge and unscrew it counterclockwise;
- Check the condition of the contacts and wiring;
- Screw in a new light bulb that matches the previously installed one;
- If necessary, before screwing in the new lamp, clean the contacts and test the wiring with a tester. There may be a break in the circuit, so a new light bulb will not work.
Why don't FZH work?
There are several reasons why FZHs can fail. Let's try to understand them.
Replace the burnt out bulb with a new one, check the condition of the contacts
Check, replace if necessary. A fuse can lead to loss of functionality of the entire contact circuit
The board is located under the lamp. Simple repair to fix the problem
You will have to diagnose the condition of the circuit, check the integrity of the wiring using a tester and a visual method
You will need to clean the contacts and replace the elements if necessary.
In such a situation, the issue of gearbox malfunction will have to be resolved.
Characteristics of side lights VAZ-2114
VAZ-2114 belongs to the Samara modification of the second generation. The side lights in them are located, in accordance with technical regulations, at the edge of the front and rear parts of the body, next to the turn signals. These lamps are included in the headlight units.
- Unlike the front side lights, the rear ones are painted red.
- The button to turn on these headlights is located in the exterior lighting control unit. It is located in the center of the dashboard above the on-board computer. If the dimensions are turned on, the green light on the switch lights up.
If the lights refuse to work on the left side, then fuse F11 must be replaced.
How to change the lamps on the dashboard yourself?
The VAZ 2114 headlights have halogen lamps with an H4 socket by default. These are two-strand designs in which one thread is responsible for the high beam and the other for the low beam. In addition to halogen, the following can be used:
Expert opinion
It-Technology, Electrical power and electronics specialist
Ask questions to the “Specialist for modernization of energy generation systems”
Reasons for failure of side light bulbs Unscrew one screw on each side of the tunnel, and then another one, which is located directly under the ashtray for the rear passengers. Ask, I'm in touch!
Tips for motorists
According to these Rules of the Road, on any moving vehicle, including the VAZ-2114, the headlights must be turned on, along with which the side lights must also be turned on. In addition, they must be turned on when the car is stopped or parked on the road in the dark and in conditions of insufficient visibility. Therefore, they must always be in good working order.
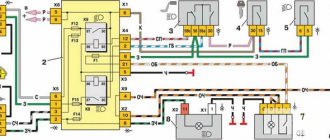
The electrical circuit of the side lights of the VAZ-2114 is not so complicated and, if desired, any self-respecting driver will be able to find a malfunction associated with the failure of its operation. To do this, you need to know that terminal No. 1 of the side light switch is always supplied with positive voltage from the battery, bypassing the ignition switch. If the side light switch key is in the on position, then electric current flows to two fuses F10 (7.5A) and F11 (7.5A), which respectively protect the electrical circuits of the left (F10) and right (F11) side lights. The further path of the current lies to relay K4 (lamp health monitoring relay), and then to the front and rear side lamps.
When only one of the side light bulbs does not light, then we check whether it has burnt out. If it burns out, then we replace it with a new one of similar power, but if it is intact, then we will have to look at the condition of the contacts of the cartridge in which it is inserted. In the rear lights, due to moisture getting into them, oxidation is possible, both of the tracks and the pads through which voltage is transmitted to the terminals of the side light lamp.
Another reason why the headlight lamp does not light up may be the lack of voltage at the corresponding terminals of the rear light blocks or headlight blocks. Then, using a tester, you will have to ring the corresponding wires:
- The right front marker does not light up (check the yellow wire from terminal No. 4 of the headlight to terminal No. 8, block X6 of the mounting block);
- The right rear light does not light up (check the yellow wire from the right rear light block to terminal No. 9, block X9 of the mounting block);
- the left front marker does not light up (check the yellow-black wire from terminal No. 4 of the headlight to terminal No. 10, block X6 of the mounting block);
- the left rear light does not light up (check the yellow-black wire from the right rear light block to terminal No. 17, block X9 of the mounting block);
If both lamps on the right or left side of the car stop working, then troubleshooting should begin by checking the corresponding fuses located in the mounting block under the hood of the VAZ-2114 car, since the simultaneous burnout of two dimensional lamps at once is unlikely. The blowing of fuse F10 is very easy to determine, since it will lead to the cessation of combustion of the backlight lamps of the instrument switches. Also, the reason for turning off the side lamps may be the failure of relay K4.
Checking the functionality of the sensor
- 1. Disconnect the wire directed to the cigarette lighter;
- 2. Remove the casing from the panel in the same way as it was disconnected from the radio. After this, you will see the screws that need to be unscrewed.
- 3. Carefully, but using little force, detach the cover.
- 4. Disconnect the wires from the clock, headlights, alarms and other things.
- 5. Remove the instrument panel by unscrewing the screws that hold it in place. To protect the wires from damage, it is better to disconnect them on one side.
- 6. Before replacing the light bulbs themselves, it is necessary to remove their sockets, which is done by rotating the latter counterclockwise. Then the defective lamps on the panel are replaced with new ones, and the structure is assembled in the reverse order.
Preparing to replace the light bulbs on the instrument panel
When access to the instrument panel is open to us, all that remains is to unscrew the two bolts on the sides of the case and disconnect the power connectors.
Upon visual inspection, it will be seen that there are a total of 13 lamp sockets on the dashboard of the VAZ-2114, of which only 8 can be replaced with analogues or LEDs.
Pay attention to the general condition of the board, as if there are signs of oxidation or corrosion, they will need to be cleaned, regardless of whether the lamp is working or not. Because in most cases, the cause of failure is not the lamp, but the cartridge, which had traces of corrosion.
Selecting lamps for the VAZ-2114 instrument panel
Today, the market offers a wide variety of lamps for the VAZ-2114 instrument panel. Among them there are both conventional incandescent lamps and LED analogues, characterized by an increased service life, quality of light output, and low energy consumption.
When purchasing new lamps, always buy several more elements, because the “legs” may break during installation.
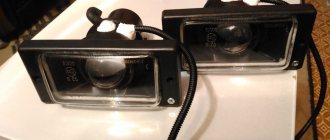
PTF Kirzhach light bulb base
Depending on the year of manufacture, different types of lamp bases were installed on the “luxury” versions of the fourteenth VAZ model. In addition to caps from foreign manufacturers, caps from PTF are often found in the PTF case.
The photo above shows the H11 format socket, which is installed in “foglights”. It makes no sense to choose bulbs for VAZ 2114 fog lights without understanding which base is used in the housing, because they are not interchangeable. Only H11 is used, while on modified versions of machines, H3 format sockets are often found.
Bulbs for VAZ 2114 fog lights of this format produce a brighter color, but H11 is more common, because do not blind oncoming cars. A car lamp for “four” is available for sale in several versions:
- Halogen (standard with a yellowish tint);
- LED (bright elements with white light). Due to low heating they are more durable;
- Xenon. Effective and bright, but require compliance with installation instructions. If used incorrectly, it blinds oncoming cars. Service life is about three years.
Also, for improper use of xenon, inspectors may issue an order to eliminate the violation.
Manufacturers of lamps for VAZ 2114
Since lamps with an H4 socket are used in headlights of many models from different manufacturers, all manufacturers of car lamps produce such lamps. Among them are the following companies:
- A world-famous Dutch company, known for its low prices and good quality products;
- A German company with a long history and rich technological experience;
- Narva. This is another manufacturer from Germany, known for the quality and durability of its products;
- Bosh. Another German company that does not need any special introduction;
- Company based in Hong Kong and Germany. Produces a wide range of reliable lighting equipment.
The above list can be continued for a long time. Today, a big name of a manufacturer is not a guarantee of high quality and reliability. There are a lot of fakes on the market, which are not only cheap, but also completely inconsistent with the original. Therefore, it is better to make a choice based not on the name, but on the characteristics of the light bulbs.
How to replace low/high beam bulbs on a Lada Granta, step-by-step instructions
LED bulbs H4 6000K (VAZ 2114) - Review, test.
Expert opinion
It-Technology, Electrical power and electronics specialist
Ask questions to the “Specialist for modernization of energy generation systems”
Burnt out light bulbs In order to understand why the fog lights failed, you need to know a little about how the electrical equipment of the car as a whole works, as well as the connection diagram for this unit in the general electrical circuit. Ask, I'm in touch!
Which modification is better?
H4 halogen lamps installed on the VAZ-2114 are divided into:
- Standard.
- Enhanced light beam.
- Improved visual overview.
- All-weather.
- Increased power.
They are two filaments for low and high beam lighting. Lamps with a power of 60/55W are considered optimal among them.
Standard H4 lamp
Such lamps are mounted on every car of this VAZ model.
High beam lamp
High light flux lamp +30%
They are designated as +30%, 50% and so on. In addition to consuming “their” 55W and percent, they produce brighter light. But the duration of their operation is not long, although the price is more expensive.
Improved visual overview
Illuminated with white light familiar to the eye. Consuming the usual 55 W, they illuminate brighter, despite the bluish tint of the bulb.
They provide an excellent background light on snowy and dry roads. On a wet road it is better to use yellow fog lights. Doesn't blind oncoming cars. The service life of these does not differ from standard ones, despite the inflated price. Manufacturers prefer lamps with a yellow or bluish tint.
All weather
All-weather yellow lamp
The lamps are specially coated with a yellowish tint, which allows the light to achieve the contrast of the area in bad weather, especially cloudy (foggy). Yellow light has less reflection.
Increased power
They are in demand among owners who do not particularly know the “subject of the dispute.”
The manufacturer does not equip the VAZ-2114 with powerful lamps and does not recommend them, since this is associated with mandatory overheating and melting of wires, contacts, and headlight reflectors.
High-power lamps lead to consequences such as blinding an oncoming car and causing an accident.
Causes of breakdowns
The most common reasons for node failure:
- the narrowest point in the entire structure is the elastic board;
- in second place, banal burnout or mechanical damage to light bulbs;
- the third reason is a problem with the fuse or relay;
- oxidation of contacts;
- broken wiring.
First of all, it makes sense to check those elements that do not require removing the entire headlight (for example, fuses, relays). Then check the quality of the connections, the presence of oxidation and the voltage supply level to the illuminator. The last step is to disassemble the taillight, remove and inspect the board.
Which lamps to put in PTF ~ VIVAUTO.RU
Types of lamps for PTF
If PTFs are installed by an automaker, then the lamps
They use standard halogen ones. Many motorists are not satisfied with them, which forces them to find replacement options. There are currently three types of lamps on the market that can be used for fog lights:
Before choosing the final substitution option, you should find which
The bulbs are in the fog lights. The main difficulty for most drivers is to correctly decide which lamps are best to install in fog lights - each of them has certain advantages and disadvantages.
Halogen
LED
Gas discharge
Fog lights. What kind of fog lights should there be?
must meet technical requirements and not dazzle the driver. What are the opposite?
Expert opinion
It-Technology, Electrical power and electronics specialist
Ask questions to the “Specialist for modernization of energy generation systems”
The best lamps for the VAZ 2114 You can, with equal probability, get suitable headlights, or have lighting fixtures that do not match the shape of the sockets. Ask, I'm in touch!
Ideas for tuning or modification
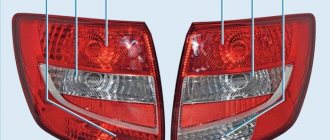
And finally, a few tuning ideas. One of them is the inclusion of conventional ultra-bright LEDs in a cylindrical housing. The photographs below illustrate the idea quite well and do not require any special explanation. The beauty of such modernization is complete freedom of action and completely new solutions that have no “doubles” on the road.
Algorithm for tuning rear lights using LEDs
Instead of individual LEDs, you can use a multi-color LED strip.
Of course, you can’t “fashion” anything out of it, but you won’t have to assemble a complex circuit with quenching resistors and mess around with connecting LEDs. I cut off the required piece, and it is ready to connect to the on-board network.
Now tinting. The easiest way to do this is with tinting paint. We cover the “back” of the car with newspaper and masking tape. We tint, following the instructions on the bottle.
We wait until the paint dries, if necessary, apply another layer (without fanaticism - the lanterns should shine!). We remove the newspaper and get the result. Obviously, it is not necessary to tint with red (red is just undesirable) color. The glass can simply be darkened.
So you got acquainted with the rear lights of the VAZ 2114 car, learned how to repair them, change light bulbs, and even considered several ideas for tuning these lighting devices.
Expert opinion
It-Technology, Electrical power and electronics specialist
Ask questions to the “Specialist for modernization of energy generation systems”
Malfunctions and their elimination (rear and front dimensions) On a VAZ 2114, the dimensions fuse blows out not so often, especially since wide plastic fuses with good contacts are currently installed in the mounting block. Ask, I'm in touch!
Reasons for failure of dashboard lights
- VAZ 2110 engine airbags
- How to glue angel eyes to the headlights of a VAZ 2114
- VAZ 2110 headlight mount
- Disassembling the headlights of the Kirzhach VAZ 2110
- Taillights about sports for VAZ 2114
- VAZ 2110 headlight reflector fell
- Tuning headlights for VAZ 2110
- The low beam headlight of the VAZ 2110 does not light up
- VAZ 2110 headlights shine low
- How to adjust headlights on a VAZ 2110 video
- How to disassemble the headlight of a Bosch VAZ 2110
Useful tips Connection diagrams Principles of operation of devices Main concepts Meters from Energomer Precautions Incandescent lamps Video instructions for the master Testing with a multimeter