Note! To replace this part you will need to use: A screwdriver and a rag, because when you reach for the speedometer cable from the box or disconnect it from the gearbox, you will get dirty and you can wipe your hands with a rag, or initially you can just put gloves on your hands and then no rag no need!
LED for illuminating the instrument panel (left) and buttons (right)
In addition, there are LEDs on sale that have a point glow, when the light of the diode is narrowly directed in only one direction (forward), and LEDs that have a diffuse glow, which is achieved by a special shape of the LED lens. Which one you prefer, choose for yourself. So let's get started.
Expert opinion
It-Technology, Electrical power and electronics specialist
Ask questions to the “Specialist for modernization of energy generation systems”
Designation of buttons on the VAZ 2112 Europanel In order not to violate the informational nature of the panel description, and most importantly, so as not to redraw the arrows, we will use the factory layout of indicator lamps and indicators on the instrument panel. Ask, I'm in touch!
Disassembly and replacement of devices
To replace (repair) devices, you need to perform the following actions in a strictly established order:
The entire combination of devices should be completely removed.
Unscrew the screws (2 pcs.) that secure the tire. After which the bus itself must be disconnected from the device system board.
Unscrew the screws (7 pcs.) that secure the frame with glass.
You need to remove the frame by disconnecting it from the device system.
Unscrew the 2 screws that secure the device composition board.
Disconnect the left light filter, which is marked with warning lamp symbols.
Disconnect the right light filter, which has warning lamp symbols on it.
Unscrew the screws (2 pieces each) that secure the reddish and snow-white pads. Then remove these pads.
LEDS IN THE INSTRUMENT PANEL FOR VAZ 2110 2111 2112
Unscrew the nuts securing the fuel level sensor, cooling water temperature sensor and tachometer. Each device is secured with 3 nuts.
Disconnect the board from the device system housing.
Unscrew the screws securing the device scale to the body (5 pcs.).
Remove the scale with devices from the system body.
Very carefully, prying the arrow of the fuel level indicator with a screwdriver, you need to remove it from the axle.
Unscrew the screws (2 pcs.) that secure the fuel level indicator to the scale.
Disconnect the fuel level indicator. Install a new one in its place. When installing the sensor, perform all steps in the reverse order of removal.
Change other devices in the same manner as described. This is the entire repair of the VAZ 2110 device panel. You see, there is nothing difficult and there is no need to go to a special service center and pay money.
The assembly of the device system must be carried out in the reverse order of the disassembly procedure. When carrying out this work, you need to take into account that the nuts that secure the tachometer have a different thread.
How to remove the tidy
On a VAZ 2110, removing the dashboard from the dashboard is not difficult, and the only tools you need are a Phillips screwdriver and pliers or a wrench. With their help, we will remove the positive terminal from the battery before starting work. So, lower the steering wheel and unscrew the 4 screws that secure the decorative trim.
Releasing the decorative trim on the VAZ 2110
After this, we pull the cover towards ourselves, and it can be easily removed, hanging on the wires of the switches. To prevent the cover from getting in the way, the wires from the switches can be disconnected - they are on the connectors.
Disconnecting wires from switches and removing buttons located on the decorative trim
Before disconnecting the connectors, do not forget to label them so as not to mix them up during assembly!
So, now we have a tidy in front of us, which is held in place by two screws located on the sides.
The instrument panel is secured with two screws
We unscrew them and carefully remove the panel, not forgetting that it is also on the wires. In principle, the wires supplying the instrument console in the VAZ do not need to be disconnected, since their length is sufficient to replace the lamps.
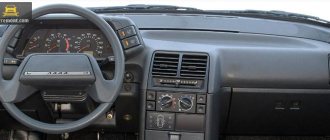
Nuances and subtleties of do-it-yourself tuning of the instrument panel illumination of the VAZ 2110
The entire composition of devices on the panel is secured with 2 bolts and consists partly of mechanical and partly of electrical components. The electrical component of an ordinary panel is a speedometer and tachometer, but some cars from the VAZ 2110 model range already have an electrical panel .
Also, there must be indicators: coolant temperature, availability, fuel level, as well as warning lights, of which there are 12 installed on the VAZ 2110.
All device connections are stored in a printed circuit board, which is mounted on the back of the case.
Dashboard of VAZ 2110 disassembled
Simple and fast upgrade
In principle, with your own hands you can either completely replace instrument panel of a VAZ 2110 or tuning the existing one.
One of the quite popular options is replacing light bulbs with LEDs. Moreover, there is no difficulty in this - you need to remove the light bulbs and insert LEDs in their place.
However, there is one small trick: they work well only if the polarity is observed! If the LED does not light up immediately when connected, you need to remove it, turn it 180 degrees, then reinsert it into the socket.
Even such a simple replacement will increase the brightness of the dashboard , but this is not enough, it is hardly worth completing the tuning with your own hands.
READ How to clean the MAF sensor on a VAZ
What lamps are installed and how many of them?
The VAZ instrument panel is illuminated and the status of the vehicle’s components is indicated using 12 V 1.2 W incandescent lamps, which are installed in a 2W2 socket. The lamp is easily pulled out of the socket - you just need to pull it with your fingers; it can be purchased either separately or with a socket. In total, 20 lamps are used for lighting and indication in the instrument panel for the VAZ 2110, and they are inexpensive - 5-10 rubles. (at the time of writing) depending on brand (without cartridge).
VAZ car lamp installed in a socket and without it
If desired, instead of incandescent lamps, you can install LED ones in the VAZ instrument panel - they are produced for the same voltage with the same standard size and can be either with or without a socket. By the way, in the latest modifications of dozens of VAZs, LED light sources have already been installed.
LED bulbs without socket and with socket for VAZ 2110
Why are LEDs better?
First of all, they have a longer service life (up to 20-30,000 hours instead of 1,000 for incandescent lamps). They are not afraid of vibrations and are 8 times more economical. But you have to pay for all this in the literal sense of the word: LED light bulbs are many times more expensive than their conventional incandescent counterparts. If you consider that there are 20 of them in the VAZ panel, the amount will be considerable.
Be careful with the generator warning lamp; based on feedback from our readers, it is better to replace it only with the same one.
Replacing warning lamps in the instrument panel
In many cars, including the VAZ 2110, warning lamps A12?1,2 are used in the instrument cluster. When replacing the lamp, do the following:
The socket together with the burnt out lamp should be turned counterclockwise all the way.
Remove the lamp socket from the instrument system.
A new lamp is installed in place of the burned out one in the reverse order. All other instrument cluster lamps are replaced using the same method.
Instrument control panel illumination
To illuminate the stove, you first need to carefully remove the plastic handles of the levers that control the dampers and remove the glass. Below it is the stove itself. To do this, take any sharp object (knife or scissors) and carefully pry the glass. Prepare foil according to its size. It will be an additional source of illumination.
Fixed on the inside of the glass, it will give a very attractive appearance to the stove, and the console illumination will not be concentrated only in the place where the LED is installed next to the handle.
The next step is to remove the lamp socket from the backlight of the stove control unit. The lamp must be replaced with a purchased LED. In order for the light to spread around the entire perimeter of the stove, an LED strip is used, which is glued to the bottom. Two wires are usually soldered to the contacts, which are connected to the cartridge.
All connections are carefully insulated. Assembly is carried out in reverse order. If one of the parts does not work, check all contacts and connections again. The lighting of the stove control panel will become much better and more modern; the light from it will spread throughout the entire perimeter both day and night.
READ How to connect a generator to a VAZ 21 21
Illumination of the heater (stove) control console.
Remove the plastic handles for the heater damper control levers. Remove the glass of the stove control unit by picking it up with a knife. We make a reflector out of foil and fix it under the glass of the VAZ 2109 heater control unit. If it is not made, the console backlight will be concentrated only in the place where the backlight LED is installed next to the heater fan speed control knob, and will decrease towards the opposite area, which does not look very good attractive.
Then we unscrew the lower part of the center console (the beard), remove the socket with the backlight lamp for the heater control unit and change the lamp to an LED. We put everything back together in reverse order.
It should be noted that simply replacing the backlight lamp with an LED one, despite all the tricks, will not achieve completely uniform illumination of the heater control panel. Although this is still better than the standard backlight.
To finalize the illumination of this unit, it is best to stick a 10 cm long LED strip to the bottom, solder 2 wires (plus and minus) to its contacts, and connect the wires to the backlight lamp socket of this unit. Just act carefully, do not leave uninsulated sections of wires to avoid a short circuit!
LED strip for illuminating the heater control panel
Now the backlight of the heater control panel glows brightly and evenly over the entire area. Moreover, this illumination is noticeable both day and night.
Illumination using LED strip
This is what the backlight looks like during the day
However, if in the daytime everything is great with the backlight, then when it got dark, I realized that the brightness of such a backlight was excessive for me, and it would be nice to make it a little less bright. You can, of course, adjust the brightness of the entire instrument panel illumination using the corresponding regulator to the left of the steering wheel, but the brightness of the remaining instrument panel illumination lamps suited me, so I did it differently. We take a black marker and paint over the coating above the LEDs (my LED strip is insulated) to the desired level of light transmission - and the problem of excess brightness is solved. The photo above shows a version of the backlight already modified in this way. You can also cover the LED strip with a piece of tint film, the effect will be the same.
Repair of instrument panel VAZ 2110
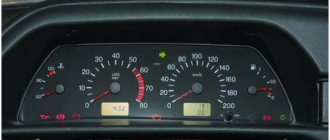
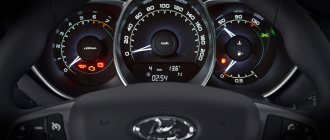
On cars of the VAZ 2110-2112 family, the dashboard includes control lights and on-board instruments, with the help of which the driver can easily monitor the condition of the car. The following indicator lights are displayed on the instrument panel: coolant temperature, turn signals, tachometer, fuel level, speedometer, an image in the form of a gas station, indicating that it is necessary to refuel, lights for turning on the dimensions and high beams, low brake fluid level, a screen reflecting the vehicle’s mileage, emergency alarm system, Check Engine, which signals engine malfunctions, a display with a clock, an indication of a generator malfunction or battery charging, an indication that the handbrake is turned on, a low oil pressure light choke light
Removing the instrument panel and preparing for replacement
To change the lamps in the instrument panel, the latter will have to be removed. It cannot be said that the PP can be removed with one movement of the hand: the designers of the VAZ 2107 made dismantling a little more difficult than on other cars of the VAZ family. Nevertheless, dismantling the PP is quite feasible in a garage or even a parking lot. In this case, the operation does not require any special knowledge. The tools we will need are:
- small flat screwdriver or knife;
- crosshead screwdriver.
I think all this will be found in the trunk of any VAZ 2107, and we can get started. First of all, we remove the plastic handles from the heating control knobs by prying them off with a flat screwdriver.
Removing handles from the seven's interior heating system
We unscrew the nut securing the daily counter reset button (marked with a red arrow), and push the button itself inside the shield.
Removing the daily counter reset button
Now you need to unscrew the screw that is located under the plug and secures the decorative trim. Remove the plug using a flat-head screwdriver and unscrew the Phillips screw.
Removing the fixing screw of the PP decorative trim
After this operation, the right side of the panel will move away so that you can get to the flexible speedometer control shaft.
Releasing the right side of the control panel on a VAZ 2107
The shaft is removed with bare hands: simply unscrew the nut securing it.
Removing the speedometer drive
Now remove the instrument panel from the clamp that secures its left side and pull it out slightly to get to the vacuum hose connected to the econometer. It can also be removed with bare hands, but be careful not to tear it.
Removing the vacuum hose from the econometer to the PP
It remains to disconnect the three power connectors of the instrument panel and the three wires on the VAZ 2107 heater switch. Before disconnecting, it is advisable to mark them so as not to confuse them when assembling the panel.
Disconnecting the power wires from the heater switch
We remove the decorative trim along with the PP and unscrew the four self-tapping screws securing the shelves (two on each, I marked them with red arrows) to the decorative trim, and the instrument panel can be removed.
Removing PP from a decorative trim
Removal and disassembly
-it-yourself removal of the instrument
- First of all, remove the casing;
- Use a Phillips screwdriver to unscrew the fastening bolts;
- We find and unlatch the latches. It is better to snap off the ones at the bottom first, and then push up. This way it can be easily removed;
- Before tuning, you need to remove the arrows. At first, just pull them lightly. If they don’t give in, start turning them from right to left, while slightly tightening them – they will definitely come off.
Disassembly and replacement of devices
To replace (repair) devices, you must perform the following actions in a strictly established order:
Unscrew the screws (2 pcs.) that secure the tire. After this, the bus itself must be disconnected from the instrument system board.
Unscrew the screws (7 pcs.) that secure the frame with glass.
It is necessary to remove the frame by disconnecting it from the instrument system.
Unscrew the 2 screws that secure the instrument cluster board.
Disconnect the left light filter, which is marked with warning lamp symbols.
Disconnect the right light filter, which has warning lamp symbols.
Unscrew the screws (2 pieces each) that secure the red and white pads. Then remove these pads.
Unscrew the nuts securing the fuel level sensor, coolant temperature sensor and tachometer. Each device is secured with 3 nuts.
Disconnect the board from the instrument system housing.
Unscrew the screws securing the instrument scale to the body (5 pcs.).
Remove the scale with instruments from the system body.
Very carefully, prying the arrow of the fuel level indicator with a screwdriver, you need to remove it from the axle.
Unscrew the screws (2 pcs.) that secure the fuel level indicator to the scale.
Disconnect the fuel level indicator. Install a new one in its place. When installing the sensor, perform all steps in the reverse order of removal.
Replace the remaining devices in the same manner as described. This is the entire repair of the VAZ 2110 instrument panel. As you can see, there is nothing complicated and there is no need to go to a specialized service center and pay money.
Assembly of the instrument system should be carried out in the reverse order of disassembly. When carrying out this work, it is necessary to take into account that the nuts that secure the tachometer have a different thread.
Replacing the backlight on the dashboard
Plate for the dashboard of the VAZ 2110
To do this you need to use the following algorithm:
- Remove the panel.
- The backlight designation is determined by special LED bulbs. To replace the backlight, these bulbs must be removed.
Note: this must be done very carefully as they are quite small. In addition, the panel itself can be damaged.
- But first you have to take it apart. This is not a difficult task as disassembly is as simple as pressing the latches so that the bulbs can be removed.
- Everyone has seen that on the top of the instrument panel there is a “sticker” and symbols (speed, amount of gasoline). It holds the glue, so you have to dig deeper to remove it.
Remaining glue must be removed.
- You can start replacing the backlight.
Note: it is advisable to choose colors that are not very bright and strain the eyes. White or blue colors are ideal.
- To remove the light filter located on the back of the “sticker”, you need to take a utility knife. The light filter is located under the protective layer. First you need to remove it. Do not press too hard with the knife as this may damage necessary parts.
Description of dashboard optimization
Note: It is easier to remove if you rub a knife in one direction and then the other.
- To insert LED lamps, remove the card located in the plastic case. There will be special holes for them.
Instrument panel pinout
Note. But that's not all, you need to solder the lamp harness to the board for them to work.
- Now you need to assemble everything and install it correctly.
Repair of instrument panel VAZ 2110
On cars of the VAZ 2110-2112 family, the dashboard includes control lights and on-board instruments, with the help of which the driver can easily monitor the condition of the car. on panel : coolant temperature, turn signals, tachometer, fuel level, speedometer, an image in the form of a gas station, indicating that it is necessary to refuel, lights for turning on the dimensions and high beams, low brake fluid level, a screen reflecting the vehicle’s mileage, emergency alarm, Check Engine, which signals engine malfunctions, a display with a clock, an indication of a generator malfunction or battery recharging, an indication of the handbrake, a low oil pressure light in the engine and, on carburetor engines, a light ).
READ What Bulbs Are on a Volkswagen Polo Sedan
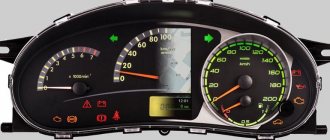
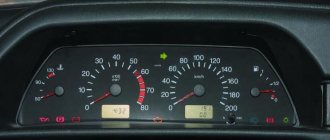
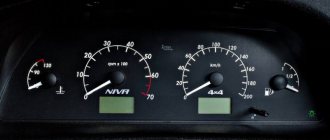
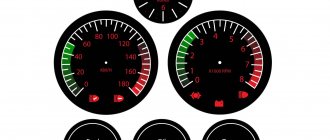
Europanel
- Side scale from 50 to 130 and arrow. Shows the temperature of antifreeze (antifreeze) in the engine cooling system;
- Almost round scale (0 – 80) and arrow. Tachometer showing engine speed;
- Two arrows at the top, almost in the middle of the control panel - turn signals (right, left);
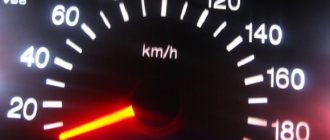
- Speedometer. Well, this device, probably everyone knows, shows the speed at which the car is moving;
- A side scale with an arrow and, most often, two images of a filling column (white and red). Instead of a red column there may be a yellow light. This is an indicator of the fuel level in the tank. If the red column (yellow light) lights up, it means that there is very little fuel left in the tank - no more than 7 liters, urgent refueling is required.
Despite such electronic asceticism, it is in principle possible to splurge on several dozen light bulbs and scales. Sitting at home, with a book in hand and drinking tea. But when, at a speed of 140, some indicator begins to frantically demand attention, you involuntarily get lost, and control over the car becomes, to put it mildly, not the most ideal.
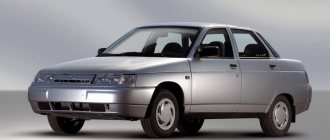
Especially when you change from a penny to the wheel of a 2112, you feel like young Gagarin in an alien spaceship, when every light means something, and what exactly - go and figure it out. For these purposes alone, it was worth studying the new panel one hundred and twelfth in more detail, which we are happy to share.
Expert opinion
It-Technology, Electrical power and electronics specialist
Ask questions to the “Specialist for modernization of energy generation systems”
Indication symbols But when at a speed of 140 some indicator begins to feverishly demand attention, you involuntarily get lost, and control over the car becomes, to put it mildly, not the most ideal. Ask, I'm in touch!
Replacing warning lamps in the instrument panel
In many cars, including the VAZ 2110, warning lamps A12?1,2 are used in the instrument cluster. When replacing the lamp, do the following:
The socket together with the burnt out lamp should be turned counterclockwise all the way.
Remove the lamp socket from the instrument system.
A new lamp is installed in place of the burned out one in the reverse order. All other instrument cluster lamps are replaced using the same method.
The importance of every light bulb
If one of the lamps does break, it should be replaced as soon as possible. The thing is that each light bulb signals one or another malfunction. If one of them is broken, the driver will not be able to know that, for example, he is running out of fuel. This can lead to quite unpleasant consequences.
It also happens that the light indicates a malfunction in the fuel system. This is a fairly serious problem, so it needs to be addressed urgently.
What are dashboard lights for?
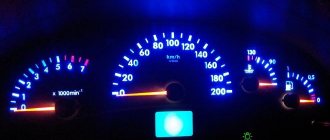
VAZ 2114 is one of the highest quality, dynamic and beautiful models of the domestic automobile industry, with excellent technical characteristics. However, it also has its drawbacks, one of which is the dashboard, which is not particularly reliable and of high quality. A common problem with the dashboard is the rapid failure of the backlight lamps.
Working illumination of the dashboard of a VAZ 2114 car
The backlight bulbs provide the driver with various information that allows them to monitor the condition of the car and diagnose possible malfunctions in a timely manner. There may be several reasons for their operation:
- the battery is discharged;
- holding the handbrake;
- lack of fuel in the gas tank;
- a decrease in engine oil pressure is a reason that requires stopping the car to avoid engine damage;
- accumulation of water in the filter. Excess liquid is drained to prevent it from entering the pump;
- malfunctions in the fuel system;
- engine malfunctions.
Failure of instrument panel lamps may cause the driver to miss a breakdown or malfunction that could cause an accident. For this reason, you should not delay replacing light bulbs.
Features of the functioning of light bulbs on the dashboard
The VAZ dashboard is needed to inform the car enthusiast about any processes occurring in the car. This means that using the dashboard you can monitor the status of the car, as well as monitor your driving. In addition, it is the dashboard that is needed in order to diagnose certain malfunctions. All this means that the lights on the panel do not light up just like that, but for some specific reason.
One of the most common causes of light bulb failure is prolonged use. Another reason is problems with contacts. Almost any car part requires replacement after a certain period of time. Light bulbs are no exception. And some problems may require the help of an electrician.
Features of replacing a light bulb in the instrument panel of a VAZ 2114
There are 13 lamps in the dashboard, but not all of them can be replaced. Unfortunately, only 8 bulbs can be replaced.
Before you begin the process of replacing the lamp, you need to clean the contacts in case there are any traces of oxidation on them. Sometimes it is not the lamp that needs to be changed, but only its socket.
Before you buy new lamps for the panel, you need to calculate the total number of devices that are needed for the sensors.
Don't forget about checking. If the new lamps do not work, this means that the replacement was not carried out correctly. It is possible that the reason is that the new light bulb has some kind of defect.
READ What kind of bulbs are in the fog lamps of VAZ 2110
Dashboard side mounting screws
If the light does not light, then the cause of the malfunction may be a malfunction of the contacts. This is a pretty serious problem. It may require the help of a qualified electrician to resolve it as quickly as possible.
Another relevant tip concerns current trends. Some car owners are not looking for standard light bulbs for their VAZ, but modernized ones. You need to be aware that retrofitted light bulbs may have some significant defects. Ultimately, this can lead to damage to the instrument panel. In order to reduce the likelihood of such an unpleasant scenario, it is best to give preference to standard lamps for model 2114.
Reason for replacement
It is obvious: the light bulb in the dashboard is changed when it burns out. This can happen either due to a sudden power surge or due to the expiration of the light bulb.
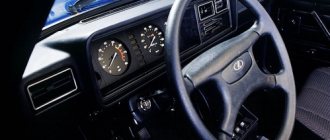
Replacing the instrument cluster of a high panel on a VAZ 2108, VAZ 2109, VAZ 21099
Welcome! The instrument cluster is not a cheap thing, since all the indicators and lamps are located on it, replacing it is essentially nothing complicated, the most important thing is to know how to do it, only two combinations were used on cars of the Samara family, although if you take into account the fourteenth panel
then three combinations, the first combination is from the low panel (For information on how to replace this combination, read the article: “
Replacing
the instrument cluster of a low VAZ panel”), the second is from the high panel, today we are disassembling it, and the third and last combination is from a car of the Samara 2 family, that is from the fourteenth.
Note! To replace this part you will need to use: A screwdriver and a rag, because when you reach for the speedometer cable from the box or disconnect it from the gearbox, you will get dirty and you can wipe your hands with a rag, or initially you can just put gloves on your hands and then no rag no need!
When should you change the instrument cluster? When it becomes completely unusable and stops working, the speedometer on it may first fail, without which it will not be very convenient to drive, and the tachometer may also stop showing, but basically all these things are connected not with the combination but with something others, for example, if your speedometer has stopped showing, then check its cable, maybe it’s disconnected and the problem here is far from being a combination, the same thing with the tachometer, maybe the wires that come from it are broken or something else happened to them, the tachometer is the same will stop working, there were even cases when people went and bought a new instrument cluster and brought it with them and said replace mine suddenly stopped working, but it turned out to be a fuse that had blown and after replacement the old combination began to work exactly the same as it had worked before.
How to replace the dashboard bulbs of a VAZ 2114
Burnt out light bulbs on your dashboard are a nuisance. Without them, the driver cannot obtain all the necessary information about the condition of his car. The dashboard on the VAZ 2114 has never been reliable, so the owner of this car will sooner or later have to change one or more light bulbs in the dashboard. We will tell you below what manipulations you will need to do yourself to replace it.
ONE OR MORE LIGHTS ARE NOT BURNING
- VAZ 2114 instrument panel does not light up
- One or more warning lamps are not working.
Let's consider the first variant of malfunctions, when the backlight of the VAZ 2114 instrument panel does not work. You must begin checking the functionality of the backlight by checking the serviceability of the fuse in this circuit. This only applies when all the backlights are off.
The fuse box on this model, as well as on the VAZ 2113 and VAZ 2115, is located in the engine compartment on the driver's side. You need to remove its cover and find the fuse responsible for the backlight, this is F10. It is designed for a current of 7.5 A. If it burns out, replace it with a new one and check the operation of the backlight paws.
Further events can develop as follows: either everything works or it doesn’t. If the instrument panel backlight works, the test ends here, otherwise it is necessary to continue troubleshooting. It may be due to poor contact of the connectors or an open circuit in the power supply of the backlight lamps.
To find and eliminate these problems, you need to remember the basic concepts of the laws of electrical engineering, and have a car LED electrical circuit tester, tester or voltmeter. If there is neither one nor the other, then it is better to seek help from an auto electrician.
The situation is much simpler when one or more, but not all, backlights are off. Burnt out light bulbs are simply replaced with known good ones. From the practice of auto electricians, we can conclude that in most cases a fuse or light bulb . It rarely comes to troubleshooting using instruments, but sometimes it happens. You should be aware that if a replacement (new) fuse blows repeatedly, you should look for a short circuit in the electrical circuit.
In the second case, they do approximately the same, but take into account that there are no fuses for each indicator lamp. They try to replace the light bulb with a new one, if it doesn’t light up again, then the contacts need to be checked. As a rule, this is enough to troubleshoot problems. Otherwise, it is better to ask a specialist for help, because the culprit may be the sensor that works in conjunction with this warning lamp. Dashboard lamps
Replacing light bulbs in the dashboard of a VAZ 2110 12
Sources:
https://fastmb.ru/autoremont/399-remont-paneli-priborov-vaz-2110.html https://xn80aaajvii0auesmd7d.xnp1ai/pribor/skolko-lampochek-v-paneli-priborov-vaz-2115-zamena-lampochek -v-pribornoj-paneli-vaz-2114-2115-foto-i-video-cena.html
Designations
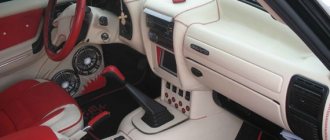
Installing a Europanel on an old-style VAZ 2112
Replacing the entire panel is a rather labor-intensive and time-consuming process, because you will have to repack almost all the wiring. But it's not just the work that makes the replacement process difficult. You will have to purchase some necessary elements for the panel to fit into place. Namely:
- plugs for extra buttons;
- air duct;
- inserts, buttons, pads;
- a new wiring harness corresponding to the wiring diagram;
- shield mounting brackets;
- The door cards will have to be replaced because the old ones do not fit with the new design.
Therefore, before replacing, you should think about the feasibility of the operation. Thus, we have become closely acquainted with the dashboard of the VAZ 2110, and we hope that it will not cause you any trouble on the road. Fewer red lights on your dashboard, and have a good trip
Useful tips Connection diagrams Principles of operation of devices Main concepts Meters from Energomer Precautions Incandescent lamps Video instructions for the master Testing with a multimeter