Already on new cars of the VAZ 2110 series, buyers noted the insufficient effectiveness of noise insulation and wind protection by rubber on the doors. Therefore, there is no need to talk about used cars.
Over time, creaking and rustling noises appear, and the driver and passengers experience discomfort from the cold seeping through worn-out seals. Plus, loose fitting of the doors leads to the appearance of moisture inside the cabin during snow or rain.
It would seem that such an insignificant element as a seal, but how many problems it can cause in case of wear or mechanical damage.
The seals at the bottom of the doors, near the thresholds, are subject to the greatest wear. Therefore, every buyer of a used VAZ 2110 or the owner of a rather old car must first replace these same rubber bands.
Appearance of the gum
Functions of the door seal on the VAZ 2110 and its independent replacement
If even the owners of the new “ten” noted insufficient noise and wind insulation of the door rubbers, then what can we say about well-used cars.
The door seals of the VAZ 2110, worn down by time and use, no longer meet even the minimum requirements that are imposed on them by not so demanding consumers of AvtoVAZ products. Not only can you hear every creaking and rustling sound outside the cabin, but the driver’s left side and knee are “frozen,” and the passenger’s right is “frozen” by the headwind, which freely penetrates through loosely fitting doors and sagging rubber bands. To complete the picture, you should also add raindrops penetrating into the interior.
Door seal per meter
And yet, undoubtedly, any seals wear out, especially at the bottom, in the threshold area. Therefore, the isolation of the interior from external influences can be saved either by replacement or significant modification.
Selection of replacement
You won’t find any kind of advice for naive and gullible car owners on the Internet. Some suggest installing window seals on the VAZ 2110 instead of rubber bands intended for this model, others suggest inserting tubes from droppers inside. In general, there is no limit to skillful imagination.
We will try to focus on the most acceptable options, with proven effectiveness in practice.
So, to replace rubber bands you can use:
- a ready-made set from the manufacturer - designed specifically for the VAZ 2110. These are mass-produced rubber bands that fit perfectly on all doors. They are double-circuit and allow for additional sealing;
- measured VAZ rubber bands. That is, on sale you can find both ready-made, “soldered” rubber bands for each door, and a rubber band per meter for the same purpose;
- seals for Priora - according to experts, they are even better. Firstly, they are three-chambered, with a steel strip for fixation. Secondly, they are of higher quality, “hold” their shape longer, and do not wrinkle as much; Priorovsky door seal
- It is also possible to install rubber bands from GAZelle.
Tip: Before choosing a seal, you need to very carefully measure the internal length of the rubber bands on the front and rear doors. It’s better to take a little more if you’re not using a “native” set, because shortening is always easier than sharpening.
In addition, if you plan to modify it for tighter insulation, you will also need a tube for additional door sealing, about 8 mm in diameter made of silicone or polyurethane.
For fixation, disposable pins and glue are used.
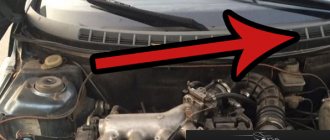
Refinement of gutters on the windshield from Priora
In order to install gutters from LADAPriora on a VAZ 2110 without modifications, two conditions must be met:
- — the ability to remove the windshield on the VAZ 2110;
- — The VAZ 2110 should have a frill of a new type (or a frill from LADAPriora).
If there is rust under the windshield rubber on your VAZ 2110, then the process of removing it can be combined with installing gutters.
If you are not inclined to remove the windshield from your ten, then to install drains you will need to make minor adjustments to the car:
- First, you need to remove the standard rubber side seals of the windshield;
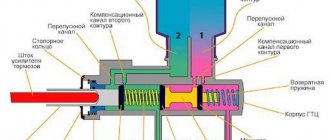
- Secondly, you will need to trim at a slight angle that part of the drain that will later extend behind the glass (shown in the figure below);
- The next step is to apply silicone sealant to the inside of the drain, extending behind the glass;
- At the last stage, we snap the gutters from LADAPriora.
If necessary, in order to avoid detachment of the upper corner of the edging, it may be necessary to trim or glue in certain places (depend on the situation).
If your VAZ 2110 car has an old frill installed, then the bottom of the drain will rest and it will need to be cut in place (although it is better to replace the old frill with a new frill - no alterations are required for this).
Dismantling
After purchasing everything you need, you can first begin dismantling and then installing a new seal. The first stage is removing the plastic facing panel from the threshold. This is done using a regular flat-head screwdriver. Just try to do everything carefully, without damaging the plastic clips that secure the panel.
This is followed by the removal of old rubber bands. This is done by tearing it off, then removing the residue using available tools. If you need to remove the remaining glue or small debris, use a solvent (be careful that it does not dissolve the paintwork of the car).
Next, you need to clean the entire doorway from dust and various contaminants, paying special attention to the lower parts. You can do dry cleaning with a brush and vacuum cleaner. If you still need to wash it, let the surface dry thoroughly before installing the rubber bands.
Removing the trunk seal on a VAZ 2110
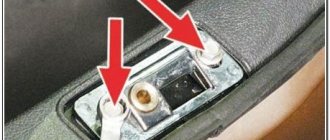
So, first you need to open the luggage compartment of the car and unscrew several screws securing the carpet. Mainly along the bottom, as shown in the photo:
After this, carefully move the carpet back so that it does not interfere with the removal of the elastic in the future.
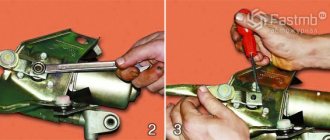
Then we take a screwdriver and carefully pry off the trunk seal at the joint, as is clearly shown in the photo.
And carefully disconnect it from the entire landing area:
After the old seal is removed, you can begin installing a new rubber band. To do this, we do everything in reverse order. It’s worth starting from the same place where we hooked it. We carefully place it in place, press so that everything fits tightly and similarly press the seal along the entire perimeter so that it fits into place everywhere.
The price of a new seal for a VAZ 2110, if we consider high-quality consumables produced by BRT, is about 300 rubles for the trunk. To extend the life of these rubber bands, it is advisable to at least occasionally lubricate them with silicone grease, and in winter this is highly recommended.
Installation
This work, in principle, is not too difficult; it can be done even without special training. Just take into account that the installation of the seal and the simultaneous modification of wind and noise insulation must be carried out carefully and meticulously, then you will ensure greater interior comfort for several years to come.
The installation is carried out according to the following algorithm:
- Even if you have previously measured the seal seat, do it again, following the popular wisdom that it is better to measure seven times;
- Cut the seal to the required length with a small margin (a couple of centimeters). Of course, if you bought a ready-made “ten” set of rubber bands, then ignore these two points;
- Inside the seal, insert the polymer or silicone tube that you have. Accordingly, its length should also correspond to the elastic band. This tube is designed to give elasticity to the entire insulating structure and create a better fit of the rubber bands, thereby protecting the interior from unnecessary additional “ventilation” and unnecessary sounds;
- Glue the side curly seal at the bottom;
- A solid rubber band can be worn anywhere. And for measuring, it is best to choose a starting point between the door awnings (or about 30 cm from the bottom of the threshold). Whether you move the installation up or down does not matter;
- It is necessary to push the figured profile all the way down. This is done only with the help of a rubber or wooden mallet (hammer);
- When you walk around the entire perimeter, you will probably find that there is a lot of material. The insert element (tube) must be cut exactly end-to-end, and the seal must be cut in such a way that there is slight deformation of the adjacent areas. Thus, there will be no “siphoning” through the joint;
- Install the piston, remount the plastic sill trim;
- Carefully and tightly glue the second contour along the edge of the door. Let it dry.
Almost immediately when closing the door you will hear a softer dull sound. And while driving you will not hear annoying noises and whistling of the cold wind penetrating inside. After a while, you see, you will forget about the pain in your previously cold left knee.
Additional seal
If you have completely replaced old rubber bands with new ones in all doors, then no additional insulation is needed. But in cases where you do not want or do not have the opportunity to do this immediately, and the old rubber bands have become crushed and worn out, you can install additional VAZ 2110 door seals as a temporary measure.
It could be a thin tube for thermal insulation. These are used in refrigeration equipment, etc. The material is a bit like black foam rubber, but denser. You may come across advice - to use meter seals for windshields in this capacity, but this is impractical. Firstly, it is quite difficult to find one, it is much more expensive, and is not easy to install - it is difficult to achieve a high-quality tight fit. seal
However, regardless of the material chosen, its installation is no different.
As a rule, additional insulation of doors is carried out only in their top and rear parts. If there is a strong need - and in the front part, you just need to be especially careful in the area of the hinges so that the material does not interfere with the normal closing of the doors, otherwise some on the forums complain that after such actions problems arose with closing the doors.
It is irrational to install anything additional in the threshold area. Dirt and water will accumulate there faster, and then corrosion, rust, holes...
The additional seal is simply glued to the body (not to the door), close to the existing one. When choosing a glue, make sure that it does not react with the paint surface of the car.
After gluing, close the doors and check whether the seal is coming out. If necessary, it is carefully trimmed.
Purpose
Color marks are also drawn in a certain place where there is a filler in the form of a porous rubber rod. The insert in the body of the seal is necessary so that when installing it in the door opening, it does not break and become deformed in the corner of the opening, where the transition is not so smooth.
Thanks to the insert, the product becomes level without breaking, which guarantees a tight fit in this area of the opening, which provides a reliable seal.
Differences
An ordinary, cheap sealant has no filler, and therefore there are no color marks. They are mounted on any side of the doors, both left and right. Ask salespeople at your auto store for universal door seals. They also fit on front or rear doors. The only thing you need is to cut off the excess part at the junction with a margin. Rubber sags over time.
Products with an insert are installed only on a certain side, on the right or left of the car, so that the filler fits exactly on the bend of the door opening.
We improve the seals on the doors of the VAZ 2110
Already on new cars of the VAZ 2110 series, buyers noted the insufficient effectiveness of noise insulation and wind protection by rubber on the doors. Therefore, there is no need to talk about used cars.
Over time, creaking and rustling noises appear, and the driver and passengers experience discomfort from the cold seeping through worn-out seals. Plus, loose fitting of the doors leads to the appearance of moisture inside the cabin during snow or rain.
It would seem that such an insignificant element as a seal, but how many problems it can cause in case of wear or mechanical damage.
The seals at the bottom of the doors, near the thresholds, are subject to the greatest wear. Therefore, every buyer of a used VAZ 2110 or the owner of a rather old car must first replace these same rubber bands.
Appearance of the gum
Types of seals for VAZ-2114
Over time, the rubber seals on car doors become unusable. The seals on the lower sills in the VAZ-2114 are especially susceptible to wear. Therefore, they need to be changed most often. It is recommended to replace all door seals as a whole.
What kind of door seals can be installed on a VAZ 2114:
- Ready-made factory kits for VAZ 2109 - VAZ 2115 - they are specially selected for the size of the doorways of these particular car models, the set includes rubber seals for the front and rear doors.
- Measuring universal seals - they are sold in the form of a measuring tape, from which a section of the required size is cut off.
- Sealing rubber from other car models - for the VAZ-2114, seals from Lada Priora or GAZelle are often used.
Important! You may come across advice to install a universal seal for windows or refrigerators on your car. You should not try to save money in this way, since such seals, which are not designed for loads in car openings, quickly wear out. In addition, they initially do not provide the proper degree of protection and sound insulation.
What to choose?
Sometimes you are amazed at the imagination and thoughts of those who are trying to save money on car repairs. If we talk about rubber seals, some advise using drip tubes instead, others go the other way, inserting window seals.
Do not follow such advice under any circumstances. They won't lead to anything good.
There are several truly correct and effective options, which we will introduce you to using the table.
Option
Peculiarities
Ready-made kits from the manufacturer
They are designed specifically for the VAZ 2110 model. These are mass-produced rubber bands that fit perfectly on the dozen doors. Their design is double-circuit, which allows you to install additional seals if necessary.
Measuring rubber bands for VAZ
In stores you can purchase ready-made or soldered seals for each door. Or a solid tape, from which they will cut you a piece of the required length
Seals from Priora
Experts believe that these are the most effective and reliable seals. This is due to the three-chamber design with a steel fixing strip and high quality. These elastic bands do not wrinkle and keep their shape perfectly.
Rubber bands from GAZelle
A frequently encountered option that has similar characteristics to the standard elements for the dozen. The price is about the same
When choosing the length of the required piece of seal, measure the internal length of the installed rubber bands on both doors separately. Take it with a reserve, because you can always cut off the excess.
The fixing elements should be caps and high-quality, effective glue. When purchasing the rubber itself, they will tell you which glue is best to use.
Removal
When you have purchased the required number of seals, you can begin to work.
The first step is to remove the old rubber elements, after which the installation of new parts begins.
Let's tell you more about the dismantling procedure.
- Remove the plastic trim panels installed on your vehicle's door sills. To do this you will need a thick screwdriver. Remove carefully, being careful not to damage the plastic caps. But it’s better to buy new ones in advance if you can’t carefully dismantle the threshold.
- Now remove the old pieces of rubber from the seats. Simply tear off the sections that are torn off by hand.
- Remaining rubber can be cleaned off with any available tool. Only be careful with sharp objects so as not to damage the metal and paint layer.
- Very small residues and traces of glue are removed using solvents. Make sure that the solvent you choose will not damage your paintwork.
- Go over the doorway with a vacuum cleaner, remove all dust and dirt. Take special care to clean the bottom part. If wet cleaning was used, wait until everything is thoroughly dry.
Upcoming work
Installation
This process cannot be called complicated. You are not required to have any special training or extensive experience. Although you should at least be able to handle glue.
Working with the back door
Each stage is performed consistently and carefully to achieve the desired result and create comfort inside the cabin.
- Even if you have already measured the required length of the seals for your doors, we advise you to do it again. Anything can happen.
- Cut the required length, plus leave a couple of centimeters of reserve. Although if we are talking about a ready-made set of rubber bands, you won’t have to cut or leave anything. Skip the first two points.
- Insert a tube made of silicone or polymer inside the sealing tape. They are sold everywhere, so there should be no problems finding them.
- The length of the tube must match the length of the rubber. This tube will serve to create the necessary elasticity and allow the elastic to press more tightly to the door. This way, ventilation gaps will not appear, and the cabin will become much quieter.
- A shaped side rubber seal is glued to the bottom.
- If the tape is solid, you can start putting it on from either side, as is more convenient for you.
- If it is a measuring rubber band, then start from a point between the door overhangs, or 30 centimeters from the bottom of the threshold. Moving up or down is a personal choice for each master. There is no difference here.
- Push the figured profile all the way down. To do this you will need a rubber or wooden hammer. He's a mallet.
- When the seal is installed around the entire perimeter, an extra piece will be revealed. Cut the tube straight and end-to-end, and make the elastic itself seem slightly deformed. It's like you tore it off by hand. This will avoid the unpleasant phenomenon of siphoning through the joint.
- Replace the pistons; if some were damaged during removal, replace them with new, intact ones.
- Replace the plastic cladding removed from the threshold.
- The second contour of the seal is glued along the edges carefully, but as tightly as possible, after which time is given for the glue to dry completely.
Almost immediately you will feel the difference between the old and new seal. This is a useful exercise that allows you to get rid of unpleasant sounds, knocking, whistling and cold air flowing directly onto your feet.
Additional measures
Some car owners believe that the efforts of standard seals are not enough to provide the necessary comfort and silence in the cabin. Therefore, they decide to install additional rubber bands.
An additional seal is installed only if the old ones are worn out, but you do not want or cannot replace them completely. If you replace rubber bands, there is no need to install additional elements.
Thermal insulating tubes, which are used in refrigerator designs, often act as additional seals. The material is somewhat similar to black foam rubber, only its density is higher.
Additional sealer
Sometimes an additional element is the seal used for the windshield. Although from a practicality point of view this is not the best option. This is explained by the difficulty of finding material and the inconvenience of installation - the material is difficult to adhere to, and it is difficult to achieve a high joint density.
Regardless of the material chosen, the installation procedure always looks approximately the same:
- Additional insulation is installed on the top and back of the doors, and sometimes on the front. In the latter case, be careful with the hinges so that the material does not interfere with closing the doors;
- There is no point in placing additional insulation in the area of thresholds. Dirt accumulates there very quickly, which will ultimately lead to corrosion, rust and other problems with the metal;
- The material should be glued to the body, but not to the doors. The additional insulation should be located tightly in relation to the rubber bands already installed on the door;
- Choose your glue carefully. Some compounds may begin to destroy the paint layer;
- When you have completed the installation, try closing the doors. Sometimes the material comes out a little. In this case, it is enough to simply trim off the excess pieces.
The presence of seals makes driving your car more comfortable and enjoyable. These rubber bands have a positive effect on the level of sound insulation. This is important, given the effectiveness of the standard Shumka provided for the VAZ 2110.
How to change the seal
In order to change the sealing rubber, you first need to dismantle the old seals.
To do this, you need to remove sequentially:
- plastic facing panels from thresholds;
- old layer of sealant;
- its remains - small traces are cleaned with a solvent;
- dirt and dust - using a vacuum cleaner and a damp cloth.
Before starting installation work, you need to wait until the openings are dry.
- For a measured seal - measure the doorway and cut off the required length of rubber + a few centimeters of reserve.
- Insert a silicone or polymer tube inside the seal chamber - it is needed to create additional density and sound insulation.
- Place the seal around the entire perimeter, trim off the excess.
- Using a mallet with a rubber striker, tap the sealing rubber so that it sinks “all the way.”
- Replace the plastic panels.
- Carefully glue the second contour of the seal.
Important! Glue and solvent should be selected very carefully so as not to damage the paintwork and metal.
Next, you need to wait for the glue to dry completely and close the door. If excess “comes out”, you can cut it off.
After installing a new sealing layer on the VAZ-2114, the level of noise insulation and wind protection in the cabin increases significantly.
A properly installed seal can also protect against moisture that gets inside when the insulating layer is worn out.
It also becomes warmer in the car - drafts no longer circulate around the cabin. But this result can only be achieved with the correct selection and high-quality installation of door seals.
Door seals VAZ 2110
When developing domestic cars, due attention was not paid to their comfort; extraneous sounds are often heard in the cabin and moisture leaks are possible during precipitation. By replacing the door seals of the VAZ 2110 and slightly modifying them, you can achieve better sound insulation performance. Serial rubber products intended for sealing the interior, as a rule, are not of high quality. Often the problem arises not only with the double-circuit seals of the doors themselves, but also of the lowered side windows. This is due to the low quality of polymer materials and rubber from which these elements are made. Errors during their installation on the conveyor, as well as deformation during prolonged and intensive use, are also possible. The work of restoring the tightness of the interior is simple and will not require much time even for an untrained worker.
Replacing glass frame seal elements
External polymer elements are gradually destroyed under the influence of moisture, solar radiation and dust and need to be replaced. The step-by-step guide for replacing seals is as follows:
- dismantling old elements using a screwdriver, being careful not to damage the coating,
- removing dirt under the old linings and wiping the seats with a rag,
- We install new seals in place, while trying not to hit or apply much force.
Having completed all the work on one door, we move on to the next one, considering that their design is similar, then there are no special features in them. This is how we consistently eliminate natural ventilation of the car interior. Photos with step-by-step operations allow you to perform all actions quickly and get good results.
Additional operations to eliminate noise in the VAZ 2110 interior
Statistics show that the majority of drivers of Russian cars are not satisfied with the increased noise in the car. This is caused by the use of low-quality rigid polymer materials and insufficiently reliable fasteners. Therefore, reassembling the interior of even a new car is the most frequently requested service at many service stations. All work can be done with your own hands if you carefully study the instructions for carrying out the entire necessary cycle. The body can be properly isolated from extraneous noise only through complete disassembly . The panels are removed, and polymer or sponge inserts are glued in the places where they meet, which will prevent knocking or other sounds from occurring. The price of materials and work is relatively low, so the total cost of work will be acceptable.
View of the improved doorway of the VAZ 2110
A car improved in this way becomes more comfortable and convenient to use, both in the city and on the highway. A high-quality replacement of the VAZ 2110 door seal eliminates aerodynamic noise and moisture leakage during precipitation into the car interior.
Application of a three-chamber seal
All seals can be divided into:
- Single-chamber universal - require installation of additional protection, suitable for windows, doors and hood. They are not produced as factory equipment for cars due to the low degree of security.
- Two-chamber - factory seals for VAZ-2114. The double-circuit structure allows, if necessary, to install an additional layer of sealant.
- Three-chamber - for example, sealing rubber for Lada Priora. They are additionally equipped with a steel strip for fixation, which allows them to retain their shape for a long time.
Three-chamber seals provide the greatest degree of protection of the car interior from cold and noise. Currently, they are used in the production of domestic cars.
Attention! After installing the three-chamber sealing rubber, car owners note that they need to apply more force when closing the door. This is a temporary phenomenon. It is due to the fact that the VAZ-2114 was initially equipped with double-circuit tires, and the door was designed specifically for its thickness. Also, the new sealing layer always has greater rigidity. Gradually the new seal will “take hold” and the door will close easier.
Additional door seals for VAZ 2110
Door seals have a significant effect on the sound insulation of a car. To eliminate wind noise in the cabin, you can modify the door seals or install additional ones.
In this article we will talk about an additional set of seals. Everyone knows what the gaps between the doors of foreign cars are, 1mm-2mm maximum. On my 11th, the gaps in some places reach 5mm. On the Internet you will find many ways to modify the door seals of the VAZ 2110, or maybe try installing additional ones?
Stories from our readers
“Fucking basin. "
Hi all! My name is Mikhail, now I’ll tell you a story about how I managed to exchange my two-wheeler for a 2010 Camry. It all started with the fact that I began to be wildly irritated by the breakdowns of the two-wheeler, it seemed like nothing serious was broken, but damn it, there were so many little things that really started to irritate me. This is where the idea arose that it was time to change the car to a foreign car. The choice fell on the melting Camry of the tenth years.
Yes, I had matured morally, but financially I just couldn’t handle it. I’ll say right away that I am against loans and taking a car, especially not a new one, on credit is unreasonable. My salary is 24k a month, so collecting 600-700 thousand is almost impossible for me. I started looking for different ways to make money on the Internet. You can’t imagine how many scams there are, what I haven’t tried: sports betting, network marketing, and even the volcano casino, where I successfully lost about 10 thousand ((The only direction in which it seemed to me that I could make money was currency trading on the stock exchange, they call it Forex. But when I started delving into it, I realized that it was very difficult for me. I continued to dig further and came across binary options. The essence is the same as in Forex, but it’s much easier to understand. I started reading forums, studying trading strategies. I tried it on a demo account, then opened a real account. To be honest, I didn’t manage to start earning money right away, until I understood all the mechanics of options, I lost about 3,000 rubles, but as it turned out, it was a precious experience. Now I earn 5-7 thousand rubles a day. I managed to get the car buy after half a year, but in my opinion this is a good result, and it’s not about the car, my life has changed, I naturally quit my job, I have more free time for myself and my family. You’ll laugh, but I work directly on the phone)) If If you want to change your life like me, then here’s what I advise you to do right now: 1. Register on the site 2. Practice on a Demo account (it’s free). 3. As soon as you get something on the Demo account, top up your REAL ACCOUNT and go to REAL MONEY! I also advise you to download the application to your phone, it’s much more convenient to work from your phone. Download here.
Additional door seals for VAZ 2110
One of the articles (“Upgrading the seals of the VAZ 2110”) has already talked about how you can eliminate wind noise in the cabin by upgrading the standard door seals. In this article we will talk about installing an additional set of door seals on a VAZ 2110.
To improve the effect of door seals, the gaps between them and the metal of the door should be no more than 1-2 mm, while on VAZ cars of the tenth family the gaps sometimes reach 5-7 mm.
In order to reduce wind noise in the interior of a VAZ 2110 car, you can try installing additional door seals made of various materials.
The first of these methods is FLEX - tube.
Most often, the FLEX tube is found in a store that sells and services climate control equipment. To attach the FLEX tube, it is best to use glue or double-sided tape. Before installing the FLEX tube, it is important to degrease the surface.
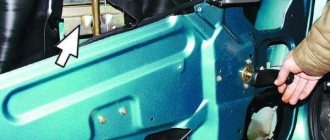
One FLEX tube needs to be run along the top (from the bottom of the windshield towards the rear door), laying it along the edge of the rear door (photo below).
In the space between the doors it is better to glue FLEX - a tube from the top to the door lock. There is no point in gluing an additional seal on the door, since when opening and closing the doors you will catch it with your hand, and gradually it will come off anyway.
You can do it differently: replace the factory door seals of the VAZ 2110 with seals from LADAPriora. Similar seals from LADAPriora have a double chamber, which has a positive effect on the tightness of the doors.
Description for the diagram above:
- Red color - glue the FLEX tube directly to the body;
- Green color – glue the rubber seal for the doors;
- Blue color – install door seal from LADAPriora.
You can close the cracks and gaps between the doors of a VAZ car of the tenth family using one of the following methods:
Door and trunk seals
Door and trunk lid seals...
Hello dear readers of the blog RtiIvaz.ru. Let's look at rubber door seals and trunk lids today under the heading of auto repair kits, find out their design numbers from the catalogue, which VAZ cars are suitable for and what they are used for. Well, let’s not waste time and start studying this photographic material.
Kalina-1118
And so here is a photograph of a rubber door seal for a VAZ car, Kalina-1118. In the red circle you can see a complex cross-section of the seal, by which you can determine which car it is intended for. We will not go into the details of this cut, which is already clear in the photograph, but let’s look at its design number according to the catalog and the length itself to determine when choosing. The same door opening seal is suitable in cross section and length for VAZ 2170 Priora and VAZ 2110 cars.
Repair kit design number:
- 1118-6107018-10 length for front doors 3 meters 11 cm. measurement error (+ -) 5 cm
- 2170-6107018-10 length for front doors 3 meters 11 cm. measurement error (+ -) 5 cm
I measured the length myself, so excuse me, I could have made a mistake, plus minus (+ -) from 2 to 5 centimeters. The length of the rear door seals for Kalina and Priora is still in question; by the way, you can install them on the rear door openings of the car from the front ones by shortening them in length with a hacksaw. Door seals for VAZ 1118 and VAZ 2170 need to be measured on site when you buy them. Sometimes on sale door seals are the same in shape and cut as Kalinovsky and Priorovsky, but longer.
It is better to buy a longer seal and cut off the excess length, rather than have it short and have to install a gasket.
VAZ-2110
Look further at the second photo of the rubber door seal for cars of the “ten” Lada 2110 family, as you can see here there is a completely different cut shape of a less complex design compared to the Kalina car door seal.
Design number:
- 2110-6107018 for the front door length is 3 meters 17 cm, and for the rear door 3 meters 4 cm. measurement error (+ -) 2 cm.
VAZ-2109
In the third photo we see the seal of the door opening of the “nine” of the best car, Lada 2109. On the “eight” with two doors, such seals are installed in the shape of the cut, only longer, if I’m not mistaken, by about 15 centimeters. They are suitable for cars from VAZ 2109 “nines” to 2115 “fourteens”.
Design numbers:
- 2109-6107018 for the “nine” the length on all four doors is 3 meters 42 cm. measurement error (+ -) 2 cm
- 2108-6107018 for the "eight" length on two doors 3 meters 71 cm. measurement error (+ -) 2 cm
VAZ 2101-2107
And now we come to the rubber door seal of cars of the “classic” VAZ 2101-2107 family. The cross section, as seen in the photo of the first cars, has a more or less simple shape compared to other seals shown on this page of the rubber technology auto blog.
Design number:
- 2107-6107018 for all “classic” models, length 3 meters 46 cm. measurement error (+ -) 2 cm.
VAZ-2170 Priora
In general terms, everything is clear about the side doors, let's next look at the seals of the trunk lids and the tailgate opening of VAZ cars. A cross-section of the trunk lid seal as we see a complex design for the Lada 2170 Priora.
Repair kit design number:
- 2170-6307024 length 3 meters 36 cm. measurement error (+ -) 2 cm
VAZ 2112
The rubber seal for the trunk lid of the VAZ 2112 car is also suitable for the Lada 2111 station wagon.
Repair kit design number:
- 2112-6307024 length 3 meters 87 cm. measurement error (+ -) 2 cm
VAZ-2110
The rubber seal of the trunk lid of the VAZ 2110 car, in comparison with the Priorovsky one, seems to have fewer complications in the section (see photo).
Design number:
- 2110-6307024 length 4 meters 9 cm. measurement error (+ -) 2 cm
VAZ-2105
Here we come to the final part. Before our eyes is a rubber seal for the rear trunk of a VAZ 2105 of the “classics” family. Since the “five” is long, it can be installed on all Lada cars only by adjusting the length on site. Exactly the same seal, about 35 centimeters longer, is found on the Chevrolet Niva SUV.
Design numbers:
- 2105-5604040 length 3 meters 46 centimeters measurement error (+ -) 2 cm
- 21213-6307024 length 4 meters 36 centimeters measurement error (+ -) 2 cm
What are all these listed rubber seals for? I'll try to answer this question. Rubber protects and protects us! For example, in order to prevent it from being cold in the car in winter or to make the noise of the wheel treads less audible, there is no whistling from the oncoming wind and dust and polluted air from the street do not get in. YouTube video:
Good luck to you and see you soon on the pages of the RtiIvaz.ru blog!
You may also be interested to know:
Door seals for VAZ 2110
Painting the trunk and hood lids