Repair of the gearbox on the VAZ 21099 is required quite often. If the car owner has never carried out such repairs with his own hands, then it is better to contact specialists.
For the first time, you can invite an experienced mechanic to help. If the car owner does not have experience in such repairs, then he will do more harm than correct the situation. Besides, it all depends on the breakdown. Perhaps it is not significant and every car owner can handle it.
If you still decide to repair the gearbox yourself, then you need to have step-by-step instructions and a video for repairs with you.
The gearbox on the VAZ 21099 has the same device and requires the same repairs as on the eight and nine.
First, let's figure out what the gearbox on the VAZ 21099 consists of.
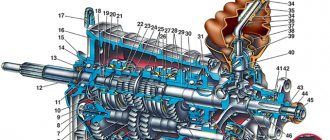
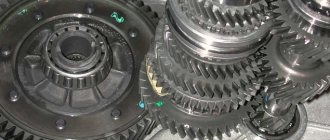
Gearbox device
A manual five-speed gearbox is a complex mechanism consisting of gear ratios, a housing, and gears. There are different configurations of the VAZ 21099 car. With four-speed and five-speed gearboxes.
Device:
- closing cover on the crankcase;
- drive gears of each gear, reverse, axle;
- bearings;
- gearbox housing;
- bushings;
- shaft bearings;
- synchronizers for each gear;
- oil seals;
- satellites;
- breather;
- primary, secondary shafts;
- couplings;
- bushings;
- differential box;
- bearings;
- drain plug for transmission oil;
- rings and half rings;
- gear shift fork.
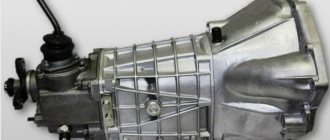
Which box is suitable for VAZ 21099?
It is obvious that the gearboxes installed on cars of the VAZ 2108-99 family (including four-speed ones) are completely interchangeable.
You can also put a box with a VAZ 2110, VAZ 2114-15 - in cases where it is installed with an injection eight-valve VAZ engine.
But when installing these units on a VAZ 21099, you will also have to replace:
- clutch cable or release bearing fork;
- starter - on these cars it has two rather than three mounting points and an armature bushing installed in the front cover.
In addition, nowadays you can buy a “sports” gearbox with shafts, the gears of which have different gear ratios, and such boxes are produced with different rows - for city traffic and for driving on the highway.
Signs and causes of gearbox malfunction
- Transmission malfunctions can be caused by:
- natural wear and tear of parts;
- mechanical damage as a result of an accident;
- systematically not fully squeezing gears;
- sealant is damaged;
- sudden release of the clutch pedal;
- regularly engaging reverse gear when the car moves forward;
- low level of transmission oil in the gearbox;
- irregular gearbox oil changes;
- Frequent wheel slipping when starting off (grinding).
Signs of a breakdown of the VAZ 21099 gearbox include:
- The gearshift lever is loose;
- extraneous sounds in the box;
- when there is a load on the box, the speeds go off (when driving in tension);
- grinding noise when changing gears;
- transmission oil leakage;
- jerking when driving.
Technical characteristics of the VAZ 2109 gearbox
| Type | Mechanics |
| Number of gears | 5 |
| For drive | front |
| Engine capacity | up to 1.6 liters |
| Torque | up to 120 Nm |
| What kind of oil to pour | TNK Trans KP 80W-85 |
| Lubricant volume | 3.4 liters |
| Change of oil | once every 75,000 km |
| Replacing the filter | every 75,000 km |
| Approximate resource | 150,000 km |
Gearbox oil drain
First of all, drain the oil from the box. If you do not know how to remove the gearbox, then use the following instructions:
- Place the car on a flat surface
- We place wheel chocks on both sides under the rear wheels.
- Disconnect the car.
- The mounting bolts are unscrewed from the crankcase and its protection is removed.
- The ground wire connected to the crankcase is unscrewed.
- Unscrew the nuts on the clutch cable.
- Completely remove the clutch cable. We disconnect it from the box.
- Remove all wires from the starter.
- We remove the starter. To do this, unscrew the bolts that hold it in place.
- The drive rod, which switches speeds, is disconnected from the hinge.
- Disconnect the speedometer and cable that drive it.
- Unscrew the bolts and nuts securing the rod.
- The hinge pin is removed from the strut arm.
- The suspension joint and steering knuckle are separated.
- The CV joints are removed.
- The shield is removed.
- The box is attached to the engine with bolts. We unscrew them.
- We remove the box.
We will prepare a gearbox switching diagram in advance.
There is always a way out
For these reasons, the most suitable option for these engines is a V-belt tensioner. A stacked “pushing” element made of steel allows significant torque to be transmitted between the rollers. The main unit of the V-belt tensioner is two sliding rollers, between which a special belt is tensioned. By moving the halves of the main pulley apart and reducing its working profile, the landing roller while simultaneously compressing it, you can get an enhanced transmission. When the two rollers are in the central position, this is the main gear, and accordingly increasing the profile of the main pulley with lowering the driven one gives an overdrive.
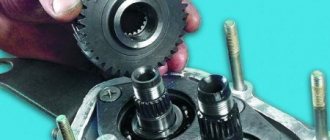
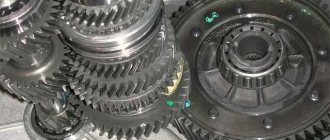
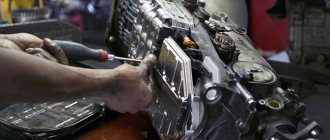
Analysis of the gearbox
Now we disassemble the box and find out the causes of the problems. If you hear extraneous knocks in the gearbox or the gearshift lever rattles, then the reason for this may be wear of parts. They need to be replaced. We disassemble:
- the outside of the box is cleaned;
- placed vertically;
- covers are removed;
- use a rubber hammer to break off the lid of the box;
- We turn on fourth or third gear (otherwise the assembly will not be carried out correctly);
- after unscrewing the bolt that secures fifth gear, turn it on;
- unscrew the nuts of the front and rear shafts;
- remove the fork and 5th gear synchronizer;
- remove the reverse gears;
- disconnect the secondary shaft from the gear;
- the bearing is secured with a plate, remove it;
- the gear, which is the drive gear, is removed from the shaft;
- the bearing plate is removed;
- the rings of the primary and secondary shafts are removed;
- there is a plug on the latch, unscrew it;
- carefully pull out the spring and locking ball;
- We also take out the other two balls;
- there is a power unit in the back of the box, remove its support;
- The shift box housing is secured to the clutch housing;
- remove the crankcase;
- unscrew the bolts securing the gears;
- remove the plug;
- stock too;
- the forks and rod are removed from the gearbox.
After we have disassembled the gearbox, we will diagnose it. Let's prepare replacement parts and begin putting the box back together. We do this carefully. An incorrectly assembled box will not work or will not work correctly.
Synchronizer design and how it works
If a car enthusiast has already imagined a complex mechanism, then we hasten to assure him that the synchronizer is designed quite simply and does not include either electrical or hydraulic components. When studying it, one can draw an analogy with some other auto mechanisms that solve the problem of discrepancy between the rotation speeds of various elements. Its main features are speed and incredible mechanical strength. So, the synchronizer includes the following elements:
- Hubs with so-called breadcrumbs;
- Locking rings;
- Engagement clutch;
- A gear having a friction cone.
The basis of the mechanism is a hub with special external and internal splines. Internal splines allow the hub to have a permanent connection with the transmission shaft. External splines are responsible for connecting the coupling to the hub. The hub has 3 grooves, spaced 120 degrees apart. Spring-loaded crackers are inserted into the grooves, which are responsible for fixing the coupling in the neutral position. The neutral position is called one in which the synchronizer is not yet turned on.
Reinstalling the gearbox
Gearbox assembly:
- we change all non-working elements;
- workers clean with a rag;
- assembly is carried out;
- degrease parts with threads;
- if necessary, lubricate the elements;
- change gaskets;
- insert the balls and bearings into place;
- we assemble the synchronizer;
- We put all the springs in place and tighten the bolts. When assembling, lubricate all connections with sealant;
- attach the box to the engine;
- add oil;
- connect the battery;
- we start the car and check it.
The VAZ 21099 gearbox is adjusted during assembly. Also, after installing the gearbox, you need to adjust the gearshift lever. It is important to adjust the gearbox and gearshift lever correctly.
It should be remembered that prevention can help avoid repairs and troubles along the way. Taking good care of the gearbox is the key to its long-term operation.
Replacing the front bearing
Changing the front input shaft bearing is more difficult. But it is still quite possible to do such work with your own hands.
Removing the front bearing
In normal condition, the front bearing rotates smoothly, no jamming or play is observed. If defects are found as a result of the inspection, the element will have to be replaced.
To work you will need:
- Screwdriver;
- Hammer;
- Bearing ejector.
If there is no ejector, use sawdust and Litol 24 lubricant. We will tell you more about their use.
Now that everything is ready, you can get to work.
- Remove the gearbox from your VAZ 2109. The task is not the most difficult, but it cannot be called an easy walk either.
- Remove the clutch cover with pressure plate from the flywheel.
- Remove the clutch driven disc from the flywheel.
- Now dismantle the flywheel itself.
- If there is a puller, there will be no problems with removing the bearing. But in its absence, arm yourself with improvised means - sawdust and Litol.
- Prepare a mixture from Litol 24 and sawdust. The proportions will be 1 to 1.
- You will need approximately the entire plastic lid from a large jar of the prepared solution of sawdust and lubricant.
- Mix the ingredients thoroughly to obtain a homogeneous mass.
- Fill the internal cavity behind the bearing with the prepared solution. Please note that after this the old bearing can no longer be used.
- Using a driven disk centering mandrel, press out the bearing. Add a little mixture periodically as the bearing begins to gradually move out of its seat.
- Make sure the element comes out of the socket completely.
- Clean the nest from any mixture remaining inside. Make sure that nothing is left there, otherwise you will soon have to carry out repairs again.
- Place the new bearing over the seat and lightly tap it into place with a hammer. You should only hit the outer ring.
- Be sure to press the bearing completely. Here you will need any metal tube or mandrel of suitable diameter.
- Return all dismantled components to their place, reassemble the structure in the reverse order.
Changing input shaft bearings is not the easiest task. The main difficulty is related to the need to remove the gearbox. Otherwise, even beginners can do the procedure. But it's not worth the risk.
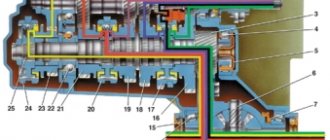
Axle system
Five-speed gearbox In the structure of the gearbox, or rather in the housing, two axles are attached. A pair of locking brackets, a bushing and a three-arm lever are installed on one axis, which makes the device more reliable. The second axis, which penetrates the hole of the locking type brackets, is determined by the hub, which acquires the function of preventing rotation. Characteristic shoulder levers:
- The first arm is designed to include the transmitting torque of the forward stroke;
- The second type of arm is designed to trigger the reverse transmission element;
- The third type of shoulder acts on the shift lever of the transmitting elements;
- In this case, the lever shift hub is equipped with a lock;
- A reverse fork is also mounted on the axle.
The car jerks when starting, it is impossible to shift into gear
The cause of the malfunction is not always the VAZ-2109 gearbox itself. Repairing it may not save it if the clutch assembly is faulty. But it is this system that interacts with the gearbox and engine. It is through the clutch disc that torque is transmitted from the flywheel to the transmission shaft. Typically, this unit serves at least 120 thousand kilometers. But many “nines” have old-style odometers, which reset to zero at 100 thousand.
It is difficult for the driver to control when this or that part in the clutch has been replaced. If the car jerks at start-up and the transmission is difficult to turn on, most likely the disc has been worn out. The plates wear out on it and the damper springs fly out. The petals on the clutch basket are also bent. We have already said about bearings that they are noisy. All this together affects the behavior of the car on the road.