Diagnostics - causes and symptoms of malfunctions
The main reason for replacing a VAZ 2114 bearing under normal conditions is natural wear. The hub assembly is subjected to regular loads, which causes the rolling elements to become unusable.
Other causes of part damage:
- incorrect previous replacement, which resulted in wear of the element;
- strong impacts of the wheel on potholes;
- aggressive driving;
- foreign particles entering the hub: dirt, dust, other particles;
- overheating due to frequent, sharp braking.
How to quickly find wheel bearing noise:
Checking the front bearing of the VAZ 2110:
The hub has a number of signs that indicate its replacement. These include:
- increased noise from the front wheel;
- hum at a certain speed;
- crunching, grinding noise when moving, turning;
- abnormal play of the suspended wheel;
- excessive heating of the disk.
Having noticed at least one of the signs, the owner must take action and replace the wheel bearing.
Causes of wheel bearing failure
Attention : if repair work is not carried out in a timely manner, the likelihood of an emergency on the road increases. As a rule, the use of a low-quality bearing leads to the fact that the wheel may jam during steering, or as a result of the disc being separated from the shaft.
It is also important to note that if the hub fails, it becomes very hot. As a result, the brake system fails, and therefore operation is disrupted. However, the work is never disrupted at the same time, unless there is a strong collision with another object. The car may hit a hole, a bump, or drive onto a curb. As a result, the VAZ 2114 may receive serious mechanical damage.
Destruction occurs gradually and the driver can often understand this by the presence of a specific sound when a specific body vibration appears. There may be small shocks, sometimes the car shakes.
There are several reasons why a malfunction may occur:
- Constant driving on off-road or poor quality roads with a lot of uneven surfaces.
- Transportation of large loads.
- The car may constantly fall into mud or slush.
- Some drivers begin to drive aggressively: they brake or accelerate sharply, or drift.
Depending on what cause is present, deformation of the main housing may occur over time, and sometimes the outer housing and bearing rim may crack. Often the lubricant dries out. Dirt, sand, and dust may get inside the rotating parts.
Sometimes there is a malfunction of the rollers and bearing balls. Often this happens not as a result of inaccurate driving, but from the quality of workmanship itself. Spare parts from domestic or European manufacturers last an order of magnitude longer than from Chinese ones. But they can also become unusable over time as a result of constant use of the car.
When a breakdown just begins to appear, it is almost impossible to recognize it in a timely manner. As a rule, for this purpose you need special diagnostic equipment, which is available in auto repair shops or official dealers. If a whistle, strong hum or crunching occurs, you have to provide it yourself or with professional help.
If the breakdown occurs on the front hub, then identifying the fault is much easier. It is enough to pick up a speed of 40-60 km/h and perform simple maneuvers. Most often, a specific hum appears. If the sound increases when turning to the right, this means that the left bearing has failed. The opposite situation occurs with the left side.
If a breakdown occurs in the rear hub, it is much more difficult. So, for example, the sound may come from one part, but in reality the breakdown may be localized in a completely different place.
However, experts advise that in order not to engage in self-repair in vain, it is recommended to carry out diagnostic measures from professionals. If the car enthusiast does not have the relevant experience, then you can ask the person to show how to carry out such events.
Design of the unit being repaired
Structural layout of the VAZ 2114 hub:
- steering fist;
- internal anti-splash ring;
- steering knuckle ring;
- retaining bearing ring;
- hub bearing;
- front hub;
- anti-splash ring;
- hub cap;
- cap seal;
- hub cap;
- screw;
- hub washer.
Note:
The order of the elements is required. Violation of the layout or installation of components not provided for by the technical requirements is strictly prohibited on the hub. The operation of the unit will be disrupted, which will lead to avalanche wear of parts and increased danger of operating the vehicle.
How to check a wheel bearing
And although replacing the front wheel bearing on a VAZ 2114 involves a simple operation, it is worth first checking the part for operability and whether it is advisable to carry out repair work or replacement. A basic check will not only help determine the malfunction, but also help to find and determine the cause.
- At the end of the ride, you need to touch the area of the wheel where the specific sound comes from. If the wheel temperature fluctuates (hot on one side and cold on the other), then the bearing needs to be replaced.
- Raise the car with a jack, unscrew the bolts from the wheel and lift the required side for inspection. Make an effort and rock the wheel. If a clunking sound occurs, it is recommended to ask someone to press the brake and try again. A replacement will be required if there is no noise.
There are other alternative options for solving the problem:
- Tap your foot on the tire. If, as a result of manipulation, any of them wobbles, this means that play has appeared, and the hub gradually fails. It is important to note that sometimes play can appear before the hub begins to wobble and before a characteristic sound appears. As a rule, at low speeds they are practically invisible or do not appear.
- If wear has reached a critical point, the extreme degree of wear can be determined by ear. However, in such a situation, using the vehicle becomes dangerous, as it can break down and create an emergency situation.
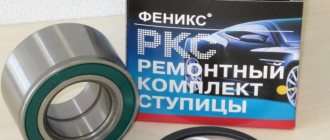
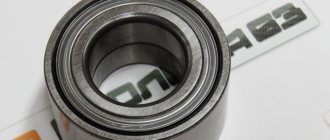
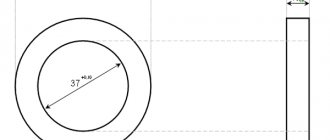
Wheel bearing dimensions for VAZ 2114
Before installing a new part, you must ensure that it is compatible with your vehicle. There is a table of analogues for this.
| No. | Manufacturer, country | Catalog number | Dimensions, mm | Price, rubles |
| 1 | Pilenga | PW-P 1307 | 34*64*37 | 400 |
| 2 | Torque, Finland | T-12106 | 500 | |
| 3 | Lada (original) | 2108-3103020 | 400 | |
| 4 | ASP Mensan | BCR001 | 540 | |
| 5 | SPZ | 2108-3104020 | 400 |
Important:
Each wheel bearing has its own unique number. Based on this, an appropriate replacement is selected.
Auto repair school - Do-it-yourself car repair
Sep 21, 2016 VAZ 2108, VAZ 2109, VAZ 2110, VAZ 1117 Kalina, VAZ 2170 Priora by admin
Is the front wheel ? I wonder how to replace it yourself and how difficult it is? Which bearing should I buy? If yes. And you are looking for answers to these questions, then I can say for sure that you have come to the right place. This article on replacing the front wheel bearing on VAZ-2108, VAZ-2109, VAZ-21099, VAZ-2110, VAZ-2114, VAZ-2115, VAZ-1118, VAZ-1119 will be of interest to you and will help you get the job done without wasting extra strength and nerves. This work, of course, is more difficult than replacing the rear wheel bearing, but it is quite doable. The main thing is to have the necessary knowledge and tools for the job. And you can easily replace the front wheel bearing with your own hands. If you are interested, I invite you to further reading...
By choice of bearing ... Here I can recommend Russian-made bearings - “Vologda” or “Samara”. For those who are curious, I would like to add that the size of the front hub bearing is 64*34*37 mm . And it will be very, very good if the seller guarantees you that these bearings are really Russian. Since China is very seriously engaged in the production of copies of these bearings.
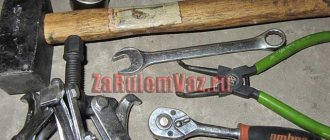
As for the tool, I would immediately like to highlight the presence of a puller for mounting the bearings of the front and rear hubs of VAZ 2108 - 1119 cars (photo 11), without it it is better not to start work. Also, a mandrel (a piece of pipe of the required diameter) will be useful for knocking out the hub. Head at “30” with a strong knob, ring wrenches at “17” and “19”.
Step-by-step description of replacing the front wheel bearing on VAZ-2108, VAZ-2109, VAZ-21099, VAZ-2110, VAZ-2114, VAZ-2115, VAZ-1118, VAZ-1119:
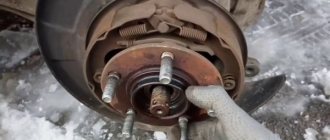
1. Put the car in “handbrake” and first gear. We install anti-roll stops under the rear wheels. 2. Loosen the wheel bolts and use a 30mm wrench to unscrew the hub bearing nut (if the car has alloy wheels, then you will first have to remove the wheel, ask an assistant to press the brake pedal and unscrew the hub nut - photo 1).
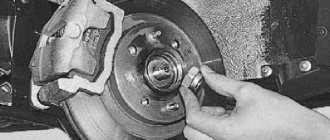
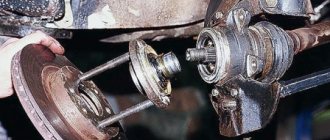
3. Use a screwdriver to press out the caliper and use a key set to “17” to unscrew the caliper from the steering knuckle (photo 2). We tie the caliper so that it does not hang on the brake hose. Unscrew the brake disc from the hub.
Further work can proceed according to one of three options. First, replacing the bearing , using a puller, without removing the steering knuckle from the car. Second, removing the steering knuckle from the car and then replacing the bearing on a workbench, using a puller and a vice. And the third method is to remove the entire strut and then replace the bearing in a vice. Each of the possible methods has both its advantages and disadvantages. For example, let’s take a closer look at the first method: replacing the wheel bearing without removing the steering knuckle from the car is good because you don’t have to touch the camber adjustment bolt. But its disadvantage is that it is inconvenient to work with, and replacing a bearing without an inspection hole or a lift will be quite problematic. So knocking out the hub and pressing out/pressing in the bearing in this position is very inconvenient.
The second method: replacing the bearing is much easier and more convenient, but a snag appears in violation of the car’s camber adjustment. Before unscrewing the bolts securing the steering knuckle to the strut, put two marks. With one mark we mark the position of the adjusting bolt to the rack (photo 3), and with the second mark the position of the steering knuckle to the rack (photo 4). During assembly, we ensure that these marks match. It may not be possible to achieve initial accuracy, but the error will be minimal. This method is 100% suitable for those who change not only one wheel bearing, but also immediately carry out the rest of the chassis repairs (replacing ball joints, silent blocks of levers, steering ends, etc.).
The third method is the most labor-intensive. To remove the strut, you will have to unpress the steering tip and unscrew the nuts securing the upper support to the body. And after that, on the rack removed from the car, replace the bearing. It’s not much harder and longer, but... This method is perfect for those who did not succeed in either the first or second method.
In our case, the work will be carried out according to the second option.
4. Set the marks (photos 3 and 4). We unscrew and knock out, using a soft tip, the bolts securing the steering knuckle to the rack (photo 5).
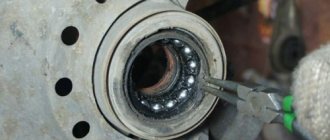
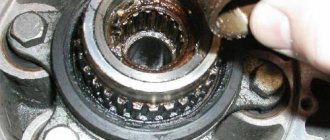
Unscrew the two bolts securing the lower ball joint to the steering knuckle. And remove the steering knuckle. 5. Next, using a tool of suitable diameter, we knock the hub out of the bearing (photo 6). Remove the retaining ring (photo 7). We install the puller in a vice and press out the bearing (photo 8). Clean and lubricate the bearing seat in the steering knuckle. Press in the bearing (photo 9). Install the retaining ring. We install the steering knuckle with the bearing on the hub and drive it in until it stops using a mandrel of suitable diameter (force must be applied to the inner race of the bearing) (photo 10).
The subsequent assembly is carried out in reverse order. After tightening the hub bearing nut, do not forget to press down the side of the nut.
When using an article or photographs, an active direct hyperlink to the website www.avtorem.info is required!
Did you like the article? Share it on your page!
Another way to unscrew the hub nut
To work, you will need to prepare a metal brush, a reliable screwdriver, universal WD-40, an iron tube and a wrench. The socket wrench must be strong. The work is performed in the following sequence:
- First, the threads are cleaned of traces of corrosion. To do this you will need a metal brush;
- The surface of the nut must be coated with a special product - WD-40. Other types of penetrating lubricants can be used;
- the part must be left for a quarter of an hour;
- Now the collar is put on and blows are struck with a hammer. The impact force must be gradually increased;
- Strikes must be struck without excessive effort. After deformation, the part should unscrew.
What to choose?
Rear and front wheel bearings today are produced by both domestic and foreign manufacturers. The choice, as they say, is yours.
But we still want to give some recommendations on this matter.
- Chinese analogues. We strongly advise against choosing them to repair your VAZ 2114. They are of dubious quality, although they are the most affordable. Such bearings will not be enough for a long service life.
- Imported, mainly from Europe. The price is higher compared to analogues, but the quality is at the same level. When buying imported bearings, pay attention that they are not successful Chinese counterfeits. There are many of these now, unfortunately.
- Domestic. Pay attention to the parts made by Vologda or Samara craftsmen. The quality is quite high, and the price is affordable and adequate. What you need for the VAZ 2114.
Regardless of whether the bearing you are looking for is a rear or front hub, its size is identical and is 64 by 34 by 47 millimeters.
To work on replacing the element yourself, you will additionally need:
- Special puller for bearings;
- 30mm socket wrench;
- 19 and 17 mm wrenches.
Further sequence of actions
So, the hub nut was successfully unscrewed. What to do next?
- First of all, an external inspection is carried out to determine the integrity of the threaded elements. Using fine sandpaper, improvised materials, kerosene or solvent, the entire surface of the thread on the stud is thoroughly cleaned to bare metal. Order factory hub nuts in advance.
- The tightening is carried out under load control. We use a torque wrench.
- To prevent this part and contact from sticking again, we use a special deep penetration lubricant WD-40 or thick graphite lubricant.
- Don't forget to lock or install a cotter pin.
Security measures
To safely unscrew the hub nut, the following requirements must be met:
- Use proper tools and accessories;
- Firmly fix the body in its original position (handbrake, heel);
- Use special anti-slip gloves;
- If excessive force is used, do not place body parts under the car body if the wheel is jacked up;
- First we try to unscrew it using more gentle methods, trying to preserve the original locknut;
- The sequence of actions is defined in the operational map. It must be followed.
A little about the device and functionality
The main purpose of the part is to ensure uniform rotation of the car wheels. Given the name of the part, it is easy to guess that wheel bearings are the connecting link between the hub and the axle to which the brake disc and wheel are attached.
The design of the part fully corresponds to the classic type of rolling bearings. These are two metal rings into which conical rollers are pressed, protected from the body by a durable rubber insulator.
Unlike foreign competitors, domestic bearings are created using outdated HUB technology. They are quite difficult to install, require very precise tightening torque and require plenty of lubrication.
The operation of the mechanism lasts for several years. It is recommended to change a spare part for a VAZ 2114 approximately once every 100 thousand kilometers.
But negative operating factors can accelerate the wear process:
- Bad roads. The entire force of the shock load falls on this mechanism of the system. Over time, the metal gets tired and the bearing begins to fail.
- Aggressive reagents. In Russia, in order to save money in winter, aggressive chemicals are often used to remove ice from roads.
- Sudden temperature changes. In winter, owners of warm garages unknowingly shorten the service life of many metal parts, for which sudden temperature changes when leaving and entering the garage create a large load.
If the nut is stuck to the shaft, unscrew it using chemicals
A fairly effective and efficient method is to apply chemicals to neutralize the resulting rust. Experts advise making a mixture of kerosene and white spirit. Then you need to moisten cotton or gauze material in the solution and apply it tightly to the permanent connection.
It is advisable to cover it with a bag or secure it with plasticine so that the solution does not erode. You need to wait at least an hour. If you have time, leave it overnight. Then, using the usual method, we try to unscrew the fasteners. Light tapping on the base is allowed (be careful not to break the thread).
A more effective solution for removing rust is a mixture of sulfuric acid, water and zinc.
How to remove a hub nut from a thread - radical methods for VAZ owners
Sometimes power options are not enough, this is especially observed on cars of the VAZ family, where bearings are often adjusted. In this case, auto mechanics advise switching to radically aggressive dismantling methods:
- Break the fasteners with a chisel, hammer or nut splitter/nut splitter;
- A series of holes are drilled along the groove for locking;
- Heat the connection with a gas burner;
- Solve the issue by welding (welding a similar nut or a larger one).
Possible problems for VAZ owners and not only
With long-term exposure to tools and repeated attempts to remove the nut, “force majeure” situations occur, which include:
- the edges are licked off;
- wear of the union head;
- does not withstand the ratchet mechanism;
- the thread on the shaft or locknut is knocked out;
- violation of adjustment, tightening torque;
- the bearing is damaged.
We buy a spare locknut and cotter pin in advance. It is also advisable to have a spare set of special keys before dismantling.
It is not recommended to unscrew
Don’t try to “discover America” again; the methods listed above will help break the locknut in 99% of cases. The following methods should not be attempted:
- Cut using argon, oxygen or electric welding;
- Strong blows with a hammer or sledgehammer on the end surface;
- Jumping on a lever;
- Impacts on the side, edges, base;
- Exposure of the part to open flame (for example, pour kerosene on it and set it on fire).
Which way do the hub nuts unscrew?
When making repairs, car owners without experience have a question: “In which direction can the part be unscrewed in the easiest way?” Of course, it all depends on the brand of car, for example, in Chinese, the design and direction of the thread may differ, but there are two basic rules:
- On older car models, where fixation with a cotter pin and groove is not provided, we try counterclockwise on the left wheel, and clockwise on the right wheel.
- On modern machines this problem does not exist; the lever must be applied counterclockwise, regardless of the place of work. The pressure will be high, so it is necessary to use a stopper.
How to unscrew the hub nut - the main 5 ways
To solve the problem of how to unscrew the hub nut, it is necessary to determine the dismantling method. This can be done in one of two main ways:
- With the wheel removed.
- The car is on wheels.
If the nut does not unscrew, we make a choice taking into account the following possible methods:
| Name | Description | What tools are needed? | When to use |
| "Barbarian" option | Provides for dismantling and subsequent replacement. | Drill with metal drills (of different diameters), chisel, hammer (small sledgehammer). | It is used if there is no chance to unscrew it in the usual way. |
| "Hot" method | Heating the metal at the joint. | Burner. | Bearings and hubs must be replaced. |
| "Delicate" work | Carefully unscrew the stuck part, gradually increasing the force with the lever while simultaneously tapping on the body. | Tubular socket wrench, heavy-duty screwdriver, hammer, extension pipe, deep penetration lubricant. | If necessary, perform the work as carefully as possible |
| Maximum force | A powerful wrench and a long pipe can significantly increase the force, thereby increasing the chances of stripping the thread. | Heavy duty socket wrench, long pipe. Heads for licked nuts. Key with hydraulic or electric drive. | A strongly stuck nut. |
| Using chemicals | A soaked rag will gradually relieve the problem. | Kerosene and (or) white spirit, hammer, rags. | If you have time. |
You can quickly unscrew a stuck element if you provide a lever. It is installed on the ratchet wrench using a small pry bar. You can use a piece of pipe of suitable diameter with a length of at least 1 meter.
Design features of the hub nut
The hub nut is located in a unit whose operation occurs under conditions of high temperatures, mechanical and external influences. Therefore, alloy steel with anti-corrosion coating is used for manufacturing. The part, in addition to the standard nut elements, has grooves. After reaching the required torque, a locking pin is inserted into them or mechanically fixed with a chisel. The outside of the nut is surrounded by 6 standard edges. We gain access to the locknut after removing the protective cap.