The Oka car (modifications 1111, 11113) is a small car of the first group of the especially small class. Almost all components and mechanisms of the car were borrowed from other proven VAZ models.
The transmission is no exception, since the Oka gearbox essentially resembles the VAZ-2108 transmission, adapted to the engine of this car (size, certain design features, operating parameters).
Oka gearbox: main parameters
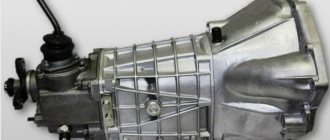
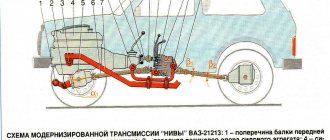
The basic transmission on the Oka is a two-shaft, four-speed manual transmission with a final drive and differential. The transmission of torque from the internal combustion engine to the drive wheels is carried out through two drive shafts with hinges.
The Oka checkpoint is controlled remotely. By the way, this car has a transverse internal combustion engine. The Oka gearbox itself in all modifications of the VAZ -1111 and VAZ -11113 is practically no different (with the exception of different indicators of the final drive).
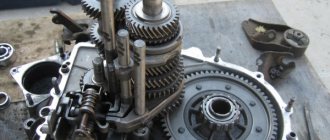
The Oka gearbox and the device diagram using the example of the VAZ-1111 Oka involves a number of components. The Oka checkpoint housing consists of the following elements:
- clutch housing;
- gearbox housing;
- lid.
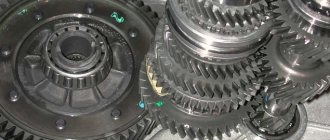
This box consists of more than 20 parts, the main ones include:
- gears;
- bearings;
- synchronizers;
- oil seals;
- seals;
- sump;
- clamps, etc.;
As mentioned above, the Oka gearbox has a remote control; the design includes a gear shift drive, consisting of the following parts:
- floor shift lever;
- ball joint and rod;
- backstage;
- hinges;
- gear selection rod and gear selection mechanisms.
Notes
1.
A cylindrical mandrel, the punch of which has two bands with a diameter of 25 and 29 mm.
2.
A mandrel with a diameter of 25 mm, the punch of which is rectangular in size 12 by 55 mm.
The Oka car (modifications 1111, 11113) is a small car of the first group of the especially small class. Almost all components and mechanisms of the car were borrowed from other proven VAZ models.
The transmission is no exception, since the Oka gearbox essentially resembles the VAZ-2108 transmission, adapted to the engine of this car (size, certain design features, operating parameters).
Read in this article
The main causes of Oka gearbox malfunctions and frequent breakdowns
The mechanical box of the Eye has a large number of parts, each of which can break. Like any mechanical device, the transmission is not immune to breakdowns. The main causes of Oka gearbox malfunctions include:
- Extraneous noise when shifting the gear shift lever to the neutral position (poor quality lubricant or lack thereof, wear of the input shaft bearings, shaft displacement, etc.). The problem is solved by replacing damaged/worn elements;
- Difficult gear shifting (defect of the cardan joint, damage to the rod lever, etc.). The problem is resolved by replacing damaged parts or adjusting them;
- Spontaneous gear disengagement (wear or damage to gears, deformation of control forks, etc.).
The malfunction is eliminated by changing the faulty elements of the box, and the mechanism drive is also adjusted. When shifting gears, extraneous sounds occur in the form of grinding noises, crunches, etc. (malfunction of the clutch mechanism, oil leakage, damage to the gearbox, etc.). By replacing the oil and/or the damaged gearbox element, it is often possible to eliminate this problem.
You can also separately highlight the causes of malfunctions in the drive mechanism of the Oka gearbox. For example, a malfunction in the operation of the gear shift mechanism occurs for the following reasons:
- Shifting gears is difficult or completely absent (deformation or damage to the hinge of the control mechanism mounted on the rod, loosening of the tension clamp). It is necessary to check the condition of the hinge and tighten the fasteners on it, which usually allows you to restore the functionality of the control mechanism.
- The Oka gear shift lever is not secured well enough (wear of the rocker elements, formation of backlashes in it). The problem is eliminated by troubleshooting or replacing worn elements;
What's the result?
Like any other unit, the Oka gearbox needs high-quality and regular maintenance. The owner must check the box for leaks, monitor the level and quality of transmission oil, adjust the gear shift drive in a timely manner, and perform a number of other actions and scheduled work.
- Equipment and tools
Particularly small class cars VAZ and SeAZ “Oka” 1111 and 1113 were the only models of the domestic automobile industry that were equipped with two-cylinder water-cooled power plants. These motors were very compact and structurally very well made.
But, like any power unit, Oka engines required major repairs after long-term operation. Moreover, some of the restoration work, especially the crank mechanism and the cylinder-piston group, is much easier to perform with the engine removed, so you definitely need to know how to remove the engine from the Oka. In general, removing the engine from the Oka is not a difficult operation, but you need to know the sequence of actions. You will also need the appropriate equipment.
How to remove a gearbox on Oka
On the one hand, there are problems that do not require dismantling the box to eliminate. In this case, there is also a group of malfunctions when the box is removed. The box can be dismantled either independently or at a service station by qualified specialists. There are two types of dismantling:
- removing a gearbox without a vehicle's internal combustion engine (without affecting the vehicle's power plant itself, many elements and assemblies are unscrewed and disconnected);
- removing the gearbox along with the vehicle's internal combustion engine (there is a need to drain the technical fluid and disconnect almost all attachments).
The sequence for dismantling the box without removing the internal combustion engine is as follows:
- install the car on an overpass or inspection hole;
- unscrew the nuts securing the drive shafts in the hub and remove the front wheels;
- disconnect the battery terminal and all wires, as well as cables from the box;
- remove the starter and unscrew the fastenings of the lower shield of the mounting housing and then dismantle it;
- unscrew the drive rods and disconnect the steering mechanism supports from the longitudinal beam;
- remove the cross member and pull the drive limit switches out of the hub;
- Unscrew the fastening of the strut and bracket of the left side of the anti-roll bar;
- disconnect the fasteners of the engine support bracket from the box;
- place a stop under the box and remove the left longitudinal beam of the subframe;
- remove the drive shaft end switches from the box and remove the motor support bracket from it;
- Unscrew all fasteners of the gearbox to the internal combustion engine, then move it towards the left wheel and remove the box.
We also recommend reading the article on how to replace the clutch on a DSG gearbox. From this article you will learn about the features of replacing the clutch on a gearbox of this type.
The sequence of dismantling the box together with the internal combustion engine of the car by lowering the components down:
- drain the working fluid (oil) from the gearbox;
- disconnect all elements from the box and the internal combustion engine (cooling system pipes, wiring, etc.);
- disconnect the column from the steering mechanism and tighten the fasteners of the shock-absorbing strut supports;
- Place a wooden pallet underneath the engine;
- to lower the engine, gearbox, steering gear, front suspension and subframe onto a wooden pallet, unscrew all fasteners of the subframe to the car body;
- dismantle the gearbox by lifting the front of the car and pushing it back;
Let us also add that with the help of a lift, dismantling the box together with the car engine can be done by lifting the components up.
Replacing oil seals
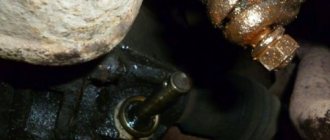
Most often, the drive shaft oil seals located at the installation site of the internal hinge limit switches in the gearbox must be replaced. A sign of wear is indicated by the presence of transmission oil leaks on the inner CV joint and adjacent surfaces of the housing.
Replacing gearbox seals is a relatively simple operation, but requires complete dismantling of the drive shafts.
The work algorithm is as follows:
- We install the car on the pit;
- We tear off and twist the nuts holding the drive in the hub;
- We hang up the front of the car and remove the wheels;
- We disconnect the steering tip and the ball joint from the hub;
- By pulling the hub to the side, we remove the end switch of the outer CV joint from it;
- We climb under the car;
- Using a hammer and a socket, we strike the end of the inner CV joint until the retaining ring installed on the end comes out of the groove;
- Remove the drive shaft assembly;
- Use a screwdriver to pry off the “old oil seal;
- We install a new seal using a mandrel;
- We install the drive in place;
- We assemble the car;
The technology for replacing the seal installed in the gearbox control mechanism is even simpler - disconnect the drive rods, dismantle the hinge and remove the leaking oil seal.
Removing the unit from the car
Thanks to its simple design, repairing the Oka gearbox yourself is quite possible. Most often, problems are caused by removing the transmission from a car, rather than repairing it.
Removing the gearbox from the Oka is possible in two ways - only the gearbox itself is removed, or it is removed together with the power plant, and only then the gearbox is disconnected from the engine and undergoes repair.
Each method has its own specific difficulties. In the first case, you have to disconnect the assembly in quite cramped conditions and require unscrewing and disconnecting many components, but the engine is not affected. If removal is carried out together with the power unit, then technical fluids need to be drained and almost all attachments must be disconnected, but removing the motor and gearbox itself is easier.
It is noteworthy that dismantling the box along with the power plant is possible in two ways - by pulling the units up (lifting devices are needed) or by lowering them down.
Removing the gearbox only
Let's look at the algorithm for removing the gearbox using an example when the engine is not affected:
You should remove the box with an assistant, since the fairly massive assembly will have to be held above your head when removing it.
Removing with the engine
One of the rather interesting methods of dismantling the gearbox along with the engine is the method of lowering the components down. Moreover, this technology allows you to do without even an inspection hole.
The general algorithm of actions is as follows:
After this, the box is dismantled, disassembled, component troubleshooting, repair and replacement of faulty parts is carried out.
The disadvantage of this method can be considered a certain complexity of reassembly, since it is not possible to correctly “bring” and put the body on the subframe the first time.
Transmission repair needed
What tools are required when surveying a checkpoint on the Oka?
When carrying out this process, you will need a set of wrenches, a screwdriver, a hammer, and pliers for installing the retaining rings.
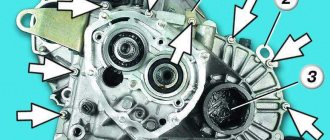
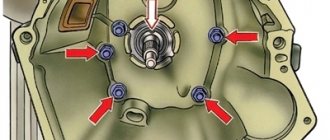
To begin repair and restoration work, you need to remove the speed box. However, it is recommended to drain the oil before doing this. When disassembling the gearbox, you need to unscrew the rear crankcase cover, retaining rings, and retainer plugs. The next step is to disconnect the gearbox housing from the clutch housing. You can use a screwdriver specifically for this. The gear shift fork mounting bolt must be unscrewed. The rod is removed along with the plug. Next, you need to remove the locking pin, then dismantle the shafts, remove the plungers, and the differential. The subject to be photographed is the magnet that is present in the clutch housing. Finally, the gear selection mechanism is removed.
The Oka has a special gear selection mechanism, which includes:
- frame;
- reverse gear fork;
- springs;
- lever arm.
In order to repair this mechanism, it is necessary to dismantle the speed box. Next, during disassembly of the gearbox, the device itself is removed. When reassembling the gear selection mechanism, you should pay attention to the springs; there are two of them (upper and lower). One of them is galvanized, the other is not. The non-galvanized spring is the top one. In addition, they differ in elasticity.
The occurrence of grinding noise can be eliminated by adjusting the clutch. There are several reasons why noise occurs. One of them is that the gear oil has lost its working properties. Also, a low fuel level may cause extraneous noise.
If spontaneous gear disengagement occurs, the driver of the car must check the condition of the clutch housing. However, there are many reasons why gears suddenly switch off, ranging from the presence of worn bushings to deformation of the lever fork.
Equipment and tools
To complete the work you will need:
- Set of open-end wrenches and sockets with cranks;
- Screwdrivers;
- Mount;
- Wooden blocks;
- Hoist or any other lifting mechanism;
Having all this, you can begin to remove the engine from the Oka with your own hands.
It should be noted that there are two ways to dismantle the power plant - lower the engine down or pull it up.
Next, we will consider the last method, which is why a lifting mechanism is needed.
Removing Attachments
Also, for the convenience of performing work, it is better to drive the car into an inspection hole. Immediately after this, the negative terminal from the battery is removed.
Before starting work, you need to drain the engine oil and coolant system.
To make it more convenient to remove and disconnect engine attachments, you must remove the hood from the car. This will provide better access to the upper hanging elements.
Then all pipes and wiring from the engine are disconnected - the cooling system pipes going to the engine from the radiator, the pipes going to the stove.
As for the wiring, you will need to disconnect all connections going to the sensors:
- oil pressure,
- coolant temperature,
- carburetor solenoid valve,
- spark torque sensor,
You will also need to disconnect the wires from the spark plugs, starter, and generator. In the future, the generator will have to be completely dismantled.
The above list of works is shown below in the photo:
You will also need to disconnect:
- fuel pipe from the fuel pump,
- brake booster hose,
- air filter housing from carburetor,
- from the carburetor itself - the throttle and air damper drive cables.
Next you need to unscrew the exhaust manifold and remove it from the studs.
In general, removal of the Oka engine should be accompanied by preliminary dismantling of the gearbox and drive, but this may not be necessary.
Since the engine will still be disassembled, the method of removing the engine without a gearbox will require removing the cylinder head before removing the engine from the car.
The above list of works is shown below in the photo:
VESKO-TRANS.RU
AutoNews / Reviews / Tests
Replacing the Eye Clutch Without Removing the Box
Replacing a VAZ-2109 clutch without releasing underpants
Even if you follow all the instructions given in the car's owner's manual, replacing the clutch is not easy at all. A necessary condition for this is that not every car owner has a pit, an overpass and, to put it mildly, an elevator.
If you go to 100, the clutch will change in almost an hour, but the price won't lift your spirits, and with your hands it will likely be useful to complete this task for an entire day, if not two. It all depends on your knowledge and speed. Most of the time is spent on disassembly and assembly, and the installation of the parts themselves takes 20-30 minutes. Citizens! When replacing the clutch without removing the box. Fine. How to do without a pit and an elevator?
Beginning
The first thing that a car enthusiast is usually interested in when replacing a clutch is
: Is it possible to replace without removing the gearbox? Wherever you look for answers, look at videos or photos, there is no specific answer. But eventually, you'll probably come across someone's review that says the procedure is doable. In addition, you can even give examples. Replacing the VAZ 2109 clutch without completely removing the box with your own hands. Replacing the clutch without removing the window is a log. Preparing the machine for work, partially removing the gearbox, replacing the clutch, alignment. Here you will understand everything. It's time to get down to business and change the part yourself.
First you need to find a couple of large stumps, the height of which is about 40 centimeters, and several bars. To be safe and the car does not fall off during repairs, you need to install two simple wheels under the bottom of the car.
Even while under the car, you may be hesitant to replace without removing the transmission because if the transmission falls to the ground, it will be very difficult to pick it up since it is almost impossible to crawl on the bottom of the car. Replacing the eye without removing the box. Clutch failure can manifest itself as too much or too little free pedal, sharp, jerky, complete. First, you need to completely turn off the battery, turning off the entire system. After this the whole process begins. The next step is to remove all unnecessary elements, namely:
How to replace a clutch on an ocean.
THERE WILL BE NO VICTORY! ? SIGN? I AM WAITING FOR NEW SUBSCRIBERS, LOOKING AND DISCUSSION)
Replacing the clutch disc with OKA
Replacement riddles
case of
clutch
on a car
Ok
You will learn from this video!
- wheels. After breeding,
they need to be twisted and thrown away so that nothing interferes; - empty the shelves. Replacing the clutch without completely removing the transmission and > OK > notifies you of replacing the clutch without completing it. To do this, remove the steering tips;
- unscrew the bolts
that fix the ball layer; - then the motor protection must be removed using a cable;
- drain all the oil from the box;
- on the wings, loosen the nut and then remove it;
- unscrew all the nuts on both pillows;
- The jack or other support should now be placed under the engine;
- exclude reverse sensor;
- the starter must be carefully disconnected, unscrewed and removed;
- unscrew the flywheel nuts and plugs;
- Next is a very important point. Checking and replacing brushes on the generator and VAZ 2107. Maintenance without dismantling the generator. It is necessary to remove the CV joint, but only on the right side, no need to touch the left;
- unscrew the mounting bolts to the gearbox.
- last step. get rid of the nut above the right suture joint.
Change clutch
You're almost ready to remove the box from the engine, but take your time. To continue the process, you will need two bolts from the classic upper control arm. They have the same threads as those connected to the engine block and gearbox. We'll roll them up at the top and then you can start removing the knots from the small crowbar.
clutch provided
VAZ-2109. It's a painstaking process, but there's a lot you can do to ensure it's done quickly and reliably. Replacing the radiator of a VAZ-2115 stove without removing the panel. Due to the gap formed after the previous procedure, it is necessary to get rid of the exhaust bearing and unscrew the bolts on the basket. But the installation is a little different from the instructions found in the manuals. We are putting the new clutch release in place. Then place the disc on the flywheel and the basket above it. We tighten the bolts literally two turns, they cannot be tightened. Replacing the Oka Clutch. Repair the oki ch1 (replace the clutch box and clutch without removing it. Then, very carefully, we will begin to push the input shaft into the disc slots.