Cars of models 2108-09 are truly legendary developments of the Volga Automobile Plant; it was with them that the production of front-wheel drive passenger cars began in the USSR. Also for these cars, a VAZ-2109 Solex carburetor was created and put into production, providing economical fuel consumption and excellent dynamic characteristics.
The carburetor unit (CU) is quite simple to set up and has a generally simple design compared to other similar devices, but it has its own characteristics and characteristic “diseases”. Here we will look at the structure of the carburetor, its dismantling and installation, the specifics of adjustment, adjusting the gasoline level, and debugging the starting mechanism.
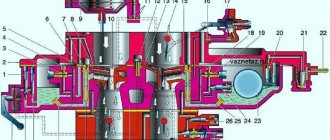
General structure of the part:
- Camera;
- Butterfly valves;
- Primary camera;
- Secondary camera;
- Diffusers;
- Float chamber;
- Case cover;
- The body itself.
The carburetor consists of a housing cover with a flange. There are studs on the body through which the air filter and fuel fittings are attached. The lower part of the housing contains diffusers, throttle valves and a float chamber. The throttle valve drive system is also located there. The cover is secured with screws (maybe 5). For sealing, there is a thin katon gasket between the cover and the body.
The part also has two dosing systems, one transition system and an idle system. The idle design includes an electromagnetic shut-off valve for the 1st chamber. In addition, there is a power mode economizer, a 2nd chamber transition system, an accelerator pump with a diaphragm, an econostat and a starting device with a diaphragm.
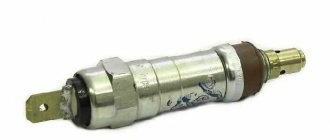
The forced idle economizer consists of:
- Solenoid shut-off valve;
- Adjustment screw limit switch;
- Electronic control unit.
All this is connected to each other by electrical wires.
This is interesting: What is a mass air flow sensor in a car?
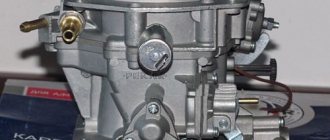
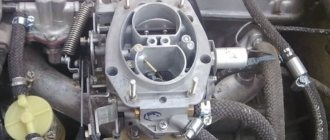
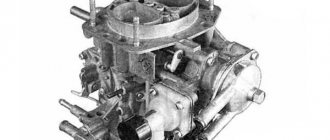
Solex design
The carburetor mechanism of all modifications on the VAZ 2108/2109 is emulsion and consists of two internal combustion chambers. At the top of the carburetor there is a cover that prevents dirt from entering the cavity of the device, and fittings - fuel lines are supplied to them. The middle part is the body itself, into which diffusers and cameras are mounted. At the bottom of the carburetor are the float chamber and throttle valves.
The key elements of the system are:
- accelerator pump;
- float;
- throttle thrust;
- forced idle economizer;
- main dosing system;
- trigger mechanism;
- econostat;
- vehicle idle system.
The principle of operation of the Solex carburetor is that gasoline is supplied through the inlet valve in the fitting. The fuel is directed directly into the float chamber. The fuel level in the cavity must always be at a certain level to avoid dips and jerks in engine operation. Level control is carried out through the movements of a needle valve mechanism.
After the chamber, gasoline is sent to emulsion wells, where it is supplied in strictly limited quantities through fuel nozzles. It is in the wells that air flows break up large drops of gasoline, forming a single air-fuel mixture with it.
The mixture is supplied to diffusers, and through them to the power unit device. Thus, the main task of the carburetor is to form the air-fuel mixture in the desired consistency and direct it to the engine.
The interaction of many elements ensures smooth operation of the motor
From the history of power supplies for VAZ
On the first Zhiguli models, which were Fiat models improved and adapted to the roads of the USSR, devices that were produced by the Dmitrov Automobile Unit Plant were installed in the fuel system of their engines. For their production, a license was purchased from the French company Weber
. They were assigned the index DAAZ 2101, 2103 and 2106. They are still called DAAZ or Webers.
Many owners still continue to use them on their cars, as they provide good dynamic performance, and their design is simple, without any special design frills. However, these DAAZs have one significant drawback: too much fuel consumption. These models have long been discontinued, since with the advent of the VAZ 2105 the era of “ Ozones”
This is already the own development of engineers from Dmitrov, which differs significantly from its predecessor in design and operational characteristics. The name “Ozone” was not given in vain; at that time they were the most environmentally friendly models available. Reviews of such products are very favorable, but they also have problems. This is how failures of the pneumatic drive of the secondary chamber damper sometimes occur.
The “leaky” diaphragm of the forced idle economizer system causes unnecessary problems for drivers. But, despite such “punctures”, their reputation is still only positive. This carburetor model is capable of providing good dynamics, with a fuel consumption of approximately 7 liters per hundred kilometers, you just need to monitor its condition and carry out maintenance on time.
The next stage in the evolution of products from DAAZ was the production of front-wheel drive vehicles, which were called “ Sputnik”
" Their power unit began to be equipped with a fundamentally new design of carburetors. Their production was also based under a license from France, which was provided by Solex. This model was the most economical of all previously produced, and also capable of providing good dynamic and power performance of engines.
Removing and installing the carburetor
Installation and dismantling is carried out in case of repair of this unit, its complete replacement, as well as for thorough washing and cleaning. The AHU can become clogged if the car is driven on dusty roads, as well as as a result of untimely replacement of the air filter element.
Removing and installing a VAZ-2109 carburetor is very simple; even with the initial skills of a car mechanic, almost any driver (car owner) can do such work with his own hands. We perform the dismantling operation as follows:
- turn off the ignition, open the hood, remove the top cover, the filter element, then unscrew the four nuts securing the air filter housing (AFC);
- loosening the clamps, disconnect the fuel hoses, unscrew the two fastenings of the choke cable, move the cable to the side, disconnect the wire chips of the solenoid valve and the throttle valve closing sensor;
- We also disconnect the throttle cable, having previously removed the return spring, the ignition angle advance hose, and unscrew the nuts securing the carburetor itself (also 4 pieces);
- in order not to lose antifreeze and not to disconnect the coolant pipes, it is easier to unscrew the screw securing the heating unit, but it is located at the back of the housing, not in the most accessible place;
- in this case, lift up the unscrewed carburetor, move it forward, find a position in which it would be convenient to dismantle this fastener;
- Now nothing prevents you from removing the entire assembly.
If the KU is thoroughly stuck to the studs and does not pull off, you can gently tap it at the base with a small hammer and shake it with your hands from side to side. As a rule, after several attempts the device gives in; after removing it, you can begin further planned operations; installation of the unit is carried out in the reverse order.
How to install a carburetor from a VAZ 2108 on a VAZ 2107
A Togliatti-made classic, it has been modernized countless times by the hands of its own car owners. In addition to various improvements to the interior and additional body protection, experiments were carried out on the power plant.
Among the highest priority areas of tuning is the desire to reduce fuel consumption and add dynamic characteristics to the car. This can be achieved by replacing the internal combustion engine power supply unit. A front-wheel drive family turned up as a donor. We offer brief instructions on how to install a carburetor from a VAZ 2108 on a VAZ 2107 with your own hands.
Preparing for work to replace the carburetor
It won’t be possible to simply swap the power supply units of the internal combustion engine, since the VAZ 2107 has a different control system and it is impossible to install a Solex carburetor from the VAZ 2108 model without modifications. If you already have a carb from the “eight”, then you need to purchase a Solex installation kit for the “classic”.
It consists of the following elements:
- choke cable from 2108-09;
- two thin gaskets for the carburetor (paper/paronite);
- one thick gasket for the carb from getinax;
- tee for gas hose;
- fuel hose 80-90 cm;
- check valve 2108;
- accelerator link with throttle rods 2108-09;
- clamps for the fuel hose 6-8 pcs.
To dismantle and subsequently install the power supply, you will need a tool. It includes: pliers, open-end wrenches 7, 8, 10, 13 mm. Screwdrivers: slotted and Phillips.
Replacing the carburetor
We remove the old carburetor and install the VAZ 2108 choke cable on the car, which is included in the repair kit for the classic. We clean the mounting area on the intake manifold from burnt particles of the old gasket (after covering the hole with a rag so that no dirt gets into the manifold). We install gaskets under the carburetor in the following order: paronite, getinaks, paper. Next, the carburetor itself, previously purchased for a classic (in our case Solex-21083), must be installed.
While the power supply is not screwed in, it is necessary to install the bracket for the rocker from 2108 from the repair kit on the two studs (closest to the engine). Then you can tighten the fastening of four nuts. The two-arm throttle lever must be removed from the valve cover. We change the short rod from the gas pedal to a long one. We install the converted two-cranked lever (link) on the bracket, adjusting the structure to size. The final stage in working with the mechanism is installing the return spring on the lever. The operation of the drive should be checked and adjusted if necessary.
Fuel hoses and check valve
Fuel hoses must be connected to the installed power supply unit. The design feature of Solex-21083 is that it has a “return”. Some people prefer to mute it.
However, installing a check valve and a tee on the gas hose would be a better solution:
- it won’t take much time, only 5-10 minutes;
- The system helps save fuel.
We cut the tee in front of the fuel filter. Then, to the tee we attach a hose with a check valve coming from the carburetor. We secure the gas hose connections with clamps.
Solenoid valve connection
After a foreign carburetor from the VAZ 2109 model has been installed on a VAZ 2107, it is necessary to ensure its correct operation. It is necessary to make sure that the solenoid valve operates from the ignition switch. You can turn off the EPHH and remove the needle, but then the car will twitch when the engine is turned off.
Necessary parts for the operation:
- BSZ switch connector assembly (with wires);
- electrical connector with 4-pin connector (assembled);
- EPHH control unit;
- pair of single-pin connectors assembled.
It is necessary to solder the 4k and 1k plug wires to the switch wires (using the pinout method). A detailed diagram is shown in the photo.
After the operation has been completed, you should install the modified unit on the car.
How to remove the carburetor assembly from a VAZ 2108/2109
Dismantling the carburetor is necessary in almost all cases of repair work. It is recommended to remove the device when the engine is cool, since all work is carried out in the immediate vicinity of the intake manifold and its pipes, on which you can easily get burned.
Video: DIY carburetor dismantling on a VAZ
To make work easier, it is best to immediately unscrew the screws securing the air filter box, as it will interfere with dismantling and prevent direct access:
- After this, you will need to disconnect two drives from the carburetor body (one goes to the air damper, the other goes to the throttle). In addition, it is immediately recommended to disconnect the return spring and its retainer from the drive.
- Next, the wire is disconnected from the forced idle economizer screw.
- After loosening the clamps, you will need to remove the fuel supply pipe and the hose that works “for return”.
- The screw securing the heating block is unscrewed and the block is removed.
- The ventilation hose and vacuum hose are disconnected from the fitting at the top of the carburetor.
- After disconnecting all lines, it is possible to dismantle the carburetor assembly itself. To do this, you will need to unscrew the four nuts that secure the carburetor with studs to the intake manifold. The device is pulled out along with the gasket.
It is recommended to close the resulting hole with a plug or a clean cloth while working to prevent dirt and dust from getting inside the motor.
Sequencing
Initially, you should adjust the throttle valve. This is done in the following sequence:
- We check and adjust the cable tension using a 13 key.
- We check whether the throttle is fully open when the gas pedal is depressed, and whether it is closed when the pedal is released. If there is a discrepancy, we use the same key to eliminate the problem.
The next stage is the air damper. The procedure is as follows:
- Remove the cover from the air filter.
- If there is such a need, we replace the filter.
- If the choke handle is completely recessed, the damper should be located directly under the dashboard and be completely open.
- Turn the damper lever until it is fully open and push it in until it stops.
- Remove the torso from the insulation and tighten the draft adjustment bolt, then check the damper again.
- If there is such a need, you should move the cable sheath slightly and tighten the fastening bolt.
- Once the desired result is achieved, tighten the bolt towards the lever and close the filter cover.
Adjusting the starting device is the third stage of this work. It can be adjusted in two ways. In accordance with the first, the carburetor will need to be removed. But, following the second stage, you can do without dismantling it. For the last option you will need a tachometer. Before proceeding with the adjustment, remove the air filter housing and completely remove the choke lever. It is located in the car's interior directly under the dashboard. Next, you need to start the engine and carefully observe what happens.
Using a flat-head screwdriver, unscrew the air damper by a third, and using a 7 key, do the same with the adjustment bolt. A similar action must be carried out until the tachometer reading varies in the range from 3100 to 3400 rpm. Once the above result is achieved, the damper must be lowered.
At this point, the process of adjusting and tuning the carburetor on the VAZ-2109 can be considered complete. As you can see, there is nothing complicated about this. The main thing is to acquire the necessary tools, knowledge and endurance.
There is a special offer on our website. You can get a free consultation with our corporate lawyer by simply submitting your question in the form below.
How to flush a carburetor assembly without disassembling it
Flushing the Solex carburetor is recommended by the manufacturer in cases where there are clearly any problems with its operation: increased gasoline consumption, jerks and jolts when driving, unstable idle speed, problems with starting.
The traditional method of washing carburetors is to completely disassemble them into individual components, which is not always possible for an inexperienced VAZ owner to do. To simplify the procedure, a technique was created for washing and cleaning the carburetor without disassembling it into components. This technique is based on the use of special aerosols in cans. The most affordable carburetor cleaners are considered to be aerosols produced by ABRO and Mannol - they can be bought at any auto store for 100–150 rubles.
These cleaners do an excellent job of cleaning carburetor mechanisms, and they are also very easy to use. To flush the Solex carburetor, it is recommended to turn off the engine, let it cool and begin the procedure:
- Remove the air filter box from the car and place it to the side.
- Unscrew the solenoid valve from the carburetor body.
- Place a special narrow nozzle on the aerosol can and spray the liquid on the nozzle channels, the first and second chambers, dampers and all visible elements of the carburetor.
- After this, spray the aerosol on the external parts of the mechanism.
- Wait 5–8 minutes (depending on the aerosol manufacturer’s recommendations). During this time, the liquid will be able to corrode accumulations of soot and dirt.
- Next, you can start the engine so that it removes all remaining dirt.
- If during one procedure the carburetor did not have time to be properly cleaned, then you can treat it again with the same aerosol.
After such cleaning, the VAZ 2108/2109 will significantly increase its dynamic characteristics, since the accumulation of dirt will not interfere with the normal operation of all parts of the carburetor.
Video: how to clean the carburetor on a VAZ with your own hands and without removing it from the car
How to replace carburetor parts
Replacing the float, accelerator pump diaphragm, and seals is not particularly difficult. Most often, during repairs, repair kits selected for the type of carburetor are used, which include everything necessary to replace the elements.
The replacement procedure is not regulated in any way: it is enough to remove the damaged part and install a new one in its place. The main criterion: the identity of the elements when replaced.
This is interesting: Repairing motorcycle shock absorbers - when you get tired of every bump!
How did the Solex carburetor come about?
The evolution of carburetors for VAZ cars began with the use of fairly efficient Weber-type devices and continued in the Ozone family, which were the same two-chamber Weber, but with additional measures to improve environmental friendliness.
Especially during start-up and warm-up, as well as overall fuel economy through the use of a slightly leaner working mixture, where exhaust toxicity was simultaneously reduced.
However, with the advent of the promising front-wheel drive VAZ-2108 family, the further use of ozone had to be abandoned. They could not work normally on a transverse engine, and their efficiency reserves were exhausted.
The new carburetors were based on devices from Solex, a well-known French manufacturer that supplies many world brands of cars and motorcycles with its products.
This is interesting: How to replace power steering fluid
Initially, Solex carburetors were used on 1.1 and 1.3 liter engines of VAZ 21081 and 2108 cars; with the advent of an engine with an increased displacement of up to 1.5 liters, model 21083, a similar device was developed, differing only in calibrations, but giving rise to a whole family of power supplies including cars with a classic layout, as well as all-wheel drive Niva with engines up to 1.7 liters. Similar modifications were used for Muscovites, as well as in the later Volga.
How to adjust Solex DAAZ 2108–1107–10
It is advisable to start the process of setting up and adjusting the performance of the carburetor mechanism from the float compartment. This is due to the fact that there is fuel here, the level of which must be strictly fixed. If the gasoline level is below or above normal, then adjusting other components becomes pointless.
Float adjustment
The adjustment procedure includes several steps:
- First start the engine and let it run for 3 minutes, then turn it off.
- Remove the air filter box and put it aside, as it prevents free access to the carburetor.
- The first step is to disconnect the pipe through which gasoline is supplied from the Solex body.
- Use a flathead screwdriver to unscrew the five screws on the cover to remove it.
- Measure the distance from the edge of the float chamber to the fuel level. It should be equal to 25.5 mm. If there are differences, you will need to set the desired parameter by bending the float bracket.
- You will also need to set the axis of the float so that it can move freely.
- The adjustment of the float chamber and float is now considered complete.
Adjusting the starter
You can adjust the carburetor on the VAZ 2108 and 2109, as well as repair it yourself. This work should be performed on the carburetor, which has been removed from the engine and installed on a flat surface. If the trigger diaphragm was damaged, then it is necessary to initially replace it and only then begin adjustment work:
- Turn the air damper adjustment lever and close it completely.
- Lower the trigger rod with the blade of a screwdriver and hold it in this position.
- Measure the width of the gap between the damper and the chamber wall. The existing indicator should be 1 mm. If this is not the case, then adjustments will be required.
- You will need to loosen the lock nut, which is located on the surface of the accelerator pump, and at the same time turn the quality screw with a screwdriver. If you turn the screw in one direction, the gap will increase, and if you turn it in the other direction, it will decrease.
- Measure the gap thickness again.
- The air damper on the second chamber is adjusted using the same principle.
You can measure the gap width using a drill with a diameter of 1 mm
How to adjust idle speed
This procedure can only be carried out on a carburetor installed in the car, after the engine has warmed up well. In this case, the air filter will no longer impede access, so it remains in its place under the hood:
- Turn off the engine.
- Tighten the air-fuel mixture quality screw all the way, and then unscrew it no more than four turns.
- Start the engine again, simultaneously turn on all the lighting, acoustics and heater to increase energy consumption.
- Working with the quantity screw, you need to set the number of revolutions of the running motor to 750–800 per minute.
- The quality screw sets the maximum idle speed - 900 rpm (in winter, this parameter can be increased to 1000 rpm).
- After this, you will need to tighten the quality screw back until interruptions in engine operation are felt. At this moment you will need to stop and make one revolution back.
Adjusting the idle speed on the VAZ 2108/2109 is necessary to ensure that the car exhibits stable operation in the set mode without high consumption of the air-fuel mixture.
Performance test
It is possible to check the quality of the carb setup using several small tests. The following needs to be done:
- let the engine run and observe the idle stability;
- unscrew the spark plugs and check if there is carbon deposits on the electrodes (white or gray deposits indicate operation on a lean mixture, black deposits on a rich mixture);
- check the dynamics of the car in motion, changing speed modes.
Having adjusted the carburetor according to the instructions, the engine should idle properly and without interruption. If such defects occur, it means there are problems in other systems. If you have insufficient experience, it is better to contact a specialist for diagnosis.
In case of successful repair and adjustment of the carburetor, it will not be superfluous to determine the fuel consumption. To do this, you should pour a small amount of gasoline into the empty tank and record the mileage on the odometer. Acceptable consumption should be 1 liter per 12 km in the city, and within 14 km on the highway.
After short trips, you should unscrew the spark plugs again and check the carbon deposits on the electrodes. If there is black carbon deposits and more gasoline has been consumed, then you need to reduce the quality of the mixture by tightening the screw 1 - 1.5 turns. At the same time, adjust the idle speed using the quantity screw. After this operation, you should recheck the fuel consumption while driving.
For reference! If the color of the carbon deposits on the electrodes of the spark plugs is white or gray and a measured driving style suits you, then the carb does not need to be reconfigured. In this case, the car will save about 1 liter of gasoline per 100 km. If you need dynamics, then unscrew the quality screw 1 turn and adjust the idle speed with the mixture quantity screw.
Setting up the carburetor VAZ 2109.
Tuning the carburetor usually begins with adjusting the position of the float.
Procedure:
- Start the engine and let it idle for about 3 minutes.
- Open the hood and remove the air purification filter
- Disconnect the hose that supplies fuel to the carburetor.
- Unscrew all the bolts that secure the top of the carburetor and carefully remove it.
- Now take a caliper and measure the height of the fuel level in the float chamber. It should be approximately 25.5 mm. If the level is not at the normal level, then you need to adjust the metal float by applying pressure to the tongue of a special bracket.
- Reassemble all components in the reverse order and repeat the process until the level returns to normal.
The launcher is now configured All actions are performed with the carburetor removed.
Procedure:
- Close the air supply damper by turning the special lever
- Using a screwdriver, you need to recess the trigger rod
- Now measure the gap that appears between the chamber wall and the opened damper, compare it with the tabular data for your carburetor model and, if necessary, adjust it. To do this, loosen the special nut located on the accelerator pump and use a screwdriver to unscrew or tighten the adjusting screw. When unscrewing it, the gap increases, and when tightening it, it should decrease.
- Now measure the gap formed by the damper of the first chamber (necessarily with the air chamber closed). The measurements must correspond to the tabulated data. If the measurement results do not correspond to the standards, then adjustment is made by rotating the throttle position adjustment screw.
Lastly, the idle speed is adjusted. When setting up, you will need a tachometer.
Procedure:
- It is necessary to tighten the screw responsible for the quality of the mixture until it fully stops. Then unscrew it 3.5 turns, start the engine and turn on the fan and high beams. Attention! The choke must be removed and the engine warmed up to nominal values!
- Using the screw, which is designed to adjust the amount of mixture, set the speed to 750-800 rpm.
- Using the mixture quality adjustment screw, set the maximum possible speed.
- Now you need to use the quantity screw to create 900 rpm.
- At the same time, tighten the quality screw until the speed drops to 800 rpm. Then tighten until the motor shows signs of unstable operation, and unscrew the screw half a turn.
- Then set the number of revolutions with the screw:
- In summer, the speed should always be maintained in the range of 800-900
- In winter, the speed should be 900-1000
This completes the carburetor adjustment. A properly configured carburetor should achieve the most stable engine operation with the lowest fuel consumption.
Cleaning and adjusting the carburetor VAZ 2108
To begin with, it is worth noting that the process of cleaning the carburetor is not a quick task and does not take five minutes, but if problems arise, it can take you the whole day. Before starting this process, it is advisable for you to study the instructions and also stock up on a large number of rags and cleaning agent.
In addition, you will need: a can of air, a container for solvent, toothpicks, a set of tools - at least keys and screwdrivers. The range of carburetor cleaners is large, but so is the percentage of low-quality products. Therefore, it is necessary to take the choice of a cleaner seriously - ask friends or consult with experts - “who, what, with what?” After you have chosen a cleaner and purchased it, you must carefully study the instructions to avoid unnecessary problems.
So, let's remove the carburetor. Cleaning a VAZ 2108 carburetor means cleaning each of its parts separately, so we disassemble the carburetor. The main problems occur due to inattention: screws and springs are lost, solvent gets on rubber bands and plastic and corrodes, etc.
Therefore, take basic precautions
All metal parts must be collected in one container and filled with cleaner for a couple of hours. After this, each part must be rinsed under running water and cleaned with a brush, an old toothbrush will do. By the way, if after cleaning the carburetor still malfunctions and adjusting the VAZ 2108 carburetor also does not help, then you will have to replace the device.
One of the main elements that must be cleaned is the mesh filter. To get it out you need to unscrew the fuel filter cap. It must be washed in gasoline and then blown with compressed air. You cannot climb into the outlet holes located in the carburetor valves. They supply the fuel mixture, so they can only be cleaned using an aerosol can with air.
After finishing cleaning the carburetor, drying follows, then assembly, and then installation of the VAZ 2108 carburetor. After this, you need to adjust the carburetor - it is advisable to trust this step only to specialists. Air and fuel filters must be changed promptly to reduce contamination of the device. It is advisable to combine this with replacing spark plugs. By the way, this issue is also very important when tuning the VAZ 2109, since during modifications to the nine it is also necessary to improve the carburetor, or still switch to an injector, this will be a more expedient option.
Fuel consumption depends on how well the VAZ 2108 carburetor is adjusted. It is advisable for a specialist to adjust the carburetor, but this is not the most difficult action, so you can do it yourself. First you need to listen to the sound of the engine. If it is strong, it means it is now in high speed mode. This contributes to engine overheating and increased consumption.
https://youtube.com/watch?v=8O9oPcvWVUM
Reassembling the Solex in reverse order
Installation of the carburetor mechanism on the intake manifold is possible after washing and repair, as well as some adjustment steps. It is important to connect all fuel and other hoses correctly so that there are no problems with engine operation. The DAAZ 2108–1107–10 carburetor is assembled in the following order:
- A gasket is applied to the installation site. It serves to reliably connect two units - the carburetor and the intake manifold.
- After this, the carburetor itself is threaded onto the studs and secured with four nuts.
- After the assembly has been carefully attached, hoses can be connected. The first step is to connect the vacuum and ventilation hoses.
- Next, the heating block is screwed to the carburetor.
- On one side, the fuel supply pipe is connected, on the other, the return hose for supplying excess fuel.
- The EPHH drive wire is connected to the corresponding screw.
- To complete the work, you can screw two wires (air and throttle valves) to the screws.
The strict connection sequence is due to the design features of the carburetor
After installing the carburetor, it is recommended to turn on the ignition and check the performance of the engine unit. If oil or fuel leaks occur at the hose connections, turn off the ignition and carefully check all connections.
All work that a car owner performs to maintain his car must be conscious. There is no need to disassemble the carburetor and replace its parts unless there are obvious signs of malfunction. In addition, when self-adjusting, it is necessary to adhere to clear rules of action. Both poor-quality repairs and incorrect adjustments can seriously affect the performance of the carburetor.
Unit setup and repair
The carburetor on the VAZ 2109 Solex is quite easy to repair due to the fact that the manufacturer has released ready-made repair kits for replacing parts of the unit. In the kit you will find fuel and air jets for both chambers. There are also kits with diffusers. You will have to buy other parts separately, for example, if you need to replace the VAZ choke cable.
Solex has several adjustment modes that allow you to adjust the fuel level in the chamber, the minimum idle speed, and the composition of the air-fuel mixture. The adjustment is carried out as follows:
- To set the fuel level in the carburetor, you will need to remove the top cover by unscrewing several screws.
- Next, remove the air filter, disconnect the wiring of the solenoid valves and the cable of the air intake system.
- Remove the clamps and pull the pipes off the carburetor cover.
- After removing the cover, turn it over, place it horizontally in front of you and inspect it.
- There should be a small gap between the floats and the surface of the cover - no more than 1.5 mm. This gap can be adjusted by bending the plate that holds the floats.
- Remember to align the floats after completing the adjustment.
By the way, as the work progresses, inspect the suction cable. The choke cable on a VAZ 2109 is replaced if the engine does not start the first time without warming up. Motorists often make a mistake when securing this small part. The air damper should be closed using a cable. If this does not happen when the choke is turned on, it is worth securing the cable in a different position. Change the position of the cable until the damper closes normally at the right time.
Return to contents
Aerosols
It is convenient to work with them, since the aerosol comes out under pressure and additionally clears blockages with a flow of air with the mixture. Sprayers contain propane, acetone and a number of other dangerous components. Therefore, avoid getting them in your eyes and hands. They catch fire easily and can only be extinguished with carbon dioxide fire extinguishers.
Aerosol Abro for carburetor cleaning
Aerosols do an excellent job, but they cannot clean the float chamber.
The cleaning process is the same for all cars:
- Remove the air filter;
- Spray cleaner through the tubes outside and inside;
- After 3 minutes, start the engine at high speed and spray the product intermittently for 2 minutes.
This process will take you a maximum of 15 minutes.
Basic faults
Any malfunctions of the 2109 carburetor affect the performance of the engine: the engine may stall when the speed is reduced, run intermittently, not develop power, and consume gasoline beyond the norm. There are many reasons for problems with this unit, but the most typical of them are:
- clogging of the HDS and idle jets, both air and fuel, and in the solenoid valve (EMV);
- rupture (defect) of the accelerator pump diaphragm;
- failure of the EMG itself;
- loose fit of the locking mechanism needle to the seat;
- air leakage through the junction of the body and the cover;
- leakage of the float in the float chamber;
- clogging of the accelerator pump nozzle with dirt;
- misadjustment of screws XX.
Of course, various types of malfunctions can occur not only due to the carburetor, the engine itself is often faulty, and the ignition may also be set incorrectly, especially if the installation was carried out by an inexperienced technician without a strobe light. Problems with idle speed can occur due to a lack of power to the solenoid valve, so before disassembling the HRV, you should first check for voltage on this wiring.
Troubleshooting other problems
Among minor problems, the most common problems are idle speed. They are decided depending on the reason:
- The electric valve that opens the idle jet does not work. Check the voltage supply to it with the ignition on, and then unscrew the valve and watch how it retracts the needle. If this does not happen, replace the part.
- The idle jet is clogged. Again, unscrew the valve and blow through the calibrated hole.
- The rubber o-ring on the valve has become loose. As a result, air leaks occur, causing the engine to operate unstably. Replace the seal.
- The rubber ring sealing the idle channel is torn or weakened. It is put on a thin brass tube pressed into the carburetor body. To get to it, you need to remove the unit cover.
- The channels supplying the fuel mixture for idling are clogged. The issue is resolved by washing and purging, as described in the previous section.
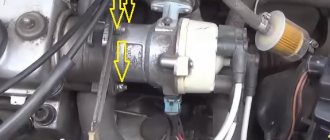
When the car stalls during a cold start, you need to change the trigger diaphragm. Due to the breakthrough, it does not retract the air damper, causing the engine to “suffocate.” The unit is located on the right side (in the direction of travel), its square cover is held on by 4 screws. Unscrew them and change the diaphragm.
When you feel a “failure” when you press the accelerator and accelerate the car, your actions should be as follows:
- Check the accelerator pump diaphragm, located under the cover on the left wall of the carburetor (in the direction of travel of the car). If it is torn, replace it.
- Remove the air filter housing and the top cover of the Solex. Underneath it, look for nozzles built into the fuel supply diffusers. Pry them off with a screwdriver, pull them out and blow them out. Replace the rubber ring if it is torn.
- Test how well the accelerator pump lever presses the diaphragm. If play is detected, change this lever.
The last malfunction lies in the electronic unit EPHH, which controls the operation of the electric valve. If the “eight” stalls when coasting in gear, then the reason is precisely this block. Changing it is not a problem; the price of this part is low.
As a rule, after eliminating the listed problems, carburetor adjustment is not required. But if you notice a change in speed in one direction or another, then the settings can be slightly adjusted.
Diagnostics of VAZ 2108 carburetors - video
Adjusting the fuel level in the float chamber
Maintaining a normal level of gasoline in the float chamber is an important condition; if it is not met, malfunctions in the operation of the car occur:
- if the level is below normal, the engine does not have enough speed, power decreases, and gasoline consumption increases;
- if it is higher than required, fuel consumption also increases, and even more.
Setting the fuel level for the VAZ-2108-09-099 is quite simple, and in this case it is not at all necessary to remove the carburetor. The procedure for adjusting the position of the floats is as follows:
- remove the KVF assembly with the filter element;
- disconnect the choke cable, fuel hoses, EMG power cable;
- unscrew the five screws securing the carburetor cover;
- turn the lid over, take a drill with a thickness of 1 to 2 mm and take a measurement between the gasket and the lower surface of the floats - this distance should be exactly within these limits, and the same.
You can also measure the fuel level, but before carrying out such a procedure, it is necessary for the engine to idle for several minutes. The distance from the upper edge of the housing to the surface of the gasoline is measured; according to factory conditions, it should be 25-26 mm. Another way is to measure the distance from the gasket to the top edge of the floats with a caliper; it is 34 mm (with the cover upside down).
Another measurement method is using a specially made template.
Important conditions when setting the level:
If the floats inside the chamber are installed skewed or not strictly vertical, they may rub against the walls of the housing, causing gasoline to overflow as a result of sticking.
Idle speed adjustment
The most common problem with a Solex carburetor is the disappearance of normal idle speed; the engine begins to operate intermittently at low speeds. Very often, the cause of such a malfunction is either a clogged EMG jet or the solenoid valve itself. It is very easy to check this - while the engine is running at idle, we disconnect the wiring from the EMG; if the nature of the internal combustion engine does not change at all, and when the valve is unscrewed, the speed increases noticeably, then the defect is present.
You can try to restore normal operation of the XX without removing the entire assembly, and this procedure is quite simple:
- With the engine off, remove the air filter with housing:
- disconnect the EMG wire, unscrew the valve itself;
- we start the engine, plugging the “idle” channel with a finger, “accelerate” several times;
- we stop the engine, do not forget to blow out the EMG and its nozzle using a compressor or hand pump, separating these parts from each other;
- we put the parts in place, do a test start of the internal combustion engine: if the idle speed has stabilized, and when the wiring was removed, the speed changed, it means that the reason was precisely the blockage, and now the idle speed has “returned to normal.”
But it is not always possible to clean the channel in this way; specks may get stuck in the area of the quality screw. Here you already need to remove and disassemble the carburetor, dismantle the screw, which in general is not very difficult, since it is located deep in the channel and is held there by a rubber sealing ring.
Lada 2109 rebuilding › Logbook › Solex carburetor 21073 (for beginners. Part 1)
So I still have an Audi carburetor, relatively new and in decent condition. The task is simple - to convert a carburetor designed for 1.7 liters to a volume of 1.5 liters. In fact, there is nothing complicated about this, the carburetors are absolutely interchangeable, the only external difference is in a different location of the fuel supply. Well, the internal ones have a little difference: These are, of course, all the jets, plus the sizes of the diffusers (they are 073 larger), which in other respects only benefits us (cool tuning from the people - boring the diffusers) I will write a lot, in detail, perhaps interestingly. I’ll say right away that I’m not a techie and I don’t have any special skills, so don’t judge strictly, I’ll be happy to add to the article and listen to criticism (in a mild form). Anyway, let's go.
So, the first thing is a visual inspection (suddenly something is wrong with the carburetor). In my case, the dampers were tight (fixed with silicone grease)
If we do a more detailed visual inspection, then I would like to draw your attention to this mechanism for opening the suction valve:
Here you can see the spring that should have tension:
Also, by unscrewing the bolt to 14 (in the photos above everything is already unscrewed) you can get to the treasured ball with a spring. They serve as a fixative and are also necessary, so I advise you to always watch this nuance:
But we've gone a little off topic. I like to disassemble the carburetor from the outside, going inside. Oh yeah, I completely forgot, I put the cam number “4” (it’s set to 073 from the factory):
First of all, if you had problems with the carburetor, it is advisable to check all the membranes, there are only 3 of them:
I won’t go into details; you can find many articles on the Internet about how to identify the problem in each specific case. It is also necessary to unscrew the fuel supply fitting and clean or replace the strainer, usually a lot of dirt collects there: After the membranes and filter, you can unscrew the mixture quality needle, this is done with a very thin screwdriver under “-“:
I’ll tell you right away about the idle air solenoid valve. I installed the jet number 39:
Next, unscrew the screws in a circle:
But we'll go inside next time, I'm tired of writing. All the best.
Source
What to do if the spark is lost?
The peculiarities of our climate and roads provoke a situation where the spark is lost and the engine does not start.
The reasons why the spark is lost are usually the following:
- The switch is not working properly;
- The Hall sensor is not functioning correctly;
- The ignition coil has failed;
- Contacts are oxidized or dirty;
- There was a breakdown of the high-voltage wire;
- The ignition switch is not working properly and needs repair.
There is another reason, the consequence of which is that the spark has disappeared - the spark plugs, or rather the contacts, have become black from soot. The spark may be lost if the ignition timing of the carburetor is set incorrectly. There may be more reasons why the spark disappears and the engine does not start; you need to check the carburetor for malfunctions and, if necessary, carry out repairs.
Why are the candles flooded?
This is the next common question that car enthusiasts face. Fills spark plugs on both carburetor and injection cars. Most often, candles are filled in during the winter. Causes of the malfunction:
- In order to mix the working mixture in winter, more effort is required, however, in new cars, spark plugs are usually not filled. A fully charged battery of appropriate power, a working starter, and high-quality oil will help reduce the likelihood that the spark plugs will be flooded;
- Engine wear;
- The spark plugs themselves with spark plug wires must be of high quality.
Spark plugs for VAZ 2109
Why do the revs fluctuate?
This is also a common problem that begins to appear in a car after a significant mileage. To check, turn on the idle speed of the car, and then turn on the various mechanisms in turn. If you see that the speed is floating, it means that the problem needs to be solved. One of the causes of the malfunction may be a short circuit.
Another problem is that the idle speed has disappeared. As a rule, there are three reasons for this - clogged nozzle, burnt out or lack of power to the solenoid valve. If the idle speed disappears, check this first.
Setting up and adjusting the VAZ 2109 carburetor is quite easy and solves many of the above problems, including reducing fuel consumption, but if you go to a car repair shop it will cost a significant amount of money. It is more convenient to carry out the work with an assistant, this will reduce the time spent. No special tools or equipment are required. If repairs are required, it is better not to do them yourself, but to contact specialists.
In order for carburetor repairs to be required as rarely as possible, you need to use high-quality fuel for the car.
Regularly lubricate quality screws and choke cables. The cables still need regular replacement.
Operation and repair
The VAZ 2109 carburetor, like all other parts, tends to break. Typically, a breakdown involves the failure of any spare part. In such cases, repair usually helps.
The first thing that can break is the accelerator pump. Its purpose is to enrich the fuel mixture, regardless of the air supply, when the throttle valves are opened. If, when you sharply press the gas pedal, the car jerks, it means that there is either not enough fuel, and significant gaps occur in the supply, or, on the contrary, there is too much of it, and it overflows the spark plugs. So, to avoid this problem, an accelerator pump is used. It regulates the exact amount of fuel required for normal engine operation, even when the gas is pressed hard.
The accelerator pump more often becomes clogged with sediment than breaks down, and then repairs are not needed, but simply cleaning is enough. But, if this is not the case, but there is still a breakdown, then the pump needs to be repaired urgently, otherwise operation of the engine of the VAZ 2109 car will be impossible, and you are guaranteed to have pedal failures.
The first symptoms that the pump is faulty is that when you press the pedal, the speed does not increase steadily, but floats. This is due to a shortage, or vice versa, an excess of fuel. The spark plugs do not have time to burn out all the gasoline, and they are simply flooded, so the car jerks while driving. Also, the pedal may fail when pressed.
Repair for such a breakdown is as follows:
- We take out the sprayer;
- Shake it. If there is a characteristic knocking sound of the ball inside, then the sprayer is working, if not, then this will be the reason why the pedal failed;
The pump has a rather heavy structure with parts. A large number of holes and channels increases the chance that the pump will clog, and pedal failure will be inevitable. If the holes are clogged, then repairs are not needed. You just need to buy carburetor cleaning fluid and use it to blow out the channels.
Scheme of operation of EPHH
If the VAZ 2109 jerks when idling, and there are dips when you sharply press the gas pedal, then the EPHH control unit has a malfunction. Its repair primarily depends on which control unit is installed. They can be 4 or 6 pin. Repair of EPHH must be carried out by a specialist. If you do not have the appropriate knowledge, simply replace the part with a new one.
The reason that the VAZ 2109 jerks when driving, or even stalls, and when you press the gas pedal, failures occur, may be not only the carburetor or the EPHH control unit, but also the spark plugs. When used for a long time, carbon deposits appear at the contact site. Because of it, the spark plugs do not completely burn out the fuel in the cylinder.
Sometimes the spark plugs flood even at idle. This is due to the fact that the EPHH control unit is selected incorrectly. The valve opening does not occur synchronously, and the engine speed fluctuates. At the same time, gas pedal failures and late ignition are observed. In order to understand which EPHH is better to install, you need to decide on the choice of carburetor jets. The type of device depends on their diameter.
Replacing spark plugs
In general, before repairing the carburetor, make sure that the speed is fluctuating precisely because of it. Also, gas pedal failures occur for this reason. After all, maybe the candles are to blame for everything. If they are flooded, the car will jerk and stall. But in this case, the cause must be sought in the fuel lines, pump and similar components. But this is better than repairing the carburetor, since this work is quite painstaking.
Features and malfunctions of the starting device
With the onset of frost, many owners of “nines” are faced with the problem of poor cold starting of the engine, and the cause of the malfunction is often the starting device (PU), which is designed to enrich the fuel mixture in a certain proportion. When the choke cable is pulled, the air damper closes, but under the influence of vacuum it changes its position, opening slightly and to some extent allowing air to pass into the carburetor. The position of the air intake is also adjusted using a diaphragm device, which is mechanically connected to the damper by a system of rods.
Of course, a cold engine may not start in cold weather due to a weak battery, a bad starter, or because of the engine itself, if it is already worn out, but the carburetor unit is also often the culprit of the problem. The causes of the malfunction in this case:
- the air damper opening screw on the diaphragm device is incorrectly adjusted;
- the diaphragm itself is torn or has lost elasticity (there may also be an air leak);
- the choke cable is poorly secured or incorrectly installed;
- the return spring is missing or stretched;
- another spring, which is located inside the diaphragm mechanism, is incorrectly selected.
In order for the engine to start smoothly at low temperatures, it is important to adjust the starting gap (the angle of the air intake during startup). We perform the adjustment as follows:
- fully extend the choke cable;
- using a screwdriver, pressing the rod, forcefully open the air intake;
- loosen the lock nut on the diaphragm mechanism, use the adjusting screw to adjust the damper so that it is installed in the position with the specified starting gap (2.5-3 mm depending on the modification of the KU);
- tighten the locknut, use the throttle valve opening screw to increase the number of revolutions;
- pumping the gas pedal twice so that gasoline enters the carburetor, we try to start the engine;
- after starting, use the opening screw to reduce the speed, bringing it to the desired level (for the winter period - approximately 2700-3000 rpm);
- If the air damper is closed too tightly, and the engine twitches, by adjusting the engine while the engine is running, we again adjust the thermal gap.
Having achieved the desired result, tighten the locknut, do a second cold start, this time the car should start almost immediately.
electric fuel pump for carburetor - rear wheel drive. How does an electric fuel pump work on a carburetor?
Electric fuel pump
has a fairly similar operating principle to the mechanical type. So, the main task of this device is to suck fuel directly from the fuel tank into the internal combustion
. We adjust the carburetor with our own hands in a way that cannot be adjusted. The electric fuel pump device on the carburetor itself operates at a fairly low pressure. This difference from operation on an injector will come from the fact that the pump will be located near the carburetor, and not in the fuel tank, as on an injector. Because of this, the work itself will take place under fairly low pressure. Although, such an installation is carried out only in a car service center.
Therefore, if a motorist wants to do everything on his own, then it is better to install an electric fuel pump in the fuel tank in the same way as on an injector. Such a device itself owes its work to the core, the device of which will be drawn into the solenoid valve until the supply of electric current is turned off by opening the contacts.
Recently, the electric fuel pump has become a popular device among users of carburetor systems. This is directly related to all the advantages of the operation of this unit, which cannot be compared with the operation of a mechanical fuel pump device.
Nuances to consider during setup
Before starting work directly, you need to clean the VAZ 2109 carburetor.
To do this, use compressed air, gasoline, and special cleaning products. Preliminary ignition adjustment is required. If early or late ignition is installed, there is no point in adjusting the carburetor.
All work must be carried out only when the engine has reached operating temperature; to do this, it starts and idles for some time. Remove the link from the gas pedal from the throttle valve. Disconnect the crankcase ventilation. Check that there is no vacuum in the timing adjuster tube. The presence of a vacuum is a sign that something was done incorrectly. Adjust the quality screws.
Do-it-yourself adjustment of the VAZ 2108 carburetor
Adjusting the VAZ 2109 carburetor
The unit is adjusted in several stages. And first you need to adjust the throttle drive:
- Inspect the throttle cable to see if it is sagging or if there is excess tension.
- Make sure that the damper reacts adequately to squeezing the gas: when the pedal is released, everything is tightly closed, when pressed, the damper opens up to the maximum angle. If you have problems with this, adjust the damper.
- Use a 13mm wrench and secure the cable sheath end nut.
- Partially loosen the locknut and set a suitable gap between the tip and the carburetor itself.
- Tighten the locknut and check how the unit works.
Air damper adjustment
- In this case, also visually evaluate the correct operation of the node. When everything is set correctly, the damper is wide open with the “choke” handle recessed.
- To eliminate the discrepancy, loosen the linkage bolt.
- Open the damper completely and push in the choke handle.
- Take pliers and use them to pull the cable out of the braid. Use a wrench to tighten the mounting bolt.
- Check the drive: pull out the handle and see if the damper is closed.
- When misalignment occurs, simply loosen the fastening slightly and move the cable sheath.
Video tutorial on cleaning and adjusting the VAZ carburetor