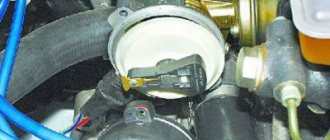
The ignition system of the VAZ “classic” ensures timely supply of a high-voltage impulse to the electrodes of the spark plugs. This impulse, for its part, contributes to the ignition of the fuel mixture, and the work cycle begins in the power unit. The correct operation of the motor as a whole depends on the correct operation of the system . Therefore, the question of how to set the ignition on a VAZ 2105 is relevant not only for owners of “fives”, but also for all other drivers. But today we will talk specifically about the fifth VAZ model.
When adjustment is necessary
The very first thing you need to know is that there are no clear regulations for setting the ignition, since the advance angle is set or adjusted only when absolutely necessary, and the need can arise at any time.
Typically, tuning is done when the car has just been purchased secondhand, and the owner is trying to get it into working condition. It is usually necessary to set the ignition after engine repairs. If the distributor has been unscrewed and removed, you need to adjust the ignition timing.
On fuel-injected cars, the advance angle is controlled electronically, and the check may be caused by the “Check Engine” light.
In most cases, the need to adjust the OZ and the moment of spark formation arises after various engine repairs with the dismantling of various components. Separately, it is necessary to say about the transition to high-octane fuel. Here it is necessary to change the SOP to the previous one, which is why the adjustment is made.
Checking for correct installation
After the adjustment has been carried out, the installed device must be checked for functionality. First, start the power unit and try to press the gas sharply. At this moment, a slight detonation should be heard from under the hood - if this is the case, then the configured unit is working correctly.
There is another verification option. After everything is done, you need to drive out onto a flat road and accelerate to about 40 km/h, at this speed you need to activate fourth gear. If at the moment when you activated the transmission there is no detonation, this indicates that all actions were performed correctly. Detonation is allowed, but not severe. If the metallic sound is loud enough, then this indicates the need for further adjustment. If one of the methods described above causes difficulties for you, then try using the second.
Types of ignition systems
For many decades, the VAZ-2107 car was equipped with different types of systems. There are mechanical contact, contactless or electronic ignition, as well as ECU-controlled ignition for injection versions.
In a mechanical system, the contacts that are opened by the cam on the distributor shaft break the low voltage electrical circuit. As a result, a powerful pulse is initiated in the high-voltage winding of the coil. This discharge is directed to the candles.
Non-contact type ignition works in approximately the same way, but the signal for a circuit break is supplied by a Hall sensor, and the break itself is realized by an electronic switch. Setting the ignition on carburetor models, regardless of the type of system, follows almost the same instructions.
In injection models there are no contacts, Hall sensors, distributors or any other rotating elements. There is absolutely no need to know how to set the ignition on a VAZ-2105 (injector). Here, the moment of spark formation is determined by the ECU controller based on information from numerous sensors. The system itself knows when and how to fire. Moreover, during operation the OZ can be constantly adjusted.
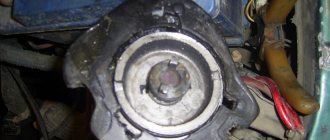
Contact distributor
The distributor is a device by which the moment of spark formation is determined. In addition, the mechanism distributes the spark among the engine cylinders. The main functions performed by the ignition distributor are:
- interruption of the low-voltage circuit of the ignition system;
- distribution of energy between candles.
The contact ignition system (CSI) or contact distributor received this name due to the fact that the primary circuit is broken through mechanical contacts mounted inside the device. This distributor was originally installed on the VAZ 2105 and other classic Zhiguli cars. It is driven by a shaft that rotates from the motor mechanisms. There is a cam on the shaft, which causes the contacts to close and open.
The VAZ 2105 distributor consists of the following elements: 1 - spring cover holder; 2 — vacuum ignition timing regulator; 3 - weight; 4 — vacuum supply fitting; 5 - spring; 6 — rotor (runner); 7 — distributor cover; 8 — central electrode with a terminal for the wire from the ignition coil; 9 — side electrode with a terminal for the wire to the spark plug; 10 — central contact of the rotor (runner); 11 - resistor; 12 — external contact of the rotor; 13 — support plate of the ignition timing regulator; 14 - wire connecting the ignition distributor to the output of the primary winding of the ignition coil; 15 — breaker contact group; 16 — distributor body; 17 - capacitor; 18 — distributor roller
Examination
Like any car part, the ignition distributor wears out over time, which affects engine performance. This is expressed in problematic starting, twitching, increased fuel consumption, and loss of dynamics. Since such signs generally indicate problems with the ignition system, before you start checking the distributor, you need to make sure that the remaining elements (plugs, wires) are in good working order. The main parts on which the formation and distribution of a spark depend are the cover and the contact group, so you need to focus on their diagnosis first.
First you should inspect the cover of the unit in question. If cracks are detected, the part is replaced with a serviceable one. Burnt contacts are cleaned with sandpaper.
The distributor cap should not have cracks or severely burnt contacts.
The contact group of mechanical distributors is a “sore spot” of classic Zhiguli cars, since the part constantly burns out and requires adjustment. Burnt contacts are inspected and cleaned. In case of severe damage, they are replaced.
If the breaker contacts are severely worn, they need to be replaced.
In addition, you should inspect the distributor slider and check the resistor with a multimeter: it should have a resistance of 4–6 kOhm.
The distributor slider should not be burnt, and the resistor should have a resistance of 4–6 kOhm
Adjusting the contact gap
The gap between the contacts is determined in the open state using probes. The adjustment is carried out as follows:
- Remove the distributor cover and turn the crankshaft to a position where the gap between the contacts will be maximum.
- Using a feeler gauge, we check the gap, which should be in the range of 0.35–0.45 mm.
Check the gap between the contacts with a feeler gauge - If the gap differs from the norm, use a flat screwdriver to unscrew the fastening of the contact group.
- Unscrew the adjusting screw.
- By moving the contact plate, we select the required gap, and then tighten the fastener.
Top view of the distributor: 1 - bearing of the movable plate of the breaker; 2 - oil can body; 3 — screws securing the rack with breaker contacts; 4 — terminal clamp screw; 5- bearing lock plate; b - groove for moving the stand with contacts - We make sure that the gap is set correctly, tighten the fastening screw of the contact group.
After adjusting and checking the gap, it is necessary to tighten the adjusting and fastening screws
Preparing for adjustment
Let's see how to set the ignition on a VAZ-2105 and what is needed for this. In fact, there is no need to create any specific conditions for this. The operation can be done in a regular garage or on the street; the ignition can be adjusted even in winter.
The tool you will need is a flat-blade screwdriver, a 13 mm open-end wrench, a 12 V light bulb with wires, a crankshaft wrench, a spark plug wrench, and a 0.35 mm metal feeler gauge.
Ideally, you should use a strobe light, but for used cars it is rather harmful. All engines are different and operate differently. Factory OZ indicators are not suitable for everyone.
BB wires
High-voltage wires, or, as they are also called, spark plug wires, are different from all others installed in the car. The purpose of these wires is to transmit and carry voltage passing through them to the spark plugs and protect other elements of the vehicle from electrical charge.
Spark plug wires provide connection to the ignition coil, distributor and spark plugs
Malfunctions
The appearance of problems with explosive wires is accompanied by the following characteristic signs:
- problematic engine starting due to insufficient voltage on the spark plugs;
- shots at start-up and vibrations during further operation of the engine;
- unstable operation at idle speed;
- periodic engine tripping;
- the appearance of interference during the operation of the radio, which changes when the engine speed changes;
- smell of ozone in the engine compartment.
The main reasons that lead to problems with wires are wear and aging of the insulation. The location of the wires near the engine leads to temperature changes, especially in winter, as a result of which the insulation gradually cracks, moisture, oil, dust, etc. get inside. When cracks reach the conductor, the explosive wire can be pierced to ground, and a spark to the spark plug simply it won't arrive. In addition, wires often fail at the junction of the central conductor and the contact connectors on the spark plugs or ignition coil. To avoid mechanical damage, the wires must be correctly laid and secured with special clamps.
One of the malfunctions of high-voltage wires is a break
How to check
First, you should visually inspect the cables for damage to the insulating layer (cracks, chips, melting)
Attention should also be paid to the contact elements: there should be no traces of oxidation or soot on them. Checking the central core of explosive wires can be done using a conventional digital multimeter
During diagnostics, a broken conductor is identified and the resistance is measured. The procedure consists of the following steps:
- Remove the spark plug wires.
- We set the resistance measurement limit on the multimeter to 3–10 kOhm and connect the wires in series. If the current-carrying wire breaks, there will be no resistance. A working cable should show about 5 kOhm.
I check the wires for damage and spark breakdown as follows: in the dark, I start the engine and open the hood. If a spark strikes ground, it will be clearly visible, especially in wet weather - a spark will jump. After this, the damaged wire can be easily identified. In addition, one day I was faced with a situation where the engine began to misfire. I started checking with the spark plugs, since the wires had been replaced recently, but further diagnostics led to a malfunction in the cable - on one of them there was no contact with the terminal itself connecting the conductor to the spark plug. After contact was restored, the engine started running smoothly.
Video: checking explosive wires
Which ones to put
When choosing and purchasing high-voltage wires, you should pay attention to their markings. There are many manufacturers of the elements in question, but it is better to give preference to the following:
- BERU;
- NGK;
- PARTS-MALL;
- AMD;
- Bremi;
- Tesla Technics.
Today a large selection of spark plug wires is offered, but it is better to give preference to well-known manufacturers
Adjustment on carburetor versions
Most textbooks and books on repairing classics tell you how to set the ignition on a VAZ-2105 carburetor using a control light. Experienced Zhiguli car owners can easily do without it.
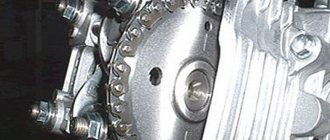
To set the ignition correctly, all conditions must be met. The marks on the crankshaft pulley should be opposite the long mark on the timing cover.
The round mark on the camshaft gear should align with the boss on the camshaft housing. The piston in the fourth cylinder must be installed at TDC, and the contacts in the distributor must be open. The slider contact is directed to the fixed contact of the fourth cylinder.
The light bulb is needed to control the moment of sparking. It is connected at one end to terminal “K” on the coil, and at the other to ground. At the moment, the piston of the first cylinder is also set at TDC, but not on the compression stroke, but on the exhaust stroke. How to set the ignition correctly on a VAZ-2105? The setting is carried out on the fourth cylinder.
Symptoms of damage indicating probable malfunctions
Both replacement and repair of the distributor in the VAZ-2106 car is carried out when the mechanism is not functioning properly.
- The car jerks while driving. In addition, twitching is not typical for your “six”.
- The engine does not want to start.
- Trying to accelerate the vehicle, the car jerks, and a lot of time is spent on the acceleration process. In addition, the engine is capable of detonating (knocking of the piston rings is observed).
- Fuel consumption increases.
In general, the symptoms are similar to those that appear when the ignition is set incorrectly. Naturally, when these symptoms appear, it is difficult to say that the breakdown lies in the distributor. Nevertheless, diagnosis of this node is necessary. As for the damage that prompts VAZ-2106 drivers to repair, they are mainly as follows:
- The unit slider is burnt out or worn out.
- The contacts directly in the cover have burned out.
- The Hall sensor is damaged. There is not only a breakdown of the controller here, but also poor contact of the regulator plug.
- Distributor bearing. From prolonged use it has become loose or jammed.
- There are mechanical issues including cracks in the cover.
- Engine fluid penetrates into the distribution unit. The problem is mainly associated with the tightness of the lid.
Step-by-step instruction
Turn the crankshaft with a wrench and align the mark on its pulley with the long mark on the block.
If the valve cover is removed, you need to follow the mark on the camshaft gear. Then remove the cover from the distributor and turn its shaft so that the slider is opposite the fourth cylinder. Next, the distributor is inserted into the engine, holding the slider, and the distributor is securely fixed with a nut.
Connect the wires and turn on the ignition. The nut is released and the distributor is slowly turned by its body. When the lamp flashes, the distributor is secured in this position. It is better to turn off the ignition to make sure that the contacts in the distributor are open. You can check the gap between them using a feeler gauge.
This way you can set the ignition on a VAZ-2105, but this is only the initial setting. For stable operation of the engine, the OZ will need to be adjusted.
Do-it-yourself VAZ 2121 carburetor repair
Repair of the carburetor unit on the Niva may be required in different cases. If a car enthusiast has practical skills in servicing his “four-wheeled friend,” then performing repair work independently will not be difficult for him. However, it should be noted that the design of carburetor mechanisms is highly complex, so high-quality work without preparation is unlikely.
Signs and causes of malfunctions of Ozone carburetors
External manifestations of the operation of the engine unit and the driver’s own sensations, as a rule, may indicate the occurrence of any malfunctions in the operation of the carburetor. The most common signs of malfunctions on Ozone are:
- unstable operation of the power unit at idle;
- the car loses its dynamics;
- after reaching a speed of 90 km/h, engine productivity drops sharply;
- difficulty starting;
- increase in fuel consumption.
Thus, if Ozone shows one or more of these signs of malfunction, this means that repair work is necessary.
The engine receives too much gasoline - the carburetor is flooded / the needle is stuck
If a car owner notices that the carburetor is constantly being filled with excess gasoline, we can conclude that the needle valve is faulty. Over time, it can lose its throughput, which is why at first there are difficulties in starting the engine, fuel drips appear on the carburetor, and then it will be impossible to start the engine at all.
The way out of the situation is to replace the needle valve yourself. To do this you will need:
- Remove the cap from the carburetor.
- Align the float along its original axis.
- Disconnect the needle valve.
- Screw a new valve into the vacant space.
- Screw the lid into place.
The car cannot maintain idle speed and immediately stalls
In this case, the economizer will need to be replaced. Most likely, the reason lies in this component, since it ensures the supply of fuel to the engine at idle. In rare cases, the idle speed control unit on Niva carburetors may fail.
To determine the cause of the malfunction, it is recommended to disassemble the carburetor and inspect the economizer and idle devices. Their condition will be visually noticeable (adhesion of a large amount of soot and dirt, deformation). If devices fail, the procedure for replacing them is as simple as possible: a new one is installed in place of the old component.
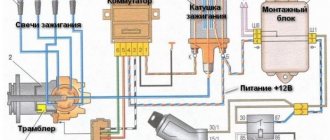
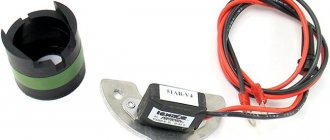
Electronic ignition
Everything is a little simpler here. Let's see how to set the electronic ignition on a VAZ. Instead of a mechanical breaker, the system uses a commutator and a Hall sensor.
The procedure is quite simple. For safety, remove the negative terminal from the battery. Next, rotate the crankshaft until it aligns with the long mark - in this position, the piston of the fourth cylinder will be at TDC (top dead center).
Next, you need to remove the ignition distributor cap. The slider should be looking at the fourth cylinder wire. You can use a spark from a candle or a lamp. There is no particular difference in how to set the ignition on a VAZ-2105. The distributor is slowly turned in one direction and the other. When a spark jumps or a lamp flashes, you need to stop. Next, the distributor is turned quite a bit towards the minus side and secured.
Operating principle of BSZ
Electronically controlled spark generation operates according to a fairly simple algorithm, which determines the reliability of such a circuit. When the driver turns the key in the ignition switch, a constant voltage from the on-board network is applied to the primary winding of the coil, causing a magnetic field to form around it. Then the system works like this:
- The starter turns the crankshaft and drives the distributor shaft along with the slider.
- The Hall sensor, which reacts to the passage of a metal mass nearby, registers the rotation of the shaft along the protrusion on it and sends a signal to the switch.
- The electronic unit, based on a signal from the sensor, turns off the voltage supply to the primary winding of the coil.
- At the moment the circuit breaks, a high voltage pulse (up to 24 kV) is formed in the secondary winding of the coil. It is directed along a thick wire to the moving contact of the distributor.
- The slider redirects the impulse to one of the fixed contacts built into the cover. From there, the voltage goes to the spark plug of the cylinder where the piston is at top dead center.
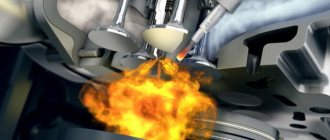
- At this moment, the fuel is already in a compressed state in the combustion chamber. When a spark jumps across the electrodes of the spark plug, it ignites.
- The runner rotates and transmits a spark to all cylinders according to the 1-3-4-2 scheme, after which the car engine starts and starts working.
Outdated circuit with contact breaker
Prerequisites for failure
Please note that the engine control system malfunction warning lamp, located on the device panel in the signaling unit, is the first indicator of deviations in the operation of the VAZ 2107, where an injector is used. Some modifications of the VAZ 2107 provide for the location of the warning lamp on the upper insert of the radio panel. By starting the ignition, a system malfunction is tested, which means the lamp lights up and goes out after the engine starts.
A prerequisite for diagnosing the ignition system is that the lamp does not go out when the engine is running.
By starting the ignition, a system malfunction is tested, which means the lamp lights up and goes out after the engine starts. A prerequisite for diagnosing the ignition system is that the lamp does not go out while the engine is running.
In situations where there is a malfunction, VAZ 2107 owners replace the spark plugs. Old factory spark plugs are usually replaced with iridium spark plugs from NGK or Denzo. Do not forget that only those spark plugs that are designed for the appropriate type of injection are suitable here.
The type of ignition system is no less important in determining the parameters of the spark plug. Often such manipulation does not provide much improvement (plugs have a fairly long service life), so the non-contact ignition system undergoes a full diagnosis.
https://youtube.com/watch?v=mRnm1GVTUmk
Do you want to know more about how to install
valve timing according to marks on VAZ 2101- VAZ 2107
? And so.
Contactless distributor
The contactless ignition system is a modernized KSZ. Its main difference is the absence of a contact group, instead of which a Hall sensor is used. The advantages of such a distributor are:
- no need for periodic adjustment;
- more reliable engine starting;
- reduction in fuel consumption;
- increase in power.
A non-contact distributor is considered a more modern and reliable device
The Hall sensor is mounted on the distributor shaft. Structurally, it consists of a permanent magnet, which has a special screen with slots. The number of slots usually corresponds to the number of cylinders. As the shaft rotates, the screen holes pass past the magnet, causing changes in its field. During operation of the ignition distributor, the sensor reads the shaft revolutions, and the received data is fed to a switch, through which the signal is converted into current.
Examination
Checking the contactless mechanism repeats the same steps as with the contact system, excluding the contact group. In addition to the cover and slider, problems may arise with the switch. The main sign indicating problems with it is the absence of a spark on the candles. Sometimes a spark may be present, but very weak or disappear periodically. At the same time, the engine runs intermittently, stalls at idle, and power decreases. The same problems can occur if the Hall sensor malfunctions.
Switch
The easiest way to test a switch is to replace it with a known good one. Since this possibility is not always available, another diagnostic option is also possible.
One of the reasons for the lack of spark on the spark plugs may be a faulty switch
Before starting the test, you must make sure that power is supplied to the ignition coil and that the Hall sensor is in working condition. The tools you will need are a test lamp and a standard set of keys. We check the switch in the following sequence:
- Turn off the ignition.
- Unscrew the nut on the coil contact “K” and disconnect the brown wire.
- We connect the control unit into the gap between the removed wire and the coil contact.
- Turn on the ignition and crank the starter. The light indicator will indicate that the switch is working properly. If there is no light, the switch will need to be replaced.
Hall Sensor
The sensor is located inside the distributor, so to access it you will have to remove the cover.
The Hall sensor does not fail very often, and if this happens, the fault can be identified by the absence of a spark
You can check the part in several ways:
- replace the sensor with a known good one;
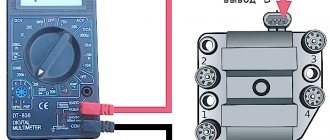
- use a multimeter to check the voltage at the output of the element, which should be 0.4–11 V;
You can check the Hall sensor with a multimeter by connecting the device to the output of the device - assemble a circuit that simulates the operation of the sensor by connecting contacts 3 and 6 going to the device being diagnosed (the appearance of a spark will indicate a faulty part).
Which distributor is suitable for the VAZ-2107
On all carburetor rear-wheel drive VAZ cars, the device has almost identical components and a similar operating principle. Distributors for engines with a volume of 1200-1300 cc differ in that: - the drive rod is 7 mm shorter; - there is no vacuum ignition timing regulator;
DETAILS: Wiring diagram for the VAZ-2107 generator. Generator device
— the settings of the weights and springs of the centrifugal regulator are different. For engines with a volume of 1500-1600 cc, all distributors are suitable in terms of seating dimensions and characteristics. Only “Nivovskie” ones differ. They are tuned for stable traction at low speeds and the VAZ-2107 with such a distributor will accelerate slowly.