The electrical equipment of this car is made according to a single-wire circuit: the negative terminals of devices and equipment are connected to the “ground” - the body and other mechanisms of the car, which play the role of a second drive. The on-board network of the Gazelle is equal to the nominal voltage of 12V DC. To turn on the electrical circuit, use the ignition switch, which consists of a contact drive and an anti-theft lock. When the engine is not running, all electrical consumers take power from the battery, and when the engine is running, power is supplied from the alternator. While the element is working, the battery is charged, and the on-board circuit is powered through two fuses.
The lighting circuit is equipped with a 40 A fuse, and the accessory circuit is equipped with a 60 A fuse. They are located in the fuse box, which is installed in the engine compartment. Also, the circuits of all consumers are protected thanks to additional fuses with a lower current response. They are located under the dashboard on the driver's side.
Replacing a generator for a gazelle 406 engine
The same light bulb began to burn out frequently.
Then I noticed that the wipers sometimes work too fast. The same garbage with window lifters, mostly normal, and sometimes just a “quick jack,” as they say. Then other light bulbs began to burn out. In general, it became obvious that the voltage regulator had failed. I didn’t go to the service center, I decided to try to fix it myself. I'll try to describe in detail how I did it, in case it helps someone. 1. you need to remove the hose or pipe (I don’t know what it’s called correctly) supplying air to the engine
2. Remove the connector of the air flow sensor
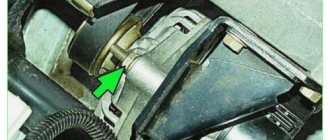
3. Now you need to remove the belt. We take a 15mm wrench and hang it on the tensioner pulley bolt. And pull it clockwise up and take off the belt. But to make it easier to crawl up, you first need to remove the iron panel, but I think everyone already knows this.
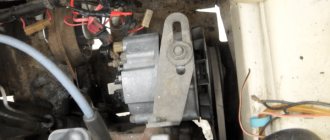
4. Once the belt is off, you can start removing the generator. The generator is mounted in two places. Unscrew the top fastening with a 13mm head.
5. Now you need to unscrew the lower fastening. I did it from below, from below it is more convenient for me. I don’t have crankcase protection, I don’t know how to get to this bolt from above, because... I haven't tried it. There's not just a bolt, there's a long pin. In order to unscrew it, you need 1 socket wrench for 17, and a head also for 17 with an extension, I also used a cardan. Everything came off easily.
6. When you unscrew the pin, you need to pull it out, but this is impossible, since the tensioner roller is in the way. It is necessary to remove not only the roller, but the entire structure. It can be removed with a 17 key, there are 2 nuts there, it must also be removed from below.
7. When you have removed the tensioner roller, you can get out from under the car and pull out the gene. There are two more terminals, with one we remove the chip, with the second we unscrew the nut by 10. The protective casing may not come off, as it has become stuck and dried out over time.
8. When the gene is on the table, you need to remove the black protective casing from it by unscrewing the nuts.
9. Having removed the protective casing, we see the brushes that are built into the voltage regulator.
10. Unscrew two nuts and 1 screw. Remove the brushes and install new ones
11. From your phone, go to VK, find the autoweather group, join it vk.com/avtopogoda There are deflectors, mats, armrests, eco-leather car covers, spoilers, eyelashes, armrests, frame curtains and other accessories for cars. We rested, now we collect everything in reverse order.
I didn’t take any photos of myself, so I’m showing everything in photos from the Internet. But it’s even clearer this way. I hope I haven't forgotten anything.
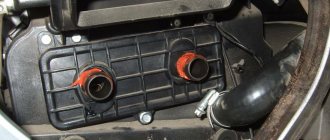
We remove the Gazelle Business generator for repair or replacement if it fails. Disconnect the wire terminal from the negative terminal of the battery. Remove the air intake of the air filter. Remove the air supply hose to the throttle assembly. Remove the drive belt for the generator and coolant pump.
Using a 19mm wrench, unscrew the two nuts securing the generator bracket.
Generator bracket mounting nuts (shown with the engine removed for clarity)
Use a 12mm socket to loosen the nut securing the adjusting bar. Unscrew the bolt securing the Gazelle Business generator to the adjustment bar
and remove the bolt with the clamping bracket. Remove the bracket with the generator from the studs and turn the generator casing up.
disconnect the wire block from terminal D of the generator.
We remove the rubber protective cap from the “B+” terminal of the generator.
Use a 10mm wrench to unscrew the nut.
and disconnect the wire tip from the “B+” terminal of the Gazelle Business generator.
We remove the generator from the engine compartment.
If necessary, unscrew the nuts of the bolts of the lower mounting of the generator and remove the bracket from the generator. Install the generator in reverse order. We adjust the tension of the generator drive belt and coolant pump.
Considering that the power of the standard generator is not so great, its maintainability in rural and field conditions is below par, as well as its rather capriciousness... in short, I wanted to change it. As a result, after sitting and thinking, calculating how much it would cost to sort out the original genych, I decided to install a NEW one. Well, the power should be maximized with the prospect of winches, music and other joys.
Checking and replacing brushes and voltage regulator of a car with a ZMZ-402 engine
On cars with engines ZMZ-4025 and ZMZ-4026, generators 16.3701 or 191.3701 are installed, not equipped with a built-in voltage regulator.
These generators operate in conjunction with an external transistor voltage regulator type 13.3702-01 or 50.3702, which has electronic protection against short circuits in the generator excitation winding circuit.
The regulator is installed in the engine compartment and attached to the engine compartment mudguard with two nuts.
The regulator provides a battery charging voltage of 13.4 - 14.7 V at a generator speed of 2800 - 12,000 min -1, corresponding to an engine speed of 1400 - 6000 min -1, a load of 5 - 40 A and a temperature from -20 to +80 °C.
At the “Ш” and “-” terminals of the regulator, the voltage drop should be no more than 1.6 V at a current of 4 A in the generator excitation winding circuit and a temperature of +20 °C.
Before checking the regulator, make sure that the generator belt tension is normal and that the regulator has good contact with ground (if necessary, adjust the belt tension and tighten the nuts securing the regulator to the body).
You should not connect additional electrical consumers to the power supply circuit of the generator excitation winding, since in this case the generator voltage increases greatly.
1. Before checking the voltage regulator, check the condition of the wires and the reliability of the connections between the generator, voltage regulator and battery.
It should be noted that the absence of charging current can be caused by the operation of the regulator protection circuit in the event of a short circuit in the generator excitation winding circuit. When the short circuit is eliminated, the operation of the voltage regulator is restored.
2. The voltage regulator can be checked on the car.
To do this, you need a DC voltmeter with a measurement limit of up to 20 - 30 V and a division value of 0.1 - 0.2 V.
Start the engine and, maintaining the engine speed of 1700-2000 rpm, turn on the low beam headlights. In this case, the charging current according to the ammeter should be no more than 10 A.
If the ammeter shows a charging current greater than 10 A, turn off the low beam headlights and side lights.
Measure the voltage at the “+” terminal of the battery, it should be 13.9 - 14.6 V at a regulator temperature of +20 °C.
If the voltage differs from the specified values, the voltage regulator is faulty and needs to be replaced.
Disconnect the plug from the voltage regulator.
Using a 10mm wrench, unscrew the two bolts securing the regulator.
Under each of the bolts there are tips of “mass” wires
We remove and replace the regulator.
We install the new regulator in the reverse order.
Possible faults
If the Gazelle generator malfunctions, the operation of all electronic devices is disrupted, and the battery is not recharged. A special indicator on the dashboard informs the driver about the breakdown of this part. With such a malfunction, starting the engine and driving the car is still possible, but until the battery is completely discharged. It is impossible to travel normally in such a car.
The main malfunctions of the generator include the following: violation of the integrity of the charging circuit wires, failure of bearings, damage to the diode bridge, short circuit of the stator winding, breakdown of the voltage regulator, wear of slip rings, excessive wear of brushes.
The Gazelle generator, like any car mechanism, can have both mechanical and electrical damage. Therefore, both the method of repairing the breakdown and the types of operations are different.
Mechanical damage includes wear and damage to rolling bearings, springs, damage to the integrity of the housing, pulley and drive belt.
Faults that are called electrical include breakage of the stator winding, cracks and wear of brushes, breakdown of the relay regulator, melting of the insulating coating of the turns, and interturn short circuits.
In case of any of these types of breakdowns, the car's generator does not fully perform its functions or completely fails, which affects the operation of all electronic devices and the engine as a whole.
Alternator belt, belt drive device
The alternator belt is a small part of the car that helps ensure its normal operation. Thanks to the generator belt, it is possible to transmit rotation from the crankshaft to the generator itself, which allows it to produce a sufficient amount of electrical energy to operate all kinds of equipment and systems.
The alternator belt is a simple rubber product and is one of a large number of car consumables that must be replaced on time according to the requirements of car manufacturers. The belt is an elastic rubber band; if it fails, the car will not be able to move independently. In order to avoid getting into an uncomfortable situation, you need to have an understanding of the structure of the car, the alternator belt itself, its location and replacement methods.
Simplicity of design and reliability have made it possible to use rubber alternator belts in all modern cars. This method of transmitting the rotational motion of shafts from one to another is the most trouble-free. However, despite this, it is necessary to carry out periodic visual inspections of the condition of the rubber belt, since it has a limited service life and may fail from time to time.
Today, there are many distinctive belt designs due to their use in different types of engines. Thus, all models of car alternator belts may differ in length, thickness, width and profile. Considering the fact that this rubber device is under constant heavy load, it must be strong enough and at the same time elastic to ensure a reliable connection between the generator pulleys and the crankshaft.
An important point that has a direct impact on the quality and durability of the belt is its temperature resistance. Since it is in constant motion under high voltage, it is subject to significant loads and temperatures. To ensure that the rubber material is not subject to rapid stretching and wear under the influence of those same constant loads, it must be sufficiently reliable and resistant to all influences.
The generator belt is made of special rubber, which has a strong multi-layer base inside of a special material and very reliable polymer threads. And for more reliable contact, different types of belts have different designs inside, allowing to increase the contact area and, accordingly, the reliability of the device. For greater reliability of the alternator belt and for it to have a number of other positive qualities, manufacturers pay sufficient attention to the development of new manufacturing technologies.
Possible malfunctions and their causes
Despite the fact that the GAZelle is not a particularly fastidious car, sometimes problems with the generator can occur. The main problems with the generator are considered to be:
- bearing failure;
- diode bridge problems;
- break in charging wires;
- short circuit in the stator;
- voltage regulator malfunction;
- “aging” of brushes or slip rings.
Like other transport mechanisms, the GAZelle generator is doomed to receive not only mechanical damage, but also electrical damage. Based on this, troubleshooting methods differ. Mechanical damage is considered to be damage to the springs, also to the swing bearings, drive belt or pulley and housing. Electrical problems include regulator failure, starter winding breakage, insulation melting, turn-to-turn short circuit, and brush wear.
The causes of malfunctions can be moisture and, accordingly, corrosion. Mechanical problems arise from “fatigue” of the material, non-compliance or violation of operating standards, from pollution, salts, and elevated temperatures.
How to remove the generator on a Gazelle?
Now let's consider the issue of dismantling. When carrying out repair operations on a Gazelle car, removal of the generator must be carried out in accordance with all technological instructions and follow safety rules when carrying out work. If the car engine is hot, you need to let it cool down to avoid the possibility of getting burned.
If there is a malfunction of the generator, it is removed from the car engine and diagnostic and repair operations are carried out. To do this, you can contact service workshops or carry out repairs yourself. Many car enthusiasts who encountered this problem for the first time are wondering how to change the generator on a Gazelle. The operation of removing and installing this part is not a complex technological or repair process, and can be done at home. To do this you will need a standard set of tools.
Dismantling the generator
You can dismantle the ZMZ 406 generator from the power plant with your own hands. To do this, you will need a key for 10 and 12. Then you can perform the necessary dismantling operations:
- Remove the negative terminal from the battery.
- We unscrew the wires that are connected to the generator.
- Unscrew and loosen the belt tensioner.
- We remove the belt. If the belt is not planned to be changed, then it can only be removed from the pulley of the generator itself.
- Unscrew the nuts securing the unit to the bracket.
- Pull out the fixing bolts.
- We remove the generator.
With the part removed from the car, you can now begin diagnosing the problems. First you need to disassemble the unit. Remove the back cover, remove the voltage regulator and pulley. Next, unscrew the coupling bolts of the generator covers and remove the stator. If necessary, the rectifier can also be removed.
First you need to diagnose the brush assembly and voltage regulator. As practice shows, it is precisely these parts that often have malfunctions. If everything is in order with the parts, then it is worth checking the stator, rotor and coil winding. Usually, if these components are faulty, they can be replaced. But, if a winding or more than two parts have failed, then it is advisable to purchase a new ZMZ 406 generator, since repairing the old one can cost much more.
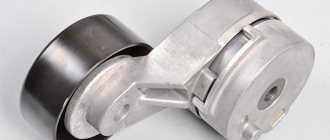
Replacing the tension pulley and accessory drive belt tensioning mechanism
We loosen the tension of the drive belt.
Completely unscrew the tension pulley bolt.
Remove the pulley from the tensioner axle.
If necessary, use a socket wrench or a 12mm socket to unscrew the three bolts securing the tensioner
Remove the tensioner mount from the engine
We install the tensioner and pulley on the engine in the reverse order, and then tighten the belt.
Many owners of ZMZ 406 power units were faced with the need to repair or replace the generator. Not everyone is able to do this procedure with their own hands. Let's look at the main subtleties and nuances of operation, repair and maintenance of the unit.
Removal process
Before replacing the generator on a Gazelle, it is important to remove the negative terminal of the battery, thereby de-energizing the vehicle’s network, and also disconnect the electrical wires from the part. Next, you need to loosen the belt tension using a special mechanism and remove it. Then, having unscrewed the two mounting bolts of the generator from the engine crankcase, we remove the generator itself from the engine compartment.
If the brushes fail, replacing them will not be difficult.
You just need to unscrew the two screws securing the brushes and remove them from the body. But in case of more serious malfunctions, the element must be disassembled and a detailed analysis of the faults.
Type
The Gazelle generator is a synchronous three-phase machine with electromagnetic excitation and is designed to convert rotational motion into electrical energy. The car is equipped with models 2502.3771 or 9422.3701, the power of which is about 1000 W. Do-it-yourself installation of the generator on the Gazelle is carried out using a mounting bracket on the right side of the power unit. It is driven by a V-belt from the crankshaft ratchet. It works in tandem with a built-in voltage regulator Y212A11E, which maintains the output voltage in the specified operating mode.
Removing the GAZelle generator
To carry out repair operations, you should know how to properly remove the generator on a GAZelle without breaking anything. First of all, you will need to de-energize the vehicle networks. To do this, remove the negative terminal from the battery. Then the belt is loosened using a special mechanism and then removed. Only after this the bolts are unscrewed and the generator on the GAZelle can be removed.
Now you need to disassemble the part to determine the problem. To do this, remove the protective cover from the housing and unscrew the brush block. Having disconnected the wiring, de-energize the voltage regulator, after which it is also removed. The housing cover is removed simultaneously with the starter. Then the terminals are disconnected from the diode bridge, and if necessary, the bridge itself is removed. To check the generator on a GAZelle, you can use a test light or a specialized measuring device.
What should you do first?
How to replace a diode bridge? This assumption should not be the first one when there is a problem with battery charging. Before you start disassembling the generator and changing the bridge, you need to check the charger brushes and the voltage regulating element. If everything is in order, then almost 100% of the diode bridge needs to be replaced.
The replacement process is not complicated, so this work can be easily done on your own. To check the functionality of the bridge, it must be removed from the generator. Of course, you can check without removing it, but it is very difficult and inconvenient.
Disassembly
This section describes a step-by-step process that will help you correctly disassemble the Gazelle generator.
So, first you need to remove the plastic protective cover from the case. Then unscrew the brush block and the voltage regulator, having first disconnected the wiring from it. Next, you should unscrew the four tie rods of the generator housing and remove the housing cover together with the stator. Then, having disconnected the winding terminals from the diode bridge, you need to remove the stator, and, if necessary, the diode bridge itself.
Next, remove the drive pulley and the cover with the rotor bearing from the shaft.
You can carry out the process of diagnosing generator parts using measuring instruments: E236 or a special test light.
Repair and replacement of generator components for Gazelle Business
In most cases, a generator breakdown can be repaired yourself. The Gazelle Business generator device includes several units that are simply changed in a modular manner - disassembling the generator housing for repairs is carried out as follows:
- First of all, you need to remove the protective cover. Along the perimeter of the unit, you need to unscrew the tightening bolts, then remove the casing and carefully dismantle the outer layer of insulation;
- After removing the insulation, access to two brushes, as well as brush holders and a voltage regulator, is available. Most often, a generator malfunction lies in the failure of the regulator or natural abrasion of the brushes;
- Next, turn the device over and remove the bottom cover, after unscrewing all the bolts. The stator and rectifier unit are located there. After removing these parts, access to the rotor shaft and drive bearing will be available.
To restore the functionality of the generator, it is enough to find the faulty unit and replace the part with a new one. The condition of the elements is checked visually or using a test lamp.
Checking the condition of parts
Regardless of which generator is installed on the Gazelle, the causes of the malfunction, as a rule, can be of the same nature.
The generator brushes should not have chips or cracks; when pressed with a finger, they should freely sink into the channels of the brush holder, and return to their original position under the influence of the spring.
The length of the brushes should not be less than 4 mm, and if there is severe wear, they are replaced with new ones.
The stator is checked for short circuits between the turn windings and the housing.
This is done by connecting one terminal of the control light to the housing, and the second is alternately connected to one of the three terminals of the turns. In this case, if there is a short circuit to the housing, the indicator light will light up. Having discovered this type of malfunction, it is eliminated or the stator is completely replaced.
To check the stator for a short circuit between the turns, a test lamp is alternately connected to the two terminals of the windings. Moreover, if the light bulb lights up, then there is no break in the turns.
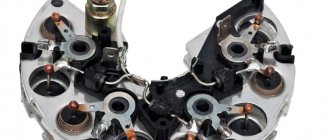
The generator rectifier unit should be cleaned of dust and dirt deposits. Next, you should check the diodes using a test lamp. Due to the fact that diodes of different polarities are placed in each section, they are checked with different battery connection polarities. If a faulty diode is detected, the rectifier unit is replaced.
Checking the generator after repair
After a detailed inspection and replacement of defective elements, the generator is assembled. Assembly occurs in reverse order. After the Gazelle generator is assembled, it is important to carry out diagnostics. The serviceable condition and correctness of its assembly can be determined by checking the rotation speed, during which the generator delivers a current of 40 A and 70 A. Diagnostics are carried out on a special stand. The electric motor of the testing stand smoothly changes the rotor speed. At the same time, the generator’s performance is measured, and the degree of its serviceability is determined.
What battery should I use?
If you plan to install a 115-amp generator, you must have a 75 Ah battery. The optimal solution would be to purchase a 120-amp device and an 80 Ah battery. But if the number of electrical appliances in the cabin is off the charts, you can install 150. The battery must be designed for 90 ampere-hours.
Will the battery heat up if its capacity is greater than what the standard generator can produce? Absolutely not. The only problem will be that the factory generator will need more power. As a result, the winding may heat up and damage the varnish insulation. It is worth remembering that as the current load increases, the load on the belt increases, and, accordingly, on the rotor shaft, tension roller and pump.
Installing a dynamo on the engine
Installation on the engine is carried out in compliance with a certain technological process.
First, unscrew the fastening nuts of the generator brackets to the crankcase. Next, install the dynamo and secure the front mounting bolt. Then we move the front bracket and achieve alignment of the crankshaft ratchet with the drive flywheel of the part and the pump drive. By moving the bracket, we achieve elimination of the gap between the generator loop. Install the rear mounting bolt and firmly tighten the mounting nuts of the brackets to the engine crankcase. Next, we put the drive belt on the pulleys and tighten it using a tension bracket. We carry out a control check of the tightness of all threaded connections. We connect the part to the car's electrical network and put the terminals on the battery.
Therefore, solving such an issue is not particularly difficult, and besides, the process itself takes a small amount of time. You can save a lot on auto mechanic services.
Checking the generator on a car
After installing the part in place, you need to start the car engine. Next, you need to turn on the maximum number of electrical appliances available in your vehicle (interior heater fan, wipers, car radio, interior lighting) and turn on the headlights. In this case, even at idle engine speed, the voltage in the on-board network should be 13.8 V. With this indicator, operating the car will not cause any problems.
So, we found out how to change the generator on a Gazelle.
How to check the performance of a generator at home
To check the generator for correct operation, it is not at all necessary to dismantle the device for testing the circuit and measuring power - it will be enough to conduct a test under natural load conditions.
To determine the condition of the generator and the approximate wear of its components, simply follow the following instructions:
- We open the hood of the car, then go into the interior and start the engine;
- Then we bring the gas pedal position until the engine speed increases to 3000 per minute. For convenience, you can hold the accelerator with a stop or ask your partner for help;
- After a few minutes of warming up the engine, it is necessary to connect the maximum possible number of vehicle energy consumers - high-beam headlights, heated windows or seats, climate control device;
- Next, we connect the battery meter and look at the state of the network.
If the battery is successfully recharged under such a load, the condition of the generator is normal, but if the battery is discharged, the generator will have to be dismantled to disassemble and replace components.
Prices for Gazelle generators
For Gazelle and Sobol cars, generators are produced by different manufacturers, the most well-known companies are:
- ELDIX (Bulgaria);
- PRAMO-ISKRA (city of Rzhev);
- KZATE (old name KATEK, Samara);
- BATE (Belarus).
In 2022, generators for GAZ commercial vehicles cost on average from 4,000 to 9,000 rubles; the cost of the unit largely depends on the manufacturer, engine model and the power of the generator itself. The most expensive parts are for the Cummins turbodiesel, prices for spare parts range from 8 to 15 thousand rubles, the most expensive are original production parts. The ZMZ-402 generator produced by KZATE for 65 Amperes is relatively inexpensive - on average 4.5-5 thousand rubles.
Source
Commercial vehicles GAZ
To quickly find the cause of a malfunction in your car, all Techs are equipped with modern and high-tech diagnostic equipment. More than 95% of all warranty repairs are performed on the same day.
Unified quality standards
To quickly find the cause of a malfunction in your car, all Techs are equipped with modern and high-tech diagnostic equipment. More than 95% of all warranty repairs are performed on the same day.
Qualified personnel
To quickly find the cause of a malfunction in your car, all Techs are equipped with modern and high-tech diagnostic equipment. More than 95% of all warranty repairs are performed on the same day.
Spare parts in stock and on order
To quickly find the cause of a malfunction in your car, all Techs are equipped with modern and high-tech diagnostic equipment. More than 95% of all warranty repairs are performed on the same day.
The traditionally low cost of standard hours (on average 30% less than competitors) and spare parts (3-5 times lower than analogues) allows you to minimize the cost of owning a GAZ car.
The total costs for scheduled maintenance of GAZ vehicles are on average 20% less than their European counterparts!
All services are certified by the Russian certification body. (Certification system for road transport)
Our service centers are modern and professional service stations. All of them undergo mandatory certification in accordance with GAZ corporate standards. Map of GAZ service stations Stores "GAZ car parts"
Increased warranty for main components and assemblies. The warranty period is extended for the duration of the GAZ vehicle undergoing warranty repairs.
Has a wider coverage of components included in the vehicle (competitors have more restrictions)
For limited parts, the warranty period is comparable to foreign analogues, and in some cases even longer.
Maintaining a full warranty when installing LPG.
Reimbursement of expenses to the consumer associated with the delivery of a faulty GAZ vehicle to service, incl. evacuation if the malfunction is of a production nature and is subject to repair under warranty;
Providing the owner of a GAZ vehicle with a guarantee for modifications or newly installed additional equipment and accessories (seller).