Since the moment seat belts were invented, they have managed to save more than one human life. Since this element is directly responsible for the safety of the driver and passengers, maximum attention must be paid to its performance. If a seat belt extender or other component fails, the system should be repaired first. More information about the main breakdowns and repair methods can be found below.
Troubleshooting seat belt problems
First, you need to take into account that driving with a faulty strap is not only dangerous for life, but can also hit the car owner’s pocket. But still this is not as important as the safety of the motorist. Of course, if a seat belt extender or other structural component fails, you can always contact a service station, where specialists will do everything efficiently. But you will need to pay a certain amount of money to repair a seat belt buckle or other element. However, if necessary, you can always complete the entire repair process at home.
As for malfunctions, there can be many of them, but we will look at the most common problems that our motorists encounter. One of the most common problems is the inability of the strap to screw back on. That is, after the driver reaches his destination and unfastens the strap, it remains in the same form and does not twist back.
Of course, the situation is not particularly pleasant, but this problem can be solved. As a rule, the reason is a failed spring installed in the drum. Therefore, to solve the problem, you will simply need to replace this spring.
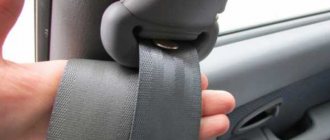
What happens just as often is that the strap does not come out of its installation location; in this case, it is most likely simply jammed. If the seat belt for dogs or people cannot be pulled out, then this may indicate a breakdown of the locking device. This also often happens as a result of road accidents. A special sensitive ball located inside is responsible for blocking the device. That is, if the device is jammed and the motorist cannot turn it off, this may indicate that the mechanism itself is now not working correctly.
Seat straps disassembled
If the seat belt for dogs or people is stuck in the socket and cannot be pulled out, there may be three reasons for this problem. Before we talk about how to repair or change a car strap with your own hands, we will talk about possible reasons.
So, why the device can get stuck in the socket:
- Element wear is the first and one of the most common reasons relevant to older vehicles. In this case, we are not talking specifically about the wear of the strap itself, but directly about the device’s locking system. In addition, the reason may not lie specifically in the operation of the entire system, but also in its individual components. If the seat belt plug does not want to come out of its socket and you cannot turn it off, then the problem lies precisely in the mechanism. As you understand, if the belt was not fastened, then this is basically not a problem; it will be much worse if the device jams during use.
- Failure or incorrect operation of one of the structural elements is another common reason. This problem usually occurs when the strap is fastened. If this happens, then there can be no other options other than replacing the device with a car. Of course, you can try to identify and replace the failed elements, but this will take more time and such a replacement process is not always advisable.
- Road accident. It often happens that the seat belt plug in a car gets stuck after a traffic accident. As a rule, the design of the device on the car itself is made in such a way that after the car gets into an accident, the sensitive elements are triggered and the squib is activated. The squib is a blocking structural element. Therefore, if the squib is turned on, turning it off can be very problematic (video author - SH).
It should be noted that the problem of strap jamming can be encountered for a trivial reason - dirt. Dirt and debris that accumulates directly in the mechanism itself may at first simply prevent the belt from being pulled out evenly. Subsequently, this problem can develop into a bigger one - that is, the strap will simply jam and cannot be pulled out.
To solve such a malfunction, it is not necessary to change the element; you can try to clean it; for this you need to purchase a special cleaning agent. It is sold in any car store - the product is simply injected into the device itself, after which the belt needs to be wound and unwound so that the substance gets inside. You can also disassemble the locking mechanism yourself and try to clean it.
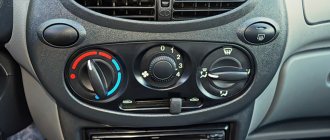
The car can warn the driver about a system malfunction. Depending on the car model, meaning newer vehicles, the on-board computer can send a signal to the motorist that there has been a failure in the system and the belt has jammed. This signal may appear on the dashboard as a light icon, or it may be an audible signal. In addition, if the car is equipped with an on-board computer with a screen, then information about the problem may appear on the display. One way or another, if you have a more modern car with an on-board computer, then it should warn you about a problem.
Another signal may indicate a malfunction. For example, if there is no on-board computer, then when a problem occurs, a loud click may occur. This click can be heard even if the music is turned on at full volume. When this signal appears, the driver should keep in mind that the car’s seat belt must first be cleaned if it has not yet jammed.
Diagnostic methods
Let's look at the procedure and methods for checking the condition of seat belts. For example, let's look at how to carry out diagnostics on a Ford Focus car.
Attention! If an accident occurs and the airbags deploy, the belts must be replaced with new ones.
Insufficient belt retraction
If the belt does not retract well, check how the decorative covers are installed to make sure they are not touching the belt tape. Also check to see if the belt is rubbing against the retractor. If this is the case, then loosen the fastening bolt and align the device so that the tape is in the middle.
Most cars have 2 front and 3 rear retractable seat belts. They are equipped with double protection by sensitive elements.
- Vehicle motion sensor – blocks the belt during braking, sharp turns, descents, and ascents.
- Belt movement sensor – blocks it when pulled sharply.
These systems must function properly. To check them, special control methods are used.
How to check a car motion sensor
There are two ways to test this sensor.
First way
This will require the participation of two people. The first way is to slow down. During the inspection, people in the vehicle must not interfere with the operation of the seat belts.
- Choose a flat section of road with good visibility.
- The driver must sit in a comfortable position with the seat belt fastened and correctly adjusted.
- Drive no faster than 10 km per hour.
- Brake sharply to stop the car. If the locking is working properly, the belt will lock.
- The check is performed twice for the front and rear seats.
A belt retractor device that is not capable of restraining a person must not be used.
Second way
To do this, you need a flat road with a circular motion so that the car's steering wheel is in the extreme position.
- The driver is wearing a seat belt.
- The passenger sits in the back seat and also buckles up.
- Start the engine, turn the steering wheel all the way to the left and drive at a speed of 16 km per hour.
- When the passenger tries to slowly pull out the belt, it should lock.
If any of the belts can be pulled out, then they cannot be used.
The car must be stationary on a horizontal, level road. Grab the seat belt and try to pull it sharply. The lock should engage after 25 cm of extension. Otherwise, such a belt must not be used. Such a simple check allows diagnostics to identify faults and replace worn belts with new ones.
Seat belt replacement and repair
If you need to change the strap on your car, there are several options to solve the problem. You can go to a specialized service station, where technicians will quickly and inexpensively replace the element. This way you can save your energy, time and nerves, especially since the cost of replacement today is not so high. But you can also change the device on your car yourself. Having completed this procedure once, you will always know how the replacement is carried out, and in the future you will be able to do it yourself (the author of the video is a Real White Guard).
Video “Seat Belt Repair”
Using VAZ cars as an example, you can familiarize yourself with the process of repairing seat belts at home (the author of the video is Vasily Kalugin).
Wearing a seat belt is a prerequisite for a safe trip, which is regulated by traffic rules. The legal requirement applies to both passengers and the driver. What to do if this protective accessory fails, why does this happen and how to repair the seat belt yourself?
The seat belt belongs to the category of mandatory protective measures that must be used by everyone present in the car. The purpose of this device is to minimize the likelihood of injury as a result of an accident. A broken seat belt is a good reason for a fine, so you should worry about repairs immediately after discovering a breakdown.
It remains to be seen why this accessory may break and how to fix it.
Design and operating principle
The design of the protective device in question is represented by a retractor reel, a lock and a tape. High-strength material is used to make the tape; this element is fixed to the body in several zones as follows:
- in the area of special traction with a lock;
- on the counter;
- in the threshold area.
The main purpose of the lock, in turn, is to lock the belt. This element is located near the seat. A movable tongue made of durable metal simplifies the operation of the belt; it is located directly on the belt. You can find a retractor coil on the car body pillar. Its purpose is to forcefully wind and unwind the tape. The design of the retractor reel provides for the presence of an inertial locking mechanism, due to which, in the event of a sudden stop, the movement of the belt is stopped and the person remains in a fixed position, not being able to go into free flight through the windshield.
The principle of operation is nothing complicated: the action of a coil with a blocker is based on a gear mechanism that rotates it. The closing of this mechanism occurs through a pendulum; it can have a ball or spheroid support with a lever system.
Operating rules
The procedure for proper operation of the protective accessory in question is regulated by the following rules:
- The shoulder part of the tape must go over the chest and shoulder; it is forbidden to thread it through other parts of the body, even if it causes inconvenience.
- When the seat back is positioned vertically, maximum protection is achieved when using a seat belt. Leaning the seat back increases the risk of a person slipping under the belt. Under these circumstances, a head-on collision will result in the passenger striking the instrument panel.
- One seat belt is designed for one passenger; two people are not allowed to wear it together.
- It is forbidden to drive with a child in your arms with a seat belt fastened. In this case, the accessory not only does not protect the adult passenger, but can also cause injury to the child in the event of an accident. The child must have a separate seat belt or child seat.
- It is prohibited to add or change the design of the device in question in order to weaken the tension or block the tightening of the belt.
- Make sure that the tape fits against your body and does not twist.
- If the child's height allows him to be fastened correctly, the use of a belt is mandatory. If the child is too small, a child car seat should be used.
- The waist part of the tape should be adjacent to the area above the hips.
- Adjust the mechanism to ensure a snug fit of the tape to your body.
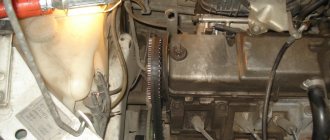
We change the alternator belt on a Lada Priora car ourselves
The new version of Lada-Priora really attracted domestic car enthusiasts. But, like any other car, it needs timely service. For example, the Priora alternator belt must be changed after a certain mileage, and its condition must be checked regularly.
Lada Priora differs from previous models in comfort and improved handling. But the main differences are under the hood. Everything here is located differently than in previous models. As a result, not all specialists even know how to replace the belt and tension it. New models are equipped with additional systems. Air conditioning and power steering (EUR) added comfort, but such changes complicated the approach to the generator.
In versions with power steering or air conditioning, the belt is longer when compared with the regular version of the car. As a result, we will look at how the change occurs in the first and second cases on models 16 and 8 valves.
Car Lada Priora
In what cases does a car need to be replaced?
Typically, the need to replace the alternator belt appears due to wear during its use and deterioration of adhesion to the roller surfaces. Also, tightening or changing is necessary if, as drivers say, it starts to whistle.
This video shows the generator drive whistling.
The instructions that come with the car indicate that the alternator belt should be replaced every 60 thousand km. If the car is used infrequently, then replacement should be carried out every two years.
Step-by-step instructions for replacing without power steering
Do-it-yourself replacement work on a Priora without power steering (EUR) and air conditioning is more convenient to carry out in the inspection pit.
- a set of keys;
- fender liner removal device;
- balloon wrench.
Stages
- First, loosen the nut with a wrench of the appropriate size.
- Unscrew the adjusting bolt.
- We move the generator towards the power plant.
- Remove the right front wheel.
- We remove the fender liner and get access to the old belt.
- We replace it with a new one and do not forget to tighten it.
- Checking the tension. It should not be weak, but tightening it on a model with power steering (EUR) is also dangerous. The generator bearings may be the first to suffer.
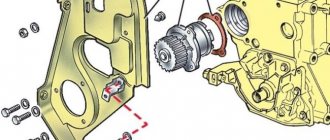
The nut that needs to be loosened. Unscrew the bolt. Install a new one.
Replacement instructions with power steering
Since the power steering pulley in this modification is at a low height, the creators ran the generator belt around the engine mount. This makes it a little more difficult to do the DIY change.
Stages
Use WD40 to moisten the bolts that secure the motor mount and bracket. These bolts need to be moistened with liquid. After about a quarter of an hour, you can begin to unscrew the bracket nut. Let's jack up the wheel. Next, we place some object under the motor and remove the wheel. We lower the car a little. Unscrew the tension roller. Bend the belt. Now you can unscrew the bolts that secure the pillow. These bolts need to be unscrewed. Next, we lower the car so that the engine begins to hang out. The cushion moves towards the motor. Move the pillow Now you can change it. Next, we lift the car with a jack so that the power unit lowers
We do this carefully so that the belt and pillow do not move. Tighten the bolts and nuts. We put on the wheel and lower the car.
At this point, work on the model with power steering can be considered completed.
Tensioning and checking the belt
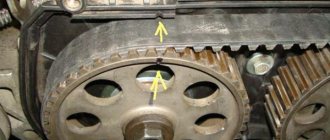
The belt in Lada Priora is tensioned as follows:
- The first step is to loosen the roller nut; to do this, the cage is held with a wrench.
- We rotate the roller cage by rotating the key.
- We tighten the roller nut.
- The tension is checked on the longest section between the pulleys.
- When pressed, the alternator belt should bend approximately 10 millimeters.
- On a model with power steering, the tension should be a little tighter. You can also test it by ear. If the tension is insufficient, a whistle will be heard and you need to tighten it. If it is too much, you will hear the hum of the bearings and the tightening will need to be loosened. Roller key
The work is not difficult, but a little troublesome due to the need to dismantle some components in models with power steering and air conditioning with your own hands, but it is doable even for a novice car enthusiast. But calculate how much such work costs at a service station and whether it would be better to use this money for other purposes.
AvtoZam.com
Repair options
Troubleshooting measures directly depend on the cause of the breakdown:
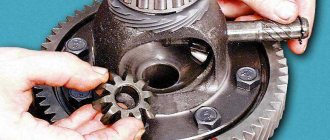
- If you have successfully pulled out the belt, buckled it, but when you need to unfasten the belt does not return to its original position, the problem may lie in the spring. It often comes off due to prolonged use or under stress. It is necessary to disassemble the lining and reach the drum to install the spring in the correct position. If it is still there, you will have to change the drum.
- Dirt on the belt and in its fixation areas can also cause the belt to not return to its original position. This problem is most common with older cars. Just rinse the entire device and dry it thoroughly.
- If the device is jammed and the seat belt does not extend at all, the cause may also be the accumulation of dirt, but not on the belt, but directly in the mechanism. To fix the problem, use a special composition, which can be purchased at any auto supply store. Spray it as close to the mechanism as possible and try moving the tape a couple of times to develop the device. You can also disassemble the device yourself and clean it, but first pull out the tape to the end and secure it with improvised devices, which can be a clothespin or a paper clip.
Troubleshooting a Lock
If the strap latch does not lock in the lock located on the side of the chair, the cause is often a broken spring. It must be said that the lock body is a non-separable unit, but this will not stop craftsmen, especially since it is extremely difficult to purchase a lock separately. They suggest separating the case using a knife or screwdriver.
It is unlikely that you will be able to find a spring, so home craftsmen make it themselves from a special wire with a cross-section of 0.4-0.5 mm. Some people make a part from a regular spring, first straightening it. Next, the workpiece is bent to the shape of the original element and installed in its original place. If the unit is functioning normally, all that remains is to glue the housing and install the system element in place.