On all carburetor cars produced in Tolyatti, a distributor-distributor is installed in the ignition system; there is no electronic control unit in the electrical circuit. Although the electronics are quite simple and reliable, breakdowns still occur.
Repairing the distributor on VAZ cars is necessary when its parts wear out, but if the damage to the device is too serious, it is not practical to repair the distributor; it is easier to replace it.
Distributor VAZ-classic
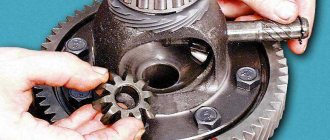
The breaker-distributor (CD) on rear-wheel drive VAZ cars is designed to interrupt the current in the primary circuit and distribute high voltage across the cylinders. On VAZ 2101-07 cars there are contact and non-contact distributors. Contact PR VAZ model 30.3706 consists of the following main parts:
- housings;
- roller with cams;
- centrifugal regulator with weights;
- contacts;
- runner (rotor);
- covers;
- vacuum ignition timing.
A capacitor is installed on the contact distributor, which improves sparking and protects the contacts from premature burnout. In a contactless system, interruption occurs due to a Hall sensor, which is installed instead of contacts.
VAZ classic distributors differ in shaft length - on engines 2101/21011 a distributor-distributor with a short shaft is installed, on engines 2103/2105/2106/21213 - with a long shaft.
The key to high-quality circuit testing
Non-contact ignition system checks for short circuits
First, pay attention to the coil winding. To get started, connect a multimeter, which determines the resistance value
There is a recommendation regarding the lubrication of the tip of a high-voltage wire: a special product for the VAZ 2107 or technical petroleum jelly is used here.
The coil itself is diagnosed as follows:
- the module is disconnected from the tips;
- one terminal of the device is connected to the central contact, which has a coil;
- the other terminal of the device is connected to ground.
If the display of the infinity device implies that there is no short circuit, then the coil is in order
Important: unchanged display indicators when ringing the circuit will indicate infinity
Checking the primary ignition circuit involves installing a multimeter to its left and right contacts, which are assigned the ignition function. This setting of the ohmmeter should cause a change in readings. If this is not observed, you can prepare not only to replace the coil, but the entire device. Here they focus on the norm, which is 3-3.5 ohms.
The process of checking the secondary windings of the module includes:
Disconnecting wire tips from it. Level position in front of you. Installing the module to the right outputs of the upper and lower locations
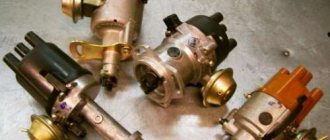
Distributor VAZ 2108-09
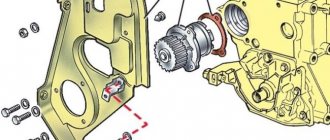
The PR on front-wheel drive VAZ cars with a carburetor engine is of the contactless type; it is fundamentally designed in the same way as the contactless distributor on the Classic, but has its own design features and looks completely different in appearance. The shaft of the VAZ-2108 distributor is short, it is driven directly from the camshaft, and is installed on the cylinder head.
Removing the replacement part
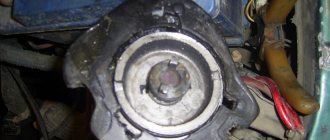
Be sure to remove the terminal from the battery! After this, we disconnect all kinds of wiring from the coil, the main high-voltage wire. Now remove the cap from the distributor.
We must try to set the slider so that it is at an angle of 90 degrees towards the engine.
Draw a mark in advance (most conveniently on the cylinder block) so that you screw the new part to its original location.
Unscrew the nuts from the old distributor and remove it.
Distributor malfunctions
The distributor on VAZ cars may fail:
- due to mechanical damage;
- due to wear and tear of parts;
- due to moisture entering the device.
Main breakdowns in the distribution switch:
- cracks appear in the distributor cover, or the contacts in it burn out (central or side);
- the slider burns out;
- The Hall sensor stops working;
- shaft bearings wear out;
- the sensor contact breaks;
- the diaphragm of the vacuum ignition timing regulator breaks through.
The contact distributor may also have a faulty capacitor or burnt contacts.
You can identify a faulty distributor by the following signs:
- the engine does not develop speed;
- the engine is running rough, one or more cylinders may not work;
- the operation of the internal combustion engine is accompanied by popping sounds in the carburetor and muffler;
- when you sharply press the gas pedal, detonation occurs and your fingers “knock”;
- The engine will not start.
Ignition setting: when required
It is worth focusing on some symptoms by which the car owner can easily determine that the distributor requires adjustment and alignment.
- The engine cannot be started.
- Increased fuel consumption. Sometimes this is due to the need to adjust the carburetor. For example, if the ignition is adjusted later, then the dynamics of the “six” will be low, and in order to accelerate well, the engine requires more gasoline.
- The occurrence of shots in the muffler or air filter.
- The power unit functions unstably: it makes noise, vibrates. Setting the ignition and clearly placing the distributor on the VAZ-2106 is required in case of engine tripping or shaking.
Repair of VAZ 2106 distributor
On older VAZ 2106 cars, a contact distributor is installed, but such a system is not very reliable - due to malfunctions in the contact group (CG), various problems often arise:
- due to burnt contacts, the engine may not start;
- too large a gap in the CG affects engine power - the engine stops developing speed;
- If there is a small gap in the contacts, the motor jerks and works unstably.
To repair the VAZ 2106 distributor, it must be removed and troubleshooting carried out. Removing the device on the “Classic” is very simple, but before repairing it, it is recommended to align the crankshaft to the mark - this will make it easier to install the distributor after repair. We remove the distributor as follows:
- rotate the crankshaft until the marks align;
- we pull off the tips of the high-voltage wires from the spark plugs;
- unclip the two latches of the distributor cap and see what position the slider is in. If it is directed to the fourth cylinder, we make another full turn of the crankshaft. Usually, with correctly set marks, it should be located as in the picture below;
- pull off the hose from the vacuum regulator;
- unscrew the nut number 13, which holds the distributor, and dismantle the distributor.
Now the PR should be disassembled, perform the following operations:
- unscrew the fastening screws of the runner, dismantle the rotor;
- unscrew the nut located on the body, hold the screw on the other side of the body with a screwdriver;
- dismantle the fasteners, take out the plastic insulator;
- tighten the screws holding the contact group (KG);
- dismantle the CG;
- knock out the shaft pin;
- remove the oil deflector and washer from the roller, pull the shaft out of the housing;
- to get to the bearing, remove the locking washer of the ignition timing regulator rod from the top of the housing;
- Unscrew the bolts securing the regulator, dismantle the ignition timing mechanism;
- unscrew the screws (2 pcs.) that hold the bearing fixing plates;
- dismantle the bearing, lifting it from different sides;
The disassembly is now complete, all that remains is to troubleshoot and replace worn parts.
Octane corrector
It's no secret that the gasoline we buy at gas stations often does not meet the standards provided by the car manufacturer for normal engine operation. As a result of using such fuel, clogging of the fuel system, an increase in the amount of deposits on piston parts, and a decrease in engine performance may occur. But the most dangerous thing for the power unit is detonation, which occurs due to the use of low-octane gasoline.
In cars with an electronic control system, detonation is eliminated using a special sensor and control unit. Such elements are found in injection “sevens”. The computer receives the signal from the sensor, processes it and automatically adjusts the ignition timing, increasing or decreasing it. The carburetor VAZ 2107 does not have such equipment. Drivers have to do this manually, turning the distributor in the manner described above.
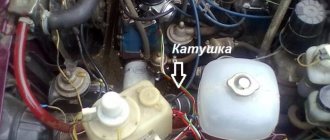
The electronic unit is installed in the engine compartment
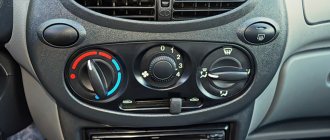
But there is a special electronic device that makes it possible not to adjust the ignition angle after each refueling. It's called an octane corrector. The device consists of two parts: an electronic unit, which is installed in the engine compartment, and a control panel located in the car interior.
The panel is installed inside the car, in a convenient and easily accessible place
Noticing that the piston fingers begin to “ring”, the driver turns the knob on the control panel of the device, making the ignition later or earlier. Such a device costs approximately 200–400 rubles.
The “seven” distributor is indeed a complex device, but if you understand the design and operating principle, you can easily maintain, repair and adjust it yourself.
Repair of VAZ 2107 distributor
On VAZ 2107 (2105) cars, both a contact and non-contact distributor can be installed, much depends on the year of manufacture of the car. Since the principle of disassembling the breaker-distributor on the “Classic Seven” is exactly the same as discussed above, in this section we will analyze how to properly troubleshoot.
First of all, we inspect the distributor cover:
- there should be no chips or cracks on its surface, both outside and inside;
- the coal on the spring should move freely, without jamming;
- there cannot be burnt contacts on the cover, and the internal contacts must not show signs of wear.
If the condition of the cover is in doubt, it is better to replace the part immediately, especially since it is very inexpensive.
The runner must also be visually intact, without external defects. We check the performance of the part using a multimeter, measure the resistance of the conductive part (resistor) - it should be in the range of 5 to 6 kilo-ohms.
The condition of the contact group is determined by external inspection - the contacts must close tightly, without gaps, and not have signs of burntness or severe wear. If the contacts are slightly burnt, we smooth out the unevenness on them with a file; a badly burnt CG needs to be changed.
The weights on the shaft should move easily, without jamming, and return to their place under the influence of springs. If jamming is observed in the mechanism, the moving joints should be lubricated with machine oil.
The shaft itself should not show signs of wear, and if there is wear on it, it needs to be replaced.
The vacuum ignition timing regulator (VROZH) is easy to check: we draw in air through the fitting with our mouth; if the device is working properly, the “vacuum regulator” rod begins to move.
The distributor bearing should not bite, rotate as desired, or have any play.
Repairing the VAZ 2107 distributor is easy to do yourself; besides, distributor spare parts are always available in auto stores, and they are very inexpensive.
Installing a new spare part
We disconnect the cap from the new distributor, set the slider at an angle of 90 degrees, and only then begin installing the part.
Now we match the marks and tighten the distributor.
Having attached the cover, we connect the spark plug wires and the main wire of the ignition coil itself.
After this, we begin to change the ignition coil. Remove every single wiring from the old part, unscrew the bolts, dismantle it.
We connect the wiring (including high-voltage) from the distributor to the spark plugs to the new spare part.
We will connect two brown wires to the first contact, usually designated “K”, and two blue wires to the other (contact “B”).
A connector with three contacts must be inserted into an empty socket that has a distributor.
To install the switch, you will need to make a couple of holes and attach it with self-tapping screws. We recommend placing it next to the washer barrel and the left headlight.
We plug the most important connector into the switch, twist the wires into a bundle, and attach them side by side so that they do not interfere.
After these steps, you can safely start the VAZ 2107 car and hit the road.
Repair of VAZ 2109 distributor
One of the most common problems with the VAZ 2109 distributor is failure of the Hall sensor. If the sensor is faulty, the engine stops starting; we replace this part as follows:
- remove the distributor from the engine;
- unscrew the cover (two screws);
- dismantle the vacuum regulator;
- unscrew the screw holding the sensor connecting block;
- unscrew the fasteners of the upper bearing holder, it is secured with two screws;
- remove the bearing assembly with the sensor, remove the Hall sensor from the holder (two screws);
- we install a new part, assemble the distributor, and put it in place.
After repairing the VAZ2109 distributor, you may need to adjust the ignition; it is done very simply:
- loosen the three nuts of the PR housing itself;
- with the engine running, gradually turn the distributor in one direction or the other, apply gas with the throttle - we find the position in which the engine picks up speed faster, without dips;
- Then we tighten the nuts and check the car while driving. If it was not possible to find the desired position immediately, repeat the operation.
The correct operation of the engine of any car completely depends on the serviceability of the ignition system. And these are empty declarative statements. Now we have to see how one small unit can affect the operation of the entire engine. The distributor of second-generation VAZ cars (eights and tens) is not the most complex device, but a lot depends on its technical condition.
Content:
Setting the advance angle
If repair work was carried out on the VAZ 2105 ignition distributor or the device was replaced, adjustment is required after installing it on the car. This can be done in different ways, which depend on the conditions and the tool at your disposal. Before you begin the adjustment process, you need to know that the engine cylinders operate in the following order: 1–3–4–2, counting from the crankshaft pulley.
Control
This method will require the following tools and accessories:
- 12 V test lamp with two wires;
- key for 13 and 38 to turn the crankshaft.
The adjustment is made with the engine off and consists of the following steps:
- Remove the cover from the ignition distributor.
- Rotate the crankshaft until the mark on the pulley coincides with the middle mark on the front of the engine.
- Use a 13 key to loosen the fastening of the distributor.
- We connect one wire from the lamp to ground, the other to the low voltage circuit in the distributor.
- Turn on the ignition by turning the key in the lock and rotate the device left and right until the light bulb appears. When it lights up, fix the distributor with the appropriate fasteners.
Video: setting the ignition using a warning light
By hearsay
The simplest and most accessible option for setting the ignition is by ear. This method is especially indispensable in field conditions. The adjustment consists of the following steps:
- Let's start the engine.
- Lightly unscrew the distributor mount, holding the device from turning with your hand.
- We try to turn the distributor to one side.
- We find a position in which the engine operates at maximum speed.
- Turn the distributor slightly clockwise.
- We clamp the mechanism fastening.
Video: installing the Zhiguli ignition by ear
By spark
The sequence of actions when setting the spark advance angle consists of the following steps:
- We install the crankshaft according to the marks, as in step 2 when adjusting using a light bulb, while the distributor slider should be directed towards the first cylinder. If he is looking at the fourth cylinder, then he needs to crank the crankshaft some more.
- We remove the central cable from the distributor cover and place the contact near ground.
- We loosen the distributor fastening, turn on the ignition and turn the mechanism until a spark jumps between the explosive wire and the ground.
- We move the distributor little by little counterclockwise and find a position in which a spark will not appear, after which we secure the distributor.
By strobe
You can most accurately set the ignition timing on the “five” using a strobe light. The adjustment technique consists of the following steps:
- Lightly unscrew the distributor fasteners.
- We connect the negative contact of the device to ground, connect the plus one to the low-voltage part of the ignition coil, and attach the strobe clamp to the cable of the first cylinder.
- We start the engine and turn on the device, pointing it at the crankshaft pulley. With such actions, the mark will be visible.
- We turn the distributor and ensure that the mark from the strobe light matches the marks on the engine.
- We control the engine speed, which should be 800–900 rpm.
- We fix the adjustable mechanism.
Video: setting the lead angle using a strobe light
The serviceability of each element of the ignition system has a direct impact on the functioning of the engine.
Therefore, attention should be paid to checking them periodically. If malfunctions occur in the operation of the motor, you need to be able to find the cause of the malfunction and eliminate it
To do this, it is enough to prepare a minimum list of tools, familiarize yourself with the step-by-step actions and carry them out as you work.
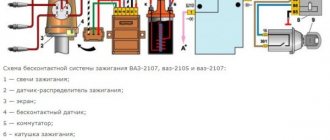
Distributor in a contactless ignition system
The contact ignition system, which is installed on the antediluvian classic VAZ models, is an example of Italian reliability, stability and maintainability. This system (not the ignition system in principle, namely the VAZ one) was developed by the Fiat concern in 1963 and remained practically unchanged throughout the entire era of the reign of the classic Lada, right up to the moment when the last VAZ 2107 was rolled out of the gates of the Izhevsk plant. the last seven already had a contactless ignition system; it did not undergo any significant changes.
On cars of the Samara family - 2108, 2109, 2114, the ignition system is contactless. What does this mean and what are the differences between it and the contact system? Here they are:
- there is no contact group in the VAZ 2109 distributor;
- the operation of the contactless ignition system is controlled electronically, and not by single-cell electromagnetic relays;
- adjustment of the ignition timing is carried out using other methods;
- The VAZ 2109 contactless distributor is more compact than classic VAZ distributors.
The operating principle of the ignition system and its main tasks have not changed with the use of a contactless system. It has become easier to maintain and has become less dependent on mechanical wear of the contact group, but more on the quality of electronic semiconductor components. Electronic control units of old 2109 require mandatory testing before purchase, since the quality of domestic radio components may not always be stable.
Switch
The switch is necessary to create an electrical impulse by interrupting the constant flow of current from the battery to the primary winding of the coil. The BSZ VAZ 2107 uses a switching device of type 3620.3734. The working elements contained in it are ordinary bipolar transistors that open the circuit when the Hall sensor receives a signal.
Switch 3620.3734 is built according to a simple single-wire circuit in which the device body is connected to the vehicle ground and, as a result, to the negative terminal of the battery. The benefits of using this assembly instead of a traditional switch include:
- no need for maintenance or adjustment;
- high spark energy, making it easier to start the engine in the cold season, as well as the ability to use gasoline with a lower octane number;
- the presence of a stabilization system that protects the Hall sensor from voltage surges.
This switch has a drawback - poor workmanship. It happens that the device fails after a few months of use. Its design is non-demountable, so repair is impossible. Therefore, experienced owners of the “Seven” and other VAZs with a contactless ignition system bring spare switches to their cars. Fortunately, the part is inexpensive - 400-500 rubles.
Source
Purpose of distributor VAZ 2109
In any ignition system, contactless or contact, there are two circuits - high voltage and low voltage. The distributor, the ignition distributor, is exactly the device that deals with both high-voltage and low-voltage wiring. Its main task is to distribute high voltage between the spark plugs at the right moment and in a certain order.
The distributor works as follows: High-voltage voltage is generated in the ignition coil by electromagnetic induction. It is supplied via a high-voltage wire to the central contact of the distributor cap. The contact is in constant interaction with the slider, which distributes the current across four contacts corresponding to the spark plug in the cylinder. The slider is in constant rotation and alternately closes the central contact with the spark plug contacts. Current is supplied to the spark plugs through high voltage wires in the order determined by the order of operation of the cylinders - 1-3-4-2. The slider is driven by a drive shaft, which is connected to the camshaft.
Required parts and tools
It goes without saying that first you need to purchase a “contactless ignition kit” for the VAZ 2107. When purchasing it, it is very important to know what the engine size is and its brand. Remember this and do not believe unscrupulous sellers who assure you that this data is completely irrelevant. The cost of such a kit ranges from 2-3 thousand rubles.
You will also need a set of high-voltage wires, four spark plugs (they must have DVRM written on them).
The tools you will need are a couple of self-tapping screws, a set of wrenches, drills, and various screwdrivers.
Operation of the hall sensor and centrifugal mechanism
The VAZ 2109 distributor device allows you to adjust the ignition timing while the engine is running. This is achieved through a centrifugal device, which is capable of moving the slider with a sharp increase in the number of revolutions. The design of the centrifugal mechanism is similar to those installed on distributors with a contact ignition system.
The VAZ 2109 distributor also has a vacuum corrector. It works as follows: when a vacuum is created in the intake manifold, to which the corrector is connected, the vacuum is transmitted through a tube to a chamber with a rubber diaphragm. The diaphragm is connected to a rod, which is hinged to the plate on which the hall sensor is located. It was this sensor that replaced the contact group in the distributor and made the ignition system more stable. Together with the plate, the sensor can move, adjusting the ignition timing, increasing or decreasing the angle, depending on the intensity of the set of revolutions and the vacuum in the manifold.
Applicability
|
Malfunctions in the distributor
Since the 2109 distributor has a minimum of mechanical parts, it is not as susceptible to wear as a distributor with a contact group. However, they exist and you need to be prepared for them.
- The hole for ventilation and pressure compensation on the distributor shank often gets clogged. This leads to the fact that crater gases, having no other outlet, break through the distributor shaft seal and oil the slider.
- Breakdowns to ground occur in the distributor cap due to microcracks.
- Due to poor quality elements, the hall sensor fails;
- The distributor shaft bearing becomes loose.
Contactless distributor
The device of the VAZ 2101 non-contact type breaker-distributor is similar to the contact type. The only difference is that the mechanical breaker is replaced by a Hall sensor. This decision was made by the designers due to the frequent failure of the contact mechanism and the need to constantly adjust the intercontact gap.
In a contactless ignition system, the Hall sensor acts as a breaker
Distributors with a Hall sensor are used in non-contact ignition systems. The design of the sensor consists of a permanent magnet and a round screen with cutouts mounted on the shaft of the chopper-distributor. As the shaft rotates, the screen cutouts alternately pass through the magnet groove, which causes changes in its field. The sensor itself does not generate an electrical pulse, but only counts the number of revolutions of the distributor shaft and transmits the received information to the switch, which converts each signal into a pulsating current.
Device and purpose
Let us first consider the general structure, purpose and types of distributors:
- The distributor is part of the ignition system, and is designed to regulate, control and transmit an electrical signal to the ignition coil switch, distributing sparks among the spark plugs in the required sequence (in accordance with the ignition stroke)
- There are two types of ignition systems - non-contact and contact (of course, there are others, but they are not very common), accordingly, distributors are also used of two types
- They differ from each other only in design: the presence of contacts (in a contact system there is a breaker-distributor), or sensors (in a contactless system there is an ignition sensor-distributor)
- In terms of basic characteristics, both systems are almost identical
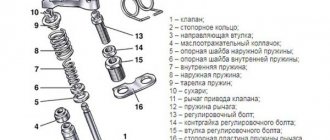
Main parts of the VAZ 2109 contact distributor
On VAZ-2109 cars, as well as models 2108-2199, a distributor with a built-in Hall sensor, four spark, with built-in ignition timing regulators (centrifugal and vacuum) is installed as standard. You can see the main details in the photo above:
- 1 - sealing ring
- 2 - coupling
- 3 – special adjusting washers
- 4 - roller with a centrifugal regulator located on it
- 5 — support plate
- 6 – screen protecting from dust
- 7 - the so-called “runner”
- 8 - Hall sensor itself
- 9 — lock washer
- 10 - thrust washer
- 11 — ignition distributor housing
- 12 — vacuum corrector
Adjustment how to set
It is recommended to use a special tool - a strobe light - to adjust contactless ignition. But if it is not there, you can use the following method.
- We set the distributor slider: unscrew the first spark plug, plug the hole with a finger and turn the crankshaft pulley. If air begins to press on your finger, it means you are on the compression stroke. At this moment, position the distributor so that the slider faces the first cylinder.
- Seize the moment of ignition. To do this, connect the central wire from the coil to the spark plug and short it to ground. Turn the distributor against the movement of the slider until the spark jumps from the spark plug. This point should be in the area where the slider interacts with the first cylinder.
- Set the ignition timing completely: with a warm car in second gear, give the gas sharply to the floor. When detonation is heard, set it later, if not, then set it earlier.
Setup video
Contactless ignition uses two important devices - a switch and a Hall sensor. The distributor and sensor must be compatible with each other. The new ignition coil must be an oil-filled type. It is better to take the wires for connecting the system from Niva.
In my free time, I read a lot, play airsoft (a team military sports game) and amateur radio communications. Lots of professional connections. My strengths: communication skills, endurance, responsibility.
Symptoms of a problem
The main signs indicating a malfunction of the ignition distributor:
- The car jerks while driving
- Engine won't start
- Piston pins knock when accelerating
- The car picks up speed slowly
- Fuel consumption becomes higher than usual
The most common faults:
- Burnt out slider
- Burnt contacts in the cover
- Hall sensor has failed
- The Hall sensor bearing is loose or jammed
- Cracks appeared in the lid
- Poor contact of Hall sensor plug
It is necessary to replace faulty parts in all of the above cases, except the very last one.
Oil entering the distributor
Let's consider a malfunction such as oil getting into the distributor using the example of a real case:
- The owner of a VAZ 2109 began to disassemble the ignition distributor
- Having removed the cover, he discovered that the ember had worn off and the slider had rusted.
- Continuing disassembly, he removed the screen and discovered that everything underneath was covered in oil.
- Then he consulted with a specialist, and it turned out that the oil had penetrated into the distributor through the shank oil seal.
- This happened due to the fact that a small hole in the base of the carburetor was clogged.
- It refers to the engine crankcase ventilation system
- In this case, when idling, excess pressure arose in the crankcase.
- This pressure forced the oil through the oil seal into the distributor
- It is necessary to clean the hole and everything is in order, but doing this with your own hands is problematic, it is better to contact a service station
- The second reason for oil getting into the distributor is a worn oil seal.
- The oil seal needs to be replaced
Removal and installation
In order to easily repair the distributor, you must be able to remove it, and then (after repair) install it in place:
- Remove the negative cable from the battery terminal
- We disconnect the high-voltage wires from the distributor, as well as the vacuum hose coming from the vacuum corrector
- We find the cable holder going to the throttle valve drive and remove the cable from it
- Remove the bracket holding the wires, with studs and wires
- To do this, unscrew the nut (there is a washer under the nut, do not lose it)
- We put marks on the distributor body and the drive of auxiliary devices. If this is not done, then when installing the distributor in place you will no longer be able to maintain the starting ignition timing; you will have to adjust it
- There is a connector on the ignition distributor to which the wiring harness is connected. Press the latch with a screwdriver and pull out the wires
- There is a rubber plug in the clutch housing, remove it
- Rotate the crankshaft until the piston in the first cylinder is at top dead center
- The flywheel mark in the hole will coincide with the middle division on the housing scale
- Unscrew the nuts securing the distributor and remove it
- Install in reverse order
- When installing the ignition distributor back, make sure that its shaft is rotated so that the outer contact of the slider is opposite the terminal corresponding to the first cylinder
- The terminal is located on the cover
- Don’t forget to also align the marks and check the ignition timing
We disassemble the distributor
Before you start disassembling the distributor, you need to remember that each wire on its cover is installed in the sequence of operation of the cylinders (of which only the first is indicated, you need to install the others counterclockwise, while looking from the side of the plastic tank with antifreeze). If necessary, replace the cover or slider - dismantling the ignition distributor is not required. We repair the VAZ 2109 distributor with our own hands in the following sequence:
- Disconnect the high-voltage wires and remove the distributor from the car
- After unscrewing the fastening screws, remove the distributor cover, remove the slider, simply pull it up
- If there are traces of burning on it, rust on the external contact, or obvious wear is noticeable, the slider must be replaced
- In normal condition, the slider ideally fits tightly to the distributor shaft
- Leaf spring (2 in photo below) ensures good contact
- If the spring is weakened, broken or deformed, change the slider
- Measure the resistance of the resistor (it is designated by number 3), it should be 1 kOhm
- Otherwise, install a new slider
What does the distributor consist of?
A device such as a distributor includes a large number of different parts. It is not the purpose of this material to consider their purpose, but you can see what components the distributor consists of in the figure below
As can be seen from the figure, the distributor consists of several independent units. And if the purpose and operating principle of the voltage distributor unit are simple and clear, then you can familiarize yourself with the work of others in more detail. However, it is advisable to check the condition of the high-voltage distributor and slider each time the car is serviced.
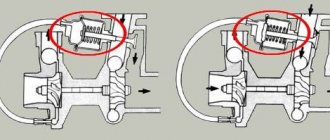
Centrifugal regulator
Such a device determines the moment when fuel assemblies begin to burn in the engine cylinders. As already noted, a spark initially appears when the piston reaches the TDC position, and it is at this moment that the distributor is initially adjusted. However, two points need to be taken into account:
- Combustion of fuel assemblies occurs at a constant speed, starting from the spark plug and then spreading further throughout the volume of the cylinder. Combustion does not occur instantly, and the greatest efficiency of a gasoline internal combustion engine is achieved when the piston has passed TDC and reached BDC (bottom dead center).
- When the engine is running, the crankshaft speed changes; increasing it reduces the time required for efficient combustion of the fuel assembly.
To eliminate this contradiction, the concept of CVD is introduced, which implies the start of fuel combustion before the piston reaches TDC. The device that ensures the formation of the UOZ is a centrifugal regulator, shown in the figure; it consists of weights connected by springs and a plate.
Its operating principle is based on centrifugal force; an increase in crankshaft speed causes the weights to diverge, and through the plate - a change in the position of the cam and the runner. This will cause the contacts to open sooner and will also cause high voltage and spark to occur earlier. The fuel assembly will ignite when the piston position has not reached TDC, which will ensure its efficient combustion.
Distributors from different manufacturers have a similar adjustment of the fuel assembly ignition moment, including in VAZ 2109, 2106, 2107, 2108.
Vacuum regulator
Such a device is designed to change the SOP when the engine load changes, determined by the position of the throttle valve. The following figure will help you understand how this is done:
The vacuum regulator is a closed cavity separated by a diaphragm. One of the cavities is connected to the carburetor. The vacuum created in it, depending on the position of the throttle valve, causes the diaphragm to move. A change in its position is transmitted through the rod to the movable disk, which affects the position of the breaker cams, adjusts the time of its operation (earlier or later), and, accordingly, the ignition time of the fuel assembly.
Thus, the distributor, depending on the load on the engine, changes the moment of spark formation, affecting the characteristics of the engine. This adjustment is present in all VAZ 2109, 2106, 2107, 2108 cars, and the joint operation of the described regulators can ensure efficient engine operation over the entire range of loads and crankshaft speeds.
Octane corrector
This device allows you to mechanically change the OZ depending on the fuel used (octane number) or its quality. You can see the corrector in the figure below.
In fact, these are two plates, one is installed on the distributor and has an arrow, the other is attached to the engine, and there are marks on it. By changing their position in relation to each other, you can mechanically set the desired ignition angle. This is required mainly when using different types of gasoline.
Contact distributor
All models and modifications of Zhiguli were equipped with contact type distributors until the early 90s of the last century. A distributor with serial number 30.3706 was installed on the VAZ 2107.
Design of contact breaker-ignition distributor 30.3706
The contact distributor consists of the following elements:
- frame;
- rotor (shaft);
- slider (rotating contact);
- contact breaker;
- capacitor;
- centrifugal and vacuum ignition timing regulators;
- cover with main (central) and four side contacts.
Housing and shaft
The base of the device is cast from aluminum. A cermet bushing is pressed into its upper part, playing the role of a support bearing for the distributor shaft. The side of the housing is equipped with an oiler through which the bushing is lubricated in order to reduce the friction force. The lower part of the shaft (shank) has splines for connecting additional engine elements to the drive gear. With their help it is set in motion.
Runner
A slider is installed at the top of the rotor. It is made of plastic and has two contacts connected through a resistor. Their task is to receive voltage from the coil through the central electrode and transfer it to the side contacts of the distributor cap. The resistor is used to eliminate radio interference.
chopper and capacitor
The breaker mechanism includes a group of contacts and a cam with four protrusions. The contacts are fixed on a movable plate, the rotation of which is ensured by a ball bearing. To be able to adjust the gap between the contacts, one of the mounting holes is made in the form of an oval. The moving contact is located on a spring-loaded lever. The other contact is stationary. In a calm position they are closed.
The cam is the thickened part of the shaft. Its protrusions serve to actuate the moving contact. When the breaker-distributor shaft begins to rotate, the cam with one of its protrusions rests against the movable contact block, moving it to the side. Then the protrusion passes the block and the contact returns to its place. This is the simple way to close and open the low voltage circuit in the contact ignition system.
Despite the fact that the voltage on the contacts is small, when they open, a spark is still formed. In order to eliminate this phenomenon, a capacitor is installed in the breaker circuit. It is attached with a screw to the distributor body.
Centrifugal regulator
The primary adjustment of the moment of spark formation in VAZ 2107 cars is carried out by turning the entire distributor . Further adjustments are made automatically. The function of the centrifugal regulator is to change the ignition timing depending on the number of engine crankshaft revolutions.
The basis of the mechanism design is the support and drive plates. The first is soldered to a bushing that is movably fixed on the distributor shaft. It can rotate relative to the shaft with an amplitude of 15°. On top it has two axles on which weights are installed. The drive plate is mounted on the upper end of the shaft. The plates are connected to each other by two springs of different stiffness.
When engine speed increases, centrifugal force also increases. It first overcomes the resistance of a softer spring, then a stiffer one. The weights rotate on their axes and rest against the support plate with their side protrusions, causing it to rotate together with the slider to the right, thus increasing the ignition timing.
Vacuum regulator
The vacuum regulator is attached to the distributor body. Its role is to adjust the ignition angle depending on the load on the power plant. The design of the device consists of a reservoir, a membrane with a rod located in it, as well as a hose through which the regulator is connected to the primary chamber of the carburetor.
When a vacuum appears in the carburetor, it is transmitted through a hose to the reservoir of our device. A vacuum is created there. When this happens, the membrane moves the rod, and it acts on the rotating breaker plate, turning it counterclockwise, increasing the ignition timing.
Contact type distributor malfunctions and their symptoms
Taking into account the fact that the distributor is a rather complex device, it is subject to the influence of a number of negative factors that can damage the elements of its design. That is why the distributor can have a lot of malfunctions. Well, as for common device breakdowns, they include:
- electrical breakdown of the lid;
- wear of the central electrode or side contacts of the cover;
- burning of the slider contacts;
- electrical breakdown of the capacitor;
- violation of the gap between the contacts of the breaker;
- wear of the moving plate bearing.
How to check the distributor
The most common manifestations of an ignition malfunction will be as follows:
- floating idle;
- engine that won't start;
- engine stalling while driving.
Most often, the cause of this may be the distributor. The easiest way to check the performance of the ignition, including the distributor, is as follows. To do this, unscrew the spark plug, bring it to the engine and start it, observing the appearance of a spark. If it is not there, then you need to check the functionality of the high voltage wires. If there is no spark again, then the diagnosis is clear - the distributor has failed.
In this case, you need to visually check the condition of the slider, the condition of the contacts and the distributor cover. Burnt contacts are cleaned and dust and debris are removed from the internal surfaces of the distributor. In a workshop or garage, you can check the performance of the ignition and distributor using measuring instruments and indicators.
The distributor appeared on the car almost simultaneously with the gasoline engine, and for many years remained almost unchanged, including on domestic cars of the 2109, 2106, 2107, 2108 family. And only after the advent of a modern element base, which includes the Hall sensor, gave way to contactless and then microprocessor ignition systems. » alt=»»>
Ignition malfunctions of the VAZ 2107, regardless of the type of system itself (contact or non-contact), are often associated with a distribution switch (distributor). Despite its complex electromechanical design, almost any breakdown can be fixed with your own hands.