To replace the timing belt on a Ford Fusion, the car owner will have to perform a number of dismantling works. This is necessary to free up the working area near the gas distribution system. The technical work itself will take from 2 to 3 hours. Any mistake or inaccuracy in the actions of the motorist can lead to complete engine failure, which will subsequently require expensive repairs. Therefore, it is extremely important to strictly follow all technical instructions.
When should you replace?
The Ford Fusion was developed with a focus on the European market.
As you know, the climate there is quite mild, the quality of fuel and roads is excellent, which cannot be said about our country. That is why the maintenance schedule will not correspond to that specified by the manufacturer. Ford says that the timing belt should be replaced every 160,000 km. In our conditions, it is better to reduce the interval to 100,000 km. Many people often have a misunderstanding about how climatic conditions can affect the timing belt. In fact, everything is simple, because in the winter the engine may not start immediately and you have to turn the starter longer. This puts increased stress on the cold belt, which ultimately breaks down faster. Moreover, even with low mileage, the belt may fail if the Ford Fusion is used in large cities where there are always a lot of traffic jams.
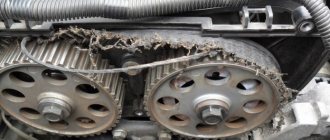
Under no circumstances should you ignore the replacement, as this can lead to irreparable results. If the belt is worn out and continues to work, it may break. For a car, such a breakdown very often means bending of the valves and damage to the pistons. This breakdown can only be corrected by overhauling the FordFusion engine, the cost of which is very high.
As you understand, you should not waste time and money on replacing the timing belt. Moreover, the cost of such an operation is quite low. At the same time, you can install new belts for the air conditioner, pump, generator, etc.
In what cases is replacement necessary?
When should you change your timing belt? This replacement question has come to the mind of every Ford Fusion owner. And not for nothing, because the gas distribution mechanism is a very important component of the vehicle. If the timing belt is not changed in time, it may simply break, making it impossible to operate the vehicle. So when should you change? The timing of replacement is written in the service manual for the car.
Ford Fusion car
The manufacturer recommends changing the strap at least once every 160 thousand kilometers.
However, domestic dealers advise Ford Fusion car owners to do this at least every 120, or even 100 thousand kilometers. But sometimes an element needs to be changed earlier. When? In the following cases:
- if the timing belt has already worn out enough and this is visible on its outer surface;
- It’s time to change it when cracks appear on the strap (this is especially noticeable when you bend it);
- when oil traces began to appear on the part;
- it needs to be changed when other defects are visible on the surface of the element (for example, the strap has begun to peel).
Loading …
Replacement instructions
Preparing the tools
To replace the timing belt, you will need:
- star key;
- set of wrenches;
- screwdrivers;
- set of heads;
- torque wrench.
Stages
To carry out the replacement work you will need an assistant:
- First, jack up the front right wheel and remove it. After this, remove the motor protection and lift it slightly by placing a support.
- Using an asterisk wrench, unscrew the screws that secure the fender liner and remove it. Using a screwdriver, unscrew the screws of the boot, behind which the crank pulley disk is hidden.
- Unscrew the screws on the air filter housing. When this is done, pry up the clamp and move it aside, then remove the air pipe. Remove the filter cover.
- Using a socket wrench, unscrew the screws that secure the antifreeze reservoir and remove it. You will also need to dismantle the reservoir containing the power steering fluid.
- Using a socket wrench, unscrew the motor mount nuts, as well as the screws that secure it to the body. The motor mount can be removed. After this, unscrew the screws securing the antifreeze pump. Then unscrew the generator mounting screws and remove the device or turn it slightly to the side.
- Now you need to remove the nine screws that secure the strap cover. The protective cover can be removed. Then, when the motor mount is removed, unscrew the screws that secure it and move the bracket to the side.
- Next, remove and move aside the high-voltage spark plug cables. Unscrew the plastic air filter guides. Also remove the screws that secure the valve cover. The spark plug of the first cylinder must be removed and a plastic tube (at least 25 cm long) inserted in its place. Now you need to turn the crank pulley disk clockwise, while watching the movement of the tube. The piston of the cylinder on which the tube is installed must be set to the top dead center position.
- Then you should unscrew the plug screw, which is located in the area of the engine fluid drain hole. A 4.5 cm long screw should be inserted in its place. In this case, the crank pulley should be turned, and the screw itself should be turned until the crankshaft hits it. The distribution pulleys must be secured with metal plates.
- Now put an assistant behind the wheel and turn on first gear, while the assistant's foot should be on the gas pedal. When this happens, the crank pulley disk screw should be unscrewed. Having done this, the disc can be removed, after which remove the lower timing belt guard. Then the unscrewed crank pulley screw must be tightened again and the pulley turned clockwise until it rests against the fixing screw (turn on neutral speed).
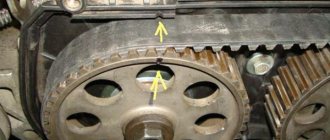
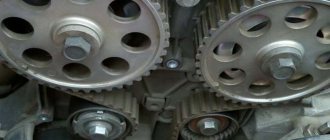
- Marks must be made on the sprockets of the timing pulleys and the mechanism strap, as well as the strap and sprocket of the crank pulley.
- Unscrew the screw securing the roller and remove it. The marks from the old strap should be transferred to the new one.
- Next, you need to install a new element. Pay special attention to all the marks: they must be aligned not only on the strap, but also on the pulley gears. Press out the roller and pull the strap over the teeth.
- Now you need to reinstall the lower part of the protective casing. Mount the pulley, then tighten the screw. Be careful when doing this as there is a risk of bending the fixing screw, so do not use too much force.
- Next, you will need to turn on the first speed. Having done this, unscrew the fixing screw, and then remove the plate, which also served as a lock. Once this is done, you can tighten the crank pulley screw all the way. Here you will need a torque wrench to calculate the torque correctly. The tightening torque should be 45 Nm, after which the screw must be tightened again by 90 degrees.
- Make a few revolutions of the crank pulley and again set the piston to the highest point. At this point, in principle, all the main work is completed. Carry out all steps for assembling the units in reverse order.
As you can see, the task of replacing the timing belt on a Ford Fusion is quite labor-intensive. There are many procedures that must be followed before you can get to the part you are replacing. Therefore, decide immediately - are you able to do this? Can you do everything yourself? Or perhaps it makes sense to turn to professionals for help?
Changing the belt yourself
First you should prepare all the necessary tools and consumables.
- Place the machine on a level surface.
- Raise the front part with a jack and remove the right wheel.
- Now you need to remove the straps of the air conditioner and other devices.
- After this, the generator is removed and the expansion barrel is dismantled. It does not have to be removed from its mounts, but can only be moved slightly.
- We place a support under the motor. It must be reliable.
- We unscrew the bolts securing the engine to the mudguard. After this, remove the front axle support.
- Unscrew the necessary bolts and remove the water pump pulley.
- We unscrew the 3 bolts and remove the support bracket on which the suspension is mounted.
- We remove the timing case. Here you will have to unscrew a few bolts. We put the car in neutral and unscrew the crankshaft to the desired level.
- Remove the plug from the cylinder block and install the retainer. At this time, the crankshaft must be constantly turned until it comes into contact with the rod.
- The camshaft should not rotate, so it must be fixed. This is done using a device that must be inserted into the grooves. In this case, pay attention to the coincidence of the marks.
- We put the car on the handbrake to fix the crankshaft.
- Remove the crankshaft pulley. It is better to replace the bolt securing it with a new one.
- Loosen the tension roller and remove the timing belt.
- When there is no belt on the crankshaft, it should not spin. Pay special attention to this. Otherwise the valves may become deformed.
- Now we put on the new drive and do the rest of the assembly in reverse order.
Installing a timing belt on FORD Fiesta, Fusion
Note: DO NOT install a used belt. When installing the belt, the engine must be COLD.
- Install:
- Tensioner roller.
- Tensioner pulley bolt (9). Hand tighten the bolt.
- Place the timing belt onto the sprockets and pulleys without tension.
Note: Make sure the arrow on the belt points in the direction of rotation.
- Install the right engine mount bracket.
- Tighten the bolts securing the right support bracket to the engine. Tightening torque: 60 Nm.
- Install the right engine mount.
- Tighten the right engine mount bolts and nuts. Tightening torque: 48 Nm.
Note: Install new engine mount nuts only.
- Install the power steering reservoir.
- Insert the installation device for the THVD pulley “12”. Special tool No. 303-732 (21-260).
Note: If there is no hole in the rear bracket, make sure the holes in the sprocket and cylinder block are aligned "13".
- Remove the THVD pulley installation device (12).
- Install the camshaft sprocket retainer (7).
Note: Make sure the crankshaft sprocket key is at the 11 o'clock position.
- Install:
- Sensor rotor (11).
- Crankshaft sprocket bolt (3). Hand tighten the bolt.
- Insert the crankshaft adjuster (8).
- Put on the timing belt.
- Turn the tensioner pulley counterclockwise until the pointer is aligned with the opening (14). Use a hex wrench.
- Tighten the tensioner bolt to 30 Nm (9).
- Remove:
- Crankshaft installation tool (8).
- Camshaft sprocket lock (7).
- Install the timing belt guide (10).
- Slowly turn the crankshaft ten turns clockwise.
- Insert the crankshaft adjuster (8).
- Make sure the camshaft sprocket retainer can be installed (7).
- If the fastener cannot be installed: Repeat the installation procedure.
- Remove the crankshaft adjuster (8).
- Make sure that the injection pump pulley installation tool can be installed (12).
Note: If there is no hole in the rear bracket, make sure the holes in the sprocket and cylinder block are aligned (13).
- If not: Repeat the installation procedure.
- Remove:
- Camshaft sprocket lock (7).
- Injection pump installation device (12).
- Crankshaft pulley bolt (3).
- Install:
- Lower timing belt cover (5).
- Flywheel lock (2).
- Crankshaft pulley (4).
- Crankshaft pulley bolt (3). Use a new bolt. Tightening torque: 30 Nm + 180°
- Remove the flywheel retainer (2):
- Install the parts in the reverse order of removal.
- Fill and bleed the cooling system.
Replacing the timing belt and its tension roller Ford Fusion 2002-2012
According to the manufacturer's recommendation, the timing belt must be replaced after 60 thousand kilometers or every 6 years of operation (whichever comes first).
In addition, replace the camshaft drive belt if, upon inspection, you find: – traces of oil on any surface of the belt;
– traces of wear on the toothed surface, cracks, undercuts, folds and peeling of fabric from rubber;
– cracks, folds, depressions or bulges on the outer surface of the belt;
– fraying or delamination on the end surfaces of the belt.
A belt with traces of engine oil on any surface must be replaced, as oil quickly destroys rubber. The cause of oil getting on the belt (usually a leak in the crankshaft and camshaft seals) must be eliminated immediately.
Carry out the work on an inspection ditch, overpass or, if possible, on a lift.
You will need: special devices for blocking the camshafts and crankshafts and the tension roller of the timing belt, a 10 socket wrench, 8, 13 socket wrenches or socket heads, 18 socket wrenches and TORX E8.
1. Raise the front of the vehicle and place it on a secure support. Remove the right front wheel (see “Replacing a Wheel”).
4. Remove the power steering pump drive belt by cutting it with a knife.
5. Remove the accessory drive belt by cutting it with a knife.
According to the manufacturer's recommendations, the drive belts for auxiliary units and the power steering pump should be cut with a knife for removal, after which they become unusable. This is explained by the fact that both belts, even after removal without damage, cannot be reused, since they are designed only for one-time stretching when put on pulleys (belt tension adjustment is not provided). In addition, the replacement of belts is regulated after a certain mileage or service life, therefore, when replacing the accessory drive belt, the power steering pump drive belt should also be replaced at the same time.
6. Remove the bolt securing the expansion tank...
7. ...pry the latch with a screwdriver, remove the expansion tank from the bracket and move it to the side.
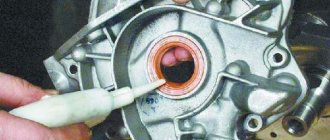
9. Unscrew the plug located in the front part of the cylinder block on the right, and screw the locking rod into the opened hole until it stops against the crankshaft. Carefully rotate the crankshaft by the bolt securing its pulley until the shaft stops with the locking rod.
10. Secure the camshafts from turning by installing the locking plate in the special grooves in the rear of the camshafts.
11. Remove the crankshaft pulley bolt.
The crankshaft pulley mounting bolt is tightened with a large torque. In order to prevent the crankshaft from turning, engage 5th gear, press and hold the brake pedal (an assistant should do this).
12. Remove the bolt...
13. ...and remove the crankshaft pulley.
14. While holding the water pump pulley from turning with a screwdriver, loosen the four bolts, moving the screwdriver one at a time. Then remove the bolts completely...
15. ...and remove the water pump pulley.
16. Remove the nine bolts securing the upper cover of the timing gear drive and remove the cover.
This is where the mounting holes for the top cover are located.
17. Remove the three bolts of the lower timing cover...
18. ...and remove the cover.
19. Remove the right power unit mount (see “Replacing the power unit suspension mounts”).
20. Unscrew the two side bolts securing the bracket for the right suspension support of the power unit...
21. ...in the same way, unscrew the two front bolts and remove the bracket.
22. Loosen the tension of the timing belt by using a finger or a screwdriver, overcoming the force of the spring, turn the movable roller bar clockwise until the holes in it and the roller bracket align. Insert a pin of a suitable diameter into the hole, fix the roller...
23. ...and remove the timing belt.
Do not turn the crankshaft with the timing belt removed, as the pistons will damage the valves.
24. Unscrew the bolt securing the tension roller and remove it.
If you disassemble the timing mechanism drive only to replace the tension roller, the drive belt does not need to be removed.
25. Install the roller in the reverse order of removal, having first secured it with a bit.
Place the new belt on the exhaust camshaft timing belt. Pull the drive belt and place it on the intake camshaft sprocket. Next, tension the drive belt and place it on the crankshaft timing pulley. Place the driven part of the belt behind the tension roller.
26. Install the lower and upper timing belt covers and the crankshaft pulley. Tighten the crankshaft pulley mounting bolt in two stages:
1st - tighten the bolt to a torque of 45 Nm (4.5 kgfm);
2nd - tighten the bolt 90°.
27. Remove the camshaft retaining plate.
28. Remove the crankshaft retaining bolt from the hole in the cylinder block.
29. Engage neutral gear in the gearbox, rotate the crankshaft two turns and stop it, not bringing it to TDC by approximately 20°.
30. Screw the fixing bolt into the hole in the cylinder block and carefully tighten the crankshaft until it is secured with the bolt.
31. Install the locking plate on the camshafts. If the device was installed without difficulty, the camshaft drive belt is installed correctly. If the device cannot be installed (the valve timing is shifted), remove the belt, install the fixing device and repeat the belt installation as described above.
32. If the timing belt is installed correctly, remove the retaining plate from the camshafts, unscrew the retaining bolt from the hole in the cylinder block, replace the plug for this hole, tightening it to a torque of 20 N·m (2.0 kgf·m), and Install all previously removed parts in the reverse order of removal.
Dangers of Timing Belt Wear
Problems with this element can lead to serious consequences. With shifted valve timing, the fuel in the cylinders does not burn completely, enters the exhaust system and causes melting and complete destruction of the catalyst. One of the signs of a problem is popping noises when the engine is running and smoke from the exhaust pipe. Due to a worn belt, fuel consumption can also increase while reducing the power characteristics of the engine.
In very advanced cases, the timing belt may break. As a result, the synchronization of the operation of the pistons and valves is disrupted; the pistons hit the valves and bend them. This is already a major overhaul of the engine with the replacement of valves, connecting rods, and possibly the camshaft.
Design features
The specifics of servicing the timing belt of an American subcompact minivan directly depend on which Ford Fusion engine is installed on a particular modification. There are several options:
- gasoline, naturally aspirated Duratec lines (Sigma modification (aka Zetec-SE) with a volume of 1388 cm3, a power of 80 hp (59 kW) and a volume of 1596 cm3, a power of 100 hp (74 kW));
- diesel, turbocharged Duratorq (1.4 and 1.6 “Tiger”, models DLD-414 with a volume of 1398 cm3, power 67 hp (50 kW) in the eight-valve version and DLD-416 (modification DV6 ATED4), sixteen-valve , volume 1560 cm3, power 90 hp (66 kW)).
All power units are in-line and equipped with a timing belt drive. In Russia, gasoline engines are the most widely represented.
When to change the timing belt on a Ford Fusion
The timing belt on a Ford Fusion must be replaced taking into account the regulations or as the unit wears out. It is advisable to monitor the condition of the belt drive, since it can wear out noticeably faster than the stated period (reasons: poor quality, old rollers, aggressive driving style, etc.). Since the consequences of a cliff are very serious, it would be better to simply prevent it.
In the case of timing belts, the principle “the more often (replaced), the better” applies; an interval of 90-160 thousand km is not always sufficient
The manufacturer in the instruction manual indicates a period of 160 thousand km, but in practice it should be half that. The more aggressive the driving style, the older the car, or other unfavorable factors, the more frequent maintenance should be.
Important! It is useful for every motorist to have a universal diagnostic device at hand (including for monitoring the condition of the timing belt).
You should not delay servicing if the unit is worn out or contains characteristic defects (they are visible to the naked eye). If there are cracks, a new one is installed immediately. An alarming symptom is the presence of oil stains.
When and why to change?
The belt drive gradually wears out and then needs to be replaced. You can do it either in a service center or with your own hands. This article will be of interest to those who want to do everything themselves. In addition to some cost savings, replacing it yourself will help you gain experience in repair work, which is so necessary for every car enthusiast.
This is not to say that replacing a belt can be simple and quick. The process is quite complicated, but still doable. If you show a little diligence and follow these instructions exactly, you can replace the belt yourself. But if you don’t have complete confidence in your own abilities, then at least ask someone more experienced to help you.
To replace the belt, you will need a set of tools and accessories:
- new consumables (belt, pump, seals, tension roller);
- torque wrench;
- other keys;
- shaft clamp;
- jack;
- screwdrivers with different types of tips.
Another important issue is the frequency of replacement. Ford Fusion was developed by the manufacturer for European roads. The climate there is milder than in Russia, the quality of gasoline is better, so the interval from replacement to replacement may be reduced, depending on operating conditions. The manufacturer promises that the belt will work perfectly and will only have to be changed after 160,000 km. But this is in Europe, and in the conditions of Russian roads, this consumable will have to be changed after 80,000 - 100,000 km.
Some car enthusiasts are perplexed as to why climate affects the lifespan of a timing belt drive. Everything is explained quite simply: in winter, the car cannot be started immediately and you need to turn the starter. This puts additional load on the belt. And if we take into account that it is cold, this leads to a faster destruction of its structure. Operating a car in big cities also leads to faster belt failure. This is explained by long periods of standing in traffic jams.
If the belt has become unusable, it needs to be changed. Otherwise it will definitely break. A broken belt drive will cause the pistons to collide with the valves, which will lead to the bending of the latter. Pistons and cylinders will also be damaged from this collision. After this, the car will need major repairs. To avoid this, you need to periodically diagnose the condition of the belt drive and replace it with a new one, if necessary. Do not spare money and buy only high-quality consumables, as cheap ones will not last long. When examining the belt, pay attention to the condition of the rollers. If it is unsatisfactory, it is better to replace them too.
If oil leaks are found on the belt, this means that the seals also need to be replaced. Otherwise, oil will continue to drip onto the new consumable, which will certainly lead to its early failure, since the oil destroys the rubber.
Tips for choosing a belt
The manufacturer recommends using original-made consumables, but this option is not always available. Fortunately, there are enough companies on the market that produce worthy analogues:
- Balakovo is the only domestic manufacturer that can compete on equal terms with Western companies. Engaged exclusively in the manufacture of rubber products, hence the high quality.
- Bosch is a German company with a corresponding image. Bosch belts practically do not change their characteristics until scheduled replacement and work quietly in our conditions for 70,000-90,000 km.
- Lemforder is a division of the German company ZF, supplying consumables for Ford, Hyundai and Toyota. The product quality is appropriate.
- Hutchinson is a French manufacturer offering automotive consumables in the mid-price segment.
- AMD is an Asian company specializing in the supply of spare parts for GM, Hyundai, and Kia vehicles. AMD belts are known for their durability.
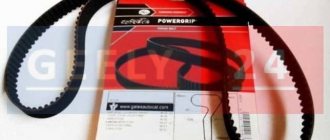
- Gates produces premium belts. All production of the company is concentrated in Europe.
You can change the timing belt yourself, provided you have the appropriate equipment. At a minimum, you will need a garage pit or lift, an installation spacer for pressing in the oil seals (as well as the new oil seals themselves), and wrenches with a set of replacement heads. In addition, our service technicians recommend changing the cylinder block cover gasket at the same time.
If you are not confident in your abilities, contact them - we have been servicing Ford cars for more than 10 years and will do everything quickly, efficiently and for a reasonable price. All the necessary parts for replacing the timing belt on a Ford Fusion are already in our warehouse. There is no need to search or buy anything - just come to the service at the agreed time. The average time for replacing a belt in our center is 1.5-2 hours.
List of all car service services and prices for themDownload price list If you do not know the nature of the breakdown of your car, we will help you figure it out. Leave a request and we will contact you to resolve the problem. Submit your application
Process Features
Replacing the timing belt on a Ford Fusion itself is not an easy task and should only be trusted to professionals. In this case, they will need to take a set of screwdrivers and other professional tools, as well as gain free access to all parts of the car in order to carry out all the necessary operations: unscrew or tighten the necessary bolts, position fasteners, remove damaged elements. During the procedure, other parts are usually replaced, for example:
- valve cover gaskets. This is a plate that protects the belt from leaks;
- crankshaft oil seal (crankshaft) and camshafts;
- timing belt tension roller;
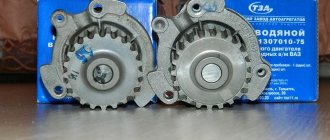
- cooling system pump, which is often the reason for replacing the timing belt on a Ford Fusion due to antifreeze leakage.
The specifics of the entire procedure practically do not change depending on the engine size of the car, so replacing the timing belt on a Ford Fusion 1.4 will be carried out in the same way as on a car with a 1.6-liter engine capacity.
In order for any car repair to be successful, be it timing belt repair, pulley adjustment, filter installation or any other operation, you should only contact an experienced professional service. An excellent example of such a company is Service 644. A team of competent specialists, armed with sufficient knowledge and skills, will help deal with any breakdown efficiently and quickly. Modern equipment, reasonable pricing policy and competent service - all these advantages always accompany our work. For any questions, you can contact our specialists who will provide you with the necessary assistance.
List of prices for locksmith work
Why might a belt break?
- Low quality materials. The belt consists of a cord (fiberglass threads), a layer of nylon and a protective rubber sheath. Some manufacturers skimp on the quality of rubber; as a result, the protective coating quickly cracks.
- Pump jammed. This unit is also driven by a timing belt and when it stops, teeth are cut off at the belt.
- Spontaneous lowering of the tension roller.
- Regular exposure of the belt to dirt, engine oil, and other technical fluids.
- Incorrect installation. If the belt is overtightened, excessive tension will cause it to wear out quickly. If the tension is weak, the teeth may slip.
- Defects in drive gears. Even minor damage to the teeth (chips, scuffs) can cause rapid wear of the fabric base and cord, which can lead to complete breakage.
Timing belt replacement process: tips and tricks
Replacing the timing belt on a Ford Fusion is not an easy task. But if you follow the algorithm below, you should be able to complete the task with ease:
- First of all, prepare the car: place it in a viewing hole, preferably indoors. A garage would be just fine.
- Next, place the car on a jack and lift the front of it. You need to fix it in this position, install the wheel chocks and remove the right wheel. This will provide direct access to the timing belt mounting element.
- Use a second jack to lift the engine. This needs to be done a few centimeters. Place a wooden block between the jack and the crankcase area. It will take all the force and will not damage the engine elements.
- Find the four nuts on the distributor cap and unscrew them. An air duct is attached to them, and a hose is also installed. Remove both parts and set aside. You will still need them in the future.
- There is a chip installed on the power steering tube. It needs to be dismantled.
- In addition, the expansion tank may also interfere with your problem. Loosen the fasteners that hold it in place and move it to the side.
- There is a plastic timing cover located on the inner right wheel bowl. It is attached with two bolts, so removing it should not be difficult.
- Next, climb into the car either yourself or ask a partner. It is necessary to put the gear in position No. 4 and depress the brake pedal. This will lock the mechanism in the desired position.
- Unscrew all nuts and studs that are installed on the engine. First make sure that the engine is properly and stable on the jack.
- Unscrew the bolts that secure the timing belt itself. After this, you can remove the cover by carefully sliding it under the power steering.
- Loosen the bolt as this will allow you to remove the timing belt tensioner. After this, remove the strap, being extremely careful that the pulleys do not move out of their positions.
- Make sure you have a spare belt and pulley kit with you during the above operations. Proceed with replacement starting with the idler roller, if your new kit has one.
- Once the elements have been replaced, you can begin reassembling the system. It starts with installing the belt.
- Please note that many manufacturers put an arrow on the belt. Its direction after installation must coincide with the direction in which the shaft rotates.
- Installing the belt has its own characteristics. First you need to tilt the roller and then thread the strap through it. Make sure all pulleys are installed correctly and will not interfere with system operation. It would be a good idea to evaluate the protrusions with a ruler or other measuring instrument. Even a minimal belt protrusion of a few millimeters is unacceptable.
- Make sure the belt has sufficient tension. This indicates that the timing belt assembly is installed correctly. If the belt sags under finger pressure, look for the hex socket. Use a wrench to achieve the correct tension on the belt.
- To completely complete the installation and ensure the mechanism is operational, engage fifth gear and depress the clutch. The marks should snap into place without play. Check the tension again, and then try to turn the belt perpendicularly. If you succeed, continue working with the hex socket.
Typically, replacing a belt on a Ford Fusion takes 1 to 3 hours. Be sure that the second time you will cope with this difficult task much more successfully and quickly. The main thing in this matter is to start.
Which one to choose: selection recommendations
It would seem that what’s difficult is to find the right part on the Internet and buy it? The answer lies on the surface - nothing. But a car’s timing belt is a complex system that consists of several interconnected elements. This brings us to the conclusion that it would be useful to select parts from the same company, or better yet, from the same series or model. For example, the German manufacturer Bosch offers several sets at once. You can choose a kit consisting of a belt and pulleys, a belt, pulleys and tensioners, or a complete kit complete with a water pump.
As you can see, this option immediately solves all the problems that relate to the compatibility and performance of parts. On the other hand, if you are an experienced driver and are able to choose a complete set of parts, then the choice is yours: original or analogue, expensive belt or cheap Chinese one. Let's give a simple example: you can purchase an original part from Ford, the cost of which is 25,000 rubles. Its counterpart with the SACHS logo costs half as much, while having the same quality characteristics. Accordingly, you pay extra for the Ford lettering embossed on the belt.
How to check the timing belt yourself
To check the timing belt, it is enough to remove the protective plastic casing and visually assess the condition of the part. The belt should be inspected completely, turning the crankshaft. To do this, you need to engage fifth gear and turn the suspended wheel. The surface of the belt should not have folds, cracks or detachments of rubber from the fabric base. The end parts should also be smooth, without delamination. The reverse side should not have any signs of burning or exposed cord threads. Pay attention to traces of engine oil - it is not uncommon for the crankshaft and camshaft seals to begin to leak.
Check Features
To diagnose the condition of the Ford Fusion timing belt, follow these steps:
- Remove the upper timing case.
- Inspect the belt for damage and defects. Replace if available:
— traces of lubricating fluid (oil) on the surface of the belt. The ingress of this liquid leads to destruction of the belt structure. The cause may be a leak in the camshaft and crankshaft seals. It is prohibited to leave such a problem without attention and repair; — traces of abrasion (wear) of the internal toothed surface. Undercuts, damage, cracks, folds - these and a number of other symptoms may be a reason to replace the belt; — traces of damage, cracks, folds, peeling on the outer part of the belt; — fraying of the end part.
- Check the tension quality. This is not difficult to do. Grasp the accessible part of the belt with your fingers (between the camshaft and crankshaft) and try to rotate it 90 degrees. If necessary, adjust the tension.
- Return the dismantled parts in reverse order.
Preparing for work
Before you begin the process of replacing the timing belt, you should prepare the necessary tools and consumables. As a precaution, you should stock up on double-layer rubberized gloves in advance. They will help protect the car owner’s hands from various injuries during technical work.
Necessary tools and materials to replace the timing belt on a Ford Fusion:
- set of spanners;
- Screwdriver Set;
- ratchet wrench with a set of replaceable heads;
- rags (preferably non-lint);
- new timing belt;
- new tension roller;
- new seals for pulleys;
- new gasket for cylinder block cover.
Ford company representatives advise car owners to purchase original consumables. However, if the car owner does not have the opportunity to do this, then you can use consumables from third-party manufacturers.
Reputable third-party timing belt manufacturers:
- Dayco - this company's timing belts are the most durable. The average service life of this company's consumables ranges from 120 to 155 thousand kilometers. The price varies from 890 to 1500 rubles. In auto parts stores they are sold as a set with tension rollers.
- Febi is a little-known brand, but the quality of the components produced is very high. The timing belt from this manufacturer is sold as a set along with tension rollers. The average cost is about 1,000 rubles, and the minimum service life varies from 85 to 95 thousand kilometers.
- Maxgear is a well-known European manufacturer of consumables for timing systems. The average price for products varies between 950 and 1100 rubles.
- Bosch - produces consumables with an optimal price-quality ratio. The average cost of products ranges from 800 to 920 rubles.
- Lemforder is one of the best manufacturers. The average price for consumables from this company varies from 1250 to 1780 rubles.
- Balakovo is a domestic manufacturer of consumables and components for timing systems. The products of this company are one of the best in terms of price and quality in the domestic auto market. The average price for consumables is 800 rubles.
It should be taken into account that in most cases, when changing the timing belt, you will also have to replace the tension rollers. As practice has shown, the service life of the original tension rollers does not exceed 75 - 85 thousand kilometers. In view of this, it is best to purchase in advance a set of belt tensioners from the manufacturers: Dayco, Gates, Ruville or original tension rollers from Ford.
Need for replacement
According to technical regulations, the frequency of replacing the timing belt on a Ford Fusion should be from 85 thousand km to 95 thousand km. The manufacturer deliberately changed the technical regulations for cars exported to the Russian Federation.
Therefore, if a motorist purchases a car from Europe or the countries of the former CIS, then their technical regulations will indicate that consumables must be updated every:
Related Posts
- Jamming traffic police cameras is an easy way to save on fines
- 140,000 km when driving around the city;
- 125,000 km of mileage when operating the car off-road.
Signs indicating the need to replace the timing belt:
- Cracks on the surface of the belt;
- Tread wear (internal teeth on the belt);
- Delamination of the inner surface of the belt;
- At high engine speeds, dips appear or knocking noises are heard.
If the above symptoms are detected, the timing belt must be changed immediately. In most cases, they appear before the belt breaks, causing the pistons to press into the cylinders.
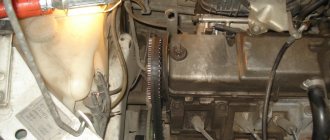
Where is the timing belt located on a Ford Fusion
Finding the timing belt drive is easy - just open the hood of the car. The rubber toothed assembly that covers the set of pulleys will be immediately visible. Detailed information on replacement can be found in the instructions. Technologically, the timing chain engages the camshafts, crankshafts, and affects a set of auxiliary mechanisms. This principle of operation reduces the service life of the unit - it is susceptible to wear.
There are no effective ways to extend the timing belt service life, other than purchasing high-quality parts.
Timing Belt Replacement Procedure
Replacing the timing belt on a Ford Fusion has its own nuances. If on 1.4 and 1.6 liter gasoline engines there are no problems with access to the mechanism, then on versions with diesel power units there is a rather complex hybrid system, next to which the supercharger turbine is located. In general, the belt replacement process looks like this:
- The crankcase protection and the right wheel with fender liner are removed. Please note that the fender liner is mounted on aluminum bolts, so excessive force can lead to their destruction.
- The air filter pipe is removed, the coolant container and the power steering fluid container are dismantled.
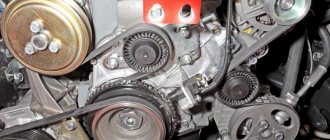
- The generator is removed, after which access to the casing opens.
- The fastening bolts are unscrewed, the plastic casing is removed and the tension roller is unscrewed, after which the old belt can be safely removed from the shaft.
The design of Ford Fusion engines is such that to install a new belt, you need to remove the cylinder block cover. In addition, you will have to remove the ignition coils. The camshaft is fixed with a special bar, the same procedure is performed for the crankshaft, where the stopper is a special screw. Fixing the shafts allows you to save marks, which will subsequently ensure normal operation of the valve timing system. After installing the new belt, the locking bar is removed and the power unit is reassembled.
Replacing the timing belt on a Ford Fusion is accompanied by replacing the tension roller and camshaft seals. The oil seals need to be changed because oil from old seals can get on the belt, which will sharply reduce its service life. Simultaneously with replacing the belt, our specialists check the condition of the valve cover gasket and pump.
Ford Fusion 2007 l. With. - with your own hands
Ekaterinburg
Ford Fusion, 2006
330 000 ₽
Voronezh
Ford Fusion, 2008
270 000 ₽
Moscow
Ford Fusion, 2007
309 000 ₽
Ivanovo
Ford Fusion, 2005
150 000 ₽
See more cars on Drome
Participate in the discussion can only registered users.
Login Register
Self-replacement of the timing belt on Ford Fusion 1. and 1.6
The process of replacing the timing belt on a Ford Fusion can be divided into two stages:
- removing the old timing belt;
- installation of a new one.
As a rule, two types of engines are installed in cars of the Fusion model range: gasoline (1.4 or 1.6 liters in volume) and diesel (1.4 liters in volume).
If there are no questions about gasoline engines, since their design is the same, then with a diesel engine not everything is so simple. The fact is that the diesel engine is equipped with a 90 l/s turbocharger, which is located next to the timing system. Plus, due to the fact that Ford engineers use a hybrid timing system in diesel engines, their maintenance becomes extremely difficult.
Duratorg TDCI diesel engine installed on Ford Fusion
Now let’s take a closer look at the process of maintaining the timing system on a Ford Fusion.
Removing the old belt
According to technical regulations, all work must be carried out exclusively on an overpass or garage pit, so that’s what we do. We park our car on the overpass and get to work. You need to immediately accept the fact that the first stage of work will take at least 1.5 hours. This is provided that the car owner works quickly enough.
Step-by-step instructions for replacing the camshaft belt:
- First of all, remove the crankcase protection. Then we install a guide with cables above the engine compartment to lift the engine. If the car owner does not have one, then you can use a jack.
- Now remove the front right wheel and fender liner. It is worth considering: the fender liner is secured with six Torx bolts. They are made of aluminum, so you should be extremely careful when unscrewing them. If you apply excessive force, the threads on them can be stripped.
- To remove the timing belt guard, you need to dismantle the air filter pipe and its casing. Then remove the coolant tank and the power steering fluid tank. Unscrew the bolts of the generator and remove it.
- Remove the right engine mount. It is attached at six points using 3 nuts and 3 screws.
- Now unscrew the 8 bolts around the perimeter of the belt protective casing and remove it.
- Unscrew the tension roller, and then remove the camshaft belt.
It is necessary to take into account: the timing belt protective cover on the 1.4 engine is secured with 8 bolts, and on version 1.6 - with 12 bolts. On a diesel engine, the belt guard is secured with 10 bolts.
This completes the first stage of work. In order to begin the second part of the work, it is best to call an assistant. Otherwise, you will have to spend about 2 more hours of work.
Work order
The process of replacing the timing belt on Ford Fusion 1.4 and 1.6L is quite labor-intensive and complicated. This involves many additional operations to remove individual engine components to get to the timing belt.
Plus, replacing the timing belt requires special devices for fixing the crankshaft and camshafts. And if you take into account the fact that the crankshaft pulley does not have a seat key to secure it, then errors are possible when replacing it even at a regular service station.
Attempts to independently replace the timing belt on these engines without appropriate experience, knowledge of their design and the absence of special clamps most often end in bent valves or broken valve plates, and complex and expensive engine repairs.
It is recommended to replace the tension and parasitic rollers at the same time as the timing belt.
In our Ford service centers, timing belt replacement is performed by experienced, qualified mechanics who have undergone additional training in a specialized department and have thoroughly studied all the features of servicing and repairing Ford engines.
Quite often, Ford Fusion owners find out what a timing belt is when it’s too late, after it breaks. However, this is a very important part, which is part of the gas distribution mechanism, connecting the shafts and causing them to move. It is located on the left side of the engine, along the body. For its production, high quality rubber is used. The inner part of the belt has special teeth, since it is worn simultaneously on several rollers. For some reason, it may fail and become unusable, which is the reason for replacement. Today we will talk about how to replace the timing belt yourself, when it needs to be done and what consequences may arise for the Ford Fusion if this process is ignored.
Replacing a timing belt is quite a complicated matter and takes a lot of time. To be fair, it is worth noting that not everyone is capable of such work. If you are confident in your abilities, then proceed with the replacement, otherwise ask someone more experienced to help. Moreover, if this is your first time doing this, then it is better to put the Ford Fusion in the garage and set aside a day for its maintenance. Replacement will require you to have a certain set of tools and spare parts, among which are:
- Timing belts, generator, pumps.
- Tension roller.
- Crankshaft pulley bolt (40 mm long).
- Torque and set of other wrenches.
- Bolt for aligning the crankshaft at TDC and using it as a mark.
- Device for fastening the crankshaft flywheel.
- Device for fixing shafts.
- Torque wrench.