With the onset of cold weather, the main task of every motorist is to create warm and comfortable living conditions in the car. After all, you will agree that it is much more comfortable to drive in a warm car than to be cold. However, if heat is not supplied, then it is necessary to figure out what could be causing this. In this article I want to talk about repairing the Kalina stove switch.
Main causes of malfunctions
So, what should we do if heat does not flow inside our car and cold air blows. Let's consider the main causes of such malfunctions:
- Failure of the Kalina heater switching control cable. The reason for such a malfunction may be that the latch has fallen off, and the cable stretches normally in one direction, but does not reach the opposite direction.
- On Kalina, the stove only works at speed 4. Associated with a broken thermistor.
- On a Kalina car, the heater switch often breaks when turned on abruptly, which is due to insufficiently strong plastic.
Here is a list of the main breakdowns that may occur. Next, we move directly to the repair itself and replacement of failed parts.
Heater radiator repair
It’s worth paying attention right away to change Kalina’s stove - you need to do a very labor-intensive task. The manufacturer of this car provides a proprietary manual that describes repairs for the most common breakdowns. Replacing the radiator is included in the instructions
Replacing the radiator is included in the instructions.
Craftsmen have developed their own loophole on how to carry out repairs without significant expenditure of effort and time. But when replacing the Kalina stove, you will need to cut out a piece of the housing under the casing so that you can remove the radiator without disassembling the dashboard.
Repair and replacement of faulty parts
Many novice motorists ask questions: how to remove the heater regulator on Kalina, what LED is in the heater switch on Kalina, what should be done when the heater mode switch on Kalina does not work. Answering these questions, I want to say that initially it is necessary to dismantle our entire mechanism, after which we proceed to disassembly according to the following scheme:
- First of all, disconnect the negative terminal from the battery. This is done to de-energize the system so as not to short-circuit any of the sensors during the disassembly process.
- We remove the radio and turn off the power coming from the wiring harness.
- We remove the damper switch lever, then remove the temperature regulator and the air flow distribution regulator.
- At the bottom, remove the plugs behind which there are 2 screws, unscrew the fastening screws and gradually begin to remove the instrument panel console.
- After our panel is removed, it is necessary to disconnect the power supply connectors located on the back.
- After eliminating the malfunction, assembly is carried out in the reverse order.
To carry out this work, we only need a flat and Phillips screwdriver from the tools.
Difficult or impossible switching of the temperature regulator may be due to a breakdown of the switch itself. On a Lada Kalina car, replacing the heater switch is quite easy (provided that work has previously been done to remove the heater control mechanism). On the rear console of the control panel, unscrew the four screws securing the switch block. We remove the cable fastening clamps, then remove the cables from engagement with the drive unit. We replace the broken switch and reassemble it in the reverse order. When performing this work, I give you useful advice: the location of the cables on the lever block must be marked with a marker; this is done in order to install the rods in their original places during assembly.
When the stove temperature regulator does not work on Kalina, the main reasons for the breakdown may be: a disconnected connection wire or a failure of the thermistor. Such malfunctions are treated by soldering the wire and replacing the broken element. It happens that the stove regulator on Kalina does not work due to a breakdown of the temperature sensor, which happens quite rarely. This sensor is located inside the car interior lamp. If it is found to be damaged, it must be replaced with a new one.
Answering the question about what kind of LED is installed in the stove switch in Kalina, I want to say that there are LED lamps with a power of 3 Watts and a voltage of 12 Volts. This lamp is quite enough for illumination, but some motorists install LEDs with a power of 5 Watts. This does not affect the work process, the backlight just becomes a little brighter.
To summarize, it should be noted that it is much more comfortable to drive in a warm car. To ensure that the heater switching mechanisms do not break, it is necessary to switch them smoothly and not jerk sharply. Good luck and may your cars be warm and cozy in winter.
Some useful tips
Any car owner who has to carry out work to replace or repair a heating system radiator wonders about the reason for the failure of the unit
It is important to consider 2 factors that allow you to extend the continuous operation of the device
- It is necessary to timely replace the system air filter. A clogged radiator is more likely to fail. There is a set period for periodic replacement, but you can do it more often, for example, change the filter after winter use and at the end of the summer season.
- Replace the coolant in a timely manner. This operation should be carried out every 60 thousand kilometers. Accumulating wear products destroy the light metal of the radiator, depriving it of its tightness. Many car owners believe that by periodically adding antifreeze to the system, they will not have to change the unit. However, corrosion products continue to accumulate, having a detrimental effect not only on the heater radiator, but also on the engine as a whole.
A pressing issue is the use of high-quality antifreeze. You should buy it from trusted sellers and do not use water in the cooling system.
The operation of any vehicle involves not only the maintenance and repair of parts and systems that ensure its movement. Assistive devices play an important role in the operation of a car. And if the radiator of the cooling system fails, not only the microclimate in the car is disrupted, but it also becomes unsafe to drive due to fogging of the windows.
The heating system in the cabin of the budget Lada Kalina model can significantly increase comfort for the driver and his passengers. It ensures that the required temperature conditions are maintained inside the car. Along with such useful options as:
- "ABS";
- airbag;
- electric power steering;
- electric front windows;
- front seat heating function,
The design of the interior heater allows the manufacturer to achieve a fairly acceptable level of equipment, which is very worthy for a small-class Lada Kalina model and makes it competitive among its rivals in this segment.
The device of the stove adjustment mechanism
On the Lada Kalina car, the heater switches are located on a panel in the central part of the dashboard. It contains control mechanisms, namely:
- heater temperature regulator;
- fan operating mode regulator;
- air flow distributor control regulator;
- recirculation flap switch lever.
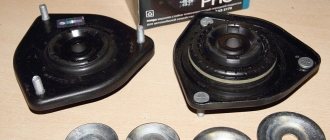
Actually, this is what our mechanism looks like. Now let's move on to possible causes of failure.
Device characteristics
The air conditioning compressor drive operates directly from the motor, which is the main disadvantage of the system. Its use inevitably causes a loss of dynamics and increases fuel consumption. The air temperature in the cabin is regulated by turning a special knob on the climate control panel.
A special recirculation mode also helps cool the air. However, its long-term use reduces the amount of oxygen in the air inside the car and fogging of the windows. In general, the climate system of Kalina has three components:
- air conditioner;
- interior heater;
- air mixing control unit.
In Kalina, equipped with an air conditioning unit, air from outside the car flows first to the evaporator and then to the heater radiator.
Possible heater malfunctions
So, what should we do if heat does not flow inside our car and cold air blows. Let's consider the main causes of such malfunctions:
- Failure of the Kalina heater switching control cable. The reason for such a malfunction may be that the latch has fallen off, and the cable stretches normally in one direction, but does not reach the opposite direction.
- On Kalina, the stove only works at speed 4. Associated with a broken thermistor.
- On a Kalina car, the heater switch often breaks when turned on abruptly, which is due to insufficiently strong plastic.
Faulty heater resistor of the Lada Kalina car
Here is a list of the main breakdowns that may occur. Next, we move directly to the repair itself and replacement of failed parts.
How to independently adjust and replace the heater dampers on a Lada Kalina
Probably every car enthusiast eventually encounters poor heater performance. The owners of the Lada Kalina, unfortunately, are no exception. Sometimes it is very difficult to understand the true reason for poor interior heating when a normally working heater suddenly begins to fail to cope with its task.
The problem of weak heating can be solved by replacing and adjusting the heater damper on the Lada Kalina.
What is the damper responsible for?
While the engine is running in the cooling system, the heated liquid moves through the heater radiator, while it heats the air flowing through it. The volume of air passing through the radiator and outside it is controlled by the main heater damper. Depending on how the temperature control knob is located on the dashboard, the amount of incoming air will depend.
You can distribute air movement throughout the cabin by turning the handle that regulates the position of the damper. But there are cases when the damper jams and it is impossible to properly regulate the flow of heat into the Kalina’s cabin.
If the problem is only with the valve, then you can correct the situation quite simply by tightening its cable. If after these actions the situation has not changed for the better, then you need to conduct a visual diagnosis of the condition of the mechanism and perform a number of simple steps.
How can I check the operation of the heater damper?
- Set the temperature control knob on Kalina to the extreme position of the blue sector, and the fan speed to the maximum value.
- Turn the damper control handle on the block and at the same time watch for changes in the direction of the air flow.
If the air flow remains unchanged, this indicates a breakdown of the mechanical control unit of the stove. Most likely, the rod fell off and stopped screwing onto the roller due to its malfunction. Or the second option could be that the damper is stuck. If your car has climate control, then check the damper micromotor and check the condition of the ventilation control unit, heater and air conditioner.
How to get to the damper?
To see where the central heater flap is located, you will need to partially disassemble the dashboard, and specifically, unscrew the beard. This is the location on the dashboard where the heater switches are located.
- Remove the ashtray.
- Squeeze out the 2 plugs located next to the emergency lights button.
- Remove all control knobs.
- Unscrew the 2 self-tapping screws of the center console and carefully pull it out, while prying it at the latches.
- Disconnect all wires.
- Now you can easily reach the damper.
- Replace the damper or its drive components.
Very often, the cause of the malfunction may be a broken damper drive mount. If the situation is not critical, then you can simply glue the part that has fallen off using superglue.
There are cases when the valve drive mount breaks off due to an undeveloped cable that is very difficult to lower. In this case, it must be developed manually, after which this problem should not arise.
How to adjust the heater damper on a Lada Kalina?
- The first step is to adjust the heater valve.
- Remove the bracket that holds the cable sheath to the faucet body.
- Remove the cable from the faucet lever.
- Open the tap to the maximum.
- Unhook the cable from the lever block.
- Remove the old cable.
- In the future, the tap may not be closed at all.
If you don’t like the method described above, you can use another one:
- Adjust the length of the sheath and cable so that in the extreme right position of the lever on the block the tap opens completely.
- Secure the cable located in this state using a latch.
- Then we proceed directly to adjusting the heater damper.
- Remove the bracket that holds the cable sheath on the heater body and feel for the yellow galvanized lever located on the left.
- Pull the lever towards you - this will be the maximum open state.
- Adjust the length of the cable so that in the right position of the long lever on the lever block the valve is open to the maximum.
- Lock it in.
- Do not forget that with the help of one lever both dampers are simultaneously controlled: both the tap and the large one.
Repair and replacement of faulty parts
Many novice motorists ask questions: how to remove the heater regulator on Kalina, what LED is in the heater switch on Kalina, what should be done when the heater mode switch on Kalina does not work. Answering these questions, I want to say that initially it is necessary to dismantle our entire mechanism, after which we proceed to disassembly according to the following scheme:
- First of all, disconnect the negative terminal from the battery. This is done to de-energize the system so as not to short-circuit any of the sensors during the disassembly process.
- We remove the radio and turn off the power coming from the wiring harness.
- Remove the damper switch lever, then remove the temperature regulator and air flow distribution regulator.
- At the bottom, remove the plugs behind which there are 2 screws, unscrew the fastening screws and gradually begin to remove the instrument panel console.
- After our panel is removed, it is necessary to disconnect the power supply connectors located on the back.
- After eliminating the malfunction, assembly is carried out in the reverse order.
To carry out this work, we only need a flat and Phillips screwdriver from the tools.
Difficult or impossible switching of the temperature regulator may be due to a breakdown of the switch itself. On a Lada Kalina car, replacing the heater switch is quite easy (provided that work has previously been done to remove the heater control mechanism). On the rear console of the control panel, unscrew the four screws securing the switch block.
We remove the cable fastening clamps, then remove the cables from engagement with the drive unit. We replace the broken switch and reassemble it in the reverse order. When performing this work, I give you useful advice: the location of the cables on the lever block must be marked with a marker; this is done in order to install the rods in their original places during assembly.
The dashboard of a Lada Kalina car disassembled
When the stove temperature regulator does not work on Kalina, the main reasons for the breakdown may be: a disconnected connection wire or a failure of the thermistor. Such malfunctions are treated by soldering the wire and replacing the broken element. It happens that the stove regulator on Kalina does not work due to a breakdown of the temperature sensor, which happens quite rarely. This sensor is located inside the car interior lamp. If it is found to be damaged, it must be replaced with a new one.
Visual instructions for removing the fan resistor
Answering the question about what kind of LED is installed in the stove switch in Kalina, I want to say that there are LED lamps with a power of 3 Watts and a voltage of 12 Volts. This lamp is quite enough for illumination, but some motorists install LEDs with a power of 5 Watts. This does not affect the work process, the backlight just becomes a little brighter.
Every car owner knows how important the operation of the heating system is, especially in winter cold conditions. If the stove fails, it will, at a minimum, cause considerable inconvenience for the driver and passengers, so the performance of this unit must be at the highest level. You can learn more about how to replace the stove on Kalina and in what cases it is required from this material.
The stove blows cold air on the Lada Kalina
If your Lada Kalina heater is blowing cold air, but all the equipment is working properly, there are no air locks and all sensors are normal, then you should think about the fact that most likely the problem lies in the dampers of the car’s heating system. It is quite difficult to identify this problem; usually it is discovered by the method of elimination, when all other elements of the heater have already been checked. In this article, we will talk about what usually precedes the identification of problems with the heater dampers, and also share information on how to correct such an unpleasant situation.
It is worth noting that on our website there is a publication Replacing the stove without removing the Lada Kalina panel, which describes in detail a method that will allow even a complete beginner to cope with the task.
Signs of malfunction of the heating system dampers Lada Kalina
Most owners of Lada Kalina cars note that even at a temperature of -25 degrees Celsius outside, it is enough to turn on the heater to first speed and the cabin becomes warm. At the same time, after a certain period of time, the heating intensity begins to drop, and it is no longer enough to start the heater at first speed; you have to switch to second, and sometimes even further.
The thing is that Kalina, like a number of other cars produced by VAZ, has a native “disease” - even in the most extreme position of the temperature control knob (as hot as possible), the damper does not open completely
. As a result, with minimal wear of the heater elements, the heating of the interior begins to decrease. To make sure that your car has such a problem, just look at the heater housing from the driver's seat. You will be able to see the lever of this damper, which operates with incomplete amplitude, and the cable that goes to it.
Fortunately, there is a method to fix this problem, but you will need to make some adjustments yourself, which we will discuss in the following sections of this article, but first, we will explain how to make sure that this is the problem in your particular case.
We check for the presence of “disease” of the valves on the Lada Kalina
So, your stove is not heating well, you suspect that the problem is with the dampers, but how can you determine this for sure? To begin with, you must bring the multimeter temperature sensor to the central deflector and measure the temperature at the first speed of the heating system. With a cold car you should get a reading of at least 46 degrees Celsius.
The next step is to move the cabin air speed lever to the far right position. As a result, the temperature should rise. This will happen in any case, whether you have a problem with the dampers or not, but if there is a problem, the multimeter readings will increase slightly - no more than 10 degrees, and maybe even lower.
What will be required to restore normal operation of the stove?
If you have identified a situation with a slight increase in temperature when moving the lever from the first speed position to the maximum speed position, you will have to work on upgrading the damper system. To do this, you will need very little: - a spring of short length and medium stiffness - pliers, which will allow you, if necessary, to modify the length of the spring to the size you need
The procedure for upgrading heater dampers Lada Kalina
The upgrade procedure is quite simple, but requires care and concentration. You need to hook one end of the spring to the lever with which the dampers move, and the other to the protrusion that is on the body. That's all. As a result of the modification described above, the spring will begin to press the damper lever much more strongly, as a result, the amplitude of movement of the dampers will increase to the maximum, and the quality of operation of the car's heating system will significantly increase.
What to Expect After Upgrading Your Damper System
After you have modified the damper system, you can forget about problems with them for a fairly long period, since their service life is very long. If after this, your stove stops working again, then you can no longer pay attention to the dampers and look for the problem in completely different elements of the car’s heating system: faucet, radiator, engine cooling system, and so on.
Source
Possible heater malfunctions and ways to eliminate them
If the stove blows very weakly or in the current mode it basically refuses to blow air, then there may be several malfunctions, as well as solutions:
- The heating system hoses are worn out. As a rule, if antifreeze leaks or the stove does not heat, this may be due to wear and tear on the pipes. To solve this problem, it is necessary to carry out a thorough diagnosis of each of the pipes. Coolant may escape through cracks or other damage.
- The heater valve has failed. If the stove control valve is broken, this can be indicated by traces of leakage of consumables in the vehicle interior.
- There are malfunctions in the operation of the control unit. If the problem lies in the unit, then first of all you need to check the quality of its connection to the on-board network. If it is connected correctly, then most likely the problem lies there. It is better to entrust unit repair to specialists.
- Wiring faults. Perhaps the unit does not turn on the heating system due to lack of contact with the on-board network. In this case, the problem is solved by checking the circuit to find the broken section.
- The additional resistor is broken. This device is used to control the heater fan, so if the stove on Kalina does not heat, you also need to check the functionality of this element. If it doesn't work, then it will need to be changed.
- The Kalina heater regulator, located in the car's interior, does not work. If the heater only blows hot air, but does not react in any way when switching its mode from hot air to cold air, then most likely the regulator installed on the center console has failed.
- The radiator of the heating unit is broken. This problem is considered one of the most common on domestic cars, and it is especially relevant for Kalina. You can try to repair this device or change it yourself. We will tell you more about how to shoot and how to replace the device below (the author is the Interesting Video channel).
Replacing the heater fan resistor
Disconnect the wire terminal from the negative terminal of the battery. Under the glove compartment.
. Use a slotted screwdriver to pry up the top edge of the plug.
Disconnect the wire block from the resistor. Using a Phillips screwdriver, unscrew the self-tapping screw securing the resistor.
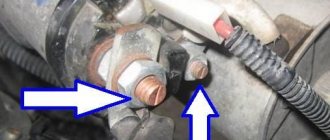
The arrow shows the hole for the resistor mounting screw. Install the heater fan resistor in reverse order.
If the light on the button for turning on the windshield defogger (heating) blinks, then most likely the heater rheostat has failed.
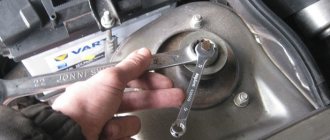
Replacing the stove rheostat is easy. Remove the wiper caps. Using a 13 mm wrench, unscrew the wiper nuts.
With the hood down, lift up the windshield wipers and remove them.
Remove the 4 plugs.
Unscrew the 7 screws to remove the elastic and the left side of the frill.
Remove the left side of the frill.
Unscrew the right side of the frill in the same way.
Remove the elastic completely. Remove the right side of the frill.
Thanks for subscribing!
Unscrew the 2 screws that secure the rheostat and disconnect the connector.
Reassemble the parts in the reverse order of dismantling.
I started the car in the evening and smelled something burning. The heater was turned on at first speed and when I started it, apparently all the energy was spent to start the engine, but the heater motor did not start. As a result, the heater heater resistor burned out. I turned on the 4th one, it works. And the stove fan works at 4 even without a resistor. Just don’t know why a turbo aircraft is needed at all)
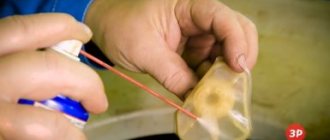
The photo shows that the thermal fuse is located by bending it as close as possible to the heater resistor coil. If the resistor is heated to 117 degrees, its internal circuit melts and breaks. The same thing can happen when soldering a new one. But in fact, it burns out not from temperature, but from increasing current strength when the stove fan cannot move. When the fan cannot move, the load on this fuse increases to 17 amperes.
In fact, the resistor itself rarely burns out; the shiny part soldered to pin 4, called a thermal fuse, burns out. Such fuses are still installed in irons and refrigerators. And since this is a fuse, it’s very easy to check whether the resistor itself is working; take any piece of wire and try to short it with a “bridge”. That's exactly what I did. I turned the heater on to first, shorted it out, it works at all speeds. If it works, then it's the fuse. We go to the radio parts store (in Ufa “World of Electronics”) and buy a new one for 15 amperes 117 degrees for 25 rubles. Solder in a new fuse. When soldering, do not overheat, overheating more than 117 degrees will cause the fuse to fail!
You need to solder with a heat sink. Overheating will cause the part to become unusable. We put it in place under the glove compartment shelf. Voila, the stove works on all 4.
How else can you stir things up, for example, if this crap burned down on the road? We take a large plastic 20A auto fuse, tear apart the body, cut off the thermal fuse from the resistor so that then, by bending the antennae, you can crimp the terminals. Just don’t turn it on immediately without pushing it into place under the glove compartment, it will melt without blowing. And it works with airflow.
If you say that this is a collective farm version, then you can step it up like this, solder the mother terminals and insert a torn 20A fuse into the mother
The option of soldering in new fuses is the best. But they sell out quickly in electronics stores. I visited two stores. What do you think, where do the replaced resistors go in services? They sit and solder. Kalym!
Question for a guru in radio electronics.
What else can be soldered instead of this thermal fuse? Maybe a light bulb to illuminate the shelf? I also heard that in trucks, instead of this thermal fuse, there is a thermal relay or a reusable self-resetting thermal fuse. Curious about the part name? The Gazelle's heater resistor is very similar to ours, but it is three-pin and instead of a thermal fuse, some large black square piece is soldered in there. What kind of detail can be soldered into ours?
Instructions for replacing the stove
Before removing all the necessary parts, cables and other components from Kalina, prepare a new radiator, pipes and clamps. The pipes will be required in case the old ones are worn out or they have never been changed over the years of operation. As practice shows, hoses are most susceptible to wear due to temperature changes, so in any case they need to be changed from time to time.
Instructions on how to change the radiator are presented below:
- We begin the replacement procedure in the engine compartment. First, place a container under the drain hole and drain all consumables from the radiator. If you notice that the coolant is already old and has exhausted its service life, which can be understood by its color and deposits, then it is also better to change the antifreeze.
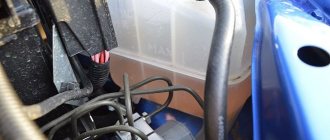
- You need to ensure the most convenient access to all pipes and hoses of the radiator assembly in the engine compartment. To do this, dismantle the power unit air filter housing, the battery, and its platform. Next, you need to disconnect all the lines from the radiator unit in the engine compartment. Having done this, you can use a wrench to unscrew the nut that secures the metal casing to the engine shield. This nut is located next to the pipes that go into the Kalina's interior.
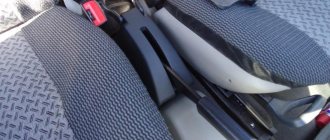
- Next, we move into the car interior. You need to remove the gas pedal; to do this, unscrew the three nuts. As for the brake pedal, it cannot be removed, so just move it to the side as far as possible.
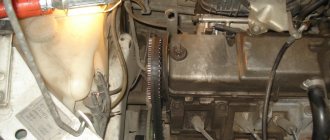
- Now you have to cut the steel casing as shown in the photo, and then cut off the tubes of the radiator assembly. Having done this, you can dismantle the device from the pedals, but to do this you will also need to unscrew the bolts that secure it.
- Before installing a new radiator device, it will be necessary to carefully sand its tubes. Please note that they should be as even as possible. After all surfaces are ready, a line with a widened end is put on the upper tube, and a line with a narrower end is put on the lower tube. The remaining outputs must be connected in the engine compartment instead of the old ones. Also note that on the side of the Kalina’s interior, it is advisable to treat the place where the lines exit into the engine compartment with sound-insulating material.
Price issue
The range of radiator units for Kalina is not particularly large. On average, prices for radiators are as follows:
How to choose the right heater radiator
| When the engine is running, heated fluid from the cooling system circulates through the heater core, heating the air passing through it. The amount of air passing through and around the radiator is set by the central heater damper, depending on the position of the temperature control knob installed on the instrument panel. |
The air distribution throughout the cabin can be adjusted by rotating the control knob for the air distribution flaps, as well as by turning the flaps and guide blades of the instrument panel ventilation grilles.
First of all, you need to pay attention to the metal from which the heating system element is made. Cheap options are made of aluminum
If it cracks, the owner has only one choice - throw it away and buy a new one.
Meanwhile, the brass-copper model, although more expensive, can be easily repaired - cracks in it can be easily sealed.
It is also important that the swirlers of the new radiator are made of durable plastic. As practice shows, such models last for many years and rarely become clogged.
Before choosing a stove radiator, you should know that they can be either aluminum or copper-brass. It is difficult to clearly prioritize the choice of one material, but each one has specific features of its work. These features are dictated by the properties of the material. Copper has a slightly lower thermal conductivity than aluminum, and therefore warms up more slowly. This cannot be said to be bad, since the thermal inertia of such a radiator is quite large. This means that it may not cool down for a long time.
We recommend: How to choose speakers for a car
An aluminum radiator is the opposite. It warms up quickly, but cools down just as quickly. It has a few more disadvantages. Firstly, the aluminum radiator cannot be repaired. Once it drips, you can throw it away. Copper is soldered quite simply and as many times as necessary. You just need to choose it correctly, because when selling, especially in the car market, you may come across a repaired copy with the partitions removed. It won't leak, but it won't provide heat either. Antifreeze will simply pass through such a radiator as if through a pipe.
The stove has a simple design. Its main element is the heater radiator. During the first 20-30 minutes, the engine heats the coolant to a temperature of 40-50 degrees, and then it circulates through the cooling system and enters the heater radiator. Warm air is distributed throughout the cabin using fans.
Each type, depending on the properties of the material, has its own advantages. The thermal conductivity of copper is less than that of aluminum, so it heats up more slowly. But it also retains heat for a long time. Copper products have high maintainability and can be soldered a large number of times.
Aluminum, on the contrary, heats up quickly and cools down quickly. The disadvantage of an aluminum radiator is low resistance to mechanical damage and non-repairability. If it leaks, it should be replaced. The advantage of aluminum devices is their low cost.
Swirlers in pipes
In any case, it is better to buy original products to avoid fakes. The car owner decides which radiator is best to purchase.
Summary
The Lada Kalina car is available with a ventilation and heating unit or with an air conditioning unit. For the first option, it is impossible to provide a cabin climate whose temperature will be lower than the ambient temperature.
The Lada Kalina air heater is considered one of the best in terms of heat performance in the VAZ family, but is far from the most reliable in operation. Problems begin almost at the car dealership, as many motorists say. But most of the problems are completely solvable, and often even without the involvement of car service specialists.
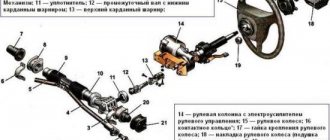
Lada Kalina dashboard diagram
1,2,3,4 — blocks of the instrument panel wiring harness to the blocks of the rear wiring harness; 5,6 — blocks of the instrument panel wiring harness to the blocks of the front wiring harness; 7 — block of the instrument panel wiring harness to the block of the wiring harness 8 — block of the instrument panel wiring harness to the block of the front wiring harness; 9 — lighting control module; 10 — ignition switch; 11 — on-board computer mode switch; 12 — windshield wiper switch; 13 — sound signal switch; 14 — light signaling switch; 15 — instrument cluster; 16 — evaporator temperature sensor; 17 — interior air temperature sensor; 18 — air conditioner switch; 19 — controller of the automatic climate control system; 20 — heater damper gearmotor; 21 — rear window heating switch; 22 — alarm switch; 23 — brake signal switch; 24 — cigarette lighter; 25 — electric amplifier control unit; 26,27 — blocks of the instrument panel wiring harness to the radio; 28 — backlight lamp for the heater control panel; 29 — illuminator; 30 — mounting block: 31 — heater electric motor switch; 32 — heater electric motor; 33 — additional resistance of the heater electric motor; 34 — glove box lighting; 35 — glove box lighting switch; 36 — control unit of the APS-6 automobile anti-theft system; 37 — driver airbag module; 38 — passenger airbag module; 39.40 — blocks of the instrument panel wiring harness to the blocks of the ignition system wiring harness.
Air Conditioner Frost
The Frost kit is installed on VAZ cars such as Granta and Kalina. This air conditioner is equipped with a three-position compressor regulator, which allows you to better adjust the microclimate in the car. The Frost air conditioner is easy to maintain: the main thing is to fill it with freon on time. This model can also be installed with a special cooled air filter.
Some car owners complain about the reduced performance of the system compared to some analogues, that is, normal air temperature is achieved in a longer time than when using an air conditioner of a different system. Most likely, this flaw is due to insufficient compressor power. But in general, the Frost system does not have a bad effect on the operation of the car, like a standard air conditioner.
Kit for installing air conditioning on a Lada Kalina car
This cooling machine runs on freon and is driven by a motor. In conjunction with the standard heater, the air conditioner forms a climate control system, which also allows you to reduce the air humidity in the cabin, which, at high relative humidity, protects the car windows from fogging.
The maximum speed, power, gasoline consumption and other characteristics of a car with installed air conditioning are maintained in accordance with the specifications for the vehicle. The Frost air conditioner, when brought to its maximum operating mode, has sufficient potential to reduce the temperature in the cabin by 5-12 ° C relative to the outside air temperature, depending on the intensity of solar radiation, air humidity and the number of people in the cabin.
Kalina engine cooling system
Kalina, like other cars of the VAZ family, is equipped with a similar cooling system to other cars. Since the system is not perfect, but it works very well when the car is new, over time its performance deteriorates and components are subject to breakdowns.
Main elements of ODS:
- Cooling radiator;
- Heater radiator;
- Water pump;
- Expansion tank;
- Cooling jacket;
- Thermostat;
- Expansion tank cap;
- Pipes.
Each of the elements seriously affects the operation of the car and its stove.