How a puller makes life easier for a car owner
Using this tool, you can dismantle bearings, bushings, pulleys, flanges and other components, remove or fix rings and gears, and repair chassis elements. It greatly facilitates the process of maintenance and repair of various parts of the vehicle. Using the right puller, you can quickly and easily replace a damaged element without the risk of damaging the machine elements connected to it. In addition, the tool can be used to work with hard-to-reach parts of the car, in a convenient position.
Products can have different designs, but the most common is the following - several gripping arms, which are shaped like hooks, and a threaded rod between them. Thanks to this structure, you can easily grab the required element and press the bearing out of it.
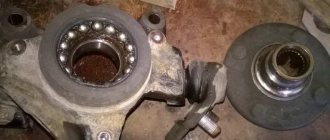
Determining the condition of parts
To determine the condition of the hub parts, it is necessary to lift the car wheel so that one or more wheels are above the ground. And shake them simulating vertical and horizontal load. Before checking the wheel, it is necessary to check the stability of the body; to do this, push the body from the side; the body must stand securely; if there are vibrations, it is better to shift the safety pad. If the wheel play is no more than 2 mm, then you can try to adjust the gap in the rolling elements of the product.
Kinds
Tools are divided into two groups.
- Hydraulic. When they operate, hydraulic traction is used; removal and landing are performed in semi-automatic mode. The main part of such a puller is a hydraulic nut, the internal cavity of which presses on a special piston. This, in turn, transfers the force to the desired part. The hydraulic model is in demand among owners of trucks and other large vehicles - with its help you can easily remove the most massive internal parts.
This is what a hydraulic bearing puller looks like
- Mechanical. They operate from human muscular strength and are in demand for mounting/dismounting wheel bearings. There are two-jaw, three-jaw and internal ones. Two-grip ones are the simplest. They are used where maximum process control is needed. Three-jaw machines are equipped with three paws and are used for working with the front hub and generator. Internal options are useful for removing ball and needle roller bearings; in addition, they can be used to dismantle various brass couplings.
This is interesting: Technical characteristics of the CFNA engine
Mechanical three-jaw model
Bearing pullers can come in different sizes, but the most popular are universal ones. Their parameters can be adjusted manually, adjusting them to any diameter.
You can make different tools with your own hands, but it is best to make a universal three-jawed version - it is convenient to use.
Diagram of a two-jaw puller
The process of replacing the rear wheel bearing of a VAZ 2114 (2113, 2115)
Now that we have sorted out the design features, we can move on to the actual replacement process. First you need to collect the tools. What you will need: a jack, a set of open-end and socket wrenches, a wheel wrench, rags, a 30mm socket wrench, round nose pliers for removing retaining rings, VD-40 (as needed), and a new bearing. When everything is assembled, you can consider the step-by-step instructions for replacing the rear wheel bearing on a VAZ-2114 car:
1. Place the car on a flat surface. 2. Set first gear to the gearbox and place wheel chocks (shoes) under the front wheels.
3. Dismantle the protective cap of the hub. 4. Using a 30 mm socket and an extension, we tear off the wheel bearing tightening nut. 5. We tear off the wheel rim mounting bolts. 6. Jack up the car. 7. Dismantle the wheel.
8. Unscrew the rear drum mounts. 9. Remove the front brake drum cover.
10. Remove the hub nut.
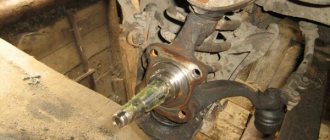
11. Install the hub puller and begin dismantling the part.
12. When the hub and bearing are removed, you can proceed directly to dismantling the internal element. 13. Using pliers, remove the retaining rings.
14. There are two ways to remove the bearing from the hub. The first is to knock the product out of its seat. The second, less barbaric, is to use a press to press out the bearings. As practice shows, all motorists use the first one, since the press is not stored in every garage.
15. Now that the old product has been dismantled, you can proceed to installing the new part.
16. Before pressing, it is necessary to lubricate the inner surface of the hub with oil. This is necessary so that the spare part fits better into the seat.
17. Once the bearing is in place, the snap rings can be installed.
18. Now, with light blows of a hammer, install the hub in its place. 19. The rest of the assembly process is carried out in reverse order.
Which bearing to choose for the VAZ 2114 hub
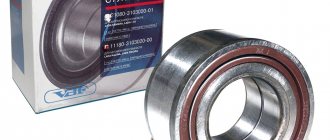
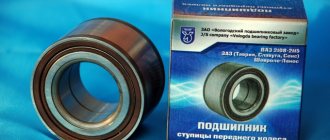
Choosing a spare part is always not an easy task, since there are many factors that influence it. It is worth noting that you must choose a high-quality product and check for certificates, original packaging, and holograms. In addition to the main original product, there are a number of analogues that are recommended for installation. Let's consider all possible options for purchasing a spare part. Original
2108-3104020 and 2108-3104020-02 – original catalog numbers of the VAZ-2114 rear wheel bearing.
The spare part under this article is produced at the AvtoVAZ plant. It's ideal to sit in a seat. The average cost is 2000 rubles. Analogues
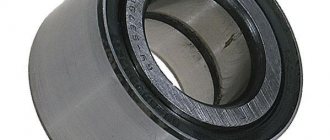
In addition to the original, there are a number of substitutes recommended for installation.
As practice shows, they are chosen by most motorists, since the quality of workmanship and service life are much higher. So, let's look at all the options for purchasing a wheel bearing:
| Manufacturer's name | Catalog number | Cost, in rubles |
| Weber | BR 2108-4020 | 500 |
| Master-sport | 2108-3104020-ST-PCS-MS | 500 |
| Finwhale | HB321 | 750 |
| Coram | CR 001 | 750 |
| Hola | NB722 | 750 |
| Meyle | 214 633 0001 | 750 |
| SCT | SCP 1307 | 750 |
| Cx | CX 081 | 750 |
| Kroner | K151208 | 850 |
| Optimal | 802 658 | 1000 |
| Pilenga | PW-P 1307 | 1000 |
| Mapco | 26081 | 1100 |
| Flennor | FR891547 | 1200 |
| Herzog | H10 1206 | 1200 |
| ABS | 200068 | 1300 |
| Patron | PBK1307 | 1300 |
| Moog | LA-WB-11604 | 1400 |
| Trialli | CS 256 | 1500 |
| GKN-Spidan | 26727 | 1500 |
| Torque | DAC 30600037 | 1500 |
| EGT | 554312EGTk | 1500 |
| SNR | R172.04 | 1500 |
Making a universal three-gripper with your own hands
To make a universal three-jaw puller designed for working with bearings ranging in size from 202 to 308, you will need:
- sheet metal (10 mm wide);
- round metal with a diameter of 30 mm.
If you plan to remove large bearings, take sheet metal 15 mm wide and round timber 30 mm in diameter.
- The first stage of production is sketching. Calculate the length of the legs - it should be 200 mm. Sketch the sheet metal according to the drawing and cut out the tabs with a gas cutter that runs on propane and oxygen.
- Sand the workpiece with heavy sandpaper. The dimensions of all paws should be approximately the same, but absolutely perfect parameters are not required - a difference of approximately 1 mm is allowed. When this part of the work is completed, you need to drill two holes in the top of each tab - these will be used to expand the tool. The diameter of the holes must correspond to the diameter of the 8 or 10 bolts. If you plan to work with large bearings, drill 3 holes for 12 or 14.
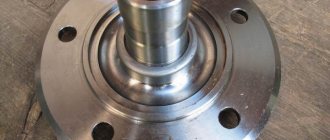
- Making the core. It is made of round metal with a diameter of 30 mm and a length of 35 mm (50 and 45 mm if it is necessary to work with massive bearings). We take the workpiece and drill a hole in it for a 16 mm thread (30 if necessary in a larger product), cut the thread with a fine pitch. We apply marks on the sides every 120 degrees, to which we then weld the paw holders. The distance between them should be equal to the width of the foot. Now you need to drill holes in the holders. They should be positioned at a certain distance from the center so that the foot can grip the large bearing.
This is what the parts of the future puller should look like - The final part of the work is making the screw. For a standard puller you will need a screw 350 mm long with a thread length of 280 mm, for a large one - 500 mm with a thread of 420 mm. We process the workpieces on a lathe and cut the threads. We leave the upper part without threads - there you need to drill through holes located perpendicular to one another, having a slight offset in height.
This is interesting: We conclude a car insurance agreement
Appearance of the finished product
Some recommendations for choosing a wheel bearing
When choosing a product for the hub, you need to keep the following in mind:
- Original parts from the manufacturer are always preferable, this applies to Russian cars and foreign cars;
- If it is not possible to purchase an original part, it is always better to choose trusted suppliers;
- Before purchasing, you need to look at the markings on the packaging and on the clips of the products, they must match. If there is a discrepancy, the purchase must be refused;
- To ensure that the purchased product fits correctly, it is better to use paper or electronic spare parts catalogs before purchasing.
- If there is an original catalog number and article, it is necessary to select products with nominal values according to the original.
A simple way to make a homemade removal device
This option is easier to implement, but the product will not be as convenient. You will need the following tools and materials:
- steel pipe, the internal diameter of which will be greater than the diameter of the bearing;
- metal plate more than 5 mm thick;
- Bulgarian;
- stud with nut or bolt with long thread;
- a few nuts.
- Cut a piece of pipe with the required parameters.
Cutting off part of the pipe - We mark all the necessary elements on a metal sheet, outline the pipe and bearing.
Marking out future details - We cut out the parts with a grinder and grind them to meet the exact parameters.
Cut parts - We drill holes for the bolt in the obtained washers.
Drilling holes for bolts - That's it, the remover is ready!
Ready puller
Unscrewing the hub nut on a VAZ: “burn, hit and twist!”
Now let’s look at the methods that may be the only effective ones in your case, but that doesn’t make them any less radical, even barbaric.
Strong hammer blows
If you hit the hub, you hit the bearing! If you are going to make a replacement, then go ahead! If you value the bearing, avoid this method.
Warming up the hub nut with a burner. Not recommended!
Using the burner
The law of physics is guaranteed to work, and the body (read: hub nut) will expand. And this will make it much easier to remove the stubborn part. There is one “but”: not only this one part heats up, but also everything else in the area of the burner. For example, a bearing. And it’s better not to allow this. As a more gentle option, we can suggest using a soldering iron and... patience. You'll need it.
Jumping on a lever
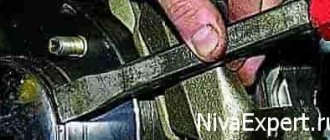
A chisel will help you remove the hub nut.
The “method” is fraught with the danger of unexpectedly breaking off the edges of the nut, breaking the key, and so on. Just don't do it.