What kind of drilling is on the VAZ-2114
One of the main parameters that you should pay attention to when replacing standard disks on a VAZ-2114 car is the dimensions, location and diameters of the mounting holes, PCD, pitch circle diameter, or, in simple terms, drilling or bolt pattern.
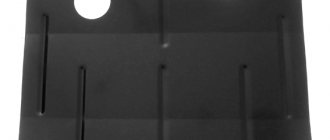
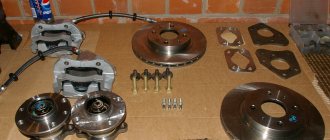
Bolt pattern on a VAZ-2114 wheel
Bolt pattern - this characteristic is expressed in two numbers and indicates the distance between the centers of the mounting holes and their number.
Drilling for all VAZ cars (except Oka and Niva) - 4x98 , four holes, the centers of which are located at a distance of 98 mm from each other .
However, this is a simplified designation for the user. The disc manufacturer is required to take into account both the diameter of the holes, their number, the distance between their centers, and the diameter along which the centers of the holes are located . Such a designation would complicate the selection of disks by the user, so knowing drilling in the “number of holes/distance between them” format is considered sufficient.
A few more wheel parameters
The drill bit can be measured using the spare wheel. In all SAMARA drilling 4*98
There are several more parameters that relate to the original VAZ-2114 rims - the width of the stock rim is 5.0J , the offset of the ET45 , the diameter of the centering hole at the hub is 58.5 .
How to install a 4x100 disk on a VAZ-2114
Most older foreign cars have a 4x100 drill. This makes it possible to diversify the choice of disks almost indefinitely. However, we must take into account that simply installing, without modifications, 4x100 wheels on a 4x98 seat will not lead to anything good. The fact is that the tolerance in the manufacture of the disk does not exceed 0.7-1 mm . That is, it is theoretically possible to put on a disk with a 4x100 fit, but this will lead to the fact that only one bolt out of four will fit exactly on the cone. The remaining fasteners simply will not tighten all the way and, as a result, the disk will sit with a distortion that is almost impossible to check by eye.
Disc with bolt pattern 4*100
The disc will not fit with its mating plane to the hub, and this will lead to the fact that it will have a runout.
Systematic runout can not only lead to the fact that the only bolt that is tightened correctly will quickly become loose, but also to instant wear of the wheel bearing, and the remaining bolts will loosen on their own. There is a way out of this situation.
Disc runout leads to rapid wear of the wheel bearing
To install a disc with a 4*100 bolt pattern, you need to either install a spacer or install studs with nuts instead of bolts.
A less reliable option is to install bolts with an offset head. A not entirely correct option is to install studs, for example, from the cylinder head and nuts from Niva, but the studs are not designed for torsional force, so the most reliable option would be to install spacers. You can carve them yourself or buy them ready-made.
But here you need to take into account several nuances:
- The width of the spacer must be at least 20 mm, since only in this case we will ensure proper thread strength.
- In this case, the offset of the disk will increase by the same 20 mm, which must be taken into account when selecting a disk.
- In this case, the disc must be selected with a minimum offset in order to remove the load from the hub and somehow compensate for the difference in offset.
What engine can be installed on a VAZ 2115
To some extent, at the beginning I thought that it was possible to meet the purchase of an engine plus small costs for labor and spare parts.
How wrong I was, like probably 95% of those starting their journey to remodeling a car. While Bodraya 015 sits in Mikhail’s garage and is slowly building up muscle mass, visitors to the garage are looking at it and naturally some have thoughts about introducing such an internal combustion engine into their car.
But as practice shows, not everyone adequately assesses their financial capabilities, which is why such alterations can drag on for a long time.
Mikhail, having already had several projects under his belt with replacing the internal combustion engine with an imported one, claims that the cost of replacing the engine with a more powerful one, even if it was installed on this car from the factory, can be safely multiplied by two based on the initial cost of the unit itself.
That is, if the internal combustion engine itself costs 40 thousand, then installing it and related spare parts, as well as servicing the internal combustion engine on your own will cost 80 thousand rubles, and if you entrust this matter to another person, it will easily exceed 120.
So what do we have:
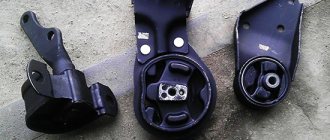
— ICE + manual transmission + related spare parts (flow meter, pump, dashboard, manual transmission poker, drive, engine cushions and more) from 60,000 rubles.
We got a freebie for 43 thousand rubles. with the condition that everything was brought home to us.
Immediately returning to Mikhail’s practice, it turns out that when buying spare parts in different places, there is a large overpayment only for delivery. Plus, sellers are often ready to raise the price for every small plug and wiring.
— Engine overhaul RUB 6,000.
Many people make the mistake of buying a contract vehicle. It’s used, so it’s a big lottery; even with a low mileage engine, it often needs maintenance, at least a belt, or at most a complete overhaul.
We ended up having to replace the liners, seals and gaskets. Fortunately, the pump and all the bearings were recently changed, and besides, all the work on the car from which the internal combustion engine was removed was carried out at our friends’ service station.
- Iron for overcooking and strengthening 2000 rubles. Square pipes, round pipes, sheet metal.
- Crabs and crabfish 1500 rub.
- Radiator with improved characteristics RUB 4,000. There will be a separate post about it.
- Exhaust pipes, corrugation, thermal tape, mufflers, fasteners RUB 12,000. This takes into account that Mikhail undertakes to make the resonator and muffler himself.
- New hoses, pipes and other small items RUB 3,000.
Here is the minimum list of costs, not including labor costs. Even if you do the work yourself, sometimes you have to turn to other people for help, which entails certain costs.
The total budget for replacing an internal combustion engine with an “imported” one starts from 72,000 rubles. If you resort to installation services, the price starts from 150,000 rubles. But remember, what is missing here is the brakes, and this should be an integral part of increasing the power of your car.
I would like to clarify the choice of engine for installation:
- Definitely Toyota. In our area, this is the most common car brand for which it is easiest to find spare parts. Quite reliable and repairable.
- Maximum volume at maximum power. The choice of front-wheel drive is not great. 2 liters of milk and 200 hp.
- No turbocharging, though.
Disk parameters 2114
Bolt pattern (also known as disk drilling, also known as pitch circle diameter) is a value that shows the number of mounting holes in the disk, as well as the linear distance between them. It is indicated, respectively, by two numbers. The standard wheel bolt pattern for the VAZ 2114 is 4*98. This means that the disk has 4 mounting holes for bolts, and the distance between the centers of these holes is 98 mm.
It is worth noting that such drilling is standard not only for the 14th model, but also for all other cars produced by AvtoVAZ, with the exception of the Oka and Niva.
In addition to the bolt pattern, there are a number of other important parameters of the disk that can be useful when choosing non-original spare parts. These include: the width, which is designated as 5.0J, the offset of the disc, marked as ET45, and the diameter of the hub centering hole, equal to 58.5 mm. The mounting bolts have an M12 thread with a pitch of 1.25 mm.
What engine from a foreign car can be installed in a VAZ without major modifications?
Today I would like to tell you which engine from a foreign car can be easily installed in a VAZ, without major modifications. At the same time, I can significantly increase the power of my old basin thanks to this engine.
Let's start before the story. Let's remember the limited production of fret 21106. That same “one hundred and sixth” differed from the usual ten of the classic version, with aerodynamic body kits and enlarged rear wheel arches. But the most important difference from the “one hundred and sixth” from the usual ten was that from the usual VAZ engine, it was equipped with an Opel engine with the index C20XE, the same ones that are installed on the Opel Astra. This engine had a 150 horsepower engine, a torque of 200 Hm and a forged piston , some models of the “one hundred and sixth” still drive without major repairs to this day.
This engine, which was installed in the “one hundred and sixth”, easily fits onto the same other front-wheel drive Samar models without major modifications. To install it, you need to weld sheets of iron onto each engine mount to offset each mount by 0.8 mm, then it will easily fit together and stand up in the engine compartment like the original one. All other wiring and attachments are installed in the same way as on the stock VAZ engine without any special modifications, nothing can cost as much as the original VAZ engine and feels great under the hood when driving and during a long period of operation.
Installing a c20xe engine
Thus, this is the simplest engine from a foreign car that can be installed on a VAZ, without major modifications, and at the same time add quite a bit of power to your iron horse.
These imported engines include engines from:
- AUDI-80;
- BYD F3;
- Alfa Romeo;
- Chery Amulet;
- Chevrolet Aveo;
- Ford Focus;
- Fiat Bravo;
- Geely CK2;
- Geely MK1;
- Honda Civic;
- Daewoo Lanos;
- Opel Astra;
- Hyundai Accent;
- Opel Corsa;
- Opel Astra Kadett;
- Opel Astra Vectra B;
- Seat Ibiza;
- Mazda 323;
- Mazda 626;
- Peugeot 205;
- Peugeot 405;
- Toyota Supra;
- Renault Logan;
- Volkswagen Golf;
- Volkswagen Jetta.
All of the listed engines can be installed on the 14th VAZ with a minimum of alterations to other mechanisms, in most cases - without any alterations at all. This will help save not only effort and money for additional work on replacing units, but can also save a lot of nerves when registering a car with the road inspection (although registering such a tuned car will still be a very big problem).
That is why, before deciding which engine is suitable for a VAZ 2114 from a foreign car, it is better to think again about tuning an existing, original engine. There are quite a few ways to increase its power and service life without replacing it with another, and all of them are completely legal from the point of view of the law.
Selection and replacement of wheel rims
Many car enthusiasts, especially those keen on tuning their cars, install wheels from various foreign cars instead of original wheels. This is due to the fact that the bolt pattern of the VAZ 2114, as already mentioned, is 4*98, and the wheel bolt pattern of the vast majority of serial foreign cars is 4*100.
This seemingly insignificant difference in the distances between the mounting holes is in fact extremely significant, because the tolerance in the manufacture of disks does not exceed 0.7 mm. As a result of this, a disk with center-to-center distances of 100 mm, even if desired, will not fit tightly on a hub with a distance between bolts of 98 mm.
Such a loose fit can lead to such unpleasant consequences as:
- disc beating while driving;
- spontaneous unwinding of fasteners;
- rapid wear of the wheel bearing.
But it is still possible to solve this problem, and there are three options. The first is to use bolts with offset heads, the second is to replace the bolts with studs, the third is to install a metal spacer between the disc and the hub. The first two options, although less expensive, are quite unreliable, since they do not provide the necessary fixation, and the studs, in addition, are not resistant to large torsional loads. That is why it is best to give preference to the last option.
However, in this case, several important points should be taken into account:
- The thickness of the spacers used (which can be purchased at car dealerships) must be at least 20 mm.
- It is advisable to replace all the disks at once so that there are no differences in their removal.
- If only one disk is being replaced, then it should be selected with the minimum possible offset in order to compensate for the thickness of the spacer and reduce the load on the hub.
When deciding to install spacers, you should remember that a large difference in the offset of the discs on different wheels can lead to a significant deterioration in the car's handling, especially at high speeds.
Installation of American women
Such tuning does not present any particular difficulties. To implement it, there are several ways to choose between depending on your skills and capabilities.
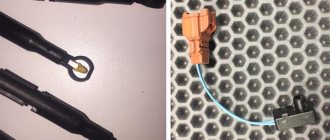
Relay
This modification makes the turn signal lamps work in the side light mode, but they do not lose their main function. This will require 2 relays, several pads, heat shrink, wires, terminals, 2 capacitors and a diode.
To obtain the effect, the relays are installed so that they break the power circuit when the turn signals are turned on. In essence, this is how the principle of inversion of the same signal is implemented. Then the lamps will be on all the time, and when indicating a turn they will begin to flash. So they work in antiphase with the rear elements. If voltage is supplied to the rear ones, the front ones go out due to an open circuit.
When the lights are turned off, the turn signals will not light up either - this is the main problem that drivers face. To solve this, several more relays are installed. They switch power from the turn signals to the standard circuit when the devices are turned off.
Due to the increase in the number of contact groups, the lighting periodically works intermittently. To increase reliability, semiconductor circuits are used for turn signals. It is quite difficult to assemble it yourself, so if there are interruptions, you will have to contact the service.
Short circuits are also dealt with using a capacitor and an additional diode. The operating principle of the design remains the same, but it becomes more reliable.
Lamp with threads
This method is considered one of the simplest. The lamp contains several filaments with different power and brightness. One is only 5, and the other is 25 watts. In this case, the weak thread is used for dimensions, and the strong thread is used to indicate a turn.
To obtain the American style, you will need a soldering iron, electrical tape, wiring, a 2-pin LED and a lamp with filaments. The installation is carried out in several stages:
- Lay the wires so that they go from the dimensions to the base.
- Replace the standard light bulb with a new one.
- Carefully solder them to the light bulbs: the first has a common minus for both lights, the second is designed for plus dimensions, and the third is for turning headlights.
- Connect the wires to the headlights, proceed in the same way as the previous step.
- Wrap everything with electrical tape and place it so that they do not interfere with each other.
- Turn it on to check if it works correctly.
Then, while driving, the turn signals will flash brightly, attracting the attention of other drivers. On two-pin light bulbs, during tuning you can also choose the color of the lights: white or yellow.
Closing dimensions
This method is easy to implement, but is not recommended due to the emergence of an ambiguous situation while driving. In this case, the lamp goes directly to the markers, so the turn signal does not work at all. In the future, such a violation will bring a lot of problems.
Cartridge in the headlight
The introduction of an additional cartridge is the most technically correct, but at the same time time-consuming method. For this, a two-filament lamp, a 2-pin socket, electrical tape, wiring and terminals are used.
When connecting, one minus and two pluses are pulled from the cartridge. The first one goes to the turn signal, and the other two go to the side lights and the second lamp. After connection, everything must be insulated and tested.
If everything works correctly when turned on, then nothing else needs to be done. In some cases, the plinth simply won't fit, so you have to trim the piece to make sure everything fits snugly. Another difficulty with this installation method is finding the right bulb and sockets. Think over this point in advance; if there are no suitable stores nearby, then look for components on the Internet.
Types of rims
Having figured out what the bolt pattern of VAZ 2114 discs is and how to compensate for it when using discs with a different type of drilling, let’s now talk about the discs themselves.
Currently, you can find 3 main varieties of them on sale, namely:
- steel wheels;
- alloy wheels;
- forged wheels.
Steel wheels come as a standard factory option on all VAZ cars. They are characterized by low cost and, at the same time, good reliability and durability. In addition, in the event of an accident they are deformed without destruction, which in most cases allows them to be straightened and used again.
Useful video
You can glean additional interesting information from the video below:
In all modifications of the VAZ 2110, the bolt pattern in the factory configuration is 4x98. “Dozens” rolled off the assembly lines with stamped wheel disks - diameter R13, as well as with cast ones - diameter R14.
The wheels were fitted with tires measuring 175/70 R13 or 175/65 R14. However, if the sizes of wheels and tires are relatively clear values, then what a bolt pattern is is a big mystery to many.
Wheel parameters and bolt pattern for VAZ 2110, 2111, 2112
Theory
So, number 4 is the number of bolt holes. And the second number is the diameter in mm of the circle in which they are located. It is not so difficult to calculate that the distance at which the bolt is located from the bolt, if the bolt pattern is 98, will be 69.3 mm.
This is the same value for all wheels installed on the VAZ 2110. But in foreign cars, most of which have a bolt pattern of 100, one bolt from the other is located at a distance of 70.7 mm.
The difference is 1.4 mm, and this will no longer allow ideal installation of wheels with a bolt pattern of 4x100 on a VAZ 2110.
The difference between the bolt pattern 4*98 and 4*100
About the bolt pattern of VAZ wheel rims (4x98 and 4x100)
Rating 4.5 out of 5. Votes: 46
| What is the bolt pattern on the VAZ 2110? 4x98. It often happens that you get wheels with a 4x100 bolt pattern from a foreign car for almost nothing. Do you know if it is possible to install 4x100 wheels on a VAZ? What is the best way to install them, and is it safe? |
First, let's figure out what the bolt pattern of VAZ 4x98 and 4x100 wheels means.
- 4 is the number of bolt holes.
- 98 and 100 are the diameter of the circle in mm on which they are located.
If you do the math, the distance between the bolts with a bolt pattern of 4x98 will be 69.3mm, and with a bolt pattern of 4x100 - 70.7mm. That is, the difference is 1.4mm. There are errors everywhere, including in the bolt pattern, but the difference is 1.4mm. does not allow ideal installation of wheels with a 4×100 bolt pattern on a VAZ. The simplest method is to simply tighten the disk onto regular extended bolts, or even just 3 bolts instead of 4. This method is not safe, so it is better to avoid it.
Installing 4*100 disks
Let's consider several methods used by car craftsmen to install disks from foreign cars on a VAZ 2110:
- Sometimes holes are drilled into the disc hub on a lathe so that it will be possible to install the discs you currently have. Both 98 and 100 bolt patterns are suitable. And if you need to replace the disk, then this is also not difficult to do. The bolt sizes are standard;
- The simplest, but not the best way is to install the disk using extended bolts of regular diameter for wheels. But don’t be surprised later that this replacement led to the disc dangling, wheel play appearing, and it is impossible to establish the correct camber and toe, as well as the longitudinal inclination angles;
- A popular, relatively safe method is to install standard size bolts with an eccentric on a VAZ 2110 (an option is also possible if the bolt has an offset center). Today, online stores offer many sets of such bolts;
Wheel bolt with eccentric
If you replace the standard wheels of a VAZ 2110 with those with a 4x100 bolt pattern, then when you gain speed you will find that the wheel dangles, and during sharp braking it may even fall off, and how this “adventure” will end is unknown.
About the bolt pattern of VAZ wheel rims (4x98 and 4x100)
Rating 4.5 out of 5. Votes: 46
| What is the bolt pattern on the VAZ 2110? 4x98. It often happens that you get wheels with a 4x100 bolt pattern from a foreign car for almost nothing. Do you know if it is possible to install 4x100 wheels on a VAZ? What is the best way to install them, and is it safe? |
First, let's figure out what the bolt pattern of VAZ 4x98 and 4x100 wheels means.
- 4 is the number of bolt holes.
- 98 and 100 are the diameter of the circle in mm on which they are located.
If you do the math, the distance between the bolts with a bolt pattern of 4x98 will be 69.3mm, and with a bolt pattern of 4x100 - 70.7mm. That is, the difference is 1.4mm. There are errors everywhere, including in the bolt pattern, but the difference is 1.4mm. does not allow ideal installation of wheels with a 4×100 bolt pattern on a VAZ. The simplest method is to simply tighten the disk onto regular extended bolts, or even just 3 bolts instead of 4. This method is not safe, so it is better to avoid it.
A more popular way to install 4x100 wheels on a VAZ is to use bolts with an eccentric or with an offset center. Sets of such non-standard bolts can be easily found in online stores.
The third option is to use studs, for example from the cylinder head of a VAZ 2108, which are screwed into the hubs, and the disk itself is tightened with nuts, for example, from a Niva (see also Installing studs). It is also possible to use spacers that you can make yourself. Or buy ready-made ones. It is worth considering that the width of the spacer must be at least 20mm, therefore the wheel offset will increase by the same amount. As an option, use discs with a short offset to compensate for the offset of the spacers.
If you have a lathe, you can make 4x100 holes in the disc hub. Thus, it becomes possible to install optionally 4x98 or 4x100 disks.
If discs are installed incorrectly on a VAZ with a 4×100 bolt pattern, vibrations may appear at speed, and during sharp braking, death may occur, so before installation, think about safety first!
By the way, do you know what tires and wheels are suitable for the VAZ 2110?
How did you install 4x100 wheels on the VAZ?
Photo source:
- Che-guevaro logbook from Drive2.ru
Interesting site? Share with your friends
Wheel alignment
After replacing wheel rims, the dimensions and bolt patterns of which differ from those provided for by the design of the VAZ 2110, it is necessary to make all the necessary adjustments in order to ensure reliable protection of the entire chassis, as well as tires and arches.
Correct alignment angles are required for each front wheel. There are three parameters that require correct installation: wheel toe, caster angles of the steering axles, and camber angles of each wheel.
Wheel installation options
The rules by which the parameters of the front wheel are set are as follows:
- You won't go far if everything hangs out the way it wants, and the car is pulled to the side when it should be going straight. To ensure the stability of each front wheel, they are installed strictly at the required angles to the body and suspension elements. This is called the longitudinal inclination angles of the turning axis. Installation dimensions are indicated in the instruction manual;
- Camber is the angle between the plane in which the wheel rotates and the vertical. The camber bolt helps install it (it secures the telescopic strut and steering knuckle). If the camber is installed incorrectly, the car “steals” and the tire tread wears out more on one side;
Wheel installation options
What are the changes?
We are talking about a list of conditions on the basis of which a car cannot be registered with the traffic police. If previously the main requirements were the coincidence of the VIN numbers on the body and units, where such a number was stamped during registration of the car, and those indicated in the documents, today they are checked with the numbers of the engine, body, frame and cabin included in the documents.
This list of conditions is contained in Article 20 of the Federal Law on Vehicle Registration and literally prescribes the following in its official interpretation:
It is prohibited to carry out registration actions: if the registration data or design of the vehicle does not correspond to the information specified in the documents identifying the vehicle, with the exception of registration and other data of the vehicle subject to change (entered into the document identifying the vehicle) on the basis of the submitted documents;
Thus, the engine for 2022 is not a numbered unit, but when registering a car, the engine number must be checked against those indicated in the documents.
You might be interested in reading:
- How to tune the taillight of a VAZ 2115 Everyone knows the banal problem on second-generation Samaras, and not only on them, but on most VAZs -...
- Repair of a VAZ 2115 gearbox Do-it-yourself repair of a VAZ 2108-099, 2110-2112, 2113-2115 gearbox Problems with the gearbox started last summer, 2nd speed was difficult to engage, in the spring...
- Error 0300 on the VAZ 2115 and what it means. What does the P0300 code mean? Trouble code P0300 indicates that one or more cylinders are misfiring. If the last one...
- Crankshaft sensor on a VAZ 2115 - where it is located, diagnostics Purpose of the dpkv The crankshaft sensor on a VAZ 2115 belongs to the engine electrical control system. Based on the controller readings, the ECU sets the ignition and...
- What does error 8 mean on a VAZ 2115 - decoding I would immediately like to note that diagnostics carried out on our own, and those carried out at a specialized service station, are absolutely...
Preparing for adjustment
Most often, the VAZ 2110 camber and alignment are installed at a service station, but you can do it yourself. First of all, check whether there is play in the bearings and whether the steering is loose. At the same time, check the diameter and absence of deformation of the disks, air pressure in the tires, and tread wear.
VAZ 2110 front suspension assembly diagram
Naturally, if a wheel is loose, action will need to be taken, and one with improper tread wear may need to be replaced. Wheels standing on the ground need to be pulled relative to the vertical. If you find any play, have a helper apply the brake and check the play again.
If it disappears, the bearing needs to be replaced. If after this the size of the play not only does not disappear, but only decreases slightly, the suspension needs to be checked, repaired, and sometimes replaced.
Front wheel hub diagram
After this, hang the wheel and check the play again. It is possible that the play has disappeared, but the wheel turns jerkily or is simply difficult, then you need to slightly expand the diameter of the bearing installation site.
If you hear a grinding noise, the bearing needs to be replaced.
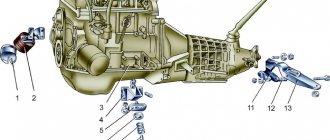
Engine dismantling process
Of course, the best option would be to replace the engine in a fully equipped workshop, but if this is not possible (and you really want to do tuning), then you should have the following minimum set of equipment:
- winch, hoist or hydraulic lift;
- shoes;
- jacks;
- cart;
- knob with a set of heads;
- spanners;
- screwdrivers.
Dismantling is carried out in the following order:
- The car is stopped using a hand brake and shoes, which should be placed under the rear wheels.
- Place the front wheels on jacks.
- With the hood open, disconnect the “mass” terminal and all small hoses and tubes suitable for the engine.
- Seal the pipe inlets to the engine to prevent them from clogging.
- Disconnect the throttle cable from the throttle pipe and bracket.
- Disconnect the air intake hose together with its bracket.
- To dismantle the air filter - to do this, use a sharp blade to cut off the three rubberized supports, due to which it is attached to the engine body.
- Remove the hoses leading to the receiver.
- Disconnect the hose intended for purging the adsorber from the nozzle.
- Remove the wires suitable for the pipe, the ignition module, as well as all others connected to the internal combustion engine.
- Remove the engine splash guard by unscrewing the mounting bolts.
- Drain all the coolant by removing the plugs on the cylinder block and radiator (while opening the reservoir cap).
- Drain the oil by unscrewing the plug cap on the gearbox.
- Disconnect the clutch cable.
- Secure the hooks of the lifting device to the eye bolts located on the gearbox and on the cylinder block, and then remove the engine.
Installation of the new motor is carried out in exactly the same order, but in reverse order. Also, it is important not to forget to connect the wires of all sensors to the correct connectors and refill all technical fluids that were drained during dismantling (coolant and oil).
Despite the fact that some car enthusiasts advise first removing the gearbox and then removing the engine, it is strongly recommended to remove the engine together with the gearbox.
Self-adjustment
Next, you need to stand on a level surface and load the machine, as recommended by the manufacturer. That is, about 320 kg in the cabin and 40 kg in the trunk.
The first adjustment is to set the pitch angles of the turning axis. The second is camber, the third is toe.
In this case, the camber angle in the loaded state should be 0°30'+-30'. The toe-in should be within 0°15'+-10', and the pitch angles of the steering axes should be 0°20'+-30'.
Remember that camber and other wheel adjustments are necessary in all cases when you in any way interfere with the operation of the front suspension of the VAZ 2110.
Peculiarities
The American style requires constant operation of the side lights; for this purpose, orange bulbs are installed in the turn signals. At the same time, while driving, one of the constantly burning lamps begins to blink, indicating the driver’s intentions. They make the car really look different. Additional lighting improves visibility on the road and also makes the car more visible. They attract owners of VAZ-2109, 2107, 2114, 2110.
Some drivers are misled by orange lights, which causes them to misjudge the situation on the road. Back in 2006, a standard for lighting devices for cars was introduced into the traffic rules. Therefore, road inspectors have the right to fine a person whose devices do not meet the standards. Employees of the regulatory authority do not always punish for this, but by law they can bring the driver to administrative responsibility.
Requirements for the operation of side lights are described in Art. 12.5 of the Code of Administrative Offenses, therefore it is better to make American women white, not yellow. Violation of the rules may result in confiscation of the lighting device, a fine of up to 2,500 rubles, and deprivation of a driver’s license for up to 12 months.
Corrosion protection
For reliable operation of the chassis, everything is important: the bolt pattern, the dimensions of all components, the alignment/camber settings, and even the protection of the arches from corrosion. It is the arches that are more susceptible to adverse factors than other parts of the body - from ordinary moisture during rain to reagents on winter roads.
To ensure reliable protection of the arches, it is best to install lockers (fender liners) on the VAZ 2110. Such protection will cost much less than subsequent repairs of rusted arches. It is important to choose the correct size of the lockers and ensure their tight fit in the area of the arches.
We hope that by completing all the repair work yourself, you will provide your VAZ 2110 with many years of trouble-free service on the road.