The products of the domestic automobile industry are reliable cars that can cope with our roads and at the same time maintain their suspension. But VAZ cars also have disadvantages, one of which is factory assembly, which does not imply the installation of alternative parts. This also applies to the 2114 model, which as standard is equipped with drum brakes on both wheel sets. This material describes in detail how to install disc brakes instead of drum brakes on your own.
IMPORTANT: changes and replacements in the brake system of VAZ cars are prohibited, the article is written for informational purposes only.
Interesting: AvtoVAZ also switched to disc brakes. The first model to receive this modernization was the Lada Kalina. Subsequent VAZ cars also received disc brakes on the rear wheels.
What is needed for replacement
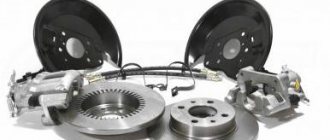
For a theoretical rework, the following elements will be required:
- Brake discs - parts from the front wheelset of a VAZ 2114 with a diameter of 240 millimeters are suitable. The only point is the diameter of the hub, which, using the appropriate equipment, needs to be changed from 58 mm to 60 mm.
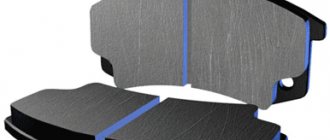
- Pads, calipers and hoses are also suitable from Samara. It is worth remembering that in this system the VAZ 2114 is no different from the “nine”, so parts from 2109 will also fit.
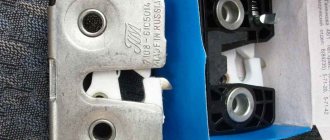
- Plates for mounting calipers. You can find this part on the Internet or in the automotive market. Some motorists make plates themselves.
- Bolts M10x1.25 30 mm – 12 pieces.
- Distance washers from the timing belt of the VAZ 2114 or “nine” - 8 pieces.
VAZ 2115 Bleeding the brake system
After each brake repair, during which the system was opened, air may appear in the pipelines. In this case, the system should be bled. There is air in the system if the pressure fluctuates when you press the brake pedal. In this case, the leak must be repaired and the brake system must be bled.
Air is removed from the brake system by pumping the brake pedal; this requires the help of an assistant. If you need to bleed the entire system, you should bleed each cylinder separately. This is the case when air has entered each cylinder. Bleeding sequence: 1 - rear right wheel cylinder, 2 - rear left wheel cylinder, 3 - front right brake caliper, 4 - front left brake caliper.
If only one caliper has been replaced or repaired, it is usually sufficient to bleed only that caliper.
Before bleeding, unscrew the cap of the compensation tank and fill it with brake fluid to the maximum mark.
While pumping, monitor the fluid level in the tank. The fluid level should not drop too low, otherwise air will enter through the reservoir. Always top up with fresh brake fluid. Brake system with ABS only: Turn on the ignition and depress the brake pedal 4 - 5 times. Then, if necessary, add brake fluid to the reservoir to the maximum level. When bleeding the rear brakes, leave the ignition on during the entire bleeding. When the bleeder valve opens, the ABS hydraulic pump will turn on and create pressure.
Remove the boot-1st wheel cylinder bleeder bolt. Clean the bolt, put on a clean hose, lower the other end of the hose into a bottle half filled with brake fluid
On older models, carefully coat the bleeder valve with a rust-corroding agent and carefully open it. Ask an assistant to pump the brake pedal until pressure is created, which can be felt by increasing resistance when pressing the pedal.
Installation process
If any difficulties arise during dismantling, then it is worth looking into the VAZ 2114 service manual, there is a detailed description of the removal and installation of all mechanisms. And now to work:
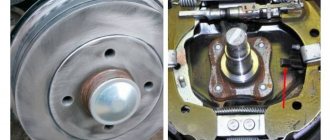
- The cable tension must be loosened and the rear pads must be brought together. After this, you can use the 12th key to remove the guide pins. The seat must be thoroughly cleaned with a metal brush, and then the drum must be knocked down. It is not recommended to use a metal tool for these purposes, as it can damage the seat. The best solution would be a rubber hammer;
The rear beam also needs to be sharpened - To release the pads, you need to remove the springs - this can be done with a regular screwdriver. After these manipulations, you can remove the tension spring and spacer bar. Next, you should lower the handbrake lever, after which you can remove the brake pad. The standard elements are removed, you can begin installing the new mechanism;
Important point! Sometimes one pin hole in a mechanism is smaller than the other. It is not recommended to adjust this size yourself. The best solution would be to go to a workshop where the diameter can be quickly adjusted.
- The caliper can be located in front or behind the wheel axle. This should not affect the operation of the mechanism in any way, but usually owners of the VAZ 2114 prefer to install it on the rear axles, since symmetry will have a positive effect on braking. The next step is to join the faceplate and hub. You should check that the centering has been carried out thoroughly. If there are defects, the docking must be repeated;
Grinding the corner of the beam - The next step should be straightening the corners of the beam. Once this procedure is completed, the hub can be installed. Straightening can be done using a grinder. The main part of the work is completed, all that remains is to install the rear brackets on the faceplate, and then attach the brake disc to the mechanism. In order for the structure to be reliable, it is necessary to place spacer washers at the contact points. The connection between the brackets and the faceplate must be securely secured, and then proceed to sealing the mechanism. An important point is to check the pedal. Rear wheels with an improved mechanism will significantly reduce the braking distance, thereby increasing safety.
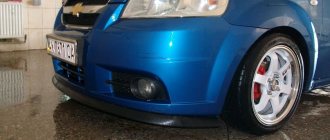
Result of work
Installation details and purchasing spare parts
So, it's time to start installation. The first step is to unscrew the brackets, cylinders and guides. Typically, new discs have a large central hole (CO), and therefore, for correct operation and accurate centering, I would advise cutting a strip from a tin beer can, which must be inserted between the hub and the disc to eliminate play. After this operation, you can put on the disc and screw on a new bracket. Diagnostics of the car's brake system must be performed without fail.
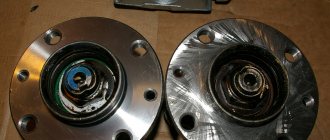
Rear hub disassembled
It is immediately necessary to describe one nuance that drivers encounter when auto tuning a VAZ 2114. It may be that one of the finger holes is significantly smaller than the other. Don’t “do magic with it”; go to a car service center, where in a couple of minutes they will make a hole for you that will be equal to 8.5 millimeters.
If you feel that all is not well with the cylinders, then it is better to replace them. The front brake system often presents unpleasant surprises, the cause of which is overheating of the discs and pads. A ventilated disc is always wider than the standard one, so you definitely need to buy new protective covers, guide pads and calipers.
Take more time to inspect the products you are about to purchase. This work is for yourself and is done with your own hands, so you need to buy high-quality spare parts, although this causes a slight damage to your wallet.
The brake system does not like saving, there is no need to be clever here - if the parts have served their purpose, you need to replace them immediately. Before starting tuning, the car must be placed on a reliable stand, or use a lift.
Tuning VAZ cars - interesting material!
Advantages of disc brakes
Installing new elements in the rear wheelset is not a whim, since disc brakes significantly increase the safety of the driver and his companions, other motorists, as well as pedestrians. The two main advantages of a disk system are described below:
- Stable work. Weather conditions have little effect on how disc brakes perform. The same cannot be said about drum brakes, since they only perform well in dry weather. When there is light rain, the braking distance increases significantly;
- Resistance to overheating. Owners of Samara have probably noticed that when braking frequently at speeds above 100 km/h, the brake pedal begins to “fail.” This defect usually occurs due to overheating of the brake fluid. Intense friction occurs between the pads and discs, as a result, the parts of the drum mechanism can heat up to 600 degrees.
The brake pedal fails (the brakes are too soft)
It is worth noting that if you feel weak braking when pressing the brake of a VAZ 2109 or any other model, you need to think about the fact that these may be features of a particular vehicle. Perhaps you just moved from another car, so you feel some discomfort while driving a new car.
On the other hand, such a symptom can also occur when air enters the system. It should be noted that in the event of depressurization of the system, the pipeline may completely burst and completely fail. This can be corrected by bleeding the brakes. At the same time, you should diagnose the cylinders, check the level of the brake fluid, as well as its quality (often air gets into the brake system simply because there is too little fluid) and perform a full check of the vehicle (the latter will help determine the presence of hidden problems) ;
If the pedal becomes soft after replacing the brake fluid, then, as a rule, the problem lies in the use of a low-quality mixture. Alternatively, it is possible that air got into the system during replacement - this is also worth paying attention to.
It is also quite common for the pedal to feel soft after bleeding the brakes. First of all, you should bleed the master cylinder. As a rule, this solves a similar problem. Alternatively, there may be problems with the anti-lock braking system (if equipped). In any case, if the brakes are soft after bleeding, you should approach this task responsibly. Perhaps you should contact specialists who can quickly and effectively fix the problem.
Video about the operating principle of the brake master cylinder:
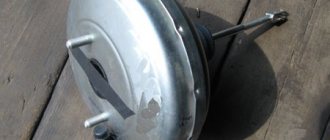
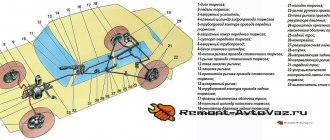
Design and principle of operation of the VAZ 2114 brake system
The VAZ 2114 has a fairly effective braking system; it has a hydraulic drive and a vacuum brake booster. The front wheel brakes are disc, the rear wheels have a brake drum and pads. This device allows you to maneuver on the road with high efficiency and, if necessary, apply emergency braking. The braking distance of the VAZ 2114 at a speed of 80 km/h is ≈ 38 meters.
The front brake consists of:
- brake disc - it is made of gray cast iron or carbon steel and must have grooves machined on it for effective air cooling during braking;
- friction elements or brake pads in the amount of two pieces;
- calipers;
- piston;
- protective anti-dust cuff and rubber sealing ring.
Typically, the front wheel brakes of the VAZ 2114 are characterized as disc brakes with a caliper, single-finger piston brakes with floating pads.
When the brake pedal is pressed, the fluid presses on the bottom of the caliper, it moves and puts pressure on the pad located on the inner surface of the disc. It presses against it and the caliper, under pressure, moves on the fingers in the opposite direction, forcing the pad, located on the outer side, to clamp the metal disc completely. As a result of the fact that the disc is clamped between the pads, the car is braked and the stronger the force on the pedal, the more effective the braking process. When the pedal is released, the pressure decreases, the caliper moves and the pads move away from the disc. The required clearance is maintained automatically due to the fact that the sealing ring in the cylinder is spring-loaded, including when the friction surfaces wear.
The rear wheel brake consists of a drum, to which both pads located in the drum are pressed during braking. They are secured with upper and lower tension springs. Both upper pads are pressed against the working cylinder, and the lower one presses them against a fixed stop. When the brake is applied, the pads are pressed by the cylinder piston against the inside of the brake drum. And when moving, due to the torque, the pressure of the shoe on the drum increases.
Reasons for failure of VAZ 2114 pads, signs of malfunction
The main reason for pad failure is natural wear and tear during operation. It is necessary to replace the front pads on VAZ 2114, 2115:
- front ones - every 15–20 thousand km;
- rear - every 100–120 thousand km.
There are a number of reasons that accelerate wear. This is an aggressive driving style, operation in regions with a lot of sand or other abrasives on the roads. Driving with faulty pads can result in a wheel seizing or an inability to reduce speed when necessary. In both cases, there is a threat to the life and health of drivers and passengers.
Difference in thickness of old and new pads
The presence of a malfunction can be determined visually - the thickness of the lining must be at least 1.5 mm. Pads need to be replaced or diagnosed if the following symptoms are present:
- whistling, shuffling when braking and while driving;
- other extraneous sounds.