Content
Owners of the legendary “Seven” often strive to somehow make their car stand out in the crowd. To do this, you can, for example, completely change the design of the car, adding “sportiness” to it. The same goes for the interior. But these external improvements are unlikely to please the owner of the VAZ 2107 for a long time. After all, despite the fact that the car has changed significantly, something is still missing. Swiftness in the exterior, sportiness and aggressiveness cannot replace the driving sensations of cars with high dynamic performance.
After some time, car enthusiasts are inclined to think that it is time to make drastic changes. We are talking, naturally, about the power unit. After all, a lot depends on him. There are plenty of reasons for tuning the VAZ 2107 engine to seriously think about this issue. These include, for example, a lack of power over long sections and the lack of good acceleration dynamics. In addition, if you carry out all the operations yourself, your friends and colleagues will respect you as a master and connoisseur of power units.
Benefits obtained by tuning an injection engine
Tuning the injector helps to unlock the full potential of the car engine. The improvement in engine performance is due to the following factors:
- portions of supplied fuel become more accurately dosed and depend on the engine operating mode;
- reducing the proportion of unburned gasoline in the exhaust leads to a decrease in environmental pollution;
- increasing the speed of reaction to pressing the gas pedal;
- Sensitivity to engine load allows you to supply the optimal amount of fuel;
- increasing engine efficiency as a result of complete combustion of a portion of the supplied fuel;
- as a result of flashing the electronic control unit, you can get rid of initially uncorrected bugs;
- all changes made to the electronic module are completely reversible;
- idle speed becomes more stable and less dependent on ambient temperature.
Typically, injector tuning is accompanied by an increase in engine power of up to 20 horsepower. If the main goal of tuning is to increase the efficiency of the car, then such a significant increase in horses is not observed. The recommended golden mean for the changes made is the maximum improvement in dynamic characteristics, accompanied by an acceptable increase in fuel consumption.
Basic steps when tuning a VAZ 2107 engine
1. Operations to increase the power of the power unit. At this stage it is expected to work with the cylinder head, change the diameter of the jets in the carburetor, install large diffusers, turbocharging, and boring the cylinder block. 2. Work with power at low and high speeds. At this stage, work is carried out to configure systems to improve performance.
Now let’s move on directly to the description of all the procedures that you can do if you have your own garage, desire and certain skills.
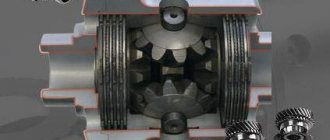
Procedure for installing a compressor on a VAZ 2107 carburetor
1. Remove the standard alternator belt and dismantle its fastening 2. Remove the air filter 3. Install pulleys from the Niva Chevrolet instead of the factory pulleys 4. Mount the compressor mounting bracket, as well as the compressor itself and the alternator belt according to the diagram below. (the bushings from the kit must be put on the studs between the mount and the compressor) 5. Place the corrugated pipe on the inlet of the compressor and install the filter. 6. We install pipes on the outlet of the compressor (they must be connected by a special pipe with a diameter of 60 mm and a length of 50 mm.) 7. We connect a 60 mm pipe with the valve, install a coupling, as well as a supply flange in the carburetor. 8. Use a blue hose to connect the compressor fitting and the carburetor fitting. 9. Disconnect the hose for crankcase ventilation, and secure all other connections with clamps. 10. The last point is adjusting the tension of the generator belt.
That's it for installing the supercharger, now you've got your 50 percent increase in power. Agree that this procedure is not as complicated as it may initially appear.
VAZ 2107 engine tuning: increasing power
The first thing to start with is modifying the cylinder block. At this stage, the channels of the intake and exhaust manifold are grooved, as well as the alignment of the resulting holes. It is worth noting that this is not as easy to do as it might seem at first glance. But the result is really impressive. You can add up to 20 horsepower to your power unit even without performing all subsequent operations.
Next, the carburetor is adjusted. At this stage, you can change the diffuser (from 3.5 to 4.5). It is also recommended to replace the jets (fuel and air), remove the throttle valve vacuum drive spring, install a wire on the vacuum drive and change the pump. All of these operations will also add power to your powertrain. Replacing the air filter allows you to get improved throttle response of the unit at high speeds. It is necessary to install a zero resistance filter. However, it is important to remember that such a filter requires some care. In addition, it can create additional noise. The hood may need soundproofing.
To improve power characteristics, several carburetors are installed on the power unit. This is done in order to straighten the supply of the mixture to all cylinders. The fact is that there is one nuance in “Seven”. The second and third cylinders located close to the center (working in pairs) produce a richer mixture. Their pistons are blacker than other cylinders. As a result of this manipulation, you will get improved torque at low speeds and an increase in power at high speeds. In order to fine-tune the engine, you can replace the camshaft. In the standard version, it distributes power equally to both ranges. Here you will have to choose between top, bottom or universal camshafts.
When installing a low-end engine, you will get more torque at low speeds. This option is well suited for towing cars, off-road driving, and also saving fuel. As for the overhead camshaft, its operating frequency starts at 3200 rpm. At low speeds it consumes more fuel. This option is great for sports and city driving. In order to improve the power characteristics of the power unit, it is possible to install lightweight parts. For example, springs will return lightweight valves to their place faster. And this, in turn, will affect the behavior of the car at high speeds; the engine efficiency will increase. Alternatively, you might consider installing a stiffer spring. And one more important nuance. The operating efficiency of the power unit can be improved by valve configuration.
The valve spring plates and rockers can also be made lighter. But the latter should be changed only when the entire valve block is changed and the engine is adjusted to the ability to accept higher speeds. Important information! If you are not sure that you can carry out all the operations yourself, contact a specialist. Even minor disturbances in engine operation can lead to very serious consequences.
Continuing the topic of tuning the VAZ 2107 engine, one cannot fail to mention the installation of a split gear in the timing belt. This part makes it possible to independently adjust the angle of rotation of the camshaft in relation to the crankshaft. A distinctive feature of this gear is the presence of an aluminum core, which makes the part lighter. But installing turbocharging on the “Seven” is not advisable. The fact is that in this case it is necessary to install an intercooler that will cool the air. But under the hood of the VAZ 2107 there is simply no room for this part. Another important point is the impossibility of installing a turbocharger on a carburetor. A much more economical and, one might say, optimal option for the “Seven” is to install a compressor.
Injector disadvantages
- the injector is capricious, requires regular maintenance and cleaning (otherwise the quantity and quality of injection decreases), and there is a loss of power, the engine runs unstable, and exhaust toxicity increases;
- since a new type of engine was not developed for the injector of the classics and the VAZ 2107, in particular, but “they took what they had,” then access to many parts of the traction unit is difficult, and it can be difficult to repair anything with your own hands;
- installation of the catalyst is low, below the rear axle gearbox, at a height of 10-11 cm, immediately forget about driving through a mown field to pick mushrooms;
- refuel wherever you want, but get your VAZ 2107 accustomed to excellent gasoline. Otherwise, you'll stall.
- If you stall on the injector, you will be “like on a foreign car”, you will stall for a long time. The tow truck and car service station are shining.
- When starting the engine, leave the key in the ignition position for a few seconds. This will allow the fuel pump to build up fuel pressure, otherwise it will fail.
- How much does it cost to tune a carburetor VAZ 2107 with conversion to injection injection?
- If you turn to service experts, you will spend about 30 thousand rubles on tuning. at prices in the summer of 2014, when the ruble was more or less stable for parts and labor, for everything on a turnkey basis. Maybe you'll even get a guarantee.
- If you are confident in your knowledge and experience, then, by going to auto repair shops, you can buy everything used, but working, for 12-15 thousand rubles, and disappear in the garage for a long time, doing tuning not only with your own means, but also “ with your own hands,” for this you need to be “handy” and understand hardware, but even more “big-headed” and understand electrics.
- The cost of a new six engine with an injector is 55,000 rubles. Will fit on VAZ 2107. Option with warranty. If you choose tuning at a car service center, you will receive a guarantee for both the kit and installation.
Tuning the VAZ 2107 engine injector: how to increase power, install a compressor, chip, photo, video
Every owner of a VAZ “classic” at least once dreamed of modifying the engine of their car, making it more powerful and responsive. The desire is justified by many objective reasons, of which three main ones can be distinguished:
- the engine power is not enough to overtake long vehicles and trucks on the highway in conditions of limited visibility;
- the “Seven” engine is not one of those that allows you to beautifully break away from the flow of cars at a traffic light;
- the owner of a car sometimes wants to put his technical knowledge into practice and create some kind of “exclusive”.
The first reason is especially important - sharp acceleration can save lives if an oncoming car unexpectedly appears on the highway.
Therefore, tuning the VAZ 2107 engine is quite popular among fans of this model.
Tags: drift, lowering, chassis, internal combustion engine, sport, good stuff
Comments 54
Well done, I respect these guys who can do something with their own hands and not stupidly bought spare parts and went to the service center, but after welding everything that was welded to the body needs to be protected from corrosion, I’m not saying anything about the steering rods and bipods, I threw it out and installed something else, but the body is the most sacred part of the car; the body will not be screwed on; there will be no spare parts for it.
Pass! Have you done anything with the HOUSE of the crossbar? I almost redid mine too, albeit for off-road use. I’m thinking about what to come up with with the Cross Rod?!
the new one was simply welded, and the old rot was thrown out
Shake your hand! Great job!
Here is the full article: Is it necessary to polish the intake manifold?
NO! Practice has proven that these operations take a lot of time, but for engine tuning the result is “no”, i.e. You can't feel it on the pedal.
Camshaft replacement
The standard camshaft of the VAZ 2107 distributes power approximately equally throughout the entire speed range. To improve power at low speeds, you can install a low-phase shaft, which closes the valves faster. A wide-phase shaft that opens the valves strongly gives an advantage when operating at high speeds.
Therefore, the market offers several camshaft options for tuning the VAZ 2107 engine: top, bottom (lower) and universal shafts.
Installing a low camshaft is convenient for those who often tow or simply do not like to “crank the engine” to high speeds. An overhead camshaft is needed for those who are used to maintaining high engine speeds. It starts working after 3200 rpm, but at low speeds the engine thrust weakens and fuel consumption increases. Therefore, such a camshaft is used only for specialized sports tuning.
Increasing engine power VAZ 2107
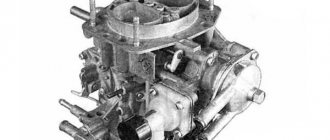
Initially, on the VAZ 2107, the carburetor was responsible for the engine power supply system. There were four samples in total: Solex, Ozone, DAAZ and Weber. From older to newer devices, the same problems were noted: clogged nozzles, incorrect mixture adjustment, insufficient fuel injection into the combustion chamber, etc. In a word, the carburetor had many shortcomings, and despite the fact that almost any malfunction can be fixed with your own hands, it took a lot of time.
It was for the above reasons that it was decided to replace the carburetor with an injector. This was supposed to introduce a number of positive qualities into the technical characteristics of the VAZ 2107, such as: faster acceleration from a standstill, fuel economy, no overflow of spark plugs and clogging of the system, etc.
Installing an injector on a VAZ 2107 with your own hands
We could not ignore such an important and sensitive issue, which can greatly increase the power of the 7 engine and please its car enthusiast. Below are approximate instructions with all the operations for switching from a carburetor to an injector in a classic. It is worth saying that everything described below is quite suitable for other engines of the classic VAZ family.
So, you have the entire kit in your hands and therefore we arrange it around the periphery of the engine compartment. 1. Place the ignition coil or module under vacuum. The fact is that this is the best place where there are low vibrations and less heating, which will ensure long-term operation of the equipment.
2. Install the front cover under the crankshaft position sensor (214 or 2123 to choose from). If you decide to try the second option, you will have to raise the fan a little higher. 3. We install the electric fuel pump on the side member or directly into the fuel tank. We recommend using the Volga kit. Don’t forget to connect the positive wire to the control unit, which we will install later.
4. You need to make a special adapter for the fuel pressure regulator from any turner you know. Now you can tuck all the hoses into the tank. Leave the vacuum tube.
5. We solder the fuel return pipe tightly to a special pad by drilling and also using soldering acid. 6. We install a speed sensor, which is characterized by a 6-pulse operating mode. It's easy and simple to do. 7. We mount the hub nut under the lambda probe by welding. 8. Now let’s estimate the length of the electrical wiring so that all the necessary wiring is supplied with a reserve. We process all the tips with a soldering iron and tinning. 9. We wash the injectors with the ramp, all the hoses and the filter. We do this procedure together. 10. Remove the standard ignition and everything connected with it. 11. We drain the antifreeze, and also install a tee under the pump and a coolant temperature sensor. 12. We make the inlet channels with a file so that their shape resembles an egg-type roundness. We put foam rubber or rags in each of the channels so that the chips do not get inside.
13. Drill holes and cut threads for new manifold studs. 14. We make a 10x1.5 thread and plugs with the same thread for a flat-head screwdriver. These will be the antifreeze drain channels. 15. Install a new manifold with a gasket adjusted to the shape of the channels.
16. Now we install the ramp and injectors, as well as the receiver. We also install the throttle, idle air control, TPS, inlet hose and breather pipe. 17. We connect all sensors.
Here are the main operations we considered. Of course, it’s a little superficial, but the algorithm will be clear to you. Of course you will have to tinker, but the effect is worth it.
Lightweight valves
Installing lighter than standard valves ensures that the valve closes quickly with a spring. For this purpose, expensive light alloy valves are used. This method of modernization provides greater efficiency and normalization of valve timing at high speeds.
When tuning valves, you can install upgraded valves with a special shape of the disc profile.
Sometimes, instead of using light alloy valves, the valve plates are simply lightened. Less weight requires less camshaft effort to operate. Reduced weight rockers can be used in conjunction with lightweight valves. This will give even more advantages when using the machine at high speeds.
A similar effect can be achieved by installing more powerful valve springs. The valves also begin to close more quickly, but this solution has its drawback: stronger springs place additional stress on the camshaft, reducing its durability.
Engine Lada 2101-2107. Boring of cylinder heads. Part 2.
The story will mainly be about how the cylinder head of the VAZ 2101-2107 was modified:
After disassembling the block, it was time to disassemble the cylinder head. To do this, I needed a tool: a desiccant and a beater for the valve guides. This was all bought. A universal beater for engine repair, of this type:
1. Desiccant - 120 rubles 2. Set of mandrels - 200 rubles 3. Key for lapping valves - 70 rubles
I sorted everything out without a book, let’s say by intuition. =) I really like to figure out everything myself, how and what is taken apart and done, moreover, with a full understanding of the operation of the system. Among the peculiarities during disassembly, I will say one thing: some valves do not want to come loose. This is not a reason to be upset = ) ) ) Take a spark plug wrench, place it on the valve plate and hit it with a hammer or sledgehammer. Then you take the desiccant again and everything desiccates perfectly. If you know this method, you will dry out the valves in 5 minutes. The guides are easy to knock out, there will be no difficulties with this! The rule is: knock out the cylinder head on a cold one, hammer in on a hot one! Then everything will be as it should!
I laid out all the spare parts neatly on the shelves so that they weren’t lying around underfoot and everything was correct and clear. It was necessary to do this from the very beginning of analyzing the engines... everything comes with experience!
Then it was time to cut the intake manifold and cylinder head. After practicing boring channels on a test manifold, I realized my mistake - I was taking the channel in the wrong direction. It's not very good. I think I wasn't the only one who had this error. Here's what it is:
crookedly bored manifold
On the left is a smooth, undirected channel, on the right is a curved and directed channel) the difference, I think, is noticeable to everyone. What is the method for smooth boring of a channel? I found a way to avoid such channel slippage so that everything would be smooth and the channels would be round. This method is just banal drawing. The manifold channels are smooth and round by nature (unlike the cylinder head channels). Therefore, you measure how many millimeters you need on each side and draw... like this:
And now you definitely won’t take away the channel. You will know which direction to move. A very convenient method. I recommend it to everyone. Seven times measure cut once. I sharpen the channels with sandpaper, but it’s a chore, I agree, but it’s still reliable. The chances of cutting into the cooling channel are low. Therefore, work is much calmer. The tool is used like everyone else: drill -> hose put on a little and tightened with a clamp -> fabric (rags) -> sandpaper wrapped overlapping. The downside of this tool is that the hoses often break. After a long time of sawing the channels, washing and externally sanding the collector, it turned out like this:
Hooray! The collector is bored out. Channels are 32-33 mm in diameter. That is, the exhaust valve fails and dangles in the channel. Sharpening the commutator is very tedious. The problem is the hoses keep breaking...so be patient. After the collector wasted away, he decided to go buy some goodies:
So, here is a complete list and prices for all parts: 1. Reamer for valve guide - 200 rubles 2. Pin driver - 100 rubles 3. VALEO clutch - 2700 rubles 4. Main and connecting rod bearings ZMZ - 185 and 149 rubles 5. Set of engine gaskets – 495 rubles 6. SM rings – 715 rubles 7. SCT oil filter – 121 rubles 8. Suppressor – -54 rubles 9. Tensioner shoe – 45 rubles 10. Pins – 160 rubles. But I took the wrong ones. I need from 2108... 11. AMP valves (Poland) - 900 rubles 12. AvtoVAZ 2101 guides - 270 rubles 13. AvtoVAZ rockers - 850 rubles 14. AvtoVAZ camshaft bed - 400 rubles 15. Mandrel for rings - 250 rubles 16. Countersinks - 900 rubles 17. Retaining rings, gearbox bolt, ratchet nut – 200 rubles Looks like I didn’t miss anything = ) ) )
"Pseudo-turbocharging"
They say that this method greatly improves dynamics due to the increased amount of air entering the carburetor. To do this, change the heated air supply hose attached to the air filter. So, choose a similar hose diameter, but a longer length, and then lead it to the radiator, closer to the fan. Thus, air will flow into it in a direct flow and without turbulence, passing through the radiator.
True, there is one circumstance due to which many car owners refuse this procedure. The fact is that with the position of the hose described above, a lot of dust and debris gets there, and, as a result, they freely pass through the radiator honeycombs and accumulate in the air filter in very large quantities. Considering that not all debris is retained by the filter, all the “rubbish” penetrates the cylinders. The result is increased piston wear. However, if you don’t mind the “engine”, make such a “pseudo-turbocharging” in your “seven”! By the way, everyone praises him very much.
Turbo principle
To increase engine power, you need to increase the fuel supply. But that’s not all; in order for this fuel to burn completely, the air supply must be increased. Domestic classics were produced with naturally aspirated engines, but here you can’t jump over your head. You can increase the volume of supplied air using various devices. For example, a compressor successfully used in models. However, the compressor is practically not used by other manufacturers. Another device that is much more popular is the turbine.
The turbine cuts into the exhaust system and, using the excess pressure of the exhaust gases, forces atmospheric air into the cylinder block.
Tuning the interior of the VAZ 2101
The “classic” VAZ, made in the USSR, which has traveled thousands of kilometers on the Great Danes, probably looks unsightly. The interior is unattractive and very different from modern cars. Do-it-yourself interior tuning is carried out in several stages.
Experts involved in tuning the appearance of the “penny” instrument panel recommend installing a torpedo from a foreign car or taking it from a modern relative. Tuning classics is an art that requires a combination of taste and the parts at hand.
First, the old dashboard is dismantled:
- The instrument panel is removed.
- The glove compartment shelf is removed.
- Get rid of the fasteners that secure the torpedo to the engine compartment.
- We disassemble and remove the steering column.
- Drain the coolant and remove the pedal assembly.
- Home tuning and installation of a new panel is carried out in the reverse order.
The master must take into account the configuration of the new torpedo and the placement of modern instruments on it. Remember that using spare parts from the “seven”, you will need to upgrade the heating system for high-quality operation of the equipment. Working at home requires patience and skill with tools.
The car will radically change its appearance after the seats are reupholstered. This is a painstaking and difficult operation that requires special training. By following the required sequence, you can do the work yourself. The price in this case is affordable for people of any income. In addition, it’s nice to show off the results of your efforts.
- Remove all seats.
- We remove the factory covers by releasing the clamps on the back.
- Carefully separate the cover into its component parts. They will serve as a template for cutting the new fabric. Number each element to avoid confusion when stitching.
- We lay out parts of the old cover on the new smoothed material. We fasten them with needles or pins. We trace the outline with a felt-tip pen with a small allowance.
- The cut out elements are glued to thin foam rubber. Special glue in tubes is ideal.
- The inside of the seams is smoothed out and turned away.
- The finished cover is placed on the seat.
- The chairs are put in place. Cheap tuning is over.
The car will radically change its appearance after the ceiling is reupholstered. It is best to replace the old upholstery with new one, but you can glue new fabric over the old material. At the same time, to make traveling in your car comfortable, do not forget to install a new layer of sound insulation.
- The work begins with removing the glass, handles, injury protection and visors.
- Remove the factory fasteners from the arches that run along the perimeter of the trim.
- We remove all the arches along with the upholstery. Work begins with the passenger seats to avoid damaging them.
- Lay out the new upholstery on the floor and make stamps on it to secure the arches.
- New fasteners are attached to the arches.
- Let's start re-upholstering. Work is carried out from the rear window. One part of the arc is inserted into the black cap. The second is in the factory hole of the body.
- The material is secured with clamps after all the arcs are in place. Otherwise, there is a high probability of tearing the fabric.
- At the front, the fabric is fixed to the front windshield frame. At the finish line, an arc is placed next to the rear window. A special tongue is used.
- The final part of the perimeter alignment using special latches.
Together with tuning the instruments and panels of the VAZ, the internal appearance of the car will radically change, turning an unsightly car into an original vehicle.
The beginning of chip tuning
The result of injector chip tuning is not only a change in the dynamic characteristics of the car, but also an extension of the service life of the power system and cylinder-piston group. All changes must be carried out on a fully functional car, since in the presence of technical faults it becomes difficult to obtain the desired result from tuning.
Chip tuning must begin with the selection of software. Sources of the necessary software can be:
- Developments of tuning service centers. The average car owner often does not have access to these programs, so to flash the module you will need to contact a specialized studio;
- Openly available software created by other car owners. This method of chip tuning should be treated with caution, since most software is not tested for its effect on the engine, which can quickly damage it or worsen its dynamic characteristics;
- Write the execution code yourself. This option is suitable only for car enthusiasts who understand programming and have the ability to control engine parameters upon completion of tuning.
If there is insufficient knowledge and lack of software, the quality of which the car owner is confident, it is better to trust the modernization to specialized workshops. Although chip tuning is a reversible operation, operating a car with incorrect software can significantly reduce the life of the power plant and fuel system.
Source
Converting a carburetor engine to an injection engine
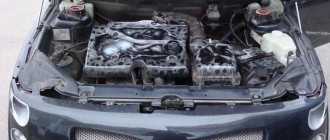
Installing electronic fuel injection instead of a carburetor will require modification of the fuel system and installation of sensors. After the modification, the engine compartment will be transformed, as shown in the figure below.
Engine compartment of VAZ 2107 after installing electronic injection
It is recommended to remove the carburetor power system according to the instructions below. For example, we consider installing an injector on a VAZ 2107.
- Drain the coolant. For ease of work, it is advisable to remove all antifreeze from the system. It is acceptable to reduce the antifreeze level below the cylinder head;
- Dismantle the carburetor;
- Unscrew the manifold fastenings;
- For ease of work, it is recommended to remove the breaker;
- Remove the pulley from the crankshaft;
- Install a new front engine cover. In VAZ 2107 cars with an injector, it comes with a place for the crankshaft sensor;
- Replace the pulley with a new one;
- Check that the marks match.
There are several options for converting a carburetor VAZ 2107 by installing an injector when installing the cylinder head:
- purchase of prefabricated head 2124;
- rearrangement of parts from the original cylinder head to a new injection one;
- boring the old, classic cylinder head for oval intake windows for injectors and additional studs.
After installing the cylinder head, it is necessary to install the following elements:
- ramp with nozzles;
- receiver;
- knock sensor;
- fine filter.
The ignition is controlled by a special module. Since this element is often not provided in the carburetor version, there is no place for its installation, so each car owner independently chooses the place where it is convenient for him to mount the control module. A site near the brake fluid reservoir is recommended, since the impact of engine temperature in this location is minimal. Low influence of heat has a beneficial effect on the reliability of the module and its durability.
Ignition module
The final stage of installing the injector is working with the electrical wiring. When performing this operation, you should adhere to the following rules:
- minimal use of terminals, as they are susceptible to oxidation during operation;
- exact adherence to color markings, which will facilitate subsequent changes and repairs;
- correct selection of the length of the electrical wire.
By performing tuning in this way, the car owner will get rid of all the problems that plague carburetor engines.