In the starter, important importance is given to the bendix, if it breaks down it will not be possible to start the engine. And, if a characteristic metallic sound is heard during startup, this indicates an immediate replacement of this part.
Qualified craftsmen are not recommended to even try to repair the Bendix; according to them, it is much more advisable to replace the old worn-out part with a new Bendix. Such a timely replacement of the bendix, rather than repairing it, will prevent imbalance of internal parts with the prospect of increased wear on the starter motor.
Purpose
Bendix is otherwise called an overrunning clutch, which refers to the working body located in the car starter. Torque is transmitted by a gear from the starter motor to the flywheel of the internal combustion engine. But the gear cannot be in long-term engagement with the flywheel, since the starter should operate for a short time, after which it must cool down. And in order to protect the starter motor from the effects of the internal combustion engine, Bendix is designed.
Diagnostics
Even with extensive experience, it is difficult for a technician to immediately figure out problems in the starter.
After all, the reason for replacing the Bendix can be not only worn-out teeth of the Bendix gear, it can also be worn-out bushings on which the starter shaft is mounted, or there may also be a common reason - damage to the retractor relay. So, in order to identify the cause of this damaged part, experience is needed. Some technicians carry out diagnostics on special stands under several loads:
- Under load;
- Without load.
And for some, it is enough to move their hand to understand the need to replace the Bendix.
Self-replacement
Replacing a bendix yourself is not as simple as it seems at first glance. To change it, even on the simplest domestic car, you will need to remove the starter, and this work can be accompanied by a number of difficult moments. Still, you can try to make the replacement yourself. So what needs to be done:
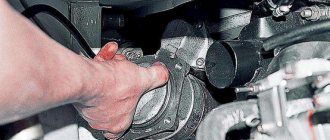
- Remove the starter. To do this, open the hood and disconnect the negative cable from the battery. The car must be driven into the inspection hole. Using a wrench, unscrew the fastening of the positive battery cable to the solenoid relay. Then the two terminals are removed, paying attention to the condition of the insulation on the wires. Unscrew the bracket using a hexagon. Then, using a spanner, unscrew the bottom bolt that holds the starter. This process is quite troublesome. After this, the upper mounting bolt is turned out and the bracket is unscrewed, with the help of which the starter is attached to the block. After this work, the starter is carefully removed.
- By unscrewing the studs along the entire starter and those that secure the cover, separate the starter into two parts. After removing the brush assembly and rotor, it is recommended to clean all parts of the starter.
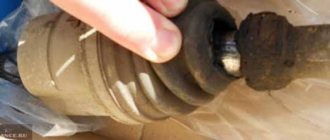
- Then you need to remove the retaining ring from the rotor shaft and remove the worn bendix, replacing it with a new one. Immediately check the condition of the bushings and forks. To remove the plug, you need to carefully remove the rubber plug and remove the required element.
- The bushing is pressed out using a head of a suitable size. If these parts wear out, they should be replaced immediately with new ones. The bushings are driven back using a hammer. It is worth remembering that the blows should not be strong and should be carried out through a special wooden lining.
- The starter is assembled in the reverse order, after which its functionality is checked.
Is it necessary to make repairs?
From a theoretical point of view, there is no problem in changing the bendix, but from the practical side of things, it is somewhat burdensome and difficult, but quite doable.
But what about Bendix repair? In principle, according to professionals, conversations about repairing this part should not even arise.
This is explained by the fact that modern machines have almost the same wear resistance of parts located in a single unit. This means that you can be sure that if one gear wears out, then after it, almost immediately, the next one will deteriorate, and so on. Therefore, it is much more practical to completely change the bendix, and besides, the cost of the part itself is low.
What is the sequence of actions
So, to change the bendix you should do the following:
- Removing the starter;
- Starter disassembly;
- Replacing the old bendix with a new part;
- Reassemble the starter in reverse order.
When starting work on replacing the Bendix, it is advisable to completely remove the battery, since even a short circuit can lead to serious consequences. If you have any questions or doubts, you should seek professional advice.
During operation, the starter is exposed to external irritants, it is exposed to dirt and moisture, which adversely affects its functionality. And therefore, a common malfunction of the electric motor may be slipping of the overrunning clutch, better known among car enthusiasts as the Bendix.
In order to avoid significant costs for repairing the starter in service centers, you can carry out this procedure at home. Yes, it’s a difficult and troublesome task, but when you know your “iron horse” from the small cog to the speedometer, you can do everything!
What is Bendix?
The Bendix is a freewheel that consists of a gear and a special device, all located in the starter housing.
The unit is in good condition:
- scrolls in one direction only;
- when you try to turn it the other way, it stops.
How does a starter bendix work? When the ignition key is turned all the way, the bendix is driven by the armature of the retractor relay. The gear meshes with the crankshaft flywheel and spins it. The combustible mixture ignites in the combustion chambers and the engine begins to operate.
As soon as the crankshaft rotation speed exceeds the rotation speed of the electric motor itself, then the overrunning clutch disconnects the gear and the starter shaft.
Characteristics of a starter malfunction
| Possible problems | The main reason | How to repair |
| When you turn the ignition key to start, the starter does not turn on. | The battery is discharged or faulty. | The battery needs to be charged or replaced. |
| The gear selector is not in the “P” or “N” position (for an automatic transmission). | Place in position “R”. | |
| The contact of the ground wire with the engine is damaged. | Repair the ground contact (clean the terminals or tighten the bolts). | |
| The gearbox lock switch has become unusable. | Install a new transmission lock switch. | |
| The starter control connector is disconnected (pin 50). | Eliminate. | |
| Starter brushes are stuck or worn. | Measure the length and free movement of the brushes in the brush holder. | |
| Solenoid relay malfunction. | Repair or replace the solenoid relay. | |
| Extensive wear on the armature commutator. | Replace the collector. | |
| There is no contact between the winding and the armature commutator. | Determined by verification. | |
| Slow engine rotation by starter. | Poor ground contact with the engine. | Improve ground wire contact. |
| The battery is low. | Check the generator. | |
| The starter bushings are badly worn. | Install new bushings. | |
| The solenoid relay is acting up. | Repair the solenoid relay. | |
| The stator or armature windings are pierced to ground. | Replace the stator or armature. | |
| Brush wear. | Replace brushes. | |
| The wire from the starter to the battery is broken. | Replace the wire. | |
| The starter turns, but the engine does not. | Damage or wear to the bendix. | Repair or replace bendix. |
| Part of the gearbox has collapsed. | Replace the gearbox. | |
| The starter rotates along with the engine. | The ignition switch is damaged. | Replace the lock. |
| Solenoid relay failure. | Repair or replacement of the solenoid relay. |
We recommend: How to make heated wipers with your own hands
If we talk about signs of a faulty Bendix starter, then you can hear the noise of a rotating starter when starting the car, but the engine shaft itself does not rotate. This drive gear does not mesh with the crankshaft flywheel. This is the answer to the question: how to check the starter bendix without removing it from the car?
In this case, the bendix on the electric motor needs to be replaced or repaired.
Overrunning clutch repair
You need to take appropriately sized keys, screwdrivers and your “golden” hands! When repairing a Bendix starter with your own hands, the car owner must first try to clean the unit of contamination, without disassembling it (what if it works out, resuscitate it).
To do this you need:
- remove the starter from the car;
- immerse part of the electric motor with Bendix in a container with gasoline for 5-7 hours;
- sometimes go up and turn the clutch gear in a gasoline container;
- remove and dry the unit thoroughly.
If the fault remains, then you need to remove and disassemble the starter overrunning clutch for repair.
How to remove bendix from the starter (using the example of a VAZ 2114)
1. First you need to remove the negative terminal from the battery and, using a wrench, unscrew the upper mounting screws that connect the starter to the clutch housing. There shouldn’t be a third bolt, but if you’re lucky, then you need to be contrived to unscrew it.
2. Now you need to disconnect the wires suitable for the electric motor.
3. At this stage, you can see the condition of the flywheel (its teeth).
4. Next, use a screwdriver to unscrew the two screws located on the starter cover and remove the nut on the solenoid relay (fastening the winding output).
5. Now you can remove the clamp washer and use a wrench to remove the tie bolts.
6. Inspect the bushings for wear.
7. For subsequent actions, take a rubber or wooden hammer, which you need to apply several blows to the lower part of the starter housing and separate it.
8. Visually assess the condition of the windings and brushes.
9. Use a screwdriver to pry up the Bendix ears and remove them from the fork.
10. Now knock down the first retaining ring (you can use a wrench and a hammer), and remove the second with a screwdriver.
11. Remove the overrunning clutch.
How to replace the mechanism?
Take a new overrunning clutch and install it in place of the removed bendix. Be sure to wash all the parts of the mechanism, the grooves of the outer race, and clean the burrs on the working surfaces.
Attention: before assembling the unit, all elements of the mechanism that are subject to this must be treated with lubricant.
After installing the starter in place, connect the battery and start the engine. If all manipulations were performed correctly, then your car is ready for use.
Video: replacing the starter bendix (instructions).
This completes the DIY Bendix repair!
Advice from experienced people
- During the installation of the starter, it is important to check the integrity of the Bendix gear and the unit drive.
- The starter should not be dropped; it is a complex electrical device that may be damaged by internal components.
- Before disassembling the starter bendix, be sure to check the battery charge. This problem often causes false panic and rash actions of the master.
- If you find a cracked or worn plastic washer, it needs to be replaced.
- When buying a new Bendix, have the old unit with you. Often different couplings differ from each other in small details that are not visually memorable.
- When disassembling the starter for the first time, it is advisable to write down the dismantling process on a piece of paper in order to prevent the slightest mistakes when assembling it.
Difficulty disassembling the starter
The most common problem when repairing a Bendix is removing the retaining ring and reassembling it.
The restrictive ring has a slot for a retaining ring. Put on on the opposite side of the Bendix.
When disassembling the solenoid relay, be sure to remove the contacts from the winding so as not to damage the mechanism. When placing brushes inside the holder, it is necessary to visually assess their condition; if delamination occurs, they must be processed on a grindstone and inserted into the holes of the holder.
Checking the Bendix and repairing it without disassembling the starter
You can check the bendix directly on the car without removing the entire unit. To do this you need:
- Enable transmission;
- Depress the brake pedal;
- Start the starter.
If at the same time you hear the sound of armature rotation, then the bendix is slipping and needs to be repaired or replaced with a new one.
To begin with, you can try to carry out minor repairs and remove dirt from the Bendix without disassembling the starter. For this:
- remove the starter from the car ( video instructions at the end of the article);
- immerse it entirely in a container of gasoline and leave it there for several hours;
- Without removing the starter from the container, rotate the clutch gear several times to better flush the grooves;
- remove and dry the starter.
If, as a result of such a “not tricky” repair, the malfunction is not eliminated, you will have to remove and disassemble the overrunning clutch.
Summarize
Of all the Bendixes that I had to repair, only a small percentage did not work long enough. Spare parts for the overrunning clutch are to blame for this, or rather, their absence in our stores. Therefore, you have to “cut”, collecting one from several.
In this case, it is better to replace the bendix with a new one. But if, upon visual inspection of the disassembled coupling, all its insides are intact, then it is enough to wash them. After such repairs, the Bendix can work for several more years until everything gets clogged back with dirt.
Principle of operation
The starter Bendix has a gear that contacts the flywheel of the car's engine. In order to start the engine, it is necessary that the starter begins to rotate it at a speed of fifty to one hundred revolutions per minute. It should not rotate faster, as it is not designed for that. He can work intensely only for short periods of time. And it is for this reason that a dangerous situation may arise when the engine itself starts. In this system, everything must work accurately, since the slightest delay can result in ruin for him. In the event that the driver does not turn off the starter in time after starting the internal combustion engine, the Bendix protective element comes into operation.
The speed of the car engine is much higher than the speed of the starter, so the role of the Bendix in this case is to protect the starter from the transmission of torque from the internal combustion engine to it. The bendix rotates only in one direction; it is not rigidly connected to the engine shaft; in a free state it can rotate. And at the moment when the speed of the internal combustion engine begins to exceed the speed of the starter, the clutch (another name for Bendix) rotates freely.
We recommend: Why engine detonation occurs when the ignition is turned off: the main reasons
Structurally, the coupling has the following form: two rings, and between them there are balls or cylinders, which in turn are supported by a spring. Constructive, well-thought-out grooves on the inside of one of the rings in which these cylinders are located make it possible to create jamming when rotating in one direction, and free rotation in the other. Bendix has another common variation - the ratchet overrunning clutch. But this version is usually used on bicycles. But in order to understand the principle of operation of the Bendix, you can take a quick look at it. It is used as a drive; when we pedal, the clutch spins and the bike moves forward, and when we try to pedal in the opposite direction, the brake is applied. I hope my example is clear.
As mentioned above, the Bendix starter may have several more options. For example, the shaft on which the coupling is located has ground splines, which are also the seat of the coupling. The system of operation is the same here: when rotating in one direction, the coupling locks rigidly with the splines, and when it rotates in the opposite direction, it comes off them and rotates freely.
The only significant drawback of the Bendix starter design is its increased and very intense wear. At the same time, the nature of wear is such that very often it is necessary to replace the entire bendix and it is not possible to replace only an individual worn-out part, because all its component parts wear out approximately equally.
Possible causes of failure
If the gear rotates in both directions, this is a malfunction.
There may be three reasons:
- deterioration of rollers due to friction, sometimes their surface can even take on the appearance of a polyhedron rather than a cylinder;
- grinding down the surfaces of the grooves in which the rollers are located;
- broken or weakened springs.
Rollers with grooves in the form of flat edges.
Springs and rollers can be replaced by selecting suitable ones. Even 15-20 years ago, Bendixes were often repaired, returning them to functionality.
Now almost all models are available in stores, others can be ordered.
The coupling is inexpensive and it is not economically reasonable to repair it - restoration work will cost more than buying a new part.
The second most common failure is wear of the gear teeth . It can be replaced, but it is easier and cheaper to replace the entire bendix.
Possible faults
The design itself is quite reliable; on modern machines it rarely fails. But nevertheless it happens.
If, when starting the engine, the motorist hears characteristic sounds reminiscent of a ratchet, but the engine itself does not start, the reason is most likely in the Bendix. Clicking sounds mean that the starter is trying to turn the engine flywheel, but it doesn't have enough effort.
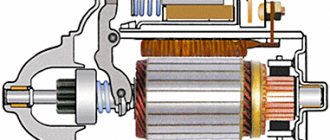
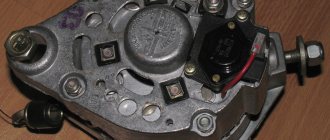
Bendix Bosch. 1 — overrunning clutch casing; 2 — driven cage with gear; 3 - ring; 4 — washer; 5 - roller; 6 — pressure spring; 7 — driving clip; 8 — buffer spring; 9 and 11 — support cups; 10 — drive fork ring; 12 — retaining ring.
Most often, the teeth of the drive gear fail. It is the gear and rollers that bear the main load during startup. The teeth are destroyed, ground down, and lack a working surface for engagement.
The rollers also wear out and lose their shape, as a result the gear begins to rotate idle and cannot transmit torque. An accompanying failure is often the destruction of the cage in the area where the rollers operate.
Sometimes a breakdown is caused by wear on the starter shaft guides. In this case, the engagement with the flywheel becomes incorrect.
In those models where there are springs, they are also the cause of failure. Over time, the springs stretch, burst, and are lost.
What if he doesn't come back
In fact, Bendix ensures long and trouble-free operation of the entire assembly. And if it weren’t for him, then at the moment when you turn off the starter (that is, the car starts), it does not disengage with the engine, which is called “does not return,” then the rotating engine shaft will simply break the starter itself. Which, by the way, sometimes happens when the Bendix malfunctions in the opposite way - that is, the accelerating clutch does not slip, but, on the contrary, sticks and continues to rotate the shaft together with the electric motor. That is, the bendix does not disengage.
And now we are talking about a malfunction when the bendix slips, slips, and it turns out that it works, but its clutch power with the engine is not enough to turn it over and start it. The thing is that heavy loads wear out the teeth of the ratchet gear over time, and the part fails.
It has already been said that this part - the accelerating clutch, popularly called Bendix - functions on the principle of a ratchet mechanism. And the cause of the malfunction, when the gear teeth do not grab and slip when rotating along their axis without achieving engagement, is in the vast majority of cases the banal wear of these very teeth. Indeed, in fact, at the time of operation, these same teeth experience a serious load, since they have to overcome the force of rotation of the heavy crankshaft of the engine, compression of its cylinders, and the like.
Over time, due to such loads, either:
- ratchet gear teeth;
- or (if it is not designed with gears, but with two rings with balls, a locking mechanism that works exclusively in one direction and return springs) the rings, balls wear out, or the spring breaks.
And such a malfunction leads to the fact that when the electric motor rotates, a characteristic malfunction occurs: lack of engagement of the starter with the engine.
How to check the overrunning clutch
If you are not in a hurry to change the Bendix, then it is worth testing it. To do this, clamp the body of the overrunning clutch, already removed from the starter, through a soft gasket (for example, a rag) in a vice to prevent damage. Try scrolling the bendix left and right. It should only rotate in one direction, because when you try to rotate it, the working part will lock. If the overrunning clutch turns, this means that it will not engage with the teeth and the starter will “thresh” idle. You can determine the serviceability of the gear visually: you will see the “eaten” teeth immediately. But if the starter is stuck, then you can understand this only by disassembling it. In this case, all the “internals”, including the gearbox, must be cleaned of dirt, dried grease and washed with clean gasoline. Next you will have to decide whether the bendix can be repaired or whether you will need to purchase a new one.
Checking the performance of Bendix directly on the car
This can be done without removing the starter. To do this, turn on any speed, press the brake pedal and turn on the starter. If the car just jerks forward, then everything is fine - most likely, your overrunning clutch is working. The sound of the armature rotating indicates that the bendix is slipping, which needs to be repaired or replaced with a new one.
Device
Most overrunning clutches (let's call them the more popular word among motorists - bendix) consist of a driving race (or outer ring) containing rollers and pressure springs, as well as a driven race. The leading holder has wedge channels, which on one side have a significant width.
The principle of Bendix operation is the inertial effect on the gear coupling that is part of it until it engages with the engine flywheel. While the starter is inoperative (the engine is turned off or running in constant mode), the Bendix clutch is not engaged with the flywheel crown.
- The ignition key is turned and current from the battery is supplied to the starter motor, driving its armature.
- Thanks to the helical grooves on the inside of the coupling and the rotational movement, the coupling, under its own weight, slides along the splines until it engages with the flywheel.
- Under the action of the drive gear, the driven cage with the gear begins to rotate.
- If the teeth of the clutch and the flywheel do not coincide, it rotates slightly until they are firmly engaged with each other.
- The buffer spring included in the design serves to soften the starting moment of the engine. In addition, it is needed to prevent tooth breakage from impact when the gears engage.
- When the engine starts, it begins to rotate the flywheel at a higher angular speed than the starter previously rotated. Therefore, the coupling twists in the opposite direction and slides along the splines of the armature or gearbox (in the case of using a geared bendix) and disengages with the flywheel. This saves the starter, which is not designed to operate at high speeds.
The Bendix starter can have several variations of the device. In any case, his work is based on one simple principle.
The Bendix is equipped with a gear, which is necessary for its connection with the engine flywheel.
And the starter itself cannot accelerate to a higher speed. In general, it is designed for short periods of operation, otherwise it would quickly fail.
So in some cases there is a possibility of a dangerous situation arising. If the driver does not turn off the starter immediately after starting the engine, the engine may overheat. And this can cause not only damage to this part, but to the entire engine as a whole.
How to remove, clean, disassemble and what to lubricate?
Let's consider one of the simple but effective ways to clean the clutch: remove the starter from the vehicle; The removed part must be immersed in a container with gasoline for 2-3 hours. This will help clean it thoroughly from dirt; to clean the coupling grooves from deposits accumulated inside them, it is necessary to rotate its gear without removing the device from the container with gasoline; Now you can take out the device, and then thoroughly wash its body.
If such a measure does not give the desired result, it will be necessary to remove and disassemble the coupling. Let's look at how to change the Bendix on the starter: Open the hood and remove the minus terminal from the power source, thereby completely de-energizing the vehicle's on-board network. After which it is necessary to remove the power wires from the solenoid relay and the starter housing and begin dismantling it. Unscrew the fasteners that hold the element. Please note that to remove the element, you will most likely have to dismantle the adjacent parts. We assess the condition of the flywheel.
To replace the overrunning clutch, you will have to completely disassemble the starting device of the power unit. First, you should remove the cover, then remove the fastener from the traction relay winding and pull out the washer. We remove the fasteners, after which the engine starting device is disassembled into two halves. It happens that there is a ball inside it, it is advisable not to lose it. Since the starter is in a disassembled state, it is worth diagnosing all its components and, if they malfunction, replace them.
We dismantle the traction rod, the rubber insert and the retaining washer to gain access to the remaining small parts of the device. We release the protruding part of the bendix by prying it with a screwdriver, after which it is necessary to dismantle the lock washer or ring located on the shaft. We remove the worn out bendix and install a new element in its place. Litol is ideal as a lubricant. If it is missing, you can get by with motor oil. Everything is assembled in reverse order.
We recommend: Why do you need to adjust the valves of the ZMZ 402 motor?
Main signs of starter problems
Repair and diagnostics of the device may be required not only when the car does not start at all - problems that arise in the operation of the starter can be identified at an early stage.
- Doesn't turn on the first turn of the key. This may mean that the problem lies in the brushes that transmit voltage to the starter rotor - they need to be replaced.
- When the battery is fully charged, it starts to work with a delay or takes much longer to spin up. This also indicates damage and wear to the brushes or bearings, due to which the rotor, the moving part of the mechanism, catches the winding - the stator.
- with a delay returns its components to their original position after the engine starts - this suggests damage/wear to the engine flywheel or the Bendix gear - the starter part that spins the flywheel. Evidence of its failure can also be a situation in which the bendix clings to the flywheel, but cannot spin it.
- continues to rotate with the engine. That is, after the car engine spins up, the starter parts are not detached from it using a return spring, but spin at the same speed as the engine flywheel. Most likely, the fault lies with a clogged rotor and/or relay power contacts.
There can be many scenarios for starter breakdowns, and if one of them has occurred in your car, you must immediately begin repairs.
There are only 2 ways to check starter faults: based on characteristic symptoms and based on the results of troubleshooting after disassembly. The main causes of breakdowns and their symptoms.
- The starter turns, but the engine does not start. Having ruled out problems with the power supply, ignition, timing and immobilizer systems, we can conclude that the starter brushes are worn out. Most often, when the brush assembly wears out, you can hear by ear that the engine crankshaft rotates more slowly than usual. But before removing the starter for repairs, check the reliability of the terminals, the absence of oxides on them and the charge level of the battery.
- The starter clicks but does not turn. The cause of the breakdown can be either wear of the brushes, low battery charge, oxides on the terminals of the supply wire, or flexible mass.
- The starter engages, but the crankshaft does not rotate. You can visually hear the rotation of the launcher armature, but the flywheel stands still. Failure may only manifest itself from time to time. Do-it-yourself starter repair involves replacing the bendix. In very rare cases, similar symptoms can be caused by licking the teeth on the flywheel ring or on the Bendix gear.
- The solenoid relay does not operate. The solenoid inside the traction relay, when voltage is applied to it, moves the plug, engaging the bendix gear with the flywheel ring, and closes the power terminals of the electric motor with a contact plate. If, after turning the key to the Start position, voltage does not arrive at the control terminal of the solenoid relay, or the solenoid relay itself is faulty, the contacts simply do not close to turn on the electric motor.
- The starter does not stop turning after the engine starts. The reason is the contact plate of the solenoid relay is stuck.
DETAILS: How to trim doors on a VAZ 2107 with your own hands
Disassembling and reassembling the Bendix when repairing the starter
Repairing the starter with disassembling the bendix is performed in the following order:
- Before disassembling the bendix, first of all, it must be removed from the anchor ( see the video below).
- Then very carefully flare the curved edge of the casing and remove it from the outer race.
- After this, remove the springs and stretch them so that when free they increase by about 10 mm.
- Next, you need to wash all the Bendix parts, the grooves of the outer race in gasoline and clean out the nicks and burrs on the working surfaces.
- Do not forget to lubricate all structural elements with engine oil before assembly.
If you properly roll the edges of the casing, then such a starter repair will extend the life of the Bendix for several more years.
Removing the starter from under the hood
Before removing the starter
An inspection hole will be needed to remove the starter from under the hood, and then diagnose it outside the car. Anyone who does this for the first time will spend relatively a lot of time, so before starting dismantling, you can try to clean the starter contacts, which may have oxidized during operation, make sure that they are securely fastened, and perhaps also replace the power wires.
You need to check the entire electrical circuit, so you should make sure in advance that the problem does not lie in the battery. If these simple measures do not resolve the problem, the device must be removed.
If you do not know where the starter is located in your car, you can focus on the sound under the hood that appears when you turn the key - for this you will need the help of a second person who will be sitting in the car.
Extraction process
First of all, you need to disconnect the device from the battery - remove the terminals and conductive cables from the solenoid relay. After this, the fastening bolts are unscrewed, usually there are 2 or 3 of them - for this you will need a hinged extension.
It was already mentioned above that an inspection hole is necessary for this work, since sometimes in order to dismantle the starter it will be necessary to remove the components and mechanisms located on the way to it, in most cases the engine compartment protection trim.
Diagnostics and replacement
During operation, the starter constantly receives serious loads, and is also very often exposed to various irritants (dirt, dust, oil, moisture). All this leads to rapid destruction of the insulating coating of the electric motor and to drive failures.
Among other causes of breakdown and failure, the main one is slipping of the Bendix during free movement. This occurs because a certain amount of dirt gets into the grooves and rollers. The first sign is the noise of the armature when the starter is turned on, while the crankshaft is stationary. In such a situation, repairs cannot be avoided.
In order to diagnose the Bendix itself directly, you can do this in a car. You need to do this as follows:
- We turn on the transmission;
- Release the brake;
- Start the starter.
Now you need to listen. If you hear a sound that characterizes the rotation of the armature, then this is a sign that the starter bendix is slipping. This means that it immediately needs to be repaired or replaced with a new bendix.
Minor Bendix repairs:
- The starter is removed from the car;
- It is immersed in a prepared container with gasoline and remains there for several hours. This is done in order to wash and clean it from dirt;
- Without removing the product from the container, rotate the clutch gear several times, this will help to better clean the grooves;
- After that, it is taken out and washed.
If, as a result of such cleaning, you have not achieved the desired result, then you will have to remove the overrunning clutch and disassemble it.
Let's look at the disassembly and repair of the Bendix step by step:
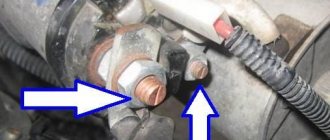
- First of all, I advise you to disconnect the car's starter. But before this, you must disconnect the negative terminal from the battery. After this, you need to disconnect one wiring from the solenoid relay, and unscrew the other using a wrench on the starter itself. The key set to “13” is most often used;
- Now you need to unscrew all the fasteners that hold the starter. Each machine has its own fastening system. So be prepared for the fact that when dismantling the starter you will have to dismantle some more elements along the way;
- Already at this stage it is easy to determine the condition of the flywheel;
- In the event that you decide to change the bendix, you need to disassemble the starter. First of all, remove the cover fasteners, and then disconnect the fastening of the winding output to the solenoid relay. You can get a washer-bracket;
- Then you need to remove the last fasteners and disassemble the starter in half. If we find a ball inside it, it is necessary to save it;
- Advice: if you have already disassembled the starter, look at all its components, which also sometimes fail. Outdated parts can also be replaced;
- If necessary, remove the solenoid relay, rubber insert and washer. Then we take out all the remaining small parts;
- Next, using a screwdriver, we remove the ears of our Bendix;
- In order to free yourself from the stopper, you need to lower the washer down, while using the same screwdriver. It happens that instead of a washer there is a locking ring. In this case, for convenience, you can use a hammer and wrench. Place the key on the stopper and knock it down with a hammer;
- The retaining ring that remains can be pulled off the shaft by prying it off with a small screwdriver or a special puller;
- Now all that remains is to remove the bendix and install a new part in its place;
- To put everything back together, you need to do all the steps in reverse order.
Tips from experienced drivers
Some useful tips that can help when repairing the starter:
- Be sure to test a new or repaired bendix before installing it in its place.
- The washers must be intact and not cracked. This applies to both plastic and steel products, including the retaining ring.
- In order not to make a mistake with the purchase of an overrunning clutch, when buying a new Bendix in a store, take the old one with you to make sure the identity of the unit you are purchasing. Often, although they are similar in appearance, bendins may have minor differences that will not allow the new part to work properly.
- If you have not disassembled the starter and bendix before, then it is best to take pictures of each stage of disassembly on your phone - this will greatly facilitate reassembly. You can also sketch actions, but photographs are more visual. You can also search for videos with disassembly and assembly instructions on YouTube or other video hosting sites.
How to remove bendix
First you need to dismantle the starting device itself, having first disconnected the positive terminal from the battery, and from the starter - the wire going to the solenoid relay. Removing the starting device (most often it is fixed with three bolts) is possible from the top or bottom (you will need an inspection hole) - it all depends on the make of the car. At the same time, inspect the flywheel teeth: if they are very worn, you will have to replace the ring gear or the entire flywheel. After the starter is on the workbench, dismantle (if necessary, here everything again depends on the model of the machine) the solenoid relay. Next comes the removal of the bendix:
- Unscrew the nuts securing the vertical studs (usually there are three of them) and, lightly tapping with a rubber mallet, separate the starter housing. Take this opportunity to visually assess the condition of the brushes and windings.
- Hook the bendix by the “ears” with a flat-head screwdriver and pull it out of the fork.
- Take a hammer and an open-end wrench that fits the diameter of the overrunning clutch shaft and remove the first retaining ring; the second can be moved with a flat-head screwdriver.
- Now we remove the starter bendix itself.
Replacing Bendix on a VAZ-2110
To complete the work you will need the following tools, materials and accessories:
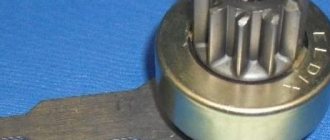
Bendix for VAZ-2110 starter with nine teeth.
Often, when a car does not start, it is confused with a dead battery. Therefore, it is important to check the battery charge. If this does not give the desired result, you should take a closer look at the snack.
Stages of work
This happens as follows:
- Remove the negative terminal from the battery. In this case, the car can be left in the inspection pit. This will make the job easier.
- Unscrew the positive wire from the starter.
Unscrew the starter cover.
After removing the old Bendix, we compare it with the new one.
The starter is installed and connected to the vehicle network. Now you can check the result of the work done.
Useful tips
When buying a Bendix you will need an old one. Often, some elements of this spare part, especially silent blocks, may differ on the car. It is necessary to buy only part of domestic production. Part numbers may vary, as the vehicle may have a different modification. Typically, the starter device is only suitable for the VAZ-2110 from the manufacturer. These points must be agreed upon with the manager at the point of sale.
Originals, analogues, articles and prices
The first modifications of the Lada Kalina were equipped with a starting device with the catalog number “21120-3708010-00” (KZATE). It was fixed to the block wall with three nuts.
After the release of the Lada Kalina with a cable-controlled gearbox, the method of fixing the PU changed to a screw one.
Original indexes:
- 21120-3708010-00;
- 21901-3708023-00;
- 21120-3708045-00 (KATEK, KZATE, ZiT);
- 21901-3708051-00 (VALEO) (8 valves);
- 21902-3708056-00 (VALEO) (16 valves).
For automatic transmission type: Jatco – 21902-3708135-00.
The cost of PU varies depending on the modification. Base price from 3100 rubles. On models with a new type of fixation from 3400 – 3500 rubles.
Foreign analogues are no better in quality than domestic ones. The cost is 10 - 15% more expensive. Manufacturers: Blue Print, Bremi, Febi, Bilstein, Fenox, Glaser (see photo).
Where is the starter installed in a Lada Kalina car?
Many car enthusiasts wonder where the starter is located. As in many other brands, the PU is installed in the engine compartment, fixed at the end of the block on the flywheel side.
Price issue
Finally, it’s worth adding that Bendix is an inexpensive spare part. For example, a Bendix VAZ 2101 (as well as other “classic” VAZs) costs about $5...6, catalog number is DR001C3. And the price of Bendix (no. 1006209923) for VAZ 2108-2110 cars is $12...15. The cost of Bendix for FORD cars of the Focus, Fiesta and Fusion brands is about 10...11 $. (cat. no. 1006209804). For TOYOTA Avensis and Corolla cars Bendix 1006209695 - $9...12.
Thus, repairs are often impractical for Bendix. It's easier to buy a new one and simply replace it. Moreover, when repairing individual parts, there is a high probability of rapid failure of others.
- Do-it-yourself brake caliper rebuild for Mitsubishi Lancer 9 Repair of Lancer 9 calipers
- Do-it-yourself repair of the lower arm of the front suspension of a VAZ
- How to clean a stove radiator without removing it? Cleaning, washing
- DIY muffler repair