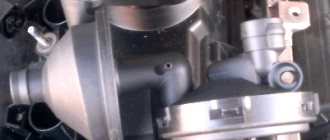
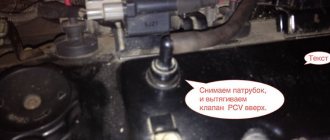
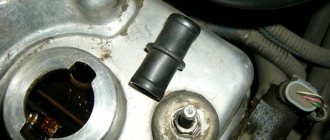
The crankcase ventilation valve (CVG) or PCV (Positive Crankcase Ventilation) is used to effectively use the gas mixture formed in the crankcase . The part is installed on most modern models with a fuel injection system and is directly involved in regulating the composition of the air-fuel mixture. Incorrect operation of the VKG valve leads to excessive fuel consumption and unstable operation of the internal combustion engine .
We will describe in detail below the device, operating principle, malfunction and methods of checking the PCV valve.
Why do you need a crankcase ventilation system?
The fact is that when an internal combustion engine operates, the penetration of a certain amount of gases from the combustion chamber into the engine crankcase is inevitable.
These gases leak through leaks between the piston and the cylinder walls. Plus, the pressure in the crankcase constantly changes due to temperature changes. Erupted gases have a detrimental effect on the properties of the oil and the environment, and also increase the pressure in the crankcase, which will inevitably lead to leaks at the engine seals and excessive oil consumption.
This system is needed to remove these gases and reduce pressure in the engine crankcase.
What does it consist of?
- Pipes, hoses;
- Oil separator;
- Control valve.
In classic VAZ models, crankcase ventilation is simplified; there is no valve.
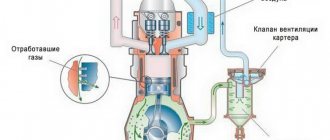
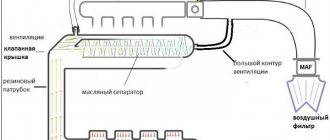
Scheme of work
- Gases enter the oil separator through hoses, where oil vapors are separated from gases;
- Next they enter the ventilation valve. It is connected to the intake manifold. The vacuum in it “sucks” them back into the intake.
Thus, we get rid of excess pressure.
In domestic cars, the breather plays the role of an oil separator. It is directly connected to the power unit. Oil passing through it settles on its walls. It is directly connected to the intake. One hose is connected to the air filter housing; pumping occurs during engine load. The second hose is connected to the carburetor, below the throttle. It is needed for crankcase ventilation at idle speed of the internal combustion engine.
Video: Crankcase ventilation system
Oil separator
It happens:
- Tangential;
- Labyrinthine.
In the first case, crankcase gases enter the oil separator housing at an angle. They twist and receive tangential acceleration. Due to centrifugal force, the oil emulsion and vapors remain on the walls of the separator and flow back into the engine sump. The gas flow continues into the valve.
Advertising:
The second type has a labyrinth in its design (it is logical to assume from the name). Crankcase gases passing through it, hitting its walls, flow into the sump.
Crankcase ventilation valve
Necessary for adjusting the intensity of the “suction”. A large vacuum can form in the engine intake manifold at different operating modes. A large vacuum can be created in the crankcase through the ventilation system. The higher it is, the more combustion products of the air-fuel mixture will “break through” the compression rings into the engine volume.
When excess pressure is created, the valve opens, gases are “sucked” into the inlet, and the pressure decreases. When a vacuum is formed, it closes, preventing the creation of a large vacuum. Thus, the extraction of fuel combustion residues, gasoline vapors, etc. is adjusted. from internal combustion engine.
Diagnosis and elimination of causes
If a problem occurs when the engine throws oil through the breather, inspect the intake system, crankcase ventilation and perform engine diagnostics. To eliminate the consequences and the cause, start with the air filter and its housing. We replace the clogged filter element and remove oil on the components with a cleaner.
Diagnosis of why oil was squeezed out through the breather: video
- Check the engine oil level by first turning off the engine and waiting at least 15 minutes. The level should not exceed the maximum mark on the dipstick by more than 5 mm. Excess oil must be pumped out through the dipstick hole.
- Inspect the crankcase ventilation system for cracks and blockages in the pipe, oil clots in the oil separator, check the functionality of the PVC valve (if equipped). Contaminants are removed by washing with solvent, gasoline, diesel fuel or kerosene. Failed elements must be replaced.
- We diagnose the condition of the engine. First of all, we unscrew and inspect the spark plugs. The presence of a black glossy coating clearly indicates excess oil in the combustion chamber. We consistently measure the compression in the cylinders.
Normal value
for a diesel engine
24–30 atm
, for an injection car
12–14 atm
, for a carburetor car at least
10 atm
.
The exact value for your model can be calculated by multiplying the engine compression ratio by 1.4
.
The spread between cylinders should not exceed 1 bar. A decrease in compression indicates a leak in the combustion chamber due to burnout of the valve, piston, wear or stuck piston rings. If compression is normal, but there are traces of oil in the chamber, you need to check the valve stem seals.
How to clean the breather?
To clean the breather, you need to disconnect the pipe, remove it from the engine and disassemble the housing, remove the oil separator and valve (if equipped). Wash all parts with gasoline, kerosene or diesel fuel, removing oil deposits. Dry and reassemble in reverse order.
How to disassemble and clean the breather: video
How to clean oil from an air filter: video
Diagnostic methods
The easiest way to check the PCV valve is by yourself. To do this, just blow into the valve from the side of the valve cover. If the air pressure from the reverse side is weak or does not come out at all, the valve is not working properly. Cleaning the crankcase ventilation system with carburetor cleaner should correct the situation. If the valve is blown in both directions, most likely it is stuck in a half-open state, or the rubber membrane is torn.
The degree of contamination and the overall efficiency of the crankcase ventilation is measured in two main ways:
- The crankcase gas pressure is measured at different engine operating modes.
- The volume of gases that the system can pass through itself is measured.
In order not to encounter the consequences of malfunctions of the VKG system, it is worth periodically changing the PCV valve, filter element, and cleaning the centrifugal/labyrinth oil trap.
Assembly process
There is no particular difficulty in assembly. The first step is to put a plug on one end of the coupling. The result will be something like a glass, but not for tea drinking. During operation of the most effective design of the crankcase gas oil separator, the plug will not have to be removed, and therefore for better reliability it is worth sealing it with a sealant. The next step is to place the metal sponge on the bottom of the cylinder. Just don't fill it out completely. In the upper part of the second plug, you need to drill two holes for the prepared plastic pipes. The edges of the tubes should be treated with silicone grease and installed in the prepared holes.
Looking at the inside of the plug, one of the pipes should be 1 centimeter shorter than the other. The longer one will be the intake one. Now all that remains is to fix the resulting cover in the rubber gasket. That's all - the homemade automotive gadget for catching crankcase gases is ready. If the owner has a delicate taste, then the product can be painted in the desired color and then allowed to dry thoroughly. Only after this can you proceed to further installation.
What is the purpose of and where is the crankcase ventilation valve (CVVV) located?
The crankcase ventilation valve is needed to pass exhaust gases that accumulate in the engine crankcase back into the combustion chambers of the cylinders through the intake manifold. The KVKG is usually located in the intake manifold. There are two types of crankcase ventilation: forced and non-forced.
Diagram of the crankcase ventilation system
How to avoid system breakdown
For the ventilation system to work properly, it is important to use high-quality oil. Ventilation also needs to be cleaned. The procedure for carrying out preventive cleaning is described below:
- Disconnect the expansion tank. Disconnect the block pipe and the wire connected to the sensor.
- The tube leading to the block is plugged, the tank is installed vertically.
- Disconnect the throttle valve, and then the tube going to the block. The block is pulled out.
- Remove the breather clamps.
- Disconnect valves from units being cleaned.
- Clean it, then reassemble the parts in the reverse order.
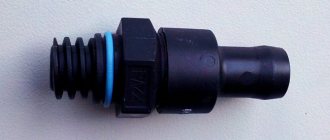
Design and principle of operation of the crankcase ventilation valve
The ventilation valve has such a simple device that even a novice car enthusiast can easily learn how to disassemble and clean it.
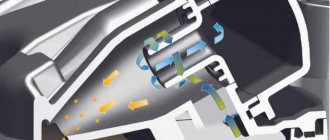
Scheme of gas movement through the ventilation valve
It consists of:
- Plastic case.
- Lids.
- Inlet and outlet fittings.
- Two cavities.
- Membranes.
- Springs.
The principle of operation of the valve in modern cars
Video about the operating principle of the crankcase ventilation system and valve.
The ventilation valve opens in medium mode, when optimal pressure is created on the membrane. In this position, the valve overcomes the spring pressure. After passing through the oil separator, the gases are cleared of oil droplets, pass into the open valve and complete the cycle, returning back to the combustion chambers, where their combustion is completed. If we are talking about a non-forced crankcase ventilation system, then the valve almost does not open in idle mode and is closed at high speeds. At high speeds, a lot of gases are released, and hot gases often leak into the intake manifold. In this case, the valve is closed, since there is a risk of ignition of crankcase gases in the crankcase itself.
Operation of the crankcase ventilation valve in different modes
Where do the gases go if the valve is closed?
In any case, crankcase gases must be removed and under no circumstances remain inside the system. There is another iron pipe that leads to another valve. This is the so-called “fungus” or pressure reducing valve. When the main valve is closed (and this happens, let me remind you, at high speeds and at idle), the gases pass through this iron pipe directly into the “fungus”.
It also has two states: closed and open. When it is covered, a small calibrated hole inside it opens slightly, which allows the gas mixture to pass through. In this case, the gases escape through a large hole. That is, a system consisting of two valves ensures uninterrupted and reliable crankcase ventilation.
Principle of operation
When a mixture of fuel and air is burned, a sharp and strong increase in its volume occurs. This creates high pressure in the internal combustion chamber, which forces the piston to its bottom dead center. The movement of the piston drives the engine crankshaft. Some of the gases formed in this case, penetrating through the gap between the rings and the cylindrical mirror, enters the cavity under the crankcase cover. Here they mix with oil vapors, which leads to the formation of pressure.
The pressure has an aggressive effect on the crankshaft O-rings, as well as on the gasket located between the pan cover and the oil dipstick channel.
The expansion stroke is periodically repeated in each of the cylinders. This leads to the injection of a repeated portion of gases. If the crankcase ventilation is insufficient, exhaust gases accumulate and the crankshaft seals are gradually squeezed out.
If you do not clean the crankcase ventilation system, it is possible that gases will push out the oil dipstick and oil will leak out of the crankcase. In addition, the following elements accumulate in the crankcase:
- a small part of the fuel that did not have time to burn;
- small soot particles;
- moisture.
All elements are mixed with engine oil that has fallen into the pan. As a result, over time the oil oxidizes, clogging it and reducing its service life.
Signs of a bad PCV valve
The aforementioned cloudy or milky film is just one sign of a faulty PCV valve. However, this phenomenon may also indicate other problems. If there is moisture in the system, then replacing only one KPVKG will not solve the problem; you will definitely need to change the oil.
Experts also recommend changing the oil more often for those who travel short distances. Due to frequent stops and short distances, the engine often does not reach operating temperature, as a result of which moisture may accumulate in the system and not be completely removed by the positive crankcase ventilation system.
Dirty oil and increased oil consumption are also signs of a bad PCV valve. A dying valve may make a whistling noise. To understand whether the PCV valve is the source of the noise, just shut off the hose going to the valve and listen to see if the noise has changed.
In some cases, a faulty CPVCG can cause oil to appear on the air filter. If you see a dirty or oily spot near the valve inlet hose, this indicates a problem with the valve. Jamming of this unit can cause errors to appear (codes: P0171 and P0174), as well as the appearance of corresponding indicators on the instrument panel (“CHECK” and oil pressure light). You should also pay attention to errors in the lambda probe and mass air flow sensor, which may be associated with this device.
If the PCV valve fails or has already failed, there will be an increase in internal engine pressure, possibly black smoke, and rough running of the engine.
If the valve is stuck, you will notice other signs. If the hose is jammed open or the hose ruptures, a vacuum leak will occur, this will be accompanied by interruptions in engine operation at idle, the fuel assembly will become “poor,” oil consumption will increase, and oil loss will begin.
A jammed open PCV valve can also cause an error to appear, including the sensors that I mentioned above (lambda and mass air flow sensor). If the diagnosis is incorrect, you can replace completely working sensors, but this will not solve the problem.
In what cases is the presence of oil in the breather not related to the crankcase?
Before diagnosis, it is recommended to make sure that the unpleasant symptoms are actually associated with gases. Oil ingress is also possible in other cases, for example, if more fluid is poured than required according to the standards. It is possible that the breather is not installed correctly and moving it will correct the problem.
Sometimes oil penetrates from the internal elements of the power unit, including injectors. Driving style, as well as the condition of the roadway, also influences. Oil particles may remain when the motor actively moves in the transverse direction.
Symptoms of a Stuck PCV
- Engine misfires at idle
- Lean air-fuel mixture
- Presence of engine oil in PCV valve or hose
- Increased oil consumption
- Hard engine start
- Rough, unstable engine operation at idle
Additionally, a stuck PCV valve can cause a check engine light due to increased air flow. And the diagnostic computer may mistakenly show this error due to the mass air flow sensor or oxygen sensor, making it difficult for you to identify the real source of the problem.
About blockages
The Passat B3 crankcase gas valve, like all others of this type, is susceptible to clogging. This may cause the mechanism to jam. The phenomenon will certainly affect the performance of the engine. If the valve is stuck in the open position, the idle speed will increase, and fuel consumption may increase significantly. Engine idling will become unstable.
If the crankcase gas valve (Skoda Octavia often suffers from this) gets stuck in the closed position, then an increase in gas pressure in the crankcase will be observed. Oil leaks are observed from all kinds of oil seals and seals. Often, such malfunctions significantly disrupt the operation of the lubrication system.
How to check the crankcase ventilation valve
Modern automobile engines use membrane-type CVCV (PCV). The design of such a valve is extremely simple; in the standard version it has:
- a housing on which there are two fittings - for supplying crankcase gases and for removing them;
- cover;
- diaphragm (crankcase ventilation valve membrane);
- return spring.
The operating principle of this mechanism is as follows:
- when the engine is turned off, the valve is closed by a membrane under the force of the spring;
- at idle speed, under the influence of vacuum, the membrane begins to overcome the force of the spring, and part of the CG passes from the internal combustion engine into the intake tract;
- at high speeds, the diaphragm completely clears the channel, and crankcase gases are sucked into the intake manifold in full.
As the valve becomes clogged, it stops working, but before changing the KVKG, you should still check it. A serviceable KVKG removed from the engine should be blown in one direction; in the opposite direction, air passes through it in a small volume.
You can also check the valve with the engine running; to do this, you need to disconnect the hose from the device on the intake side. On a working CVCG there is a vacuum, and if you put your finger on the fitting, you will feel like your finger is being “sucked”. If the device is faulty, no vacuum is created.
Through the engine ventilation system, you can check how well the piston group of the internal combustion engine “feels”. The check is done as follows - a simple transparent fuel filter is installed between the PCV and the intake manifold. If after a short mileage oil and soot appear in the filter, it means that the piston rings are not in order and the engine needs repair.
Video - How it works and how to check the PCV valve
In this video, I showed how to check the valve programmatically and physically, and also showed how a working valve differs from a faulty one. And also original from non-original
How long does a PCV valve last?
It all depends on operating conditions and many factors. With proper maintenance and regular oil changes, the device “lives” for quite a long time. Otherwise, the accumulation of dirt and various inclusions in the engine oil will significantly reduce the service life of the PCV valve, up to its complete failure.
Pros and cons of a closed crankcase ventilation system
Disadvantages of the crankcase ventilation system:
- oiling of the engine intake tract - regular cleaning is required
- if the engine is in poor condition, the volume of crankcase gases is so large that you can forget about the normal operation of the system and the engine - engine repair is required
Advantages of the crankcase ventilation system:
- our air is cleaner, since crankcase gases are much more toxic than exhaust gases
- less chance of seeing leaks through seals and seals
- engine oil life increases
- oxidative processes inside the engine are reduced
- crankcase gases increase knock resistance
- the crankcase does not communicate with the atmosphere, as a result of which dust and moisture are not sucked into it
Operating principle
When a mixture of fuel and air burns in a chamber at very high temperatures, nitrogen is released. Together with oxygen, it can form dangerous substances that have a detrimental effect on the environment. These are nitrogen oxides. Under certain conditions, the combustion temperature in the engine combustion chamber is higher than standard, due to which the volume of nitrogen oxide emissions increases significantly.
Most of it is trying to break into the bottom of the engine block. To prevent the pressure from rising to a critical level, it must be released. Until a recirculation system was introduced on engines, gases, as already noted, were removed through the breather in the engine crankcase. Let's look at how the crankcase valve works. The operating principle is very simple. It is based on the effect of vacuum in the intake manifold. Due to this, through a vacuum converter, the valve shaft moves, thereby opening the device. There are two types of devices used in modern cars. These are mechanical and electronic systems. In turn, electronic ones are divided into two more types - discrete and linear.
There is a vacuum connection in the vacuum diaphragm housing on the cylinder block. It is attached to the carburetor or throttle angle. Depending on the vacuum that occurs in the intake manifold, the diaphragm curtain presses on the continuously variable shift lever during the opening process. As a result, a special signal is generated to open the membrane of the electronic valve. As the signal level increases, the diaphragm begins to move upward, overcoming the force of the spring and moving the plunger. This will create a hole in the valve. Gases may enter the intake manifold. If the engine is idling or when the vacuum level in the manifold is low, the plunger closes. Gases will not enter the collector.
Replacing KVKG
Replacing a valve is easy on almost any passenger car, but each SVKG engine model has its own design features. Let us consider, as an example, how the KVKG changes on the M54 B22 engine, the make of the car is a BMW fifth series in the back of an E39. The KVKG valve is located under the intake manifold at the front of the internal combustion engine, and to get to it you need to remove:
- electronic throttle;
- idle speed controller.
For convenience, you can remove the intake manifold itself, but then the work turns out to be quite labor-intensive, and you will also have to purchase manifold gaskets. After access to the valve is ensured, disconnect the hoses from the KVKG and dismantle the device itself. We are installing a new mechanism, putting all the parts in their places.
Ventilation cleaning procedure
Cleaning the crankcase ventilation is carried out as follows:
open the hood and disconnect the ABC terminals (this is necessary to ensure that the reading work is completed safely);- carefully remove the pipe that goes to the air collector;
- now you need to unscrew the self-tapping screw, and then remove the casing from the throttle valve (the self-tapping screw will be visible after removing the pipe, so unscrewing it will not be difficult);
- disconnect the injectors, and then move the cable where the connectors are located to the side;
- unscrew the bolts, fasteners that hold the dipstick and the upper part of the bracket responsible for finding the intake manifold;
- remove the tube located in the oil dipstick from the engine - this must be done strictly from the “up” position;
- Now you should remove the ramp cover, which covers the injectors and their connectors (to avoid difficulties, the manipulation is carried out with a sharp movement).
The first part of the “procedure” is completed.
Now let's move on to the second one:
disconnect the fuel line from the ramp (it is important to note that its connection is different on different brands of cars);- make the damper clamp a little weaker, and then carefully remove it;
- in the same way you need to remove the pipe from the fitting (since the fitting is plastic, this is done extremely carefully);
- disconnect all XX connectors;
- remove the throttle cable from the damper, which will interfere with cleaning;
- We disconnect the bayonet connection from the “trunk” pulled out from the engine;
- remove the lid from the wells intended for candles;
- remove the valve hose, then unscrew the 4 bolts located on the top of the manifold;
- Now you should slightly loosen, but not completely remove the lower bolts (there are 5 of them), and then remove the manifold;
- slightly disconnect the clamps, and then remove the ventilation hoses from the oil separator box;
- Unscrew the remaining bolts, and then disconnect the engine block and the oil separator.
That's it - the preparatory stage of work is completely completed. Now you can begin removing the putty, as well as cleaning and washing the oil separator cavity. It should be washed until the resins are completely gone from its base.
If the contamination is too strong, it is necessary to completely replace the oil separator, since it is quite difficult to wash it. In addition, a poorly cleaned part can provoke the rapid growth of new contamination.
After cleaning, we check the hoses located on the flame arrester and crankcase ventilation. If the throttle valve is dirty, it should also be washed.
Consequences of faulty crankcase ventilation
Consequences of high pressure in the crankcase:
- Damage to the rubber seals of the crankshaft and camshaft. The engine will lose oil through squeezed out oil seals. If a sharp decrease in level is not noticed in time, oil starvation can lead to wear of the rubbing pairs and rotation of the liners.
- Turbine failure. After lubricating and cooling the turbocharger parts, the oil should drain by gravity into the pan. If there is a backlash of gases in the crankcase space (a kind of plug), the volume of engine oil pumped through the turbine will sharply decrease. Due to deterioration of heat dissipation, the oil will begin to coke inside the channels and on hot rubbing vapors. The consequence is scuffing on the liners and turbine shaft, which is equivalent to a deep restoration or replacement of the cartridge/turbocharger assembly.
- Squeezing out the dipstick and splashing oil into the engine compartment. In some cases, the dipstick flies out with such force that it leaves a noticeable dent in the hood. In this case, you won’t be able to get rid of it just by washing the engine compartment.
Video: Crankcase ventilation system
What internal and external factors affect ventilation wear
Clogged hoses cause the seals to squeeze out. Due to the increased pressure, oil flows through the crankshaft and valve cover seals. The probes may fly out.
Worn out ventilation system
When hoses are damaged, air may be drawn in. This leads to a decrease in dynamic characteristics. The valve sends gases to the engine, and carbon deposits along with oil clog the throttle valve. During repairs, the brackets cannot be removed; due to them, the hose is fixed at an angle. Otherwise, the condensate formed in winter will not be able to drain, but will freeze and clog the line.
PCV system maintenance
Sometimes, bad valve symptoms are mistakenly reported as coming from a bad sensor. This is why it is important to regularly check the PCV and related components. It takes only a few minutes. If your engine is missing a valve, or you can't get to it without removing one or more components, consult your repair manual for the best way to check your specific system. Also, check your system's maintenance schedule and replace necessary components at regular intervals, even if it appears to be in good condition. Most PCV valves and related components are inexpensive and will save you money on costly repairs if you replace them at the recommended interval.
Features of the crankcase ventilation system on VAG vehicles
Crankcase ventilation on VAG cars has a relatively complex design. The system uses a huge number of plastic parts and rubber pipes. During active use of the car, the hoses become coked. Then you have to clear all the elements. Previously, in this case the problem was solved simply. Bypassing the ventilation system, a pipe or hose was installed on the valve system cover and released gases into the environment. But this method has a lot of disadvantages. Gases seriously pollute the environment; the driver and passengers inside the car also breathe them.
Nobody does this anymore on modern cars, but if the crankcase gas valve on a VW is clogged, then the owner needs to clean the entire system. Crankcase gases on VAG group engines are not discharged from the valve cover, but from the engine block, in the hole of which an oil separator is installed (located on the right side of the block). The device does not allow oil to rise through the pipes in the SVKG. It is the gases that get there and nothing else. A plastic tube is attached to the oil separator, and a tee is installed between the hose and this tube, in which the valve is located. It can operate in three modes. It is closed at idle and high speeds, and opens when the engine runs at medium speeds.
How does the engine crankcase work and what is it for?
This box-type element is designed to protect and support the internal combustion engine elements; it also serves as an oil reservoir. The lower part includes a container for collecting gases and a pan with oil. The top contains the valve cover, cylinder block and cylinder head.
Modern crankcase models include more than 10 elements. In medium and large-sized engines, its parts are racks connected to each other. Only modifications for small motors have a solid body.
Cost of the KG ventilation valve
The cost of KVKG can be completely different; the price largely depends on the car model and the engine itself. For example, an original valve for an M54 (BMW) internal combustion engine costs about 2200-2400 rubles; this device is also suitable for M52 series engines and is installed on E39 5-series cars, X3, X5, BMW Compact. For Ford cars (Duratec HE engines), a ventilation valve can be purchased at an average price of 1300-1800 rubles, the cost depends on the seller - custom parts are cheaper if the parts are not needed urgently.
There are original parts that are quite expensive, and besides, they cannot always be found on sale, so it makes sense to buy contract spare parts - they are much cheaper and more accessible. For example, even a contract Mitsubishi KVKG for the 4G94 engine from Vladivostok will cost about 3 thousand rubles; it is difficult to say how much the new mechanism costs. You can also search for more details in car dismantling yards and various advertisements on the Internet.
Sources
- https://MoyLacetti.ru/sistema-ventilyacii-kartera/
- https://akki-carsh.ru/dvigatel/chistka-sistemy-ventilyacii-karternyh-gazov.html
- https://avtomotoprof.ru/obsluzhivanie-i-uhod-za-avtomobilem/ventilyatsiya-kartera-dvigatelya/
- https://VazNeTaz.ru/klapan-ventilyacii-karternyx-gazov
- https://vopros-avto.ru/klapan-pcv-chto-eto-i-dlya-chego-priznaki-neispravnosti-klapana-pcv-i-sposoby-proverki/
- https://santavod.ru/kak-proverit-klapan-ventilyaczii-karternyh-gazov-pcv/
- https://avtobrands.ru/znachenie-sistemy-ventilyatsii-karternyh-gazov-v-dvigatele/
- https://MoyLacetti.ru/klapan-pcv/
- https://avtika.ru/kakuyu-ventilyatsiyu-kartera-imeyut-bolshinstvo-avtomobilnyh-dvigateley/
- https://FB.ru/article/299022/kak-proverit-klapan-karternyih-gazov
Cheap and cheerful, but functional
Many drivers who have already managed to make a crankcase oil separator on their own are pleasantly surprised by the price. In some cases it is practically zero. Perhaps craftsmen make do with improvised means that they find in their own garage. But even if nothing suitable is available, the price of the crankcase gas oil separator is low, since all the parts from the instructions discussed above are cheap.
On the Internet you can find many ways to make a homemade device, for which different materials are used. However, everything is done according to the scheme described above. Differences may relate to the use of additional elements or the replacement of plastic pipes with metal fittings that are screwed into the oil separator cover.
At the same time, there is a positive trend in engine performance. Oil no longer accumulates, which means you can drive for a long time without problems. However, do not forget to look under the hood of the car and check the condition of the device.
