By releasing the VAZ-2110 car onto the domestic market, the manufacturer took a big step forward in terms of body strength, chassis reliability, engine power and fuel consumption. Despite this, a good tuning of this car will not hurt at all. The interior is especially in need of improvement, the design of which absolutely does not correspond to modern trends.
What can be done to improve the appearance of the VAZ-2110 car interior and increase comfort for both the driver and passengers? In our article you will definitely find the answer to this question and detailed instructions for improving individual elements.
Updating the dashboard on the VAZ 2110
The main disadvantage of the tens topedo is its excessive susceptibility to deformation. As a result, careless movement leads to the loss of the original geometry.
It is not surprising that many car enthusiasts are looking for a way to strengthen this module.
To solve this problem they will need
- Screwdriver with a set of open-end wrenches;
- Sandpaper sheet;
- A bottle of epoxy;
- Cylinder with polyurethane foam;
- A skein of fiberglass fabric.
Instructions for removing the panel before tuning
Before starting to redo the panel, the car owner should make it a rule to act extremely carefully. Otherwise, instead of tuning, he risks doing the banal restoration of a part that is far from cheap and deformed with his own hands.
Due to the fact that it is unrealistic to modify the dashboard, leaving it in its original place, this spare part will have to be removed from the mounts using a screwdriver with a Phillips-shaped bat.
Algorithm for tuning a torpedo on a VAZ 2110
The further sequence of actions is as follows.
- The unscrewed dashboard is wiped off from accumulated dirt, for which a slightly damp dishwashing sponge is used.
- Polyurethane foam is squeezed onto a clean panel.
- When it hardens, the mounting layer is processed using sandpaper until it acquires the desired shape.
- The panel modified as a result of the described actions should be made stronger. For this purpose, fiberglass is applied to it in several layers, which is then glued with epoxy resin. After the glue has dried, the surface should be sanded again.
- At this stage, the panel is covered with high quality vinyl film. When selecting it, the car owner should focus on his own color preferences. Typically, car enthusiasts use a carbon-colored film.
Tools and materials
Before you start upholstering doors with your own hands, you need to stock up on what you can’t do without:
- Fabric or vinyl (another name is faux leather) is best purchased in stores that sell fabrics. Even before you go there, take measurements of your doors so that there is about 5 centimeters of allowance on each side. This is necessary to ensure that the fabric fits perfectly, and most importantly, that it is enough to fill all the protrusions and cavities;
- Glue like Moment or another that has worked well for you. Possibly – Titan, Master, etc.;
- Cutting scissors;
- Stationery type knife;
- Construction hairdryer. If you are unlikely to need it in everyday life, you can often rent it;
- 2 brushes: narrow and wider with normal bristles;
- Antenna cable;
- Upholstery fastening pistons (clips). It is better to take them with a small reserve, since their removal is often accompanied by breakage. Please note that each door has 8 pistons;
- Self-tapping screws. If you are making fabric or vinyl trim, then standard, short screws, the same as the previous ones on the door, will do. But if you are going to install Euro panels with your own hands, then to attach them to the bottom you will need long self-tapping screws;
- You may need new speakers, these should also be purchased in advance. Please note that usually in ready-made Lux 2 panels there are holes for speakers of 16 - 17 cm.
Changing the dashboard backlight on a VAZ 2110
Due to the fact that the standard dashboard lighting on the 10 is carried out using ordinary incandescent lamps, you can often hear complaints about insufficient brightness.
That is why many car enthusiasts prefer to install LED lamps instead of such lamps. They not only shine better, but also work much longer.
Backlight tuning algorithm
In order to install LED elements, you will have to remove the instrument unit from the dashboard. The lamp seats are located on its rear surface, and therefore there is no other way to remove the standard lamps.
The sequence of work operations for replacing the backlight is as follows.
- The steering wheel of the ten is moved to the lowest possible position.
- Using a Phillips screwdriver, unscrew a pair of screws located on top of the instrument modules.
- After this, the cover can be freely removed; to do this, simply pull it out with a smooth movement.
- Below, three more threaded connections will open, securing the block with lamps. These three screws can also be unscrewed with a Phillips screwdriver.
- Next, you need to pull out the block with the instrument modules, for which you first disconnect all the wires. Factory standard lamps are taken out and LEDs are installed instead.
- After this, the instrument unit is mounted in its position and the dashboard is reassembled.
Modifying the stove, simple techniques
Modernizing the VAZ 2110-2112 stove is a thorough and multifaceted process. If you don’t have the time or opportunity to fully remodel the stove system, but you need a positive result in the shortest possible time and with minimal effort, because winter is almost upon us, you can try to listen to the following advice.
1. The easiest way to increase the air flow of the heater for heating the feet of the front seats in the cabin is by blocking the heater ducts for the rear ones. Any tool at your disposal will do
Thus, you sacrifice the comfort of your passengers, but is this really important if, for example, you prefer to drive alone; 2. A similar result can be achieved by blocking the air channels of the central deflector oven by cutting a suitable plug from a sheet of aluminum
Obviously, in this case, the heat flow directed to the side windows and other furnace ducts in the car increases.
Stove damper tens
- 3. Often, standard VAZ 2110 door seals are not enough for reliable sound and heat insulation. Simply gluing additional insulating tape around the perimeter (for example, from K-Flex) can significantly improve the comfort inside the VAZ interior with minimal time and money investments;
- 4. Replacing the 5-hole thermostat with a more modern 6-hole thermostat, which controls the engine cooling and heating system in VAZ cars. These thermostats are completely interchangeable, so there should be no problems. A 6-hole thermostat is technologically more advanced, and therefore the heating of the stove radiator in a car will be more efficient. Such pleasure costs about 350 rubles.
Upgraded thermostat
Painting the ceiling on a VAZ 2110
During the operation of the machine, its ceiling inevitably becomes dirty and loses its original color. Over time, dirty stains may even appear on it.
This situation does not make the car look neat, so many car enthusiasts order a complete reupholstery of the ceiling.
It is almost impossible to do this at home, and a good salon specialist will charge quite a lot of money for such work. That is why more and more owners of VAZ models decide to simply paint the ceiling of the car, and not change the upholstery on it.
Consumables for updating a car ceiling
To implement such a project it will be necessary
- Universal paint supplied to the market in spray cans. For a dozen of them you will need at least five. After treatment with this paint, the interior needs to be ventilated for about a week;
- Or a mix of water-based emulsion and universal paint, which adheres much better to the ceiling surface.
Options
There are several options for replacing door trim. Each of them has its own characteristics, advantages and, of course, the final appearance.
- Lux 1 and Lux 2. These are ready-to-install cards designed specifically for the domestic top ten. Depending on the design, these door cards are made entirely of plastic or with inserts made of fairly good quality fabric.
- Europanels. For some reason, in online stores such products are called Lux 2 door trim, although this is actually a little different. Regardless of the name, this trim looks great. But it has a serious drawback - high cost.
- With my own hands. The most budget option for replacing door trim. If you approach this issue competently and consistently, you can easily cope with the task without outside help. Today we will talk about them in more detail.
Required Tools
Any work involving repair or modification of a car begins with the search for the necessary materials and tools.
This list is mandatory; without it, it will be impossible to carry out work on replacing the door trim.
- Fabric or artificial leather, that is, vinyl. Buy them at fabric stores. Don’t forget to make replacements and calculations first to determine the exact amount of upholstery material needed. IMPORTANT! There should be an allowance of 5 centimeters on each side of the door. This significantly affects the total amount of fabric.
- Glue. Choose a proven adhesive that is sure to hold your new upholstery. It could be Moment, Master, Titan or something similar.
- Scissors. They will be used to cut upholstery material.
- Stationery knife. Something will definitely have to be cut off. In this case, a sharp stationery knife cannot be replaced.
- Construction hairdryer. It’s not worth buying it for one event to modify the car. Today this device can be rented.
- Brushes with high-quality bristles. One should be narrow, and the second should be a little wider.
- Antenna cable.
- Mounting clips. With their help you will attach fabric or leather. Be sure to buy extra, as these caps may break during installation. Also keep in mind that there are 8 pistons for each door.
- Self-tapping screws. Their size depends on the selected panels. If these are handmade products, you will need short, standard self-tapping screws. If we are talking about Euro panels, then purchase long screws.
- Speakers. New pre-fabricated panels include holes for speakers. So, in Lux 2 their size is about 17 centimeters. This is an excellent reason to install a new audio system in the cabin.
Algorithm for tuning the ceiling on a VAZ 2110
Before you start painting the ceiling covering, it must be dismantled.
- The screws securing the covering are unscrewed. The plastic clamps open. The removed ceiling is removed from the car.
- When tuning with a mixture of paints, they are taken in equal proportions.
- The paint chosen by the car enthusiast is applied to the ceiling with a simple roller. It is necessary to ensure that the paint does not penetrate the coating to a great depth.
- After painting, the coating dries for a long time and only then is installed in its standard position.
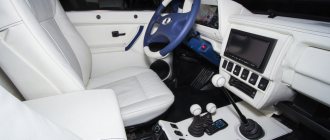
Components
When purchasing, you will receive what is included in the kit, namely:
- Europlate;
- Inserts for switches (buttons) of devices;
- Trim on the instrument panel;
- Since your instrument combination may differ from those whose installation is structurally provided, there should also be six plugs; they can be inserted instead of buttons;
- The buttons themselves and two pads for them: • Double – for low beam and dimensions; • To turn on the fog lights; • Heated rear window.
- Air ducts;
- Block and wiring harness designed to connect a double button for side lights and low beam;
- Brackets securing the instrument panel.
In addition, if you are not entirely satisfied with this combination, and you need more buttons for other devices, then they, as well as the pads for them, can be purchased separately.
1. The trim itself 2. Inserts for buttons, air ducts, instrument panel trim 3. Buttons, pads, plugs, harnesses
Sound insulation of a VAZ 2110 car
The high sound permeability of the VAZ interior consistently causes sharp criticism from car enthusiasts.
That's why they often install sound insulation using:
- Vibroplast placed on iron parts of the body;
- Isolon, mounted as the next layer;
- Foam rubber at least a centimeter thick;
- Mastic;
- White Spirit.
Step-by-step instructions for soundproofing a car
Before you begin to protect the cabin from engine and street noise, it must be disassembled.
It is necessary to remove and remove the dashboard, the seats of both rows and, in general, any parts that can prevent a decrease in sound permeability.
- Next, all iron surfaces are thoroughly washed.
- The mastic is diluted with white spirit to form a watery mayonnaise.
- Now you can cover the interior with vibroplast. You should start from the front of the cabin. The vibroplast is fixed using a mastic solution, which is applied with a brush.
- Then they cover the doors with vibroplast, having previously removed the trim from them.
- Then the vibroplast is laid on the floor, while 2 layers of insulator can be laid on the area above the muffler.
- At the next stage, the vibroplast is coated with isolon. It is fixed with the same mastic solution.
- At the last stage, foam rubber sheets are applied, which are fixed with liquid nails. Foam rubber is especially effective for sound insulation from the dashboard, ceiling and door trim.
Upon completion of the insulator sticker, the parts are fixed in their standard positions.
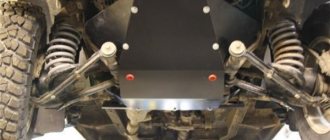
Replacing the entire hinge
If the door is sagging, then the likely cause is deformation or mechanical wear of the hinges. It is corrected by completely replacing them, along with the fingers. You don't have to buy them. You can make it yourself if you have a metal cutting machine. Such repairs will be cheap - you will only have to pay for the purchase of high-quality metal plates.
It is recommended to cut the loops strictly along the boundaries of their wedging. Fingers are placed last. And again, you need to lubricate them, hammer them, and lock them, as the manufacturer himself recommends. Replacement without taking into account their manufacture (if you do it yourself) will take at most several hours, including removing and reinstalling the doors. All that remains is to make the adjustment. And you should understand that in the next few days the noose may fall. This is shrinkage. The door may creak and may not always slam shut normally. If necessary, readjustment is performed.
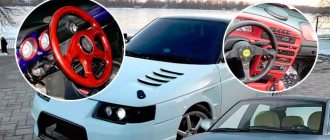
Remaking the steering wheel for a VAZ 2110
The factory steering wheel of the ten, which is not equipped with braid, is deservedly considered excessively thin. On top of that, it does not create enough friction force for confident driving.
These factors do not have the best effect on accident-free driving.
- That is why, soon after purchasing dozens of them, the steering wheel is covered with braid.
- For this purpose, the “M” option is suitable, designed for handlebars up to thirty-nine centimeters wide.
- The purchased braid is put on the steering wheel hoop, after which the edges are connected with a special needle and nylon thread.
Replacing the standard steering wheel with a designer one
Anyone wishing to install a new steering wheel must have at their disposal a Phillips screwdriver and a 24mm socket.
- The logo plate lifts up and is removed.
- The horn panel is secured with three screws. They are unscrewed and this part is removed.
- The 24 nut that secures the steering wheel is unscrewed using a socket.
- The steering wheel is dismantled and a new one purchased from a design studio is installed.
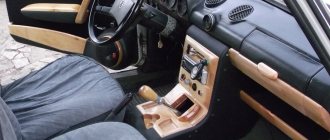
Tuning car seats for VAZ 2110
Dozens of factory seats consistently cause criticism due to their discomfort. That's why they are usually replaced with seats from an Octavia, Hyundai or BMW.
- The seats of these foreign cars are distinguished from dozens of chairs by carefully honed ergonomics, elegance and small size.
- True, it will be unrealistic to install them in a garage workshop.
- The fact is that for this procedure the fastenings require structural modification.
Accordingly, the car must be delivered to the design and tuning studio, having agreed on the cost of the work. Usually it does not exceed eighty thousand rubles.
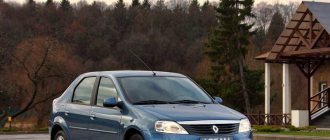
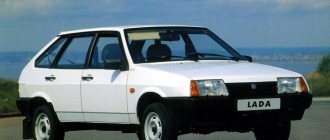
Problems of the “tenth family” on the used market
Before purchasing a VAZ-2110, check the history of the vehicle you like. A third of the “ten” are sold with registration restrictions, reduced mileage and after a taxi. Every fourth car is sold damaged or with unpaid fines.
Some owners put cars up for sale with several problems at once. We almost immediately found one.
"Ten" 2003 with a 1.5 73 liter engine. With. and a mileage of about 210 thousand km for 75 thousand rubles:
The owner indicated that restrictions were imposed on the car, and the check also found incorrect mileage, a small accident and a couple of unpaid fines for driving in a public transport lane:
Due to existing restrictions, the future owner will have problems with registration. The issue of fines and lifting of restrictions should be resolved during the inspection of the car.
Also read: Used LADA Granta: execution cannot be pardoned