The generator is necessary to power consumers while the engine is running, as well as to charge the battery in preparation for the next start. After the death of the old generator, it was decided to replace it with a more powerful one. Why and how this was done – we’ll tell you in today’s episode.
As they say, “Classics” are eternal, but progress does not stand still. The abundance of accessories and the desire to make the car cooler do their job - the standard generator cannot cope with the load.
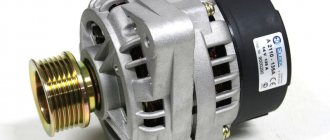
The seven was injection with a 73A generator. In principle, this could be enough, but we wanted an 80A VAZ 21214. Among its advantages, we can note that the diode bridge can be changed almost without removal, and two impellers well extend the life of weak bearings.
Generator from Niva to Classic
The generator is necessary to power consumers while the engine is running, as well as to charge the battery in preparation for the next start. After the death of the old generator, it was decided to replace it with a more powerful one. We'll tell you why and how this was done in today's episode.
As they say, “Classics” are eternal, but progress does not stand still. The abundance of accessories and the desire to make the car cooler do their job - the standard generator cannot cope with the load.
The seven was injection with a 73A generator. In principle, this could be enough, but we wanted an 80A VAZ 21214. Among its advantages, we can note that the diode bridge can be changed almost without removal, and two impellers well extend the life of weak bearings.
What will it take to improve?
First of all, of course, the generator itself and the VTN type voltage relay (9111.3702). Later you will feel the difference why we chose it.
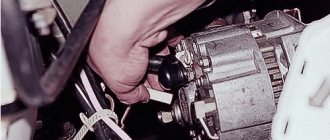
In addition, you will need a fastening mechanism from a VAZ 21214, a bracket, a bracket and a bolt for the generator itself, but from a VAZ 2110. In terms of mechanical installation, there should be no problems. The old fasteners are removed and installed in their place from Niva - anyone can do it.
The hardest part is the connection.
How to connect a generator from Niva?
The main problem is that the VAZ 2107 used two types of generator with corresponding circuits:
1. G222 - generator with constant excitation. If it was this one that was used, then we disassemble the new one and bite off additional diodes. Why is this being done? But the whole problem is that if this is not done, the car will refuse to stall. Below we attach a photo where you need to eat the diodes. After this, there should be no connection problems.
2. Generator 37.3701 . Here the excitation flows through the warning lamp on the instrument panel. In this case, no changes to the scheme need to be made.
Important nuance
If your car was produced between 1985 and 1989 , then none of the proposed options will suit you. Now we will look at how the generator was connected on these cars and what difficulties may arise with Nivovsky.
The fact is that on machines of this production a warning lamp relay was used. On constant excitation to the generator through fuse 9, the wire left the ignition switch. With this scheme, the charge control lamp never turned on, only in the absence of that same charge while the engine was running.
In this case, the connection will also depend on the type of generator:
1. G222. We also bite off the diodes and connect the wire to the generator.
2. If the excitation came through the lamp, then you need to do the following: simply remove the excitation wire from the fuse block in place 3 and connect it to place 7. Now the test lamp works. This wire is brown with a white stripe.
Photos are taken from the Internet and are not the property of the author!
Source
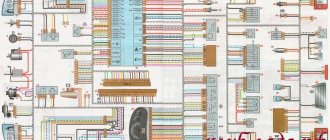
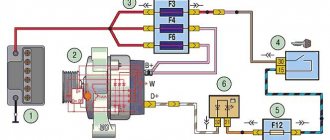
Electrical diagram of VAZ 21074
In VAZ 21074 cars, electrical energy is delivered to consumers using a single-wire circuit: the “positive” terminal of each electrical device is powered from a source, the “negative” terminal is connected to “ground,” i.e., connected to the vehicle body. This solution simplifies the repair of electrical equipment and slows down the corrosion process. All electrical appliances of the car are powered from the battery (with the engine off) or the generator (with the engine running).
The wiring diagram of the VAZ 21074 injector contains an ECM, an electric fuel pump, injectors, and engine control sensors
Also check out the electrical equipment of the VAZ 2107: https://bumper.guru/klassicheskie-modeli-vaz/elektrooborudovanie/elektroshema-vaz-2107.html
Wiring diagram VAZ 21074 injector
The injection versions of the “Seven” released from the factory assembly line have the following indices:
- LADA 2107–20 - in accordance with the Euro-2 standard;
- LADA 2107–71 - for the Chinese market;
- LADA-21074–20 (Euro-2);
- LADA-21074–30 (Euro-3).
The injection modifications of the VAZ 2107 and VAZ 21074 use an ECM (electronic engine control system), an electric fuel pump, injectors, control sensors and monitoring engine parameters. As a result, there was a need for additional under-hood and interior wiring. In addition, the VAZ 2107 and VAZ 21074 are equipped with an additional relay and fuse box located under the glove compartment. The additional unit is supplied with wiring that supplies:
- fuses: main relay power circuits;
- controller constant power supply circuits;
- electric fuel pump relay circuits;
- relay: main;
Wiring diagram VAZ 21074 carburetor
The electrical circuit of the carburetor “seven” largely coincides with the circuit of the injection version: the exception is the absence of engine control components. All electrical appliances of the VAZ 21074 are usually divided into systems:
- provision of electricity;
launch;
Providing electricity
The G7 is responsible for providing consumers with electricity:
- Battery voltage 12 V, capacity 55 Ah;
- generator type G-222 or 37.3701;
- voltage regulator Ya112V, which automatically maintains the voltage within 13.6–14.7 V.
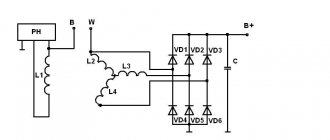
Diagram of the power supply system for the VAZ 21074 injector includes a generator, battery and voltage regulator
Engine starting
The starting system in the VAZ 21074 is a starter and ignition switch powered from the battery. There are two relays in the starter circuit:
- auxiliary, which supplies power to the starter terminals;
- retractor, due to which the starter shaft engages with the flywheel.
The starting system in the VAZ 21074 is a battery-powered starter with a relay and an ignition switch.
Ignition system
In early versions of the seventh VAZ model, a contact ignition system was used, which included:
- ignition coil;
- distributor with contact breaker;
- spark plug;
- high voltage wiring.
The contact ignition system of the VAZ 21074 consists of a coil, a distributor, spark plugs and high-voltage wires.
In 1989, the so-called contactless ignition system appeared, the circuit of which included:
- Spark plug.
- Distributor.
- Screen.
- Hall Sensor.
- Electronic switch.
- Ignition coil.
- Mounting block.
- Relay block.
- Key and ignition lock.
In 1989, a contactless ignition system appeared, to the circuit of which a Hall sensor and an electronic switch were added. The
“sevens” with injection engines use a more modern ignition circuit. The operation of this circuit is based on the fact that signals from the sensors are sent to the ECU (electronic control unit), which, based on the received data, generates electrical impulses and transmits them to a special module. After this, the voltage increases to the required value and is supplied to the spark plugs through high-voltage cables.
In injection "sevens" the operation of the ignition system is controlled by the electronic control unit of the ECU
Outdoor Lighting
The external lighting system includes:
- Block headlights with dimensions.
- Illumination of the engine compartment.
- Mounting block.
- Glove compartment lighting.
- Instrument lighting switch.
- Rear lights with dimensions.
- Illuminated numbers.
- Exterior lamp switch.
- External lighting indicator lamp (in the speedometer).
- Ignition.
Lada 2107 LadaComfortVV › Logbook › Priora Luxe 140A generator in VAZ-2107
We go to LOSK and stock up on everything we need...
Generator KZATE 140A 9402.3701-14M (2100 UAH)
Lower generator mounting bracket from Niva 21214 Belt tensioner bar from Niva 21214 Fastening bolt (320 UAH)
Pulley from Niva 21214 (120 UAH) Connector for Lada Kalina generator (40 UAH)
We arrive home and begin the installation. We remove the old generator, unscrew the fastening and screw on the new one, it becomes as it was there, having previously sharpened it from the inside so that the generator itself can fit in.
I changed the pulley on the generator without any problems, the only thing I had to do was add a couple of washers to prevent the pulley from clinging to the generator housing.
Many people start aligning the tensioner bars there, bending them, drilling them, and so on, I took a simpler route, turn the classic tensioner bar 180° and screw the bar from the field
At the bottom, the bar is screwed to the generator until it stops, and the tension is applied at the top between the two bars. The axis also became perfectly straight, the engine spun up to 5 thousand, the belt was in place
After installation, I noticed that during operation the tensioner bar rests against the cooling system pipe
And it starts to rub this place.
Therefore, in order to avoid chafing of the pipe and contact of coolant with the generator, we mark on the bar with a felt-tip pen the place protruding beyond the ear of the generator
And we grind it, in this place and, just in case, rounding the edges from sharpness
Put it in place and notice how space appears
Now the bar does not reach the pipe
We connect the wires, the main one and the one that goes to the lamp on the tidy. There are 2 wires on the generator block, unlike the classic 1. The block itself has a rectangular edge and a rounded one, so our wire needs to be connected to the rounded side on pin L
. And everything works smoothly.
The only difference... On the old generator I set the idle speed to around 600 rpm
and at these speeds charging was already underway and I liked how the engine slowly droned on at these speeds.
After installing the generator prior, the idle speed had to be raised to 900 rpm
since it only starts giving out charge at 850 rpm, now the car runs louder at idle, but the charge is now stable... at idle it produces
14.1-14.2V
Turning on the low beam lights, fog lights, heaters, heated rear window and mirrors, and heated both front seats, the voltage remains stable at
13.8V
, I think this is already an achievement ☺️
After installing the generator, the sun just came out and I made a video of what the tidy looks like in the sun. I like.
Good luck to everyone on the roads and stable voltage☺️
Source
We install an 80A generator (from the 214th Niva) on a carburetor Niva.
We install an 80A generator (from the 214th Niva) on a carburetor Niva.
To provide yourself and your car with a good battery charge, as well as get rid of the “muffled” headlights at idle and give yourself the opportunity to install additional electrical equipment, you need a powerful generator! For a regular (carburetor) NIVA, there is a simple option to increase the power of the generator - this is to steal it from its brother VAZ-21214 (injector). On 214 Nivas they install generators with a capacity of 80A, because... there are more consumers there!
Installing an 80-amp generator, for example, in the 213th NIVU is not difficult at all! You just need to buy: the generator itself from the 214th Niva (ATTENTION: they come with different pulleys!), the lower bracket for mounting the generator and the upper tension bar, and of course a special bolt for attaching the generator to the lower bracket.
Brackets can be easily installed on the engine of ANY field! because the blocks are the same! As I understand it, you can even easily plug it into the “six” for the same reason. Remove the old brackets and install new ones! Everything is screwed into the same holes!
In the case of the 213th Niva, there are almost no alterations on the electrical side! It was only necessary to change the terminal on the excitation wire (on the 213rd there is a terminal for a bolt, and on the 214th there is a regular “mother”) I can’t say for sure about 2121, I don’t remember how they have a charging relay there, if it’s external, it’s necessary redo the circuit, because in the new generator it is built into the brush assembly!
This will not affect the battery in any way! The charging current remains the same, because these generators have a standard charging relay (pocket) - 5A power
For reference: the 214th Niva has a regular 55 a/h battery
If the M2141 is with a VAZ engine, then of course! no problem!
And if the M2141 is with UZAM, then IMHO in my opinion it should work, but with the fastening it will be a little difficult. but in general there shouldn't be any problems. At one time I even wanted to install it on one car, but I never found the time.
If you put it, please unsubscribe.
IMHO, I would not contact the Vologv (or Gazelle) ones because they have an external charging relay. And another connection diagram! Why fence the garden! It’s easier to plug in this generator - since it has a built-in charging relay (tablet) and the connection diagram is similar to the standard one on UZAM! I think there is no information about the installation of these generators at UZAM because they began to be made relatively recently. at least sell it! And of course there is little chance of finding such a “junk” generator. But finding some unnecessary Volgov is a piece of cake!
If we talk about buying a new generator, it’s better to buy this one and simply modify the bracket (similar to how they do it with Volgov generators) than to remake the bracket and some other electrical parts for a Volgov generator! Although, of course, there are also 90A Volgov ones! But in my opinion it's not worth it!
By the way, it’s true that the Volga generator is installed because it is more accessible.
The native generator for the Ufa engine (58.3701) has categorically not suited me for a long time. So I decided to change it to something more decent.
Disadvantages of native generators: The original generator produced by ATE-1 (58.3701) has a power of 52A, is distinguished by crooked pulleys that fly apart from time to time (stamped welded ones - they fall apart right after welding), unreliable diode bridges and a flat current-speed characteristic - it gives too little current at idle . It also has rather weak bearings, although apparently only I encountered this problem due to the fact that I like to operate the engine often and for a long time at high speeds (5000-7000).
Recently, Ufa engines began to be supplied with generators 666.3701 produced by KZATE. Unlike the previous generator, this one has a normal, smooth, turned pulley and a more complex connection diagram - with a light bulb on the instrument panel instead of a voltmeter and a slightly higher power - 60A.
There were many replacement options - UZAM made the generator mounting in such a way that almost any generator can be installed in its original place. Therefore, a selection of replacement options was made (low-power ones were discarded immediately):
Generator from Bychka (or a converted original one). Power 90A. It is quite cheap, has a normal pulley, but is still rather weak at idle and has exactly the same diode bridge as the original one (Generator of the 94xx.3701 family. The most common ones are from the injection Niva 21214 (9412.3701) and the 16-valve ten (9402.3701) . There are rumors that they began to install the latter on all injection eights/tens. It pulls well at XX. The power is 80A. It’s not cheap. But you don’t have to worry about the bearings - they are powerful and with a reserve (since the version for 2112 has a pulley for a poly V-belt of a smaller diameter) .It also contains additional diodes in the bridge for powering the excitation winding (like the generator 37.3701, which is installed on the 2126 with a VAZ engine). As it turned out, there are 2 versions of generators 9412.3701 on sale - they differ in pulleys. Some have pulleys with a diameter of 80 mm, some - 70mm in outer size Naturally, you need to take a generator with a 70mm pulley, for which you should take a ruler with you to the store.
Generator from a foreign car (hypothetical). Their modern models are good, you can buy a suitable one quite cheaply at a disassembly site, but there will definitely be problems with spare parts for it somewhere in Mukhosransk at a roadside stall. In terms of characteristics, modern generators are usually close to option 2 (In the end, I settled on option 2. Having looked at the Nivovsky version of this generator, I came to the conclusion that this is what should be installed. The tenth one is also suitable, but:
The pulley on it needs to be changed from poly-V-ribbed to regular. A pulley from a figure-eight/classic generator 37.3701 is suitable. It has an upper ear under the bar in a slightly different place (closer to the engine), which means it will be less convenient to tighten the belt. As a rule, it costs a little more (100-300 rubles) than Nivovsky. Therefore, a Nivovsky generator was purchased. In the evening, a hole was already drilled in its lower one from 8mm to
11mm drill for 10.5, since the original mounting brackets for the generator have holes for bolts of 10. According to the drawing, the hole diameter in the original generator should be 10.2mm.
I also immediately changed the tablet in the new generator - instead of the native Kaluga one, I installed a Ukrainian one with a field-effect transistor. This will allow for less voltage sag - important at idle. (
In the morning I went outside (the car was parked at the entrance), shoveled away the snow, warmed it up a little (to make it warmer) and removed the old generator. Then I tried the new one in place. In general, as expected, it fits almost like a native one.
It is necessary to move the front bracket forward by about 5mm so that the pulley is in the same plane as the others (pump and crankshaft). I did not increase the pulley reach by moving it further along the generator shaft or sawing the lower ear of the generator: the load on the bearings increases. The original front bracket moves normally - it is screwed to the studs of the front engine cover - between the cover and the bracket, 8 washers of the required number are placed on the studs. You also need to change the studs to longer ones - I only changed one (the second one did not unscrew) - there I had to put a nut on the thread lock - it hangs down a little. Longer studs were found by chance. Unfortunately, I can’t tell you the exact length - you can unscrew one and take it to the store or to a box with fasteners - there you need literally 2mm longer. You need to buy a bolt 10 135 mm long. I bought 140 - it turned out to be a little long. But more is not less. It’s better to take a good, strong bolt with a 17mm head and 2 thick nuts (0.7-1 cm approximately) - also 17mm (to make it easier to unscrew without fear of tearing them off). The generator will be fixed by tightening the 1st nut, but not all the way, but only to move it to tension the belt. The 2nd nut counters the first. You need something to fill the gap between the rear end of the alternator bottom bracket and the rear alternator bracket on the engine. I put 4 thick 12mm nuts on the bolt (which is 10-140mm). And since the rear bracket moves (it is screwed with two nuts through the studs and can be moved back about 1cm), the gap is selected as follows - the rear bracket is loosened , a bolt is inserted in front, the generator is put on it, then 4 nuts by 12, then the rear bracket, then the nut is screwed onto the bolt, pulling the bracket to the nuts, then the bracket is screwed on. It’s a little inconvenient, but you can take the length of spacers made from nuts (or something else, maybe tubes) +-5mm and not be afraid of losing them. You also need to buy an 8mm bolt, 40mm long, with a nut (preferably Teflon so that it doesn’t come loose) to fix the generator to the bar through the upper ear. The plank remains original. There you also need to place washers in place. The original bolt is a bit short. Electrical part:
The plus is connected as usual to a thick stud with 6 nuts, but the excitation needs to be connected differently. Since the generator is self-excited, it only needs power at the time of startup. You can simply connect the standard wire, but then the engine will not stall when the ignition is turned off, because the generator will generate current through the additional one. diodes and power the ignition through the excitation wire
The standard circuit from the figure eight suggests powering this wire through a control light on the parting panel and two resistors + a diode in the FC parallel to it, but since it was too lazy to bother with searching for the required output in the FC, KRWW and I simply soldered a powerful diode in the standard wire from the excitation winding, soldered from a burnt board from a monitor, reasoning that the resistors were there only for safety net.
If the diode breaks down, you can do this: connect a standard wire to the excitation winding terminal and remove it before turning off the ignition so that the engine stalls.
Now a report on the sensations immediately after installation:
1. Charging appeared right from idle speed (which did not happen with the old glitchy generator even when it was working properly). 2. The voltage sags much less when consumers are turned on, but still sags a little. When absolutely all consumers are turned on, including the cooling fan, the generator reaches operating mode at 1200 rpm (that is, the voltage does not sags). 3. This generator is much less noisy! But I decided to make some more improvements and went to KRWW’s garage, where we unloaded the ignition switch with two additional switches (Although there is a different CY in the picture, the idea is actually the same for all CYs. As a result, the effect was amazing!
Now everything is fine already from 1000 rpm with absolutely ALL consumers turned on, and the voltmeter needle stands as if nailed down! When you turn on the turn signals, however, the voltmeter twitches a little (but much less than before, barely noticeable). Apparently the contacts in the dash are not the same.
At the same time, the wipers began to run faster and the heater began to blow more powerfully.
The voltage drops significantly at the ignition switch
Gena - 1960 RUB Field-effect transistor tablet - 100 RUB Fasteners - about 50-70 RUB 2 30A relays + pads + wires - I don’t remember Addition: I’ve driven more than 2 thousand km with the new generator - everything works fine, the belt does not wear out, there are no breakdowns.
Reader's note: Resistors are needed not for insurance, but to practically eliminate excitation at the moment of starting, which, firstly, saves electricity (and when starting with a starter, every ampere is precious!), and secondly, an unexcited generator does not resist rotation, which also makes it easier start. But I myself have completely excluded additional diodes from use, and supply the excitation through the technological output “D” using a relay. This way the voltage is maintained more accurately. Alexey Vasiliev
It's time to take a look at our SUV's electrical system. Namely, to an electric current generator. As you know, it charges the on-board battery and, accordingly, provides power to absolutely all devices - from the cigarette lighter to the “chandelier” or winch. Replacing a “gene” is not always dictated by its malfunction, so we will try to carefully study this issue from “A” to “Z”.
Content:
- Why do you need a generator?
- Each Niva has its own “gene”
- Why install a manufacturer with increased power?
- Why is the generator moved?
- What additional parts are associated with the generator?
Why do you need a generator?
The purpose of the device called “generator” is fully clarified by the decoding of its name, which is translated from Latin as “manufacturer”. The detailed name of the electric generator specifies that this component of the car structure converts mechanical, thermal or any other non-electric energy into electrical energy.
The Niva SUV, especially in capable hands, takes the owner and passengers to such distances, as in the famous song, where “you can’t really step.” Therefore, Lada 4×4 almost always has additional electrical equipment - from a harmless low-power standard music radio to quite serious consumers of electricity, such as a compressor, additional lights, etc. This is where discomfort arises - sometimes even the headlights barely shine on the Niva, sneaking through the fields for fishing or to the hunter’s night shelter.
Let's figure out how our fellow jeeppers are rectifying the situation! What do they use and what models of generators are not recommended for installation.
Each Niva has its own “gene”
To begin with, let us recall that the Niva car recently celebrated its 40th birthday and one should not think that all the cars that were assembled in Togliatti 20, 30, or even all 40 years ago are already in the dustbin of history or in museums. They quietly travel along the roads of vast Russia and other countries, and therefore we will try to take into account all the nuances associated with the generations of the legendary SUV.
As we previously found out using the example of the Niva’s ball joints, this car has conditionally survived three noticeable updates.
Generators for Niva 2101-3701010
Until about 2009, the good old VAZ-2121 was quite easily assembled with exactly the same components on which the classic model range of the Volzhsky Automobile Plant was built. The generator was installed there from a “penny” - 2101-3701010 (G221A) at 590 W with an almost symbolic maximum current of 42A. The owners of these cars were the first to encounter a power shortage due to the additional load on the car's electrical circuit. By the way, for this generation of car you can find generators ELDIX (ELD-A-2101-14V-50A at 50A and 700 W) or StartVOLT (LG 0101 already at 85A and 1200 W).
Generators for Niva 21213-3701010
Which generator is suitable for Niva 21213? Carburetor cars VAZ-21213, VAZ-2131 and VAZ-2120 (Nadezhda) were equipped with a different “geno” - 21213-3701010. Marking of the specified product is KZATE (371.3701-02). This is a 55 amp 770 watt unit.
Generators for Niva 21214-3701010
Finally, since about 2015, the injection models VAZ-21214 and VAZ-2131 and their variations have been equipped with a fairly extensive line of electrical energy producers from the same KZATE (9412.3701) 80-Amp generator for 1120 W, a couple of models from ELDIX (ELD-A- 21214-14V-90A and ELD-A-21214-14V-135A), respectively 100 and 135 Amperes and power 1400 and 1850 W.
Well, since we started a review of Chevrolet Niva generators, there is also PRAMO (5142.3771 and 5142.3771-10) for 80 and 100 Amperes, 1120 and 1400 W. And StartVOLT (LG 01214) at 135 Amps with a power of 1970 W. Accordingly, which Niva is the generator from 21214 suitable for? That's right, to the VAZ-2131!
Let’s make a reservation right away that numerous users on the Internet do not praise ELDIX products very much. Therefore, when solving puzzles: “Generator for a Chevrolet Niva: which one is better to install?”, perhaps it makes sense to focus specifically on the experience of fellow drivers. On Bulgarian Eldixes the diode bridge burns “at once”, and this is an unpleasant story.
From the point of view of the differences between early versions of the Niva generator and later ones, the fundamental design difference is in the remote voltage regulator on the former and the regulator built into the generator on the latter. Otherwise, any generator fits onto the Niva easily and almost without problems with just changing the brackets, since the power unit block is, in fact, the same for all these cars. And the “gene” is attached specifically to it. The pulleys on the Lada 4×4 are also made for the same mono-V belt, but for the model with power steering the belt is slightly wider and longer, and without power steering it is narrower and shorter.
In general, the generator should be selected carefully; it is even better to contact specialists so that you do not have to return a part that does not fit the design to the store.
By the way, in recent months many have been asking a reasonable question - what kind of generator is on Niva Travel? After all, this is a “new” model from AVTOVAZ and, perhaps, some solutions have been applied that are different from previous generations of Niva. Here we just remind you that the engine in the new product is the same as on the previous Shniva, and hence the answer - the location and name of the generator is identical.
What generator is on a regular Chevrolet Niva and which one should I buy? Let us remind you that on Chevrolet Niva cars the manufacturer installs a 55-Amp generator 37.3701. We will offer specific replacement options for more productive analogues below. First, let’s thoroughly examine the question: is it necessary to change the “gene” at all?
Why install a manufacturer with increased power?
As mentioned above, the Niva driver almost always has a lively mind, regularly solves non-standard problems, plows off-road roads and, in general, belongs to the category of people with both head and hands. That's why he lacks a factory electric generator.
There is not enough current from the standard device
Often an additional fan, numerous lighting fixtures and other attributes of a real conqueror of virgin lands are installed. Hence the banal lack of current.
Replacing the unit does not require Herculean efforts
Experienced Nivavods have many times left on the forums their recipes for resolving the issue of the lack of a native generator. The kit for installing a more modern “gena” on an old Niva contains a bar, a lower bracket, a bushing assembly, a nut and a bolt. If you have direct hands, installation does not take much time. All that remains is to resolve the issue with the wiring.
Later alternators have 2 pins, but the old alternator had 3 pins. The “extra” wire comes from the “chocolate bar” on the wing. It is recommended to simply isolate it and not connect it anywhere. If so, why not upgrade your favorite car?!
You have to cross the mud, fords, ravines
Finally, with regular extreme loads on the car, they prefer to protect it - the generator is moved from the lower plane of the engine compartment to the top. This way, the brushes will not wear out or “hang” due to accumulated dirt, which means, as a result, they will not burn.
Why is the generator moved?
Actually, we have already answered this question in the previous paragraph. Here we will try to briefly outline the options for changing the location of the generator for different models of a particular all-wheel drive vehicle.
So, the bracket and belt on the injection VAZ-21214 will allow your “gene” to serve longer without any problems:
Shendys › Blog › VAZ classic generators
What are they, how do they differ in connection?
First, briefly about the operation of the generator. Who knows - scroll down to two lines. If you wrap a wire around something metal and apply electricity to it, you get an electromagnet. This should have been taught in physics classes at school. If you move a magnet or electromagnet next to a winding (made of wound wire), then electricity will appear in the coil, electrons will run in one direction along the wire, then in the other. If you connect a light bulb, for example, it will glow. A car generator works the same way.
The generator pulley rotates through the belt, which turns the rotor (moving part), power is supplied to it through the brushes, and an electromagnetic field appears in the winding.
Standard option
Which generator is better to install on VAZ 2106 and 2107? The question is quite complicated. It needs to be considered starting with the most common option. After all, any manufacturer will say that it is the standard version that should be installed on the car. Let's look at the features of the standard version G221.
In this type of relay generator, the regulator is installed separately from the brush assembly. This makes it easier to troubleshoot some problems to some extent. The advantage is the ease of installation, there is no need to adjust the wiring for connection, everything is done according to the standard scheme. But such a generator is low-power; it produces a charge of a maximum of 42 A, which is not enough for most modern batteries.
From all this, we can conclude that a standard generator is certainly good. But, if you have additional devices, it is not very profitable to use it. It is best to choose a more powerful option.
This generator is intended for use on Niva cars. It is capable of delivering 50 A of current, which is quite enough for full-fledged electrical work. It differs from a standard “six” generator in the presence of a built-in regulator relay. Here it is assembled into one unit with brushes. Therefore, to install it on a VAZ 2106, you just need to make some minor modifications. This electric machine is installed on 2107 without any special interference or modifications.
There are several ways to refine such a generator. The easiest way would be to install brushes from the G221 generator. They fit perfectly in place of the relay assembled with the brush assembly. No modifications are required, this allows you to install such a generator, even for people without special skills. It is possible to install the G222 with a standard regulator, but to do this, you will have to redo the generator connection diagram. Otherwise, nothing will work out.
VAZ specialists answer
VAZ SPECIALISTS ANSWER
VAZ:
EVGENY BAIBORIN - engine development department
ALEXEY KLIMENKO – transmission development department
YURY PROKHOROV – after-sales service department
ALEXANDER GUSEV – transmission development department
On my Niva VAZ-21214, the plastic chain guide broke more than once, once every 10-12 thousand km. I changed the chain, sprockets, tensioner shoe and the hydraulic chain tensioner itself, the oil line - I can’t find the reason!
The dampers used in the factory configuration, produced by JSC "Plastik" from Chelyabinsk, have proven to be quite reliable. In your case, the reasons for the breakdown of the original, factory damper could be factors such as an error in the initial installation, a deviation in the location of the damper mounting on the cylinder head, or the dimensions of the damper itself from the requirements of the drawing. In these cases, the damper may become distorted, ultimately leading to its destruction.
A serious threat of breakage of the damper also arises when shock loads are applied to it due to insufficient tension of the operating chain - usually this is due to a malfunction of the hydraulic tensioner, but in some cases the cause of this is excessive wear of the sprockets and chain, its significant elongation and sagging.
Calcifiers bought in a store may be inferior in strength to the original ones due to the low quality of their material - plastic.
I want to remake the VAZ-21214 timing drive according to the 21213 model. What is the difference between sprockets, chains, etc.?
The 21213 engine has a 21213 camshaft, which is driven by the long-established traditional double-row bushing chain 2103 (116 links). Here is the original kit - tensioner, shoe, chain guide. The stars are, accordingly, double-row. The number of teeth for all engine options is the same: 19 on the crankshaft nose, 38 on the camshaft and oil pump drive. Valve lever supports are mechanical. These details are well known to many from VAZ classic cars.
On the 21214 engine, to reduce noise and at the same time increase reliability, they used a single-row, but bush-roller chain 21214 (116 links), single-row sprockets, a camshaft 21214, hydraulic supports for valve levers, an original set - a hydraulic tensioner, a shoe, and a damper.
Conversion of the timing drive 21214 to 21213 is possible provided that the above parts are completely replaced, but the meaning of the event is questionable.
Is it true that in the 21124 engine (1.6 l, 16 valves), in the event of a timing belt break, the collision of the valves with the pistons is completely excluded?
Theoretically, the probability of valves contacting the pistons on the 21124 engine still exists, but compared to its predecessor 2112, it is small. For such an event to occur, the following factors must confluence:
— unfavorable combination of the true dimensions of parts within tolerances;
— high engine operating temperature;
- camshaft stop when the valve is fully open.
Neither during factory tests nor in operation (starting from October 2004) were there any cases of contact of valves with pistons on VAZ-21124 engines.
Is it true that you should end your trip by “blowing through” the engine at high speeds (about 3000 rpm) for one minute so that there is no carbon left on the spark plugs?
In the summer this makes no sense. In winter, at frosts of 20 degrees and below, if before this the engine was slightly warmed up or was idling, the “operation” can be useful. At the same time, such techniques do not eliminate problems caused by low-quality gasoline, malfunctions of the power supply and ignition systems. Difficulty starting the engine - and not only in winter conditions - is often explained by precisely these reasons.
Is it possible to install an intermediate shaft with a CV joint from a VAZ-21213 between the gearbox and transfer case on a VAZ-2121?
Intermediate shaft 21213 can be installed instead of unit 2121 on Niva cars with any gearbox - an outdated four-speed or a modern five-speed. This is justified by the fact that it allows one to somewhat reduce the requirements for the alignment of the gearbox and transfer case shafts. An additional advantage is in the very “ideology” of the CV joint, which ensures much more uniform rotation of the “drive shaft - driven shaft” pair than with conventional universal joints, and, accordingly, a reduction in vibrations in the transmission.
In the 21214 engine, the hydraulic valve compensators are knocking. This is not the first set I have replaced! Is it possible to replace them with “cups”, like on the VAZ-2108?
Take an interest - at least in books - about the design features of the cylinder heads of both engines! They differ so radically that the alteration you propose is out of the question. This is tantamount to developing a different engine.
Generator 2108
This device is often installed on both 2106 and 2107. This is due to its greater efficiency; it produces a charging current of 55 A, which is quite enough for most motorists. But, if your car has significantly more equipment, then it is better to choose something more powerful.
These generators are identical in terms of mounting, so there will be no problems with the installation itself. Of course, if you remember to remove the terminal from the battery. The fun starts when you connect. The whole point is that 4 wires are attached to the original device. There are only 3 for the “eight” one. This is due to the built-in voltage relay. To obtain a normal result, you need to insulate the black wire, and connect the rest as usual. When the generator is running, the light indicating the discharge will be on. This is a normal phenomenon with such a connection. Accordingly, it should go out when there is no charging.
In principle, you can already drive like this, but if you want to do everything as expected, you will have to make some more modifications. We remove the old relay and replace it with a regular power relay. Now the light will light only when the engine starts, and also at low speeds, which is quite acceptable.
When installing on a VAZ 2107, you only need to add a power relay.
Generator 2107-3701010
For lovers of various additional equipment, an even stronger “gene” is required. They can recommend installing a device from a VAZ 2107i. This unit produces 80 amps, which is sufficient to operate any electrical systems added by the owner. When purchasing such a generator, keep in mind that there are several varieties. For installation on a VAZ 2106, only model 2107-3701010 is suitable; any generators of this series can be installed on carburetor “sevens”.
It is advisable to modify the device for installation on the “six”. To do this, the relay regulator is replaced with a similar one from G222. The connection is completely similar to working with a figure-of-eight generator.
Conclusion
. Initially, rather weak generators were installed on the “sixes” and “sevens”. But, in the process of technology development, their power was no longer enough to provide adequate power to the car. So the question arose, which generator is better to install on the VAZ 2106 and 2107. Fortunately, there is plenty to choose from. The next generations of devices are perfect for old Zhiguli cars after a little modification.
If the generator is seriously damaged, it does not have to be repaired, but completely replaced. Parts necessary for repair may be missing, or the breakdown may not be repairable at all. Meanwhile, the on-board voltage and the quality of battery charging depend on the good operation of the power unit. It's a shame when, despite a good motor, electrical equipment does not work properly.
And if we are talking about VAZ cars, then sometimes a replacement is in demand due to the lack of power of standard devices. Modern automakers offer many additional devices that increase the level of comfort when traveling, but they also consume a large amount of electricity, and old devices cannot cope, so they have to be replaced with more powerful ones.
Many people are interested: which generator to buy if they have a VAZ? Here you need to consider them separately by model, so before you go shopping, read the recommendations of specialists and compare them with your wishes and capabilities.
Generating Device Replacement Procedure
Before starting work, check the serviceability of the regulator relay. It is advisable to choose a model with the highest possible temperature compensation. This characteristic allows models 2106-2107 to operate at high speeds without failure. This indicator should be studied especially carefully if the VAZ 2106 or later modifications are used in areas with a hot climate.
Removing a broken device and installing a new one does not cause problems, thanks to the clear mounting method.
Difficulties arise at the stage when you need to connect a new VAZ generator. To begin with, the wires coming from the relay regulator are disconnected and subsequently insulated. Further connection of the VAZ 2108 generator is carried out as follows.
The wires, formed in the form of a ring terminal, are connected to the old place in the VAZ 2108. It is imperative to insulate the gray wire, which is not connected anywhere. Completes the installation procedure by connecting the yellow wire to the terminal. If the car owner was unable to find a device with the required power, then a model from a VAZ 2108 to a VAZ 2106 can be installed, provided that the total power of consumers is taken into account.
Careful attitude and regular preventive inspections will ensure long-term reliable operation of the machine. Even with a slight drop in speed or problems when starting the engine, there is a reason to look under the hood. The faster this is done, the less likely it is that the problem will spread further.
Generators for VAZ 2106 and 2107
The generator on the VAZ 2106-2107 costs the same as on the VAZ 2101 - G221. If you install additional external current consumers that operate constantly, this will lead to undercharging and insufficient current will be supplied from the relay regulator. These additional devices include:
Any similar device will lead to greater power consumption and, consequently, to premature battery discharge, even when the engine is running at high speeds. Standard devices for 2106 were developed a long time ago and are not designed for modern energy-consuming add-ons.
In this case, it is recommended to replace the standard generator with a more powerful unit.
What to install?
G 222
If you need to increase the current power, then, when deciding which generator is better to install on the VAZ 2106 or 2107, instead of the standard one, take the G 222, which was installed on the VAZ 2105, Nivakh. It would seem that it itself is no better than the standard one on the “six”, but you can take an upgraded version that will be more powerful. Unlike the 221, this unit is designed with a built-in regulator relay, assembled into one unit with brushes. The G 221 gives an output of 42 A, and the 222nd - 50 A. Increasing the cross-section on the rotor winding increases the power, although the design is completely similar to the G 221. However, to install it on the 2106 you will need minor modifications. The easiest way is to install brushes from G 221. They fit perfectly in place of the relay. This modification is quite feasible even for car enthusiasts who do not have the skill.
It can be installed on a VAZ 2106 G222 with a standard regulator, but then it is necessary to change the connection diagram of the electrical machine.
On 2107 everything is installed without problems.
Check the voltage at medium engine speeds at the battery terminals, if it is 14 V at 2500 rpm, then everything is fine. You can drive with a more powerful unit by connecting additional options.
Possible causes of malfunctions
There are several common reasons that require the driver to look under the hood of the “iron horse”:
- partial or complete combustion of the VAZ 2107 winding;
- cases of interturn short circuit;
- physical wear of parts;
- external physical influence;
- mechanical damage.
Inexperienced drivers of the VAZ 2108 or earlier modifications need to remember one nuance. When choosing lighting fixtures, you need to take into account their power. For example, if you decide to install fog lights, the power of which is 40-50 W each, you should look at the technical description of the VAZ 2106 or 07. Their installation is allowed only if the vehicle’s generator produces more than 55 A of current.
Failure to comply with this rule leads to dire consequences. The increased load of the VAZ generator leads to its rapid wear. The power of the unit gradually decreases, which is mistakenly perceived as a minor breakdown. That is why the total power of all voltage consumers should not exceed the maximum current level of VAZ 2107, 08 or 06.
Lada Priora - generator replacement
The Priora requires a powerful generator; the car has a lot of electronics and a weak installation cannot cope with it.
A generator labeled 5102.3771 is recommended for the Priora, providing a power of 80 A; on luxury versions with even more electronics, a 115 A device is installed. Then which generator is better to install on the Priora?
Car owners recommend a unit produced by KZATEtm Samara plant under number 9402.3701-14, producing 115 A.
There is no need to modify it during installation, you just need to find the connector, because there are differences from the standard one. You can use a plug from a VAZ-2108 from the limit switch for turning on the reversing lights, which costs only 20 rubles.
Next, you will have to make a little modification when connecting to the “B+” power terminal in order to fit it to the desired size.
The cost, of course, of domestic units is higher than that of Chinese or Bulgarian ones, sold for 2200 and 3000, respectively. For Russian ones they ask for about 4000. But if you need repairs with Russian-made components, you can easily find spare parts.
Which generator is better to put on a VAZ 2110
VAZ 2110 factories install KATEK generators with a current of 80 A. The service life is 140,000 km, which is approximately 10 years of vehicle operation. Answering the question of which generator is better to install on the VAZ 2110, experts recommend products from Russian manufacturers.
What to consider when choosing
Generator Manufacturers
It is best for 2010 to purchase a standard generator from KATEK or KZATEtm Samara plant, and about 50% of owners do just that, according to statistics. They are reliable, cope perfectly with their functions, creating the necessary tension.
Among the foreign-made generators, we can recommend Bosch, Delphi and Denso, which are also reliable and popular.
Each Niva has its own generator!
Considering that the history of the Niva has already entered its fifth decade, it is worth considering that in terms of modernization of components and assemblies, this car has undergone three noticeable updates.
— The good old VAZ-2121 was equipped with units from the VAZ “classic” - a 590 W generator 2101-3701010 (G221A) with an almost symbolic maximum current of 42A. Later, slightly more powerful analogues from ELDIX and StartVOLT appeared.
— On the VAZ-21213 with a carburetor and the VAZ-2120 (Nadezhda) they installed a “gene” marked 21213-3701010. Basically, this is a 55-amp KZATE device (371.3701-02) at 770 W.
— Since about 2015, VAZ-21214 and VAZ-2131 injectors have received an extensive line of manufacturers from the same KZATE (9412.3701) for 80 Amps and analogues: for example, a couple of pieces from ELDIX, Pramo and StartVOLT
Generators for VAZ 2114
The generator initially built into the 2114 is low-power, and if it also breaks down and you decide to purchase a new one, the question arises: which generator is better to install on the VAZ 2114? It is important here that the unit is more powerful, but there is no need to change the fastenings.
Installing these generators for 2014 usually does not cause problems, however, it will be necessary to replace the pulley, but it only costs about a hundred rubles and is not difficult to find.
Please note that a lack of charging voltage can occur simply due to oxidation of the battery terminals; keep an eye on them by cleaning them regularly.
Features of the generator for Niva
1. Almost any “gena” fits on almost any Niva, including when transferred from below to the upper plane of the engine compartment, since the power unit block of the Lada 4×4 is the same on all models without exception. Hence the versatility of the mounting points and the only differences are in the brackets.
2. The difference between conventionally “new” and “old” generators is in the voltage regulator. In new models it is built into the “gene”, in old ones it is taken out.
3. Finally, the pulleys. For a Niva with power steering, there is a wider and longer belt, and therefore a pulley for a 5-ribbed monocline belt. For models without power steering, a 4-ribbed belt is sufficient and it is shorter.
Why a high-power generator?
The answer to this question can be extremely simple - attach a winch and a decent compressor to the car, install additional lighting and a powerful radio and... the headlights on your Niva will barely shine.
To strengthen the on-board electrical circuit, we can recommend, for example, a 110-amp URBAN KATEK on a VAZ-21214. Just don’t forget to buy reinforced high-voltage wires and a corresponding belt!
Is it worth it to transfer the “gene” or not?
If you plow through mud or fords at least occasionally, the answer is “yes”! Being located at the top of the engine compartment, the generator will 100% last longer than if it collects all the dirt and water.
Transfer, by the way, does not require titanic labor - we simply take a ready-made fastener kit with a belt, depending on the specific Niva model, and get rid of the headache about the generator.
Good luck!
Perhaps, this is where we will finish our analysis of the topic of the generator for the Niva family of SUVs. Subscribe to our channel and share your experience in fine-tuning your favorite car to perfection!