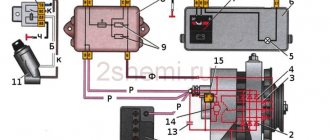
Sometimes, during long-term operation of a car, its owner is faced with the fact that there is no charging for the VAZ 2114, that is, the battery does not charge when the generator is running. This situation is quite unpleasant, because the battery may be completely discharged, as a result of which the car simply will not start at the right time. Why this can happen and how to get out of this situation will be discussed below.
VAZ 2114 battery charging lamp
Theory of the issue
While the car is moving, a dead battery receives a charge voltage of 13.6 to 14.2 V. For the correct and stable operation of all systems in the car, these voltages must be maintained until the engine starts and the crankshaft rotates. Together with the motor, torque is supplied to the generator through the drive belt. At this moment, an amount of energy is generated that will be sufficient for the stable functioning of all systems and to maintain a charge on the battery.
The internal combustion engine can operate in different modes. At the same time, the number of revolutions on the crankshaft changes. The number of revolutions of the pulley also changes, this leads to an increase in the voltage produced by the generator.
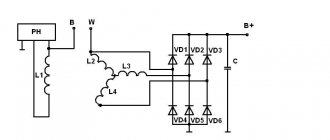
To maintain a level of 13.6-14.6 V in the on-board network, there is a special relay in the excitation circuit. It regulates the voltage level. When the rise exceeds the normal value, then the current supplied to the winding will decrease.
At the same time, the magnetizing force of the rotor also decreases. This leads to a decrease in output voltages.
If the generator does not charge, then in most cases the reasons must be sought in the excitation circuits, as well as in the output voltage circuits from the generator to the battery. But this is not always the case. Sometimes problems are related to the generator itself.
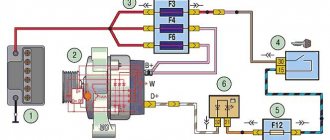
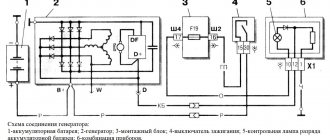
When the driver turns the key in the lock, the relay in the ignition system also starts at the same time. “Plus” flows through the relay and fuse in the mounting block. Next, the voltage passes through the on-board network, reaching the battery charge lamp and charge sensors.
It then passes through diodes, relays, elements in the mounting block and finally to the connector in the generator. There, electricity comes to the relay-regulator and, passing through brushes and slip rings, enters the exciting winding.
As the crankshaft speed increases, the phase stresses increase. Then, through a diode block, they increase the voltage on the excitation winding and on the diode of the control lamp. When the output phase voltage reaches 12 V on both terminals, the voltage will be equalized. Due to the lack of voltage difference, the control lamp will go out. In this case, the generator produces a voltage that is higher than 12 V.
VAZ 2114 charger lost
I noticed that the voltage after a while became 16V. I stopped, opened the hood, there was a smell of burnt plastic. I changed the brush assembly, everything became normal - 13.9-14V.
again I am with my tension.
What should I do
_________________ POD
grow
O L
cherish
SK
porosity
!
Freedom for parrots and c105!
Is this already with a new generator rotor?
Yes, with a new rotor. I would like to note that the car sat overnight and in the morning the charge became 14.0V. When driving, it drops to 13.5V, but the charge does not disappear, at least it did not disappear.
I bought a new battery
_________________ POD
grow
O L
cherish
SK
porosity
!
Freedom for parrots and c105!
when running 14.3, with headlights 13.8. After a long trip, with headlights on, pressing the brakes at 13.5. This is fine?
when running 14.3, with headlights 13.8. After a long trip, with headlights on, pressing the brakes at 13.5. This is fine?
_________________ POD
grow
O L
cherish
SK
porosity
!
Freedom for parrots and c105!
mar082
It looks like a sour contact on the terminal that I removed. I don’t know any contraindications to start with Carlson, I start it myself, there were no problems. But I don’t turn it off when the Carlson is running, I let it cool until it turns off (97C).
Thanks, I'll try to clean the terminals
Information on icons and features
You can not
start topics You
cannot
reply to messages You
cannot
edit your messages You
cannot
delete your messages You
cannot
vote in polls You
can
attach files You
can
download files
How to determine that the generator is not charging the battery
The easiest way to check that the generator is not charging (VAZ-2110 is no exception) is by looking at the dashboard. There is a control lamp on it. Classic VAZ models also have a voltmeter.
The arrow should be in the green zone, and the control lamp should be in normal mode (when everything is in order, it does not light up). If this is not the case, then charging does not occur. It is worth considering the problem in detail.
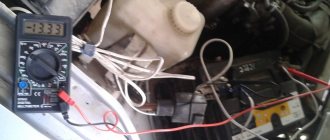
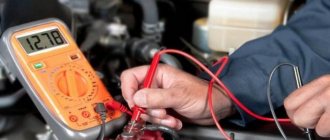
A better and more accurate way to help determine that the generator is not charging is to check the voltage at the battery terminal with a multimeter. If there is a charge, then the device will show from 13.6 V to 14.6 V. If there is no charge, then the readings will be from 12 V and below.
Problem with charging VAZ-2114
11 August 2013, 22:51 #1
voltage 10-11 volts. The charging lamp lights up either brightly or dimly. what is the reason who knows
11 August 2013, 23:00 #2
bibigon2114, 11 August 2013, 22:51, #1
voltage 10-11 volts. The charging lamp lights up either brightly or dimly. what is the reason who knows
First of all, check the belt tension, the brushes may be worn out or stuck, as well as the voltage regulator, diode bridge. If you don’t understand it yourself, then it’s better to see an electrician.
11 August 2013, 23:05 #3
Charging is checked very simply. You take a voltmeter or tester (set it to constant voltage) and connect it to the battery. should show 12 volts. When you start the engine, the voltage rises to 13.5-14.5 volts. If the voltage has not increased at all, but on the contrary drops, then: 1) the diode bridge of the generator is faulty 2) the charging relay is faulty 3) the generator winding is faulty 4) a break or poor contact of the wires from the generator, quite often they oxidize, especially the minus
11 August 2013, 23:32 #4 + 1
I changed the belt. Tomorrow I’ll measure it, for example, I’ll remove the gene. I’ll take it to the electronics and they’ll ring. And then we’ll see. Thank you
August 11, 2013, 11:34 pm #5
bibigon2114, 11 August 2013, 23:32, #4
I changed the belt. Tomorrow I’ll measure it, for example, I’ll remove the gene. I’ll take it to the electronics and they’ll ring. And then we’ll see. Thank you
When you eliminate the cause, write back, the experience will be useful for others.
October 17, 2013, 21:16 #6
Hello everyone, someone help me, I have a VAZ 2114 2006, yesterday I started the engine and the check light came on, when I add speed, the tachometer needle stays still and the rest all fall, charging shows 18.2 volts, and usually it was 14.2, the engine has become bad develop momentum. and when at idle everything is normal, the only charge shows 16.6
Generator overload
If the battery is charging, but the voltage is insufficient, it means the generator is overloaded. This is facilitated by the installation and connection, in addition to standard electrical equipment, of various gadgets that require electricity. The generator is operating at the limit of its capabilities.
Modern drivers love various car tunings. Thus, serious music systems, powerful lighting and other equipment are installed. Someone also increases the battery power.
So, with a 70 Ah battery, the standard VAZ generator cannot fully charge it. It just doesn't have enough power. As a result, the generator provides little charge.
ABOUT REPLACING THE GENERATOR SET ON A CAR
It so happened that replacing the VAZ generator is necessary. The necessary spare part has been purchased. By the way, some car enthusiasts replace serviceable components with more powerful units. The reasons for this can be very different. Basically, this is the installation of new, additional electricity consumers. Powerful audio systems, good headlights, illumination of body kits and other similar “things” require an increase in the power of the generator set.
In such cases, a generator from Priora or Kalina is usually purchased and installed. Its generated current is approximately 115 A, while the standard device produces 80 A. Its mounting is similar to the standard one, only the drive belt pulley needs to be replaced. The matter is not very difficult; even inexperienced drivers can cope with it.
Required tools for replacing generators:
- Wrenches for “10”, “13”;
- Open-end wrench 17x19;
- Screwdriver Set;
- Mount.
Replacement work begins only after the battery is disconnected.
If the work is carried out in a garage with an inspection hole, then the following procedure can be recommended:
- Disconnect the engine protection. You can release it only in the area of the generator set and leave it hanging;
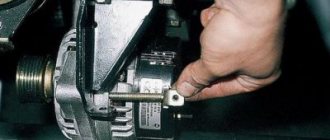
- Using a “10” wrench, tighten the nut on the protruding contact bolt of the generator and remove the wires from it. Also disconnect the connector from the brush assembly;
- Unscrew the tensioner bolt, the bolt securing it to the cylinder block and remove it from the engine;
- Now the nut of the bracket axle is unscrewed to mount the generator. This action is performed with a key set to “19”, remove the nut with the spacer washer and knock the axle out of the bracket.
Breaks in the winding
If there is a break in the excitation winding, then the generator does not charge. This is determined simply. It is enough to touch the generator with your hand.
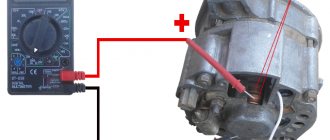
If the winding breaks, the device will heat up. To diagnose more accurately, the end of the excitation winding is disconnected from the brush and connected to a terminal on the generator. The measurement is carried out using a multimeter from the battery.
If there are breaks, the multimeter will not show anything. If a signal lamp is used instead of the device, it will not light up. In order to find the problematic coil, wires from the battery are connected to each of them in turn.
If the break is inside, the coil is replaced. External breaks are removed using a soldering iron.
General design of the generator set
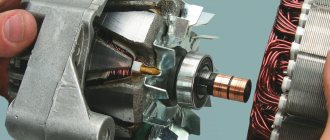
- Covers made of aluminum alloys. They contain special sockets into which bearings are pressed. On the back cover there is a terminal for connecting to the battery and a connector (“male”) for connecting to the excitation winding. There is also a capacitor attached to the back cover. It helps suppress radio interference. The brush assembly is mounted in the same housing with the VAZ 2114 voltage regulator. The generator operates due to the fact that an emf created by the rotating magnetic field of the rotor is induced in the stator winding.
- The stator is made of plates made of special grades of transformer steel. It has special grooves into which the power windings are placed. Each has a terminal for connecting to a rectifier. The covers are bolted to the stator. The field winding is located on the rotor. It is connected to copper rings. They are on the shaft. A drive pulley is installed at the front, and there is a keyway for it on the rotor.
- The diode block is attached to the back cover from the inside. It consists of nine semiconductors - six main and three additional. To ensure high-quality cooling of semiconductors, aluminum alloy plates are used. And on the front part next to the drive pulley there is an impeller.
Algorithm for finding the cause
We looked at typical faults. But it is important to find the main reason. If the car has standard equipment and there are no abnormal energy consumers, then you can begin to diagnose the generator directly.
If there are additional consumers, it is better to turn them off. In this case, it must be disconnected physically, from the on-board network.
First, measure the current output with the motor turned off. Here it is important to find out whether there is energy consumption when the engine is not running and the ignition is turned off (the key is also removed from the lock hole). It is important that even the alarm is turned off during the measurement process.
Most domestic cars exhibit small current leaks. It always gets stuck somewhere “to ground” (that is, the negative wire comes into contact with the body). But often they are not able to completely discharge the battery even in two or three weeks.
Next, all consumers are connected and the leakage is measured in the same way with a multimeter. If it is large, then the reason should be sought not in the generator or battery, but in one of the devices in the on-board network. If no leakage currents are detected at rest, then most likely the VAZ generator is not charging. We have already discussed the reasons.
VOLTAGE REGULATOR
It is not difficult to find where the VAZ 2114 generator relay is located. This device is located at the back of the generator itself under a plastic cover. Where is the charging relay located on the VAZ 2114 - a question for backfilling. The fact is that the charging relay, generator relay and voltage regulator on the VAZ 14th are generally one and the same single device. It is also called a relay regulator.
What happens if the voltage in an electrical circuit drops below 13.2 Volts? The battery will stop charging, and after a fairly short period of time the starter will no longer have enough power to crank the engine to start. What if it is over 14.7 Volts? Then elements of the electrical circuit may fail, for example, the radio or one of the engine sensors (mass air flow sensor, phase sensor, etc.) will burn out.
The charging relay on the VAZ 2114 looks like a large black tablet, at the end of which there are two graphite brushes (brush assembly). If there is little or no charging, the voltage regulator is checked.
Voltage regulator location
DIAGNOSTICS OF RELAY REGULATOR
Checking the functionality of the generator on a VAZ 2114 always begins by measuring the voltage of the on-board circuit with the engine running. The most convenient way to measure is with a digital multimeter:
- We set up the multimeter to measure voltage and set the upper limit to 20 Volts;
- We connect the probes of the device to the battery and measure the voltage with the engine turned off. The voltmeter should show somewhere between 12.5 and 13 volts;
- We start the engine, the readings of the device with a good working generator should increase to about 14 Volts (maybe a little more);
- With the engine running, turn on the load (high beam, dimensions, heated rear window, heater motor at maximum speed). We look at the readings of the multimeter - the device should not show less than 13.2 Volts at idle, but it is better if this indicator is in the range of 13.8-13.9.
Checking the generator voltage regulator can also be carried out on a removed device. The device assembled with the brush assembly is checked. For this:
- We connect the mass terminal (minus) of the “tablet” with a wire to the minus of the battery.
- We supply power (12-14 Volts) to terminals “B” and “C” from the battery.
- We connect a 1-3 Watt car lamp to graphite brushes. If the relay-regulator is working properly, the lamp should light up.
